
Earlier this month, I wrote a Quick Start Guide for Orange Pi Allwinner H3 boards such as Orange Pi PC, and showed how to install and configure Debian on the boards. I’ve also received the $5.90 Orange Pi camera, which when combined an Orange Pi PC, costs around $27 including shipping. So today, I’ve attached the CSI camera to my Orange Pi 2 mini board, and used it with motion to transform for the board into an IP camera.
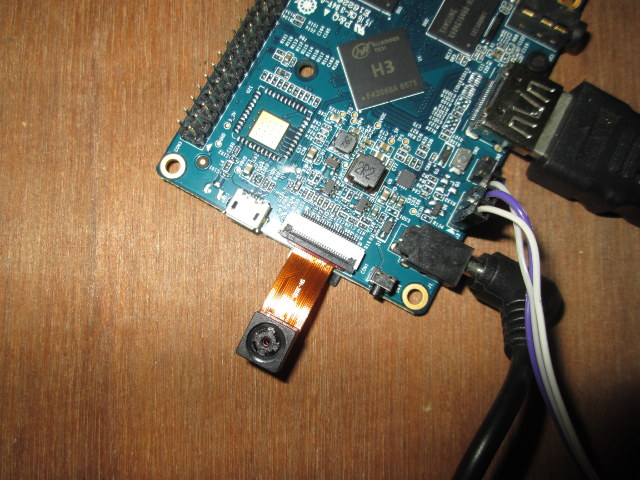 First, you’ll need to insert the camera into CON1 connector with the camera facing the ceiling, and close the black clip to keep it in place.
Now connect all cable and power on your board. First, I studied the steps described on that forum thread, and modified Allwinner configuration files, but after one or two hours, I found out some work at been done since May, and it was now much easier to use the camera since gc2035 drivers was part of the Debian image, and the script.bin file (allwinner config file) was already setup to be used with Orange pi camera.
Open a terminal window in the board to load drivers:
|
1 2 |
sudo modprobe gc2035 sudo modprobe vfe_v4l2 |
and then mostly followed the instructions for USB webcams on Orange Pi website to install and configure motion:
|
1 2 |
sudo apt-get install motion sudo nano /etc/motion/motion.conf |
and enable the following line:
|
1 |
stream_localhost off |
This will make sure the web server started by motion will be accessible from other network devices.
I’ve also changed target_dir to /home/orangepi/motion, as motion would crash each time it would create a file when detection motion.
|
1 2 |
mkdir ~/motion chmod 777 motion |
You’ll also need to change the startup script
|
1 |
sudo nano /etc/default/motion |
and change the only line in the file as follows:
|
1 |
"start_motion_daemon=yes" |
Finally, we are ready to give it a try:
|
1 |
sudo /etc/init.d/motion start |
You can launch your favorite browser, or access localhost:8081 if you are using your board, or <orange_ip_address>:8081 from another machine on the network, and you should the the picture camera updated into your web browser about twice per second.
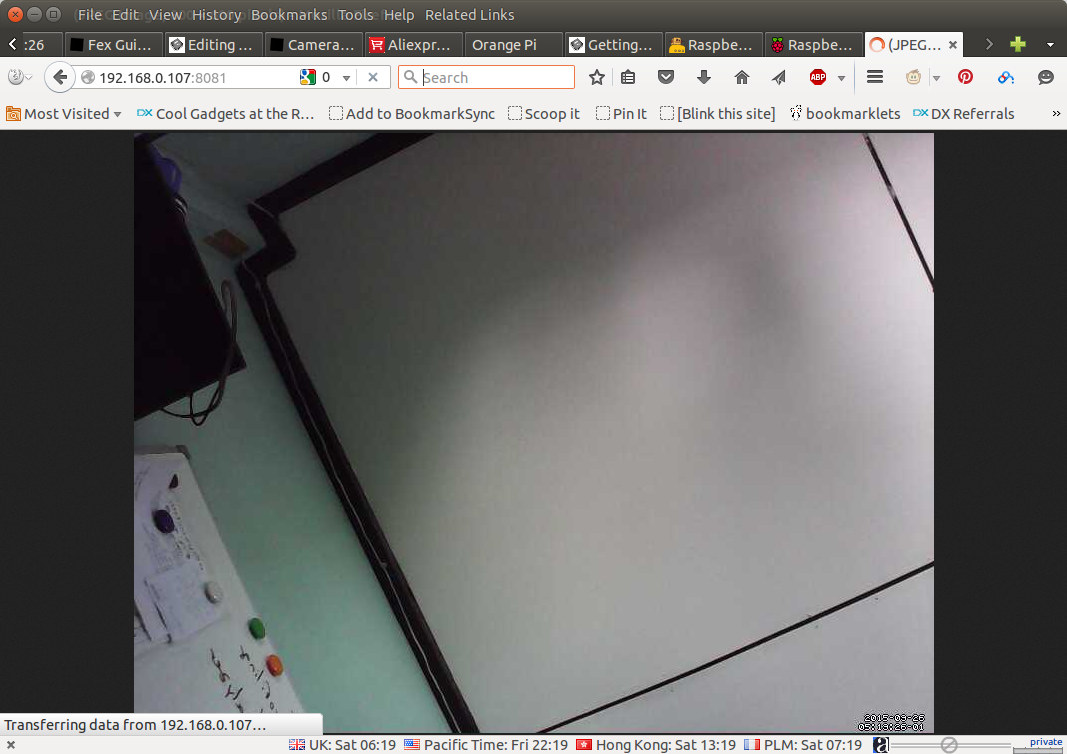
If the system detects motion will save pictures and videos in target_dir directory, which I set to /home/orangepi/motion earlier. The image resolution is set to 800×600, and it ignored width and height settings (320×240) set in motion.conf.
Motion will start automatically, but you still need to load the modules automatically at boot time for this to work. Simply edit /etc/modules, and add the two required modules at the end of the file.
|
1 2 |
gc2035 vfe_v4l2 |
Now motion will run automatically, and the camera work properly each time the board starts.

Jean-Luc started CNX Software in 2010 as a part-time endeavor, before quitting his job as a software engineering manager, and starting to write daily news, and reviews full time later in 2011.
Support CNX Software! Donate via cryptocurrencies, become a Patron on Patreon, or purchase goods on Amazon or Aliexpress. We also use affiliate links in articles to earn commissions if you make a purchase after clicking on those links.


Is the Orange Pi camera comaptible with Raspi?
No, cameras for Orange Pi and Raspberry Pi are not compatible. Even ribbon cables are not similar – different number of pins and different width.
(I know this post few years old but I think it is worth posting here correct answer for those who will read this in the future)
@onebir
Since CSI is a standard, I assume it should be, but the software needs to be adapted since it’s a different sensor.
Quality is likely to be lower though, as Orange Pi camera is 2MP, while Raspberry Pi camera is 5MP, and people have made a lot of effort to improve and tune R-Pi camera module.
Which Debian image are you using?
@Richard
Scratch that – I figured it out. I still can’t seem to get motion to work though.
Is there any program like raspistill out there that would let me take still frames on a command line call that will work with the gc2035 driver?
@Richard
I first had problem with motion due to permissions issue. You can enabled logging to /tmp/motion.log in the config file.
I understand the driver uses Video4Linux2 framework, so programs that work with V4L2 may also work with Orange Pi camera. See http://askubuntu.com/questions/122899/is-there-a-cli-webcam-image-grabber-that-works-with-a-video4linux2-device
@cnxsoft
I forgot to say mplayer, which is supposed to work, is not working because some IOCTL commands are not implemented in the driver. So you may have to try a few programs before it works, or implement the missing parts in the driver.
@cnxsoft
Just got it working – it was a permissions issue.
That said, I played around with mplayer and found the IOCTL errors, and I also played around with the v4l-utils package (using v4l2-ctl) to see if I could change some of the parameters (shutter speed, white balance, etc), but it looks like the driver doesn’t have any of that implemented either.
Do you know if any instructions exist for compiling the driver on the Orange Pi 2 for Debian 8 exist? I’d be very grateful if you could link me to them 🙂
Thanks!
@Richard
I don’t have exact instructions. But the debian image I’m using is the one made by Loboris @ http://www.orangepi.org/orangepibbsen/forum.php?mod=viewthread&tid=342 and he’s also released the Linux kernel source code (kernel_3.4.9.tar.xz) on mega which should have gc2035 driver in drivers/media/video.
Compiling gc2035 drivers should just be as compiling any Linux drivers.
You may also want to check out with people who’ve built (and modified) the driver @ http://www.orangepi.org/orangepibbsen/forum.php?mod=viewthread&tid=70&extra=&highlight=camera&page=3
@Richard
Can you explane how jou solve the premission issue?
Please how can I vertically flip the camera image?
@birky
Maybe http://www.lavrsen.dk/foswiki/bin/view/Motion/ConfigOptionRotate
According to http://forum.armbian.com/index.php/topic/504-quick-review-of-orange-pi-pc/, Orange Pi PC requires an extra board to use the camera above.
Anybody noticed that the gc2035 image is mirrored?
Things on the right side of the picture is on the left.
Any easy fix?
@111111z
Motion should have an option just like the rotate option mentioned above to mirror the image.
Motion alone does not fix that problem. I had to convert the script.bin to a fex file and edit the fex file item hflip to 0 and then convert back to a script,bin file and then rotate via motion to 180.
That fixed it. convert programs bin2fex and fex2bin
Only the linux version worked, the windows version gave a error.
hello , how to know my camera module of orange pi work or not … i try follow you but it’s not work at all
@alpha le ciel
First, make sure you have connected it the right way. If that’s OK, then check whether you see any error messages when you type the commands.
now i can fix it easily … before i use orangepi-debian-jessie-xfce , but it does’nt work …. now i install news os OrangePI-PC_Ubuntu_Vivid_Mate.img to my orange-Pi.. and then it’s work properly .. download it https://drive.google.com/folderview?id=0B1hyW7T0dqn6fndnZTRhRm5BaW4zVDVyTGlGMWJES3Z1eXVDQzI5R1lnV21oRHFsWnVwSEU&usp=sharing
and get os and install OrangePI-PC_Ubuntu_Vivid_Mate.img … and follow cnxsoft and then can use that thing 😀
Hi, Can anybody post a tutorial on how to get opencv working with orange pi pc ? In debian or Linux.
I tried according step by step, but unfortunately the camera “unable to open video device” in browser. I used Firefox Browser and url : http://localhost:8081
can you help me to solve it?
Regards,
One person did some improvements, to the frame rate notably, and others -> http://www.sistemasembarcados.org/2016/04/orange-pi-camera-with-v4l2loopback-vidcopy.html
I know this guy. He’s a expert in OpenCV (computational vision) and lives in Rio de Janeiro – Brazil. Their name is Leonardo Lontra.
Please can you give me a step by step instruction of how you solved this problem. I have tried for 5 days now with all different OS and I cant get it to work. I get no video at all. The only OS that sees the camera is the Android version which is installed on the OP Plus
Steps described work fine with the OPI Lite. Image quality is ok. I’d say quality of the RPI Cam is a bit better. But good enough for my purpose and OPI+Cam is cheaper than RPI Camera alone.
Only thing I noticed is that CPU consumption is quite high. Even if no client is connected. I disabled motion detection already to lower power consumption.
Is there a way to stream using uv4l like you can on Raspbian?
@Lutz Fechner
It’s not something I’ve tried. Orange Pi camera is relying on V4L2 here, and uv4l appears to be a different driver implementation. Why not just use motion to stream the video?
Thank you for publishing this guide – it really helped me setup motion on my Orange Pi Lite.
Question: What prevents the motion folder’s files from growing until it consumes all space?
@celem
Your might want to create a cron job to delete older files.
@cnxsoft
Setting output_normal=off in motion.conf stopped the jpg photos from being created but it still creates .swf files, which will still fill up the folder. I haven’t figured out how to stop their creation. I just want video via the 8081 web portal.
@celem
Solved it! In motion.conf, setting the following stops creation of both .jpg and .swf files:
ffmpeg_cap_new=off
output_normal=off
BTW: We now have the ability on H3 boards to use ffmpeg with GC2035 (and most probably also OV5640) cameras to record video using Allwinner’s HW h.264 encoder freeing up the CPU cores completely: http://forum.armbian.com/index.php/topic/1842-ffmpeg-with-cedrus-h264-hw-encoder-h3-cmos-camera/#entry14157
I hope a few more video enthusiasts join the party since these are really great news to get rid of Raspberries (still my only use case for these devices: using raspivid to record HW accelerated h.264)
I managed to get mjpg_streamer running with the camera!
http://sanchosk.blogspot.ch/2016/08/orange-pi-one-and-camera.html
You have to edit the “stream_maxrate 4” parameter in order to change the framerate.
@Sancho
Please write a mor concise tut that I can follow to! Thanx in advance
Hi, on a OPI Lite + gc2035 (+ expansion board) and Debian Jessi (Linux orangepilite 3.4.113-sun8i) I failed to get the camera working.
Both gc2035 and vfe_v4l2 modules are loaded and live. but I have these on my syslog, while camera connected:
[ 13.398284] [CSI_ERR][GC2035]sensor_read err at sensor_detect!
[ 13.398297] [CSI_ERR][GC2035]chip found is not an target chip.
and no /dev/videoX at all. i2cdetect doesn’t show any device.
Hello! Will this camera work with banana pi m2u?
Hi,
I’ve tried to follow the tutorial and everything worked until the access to localhost – I can’t access to the page.
Can you please clarify this step? Where I can check the exact address (maybe I missed something and using wrong ip address)?
Thanks.
@Ferri
see solution here: https://forum.armbian.com/topic/3613-armbian-525-on-orangepi-pc-the-gc2035-video-camera-doesnt-work/?page=3
modprobe gc2035 hres=0
modprobe vfe_v4l2
sunxi-pio -m “PG11” #DOVDD
sunxi-pio -m “PE15” #Power_Down
sunxi-pio -m “PE14” #reset
Seems Orange Pi have a wide angle lens auto zoom 5 MP camera in new section
https://www.aliexpress.com/store/product/OPI-5MP-Camera-OV5640-Auto-zoom-with-wide-angle-lens-for-Orange-Pi-PC-Pi-One/1553371_32869355445.html
Are there Orange Pi camera OpenCV learning videos?