
In a previous article, I wrote about an MQTT bridge by 1technophile. I added a DHT temperature and humidity sensor as well as a light sensor. Previously it included a software decoder to decode the IR signal. I never did test the IR transmitter on the gateway, as I didn’t have the parts. But thanks to IC Station, who sent me over a small YS-IRTM hardware based decoder and NodeMCU that I am writing about today. I have replaced the software based version with the YS-IRTM module in the latest update.
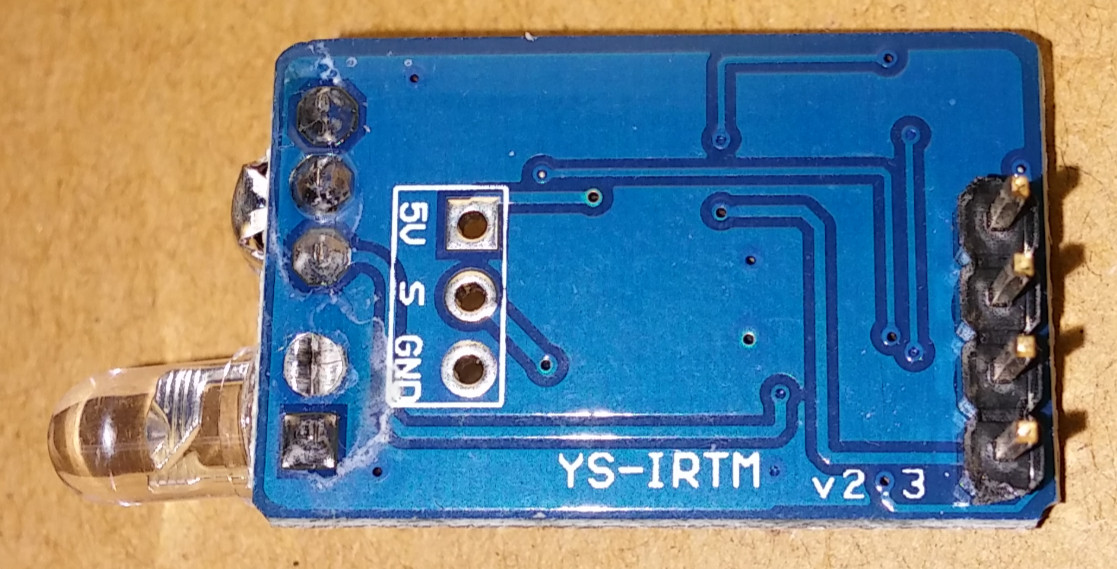
I found this project challenging. I admit I am a little weak in my programming skills. It was difficult to find documentation but I found a forum talking about this device and basics of how it works. When an IR code is recognized it sends 3 hex codes via serial connection on the transmit pin. To transmit, it expects 5 hex codes: A1,F1,xx,xx,xx. A1,F1 tells it to send the following codes. You can also set the baud rate but I left default 9600.
It is simple wiring wise. It only takes 4 dupont wires. It took a bit of coding to get it working but I finally got it to communicate via software serial. I started on a Arduino Uno with the code and then migrated it over to the ESP8266 board. I did have a little trouble when I first moved to the ESP board. I initially thought I might need a level shifter but that didn’t help. I am a little surprised I didn’t need a level shifter because the ESP needs only 3.3 volts. I was getting some weird responses and finally figured out I had to put in a slight delay. Maybe the ESP’s speed comes into play.
The way to use this is fill out your SSID and password and your MQTT server with credentials. Flash the device. You will need to add the necessary libraries. 1technophile has good documentation in his wiki.
Once flashed and ready to find your IR codes you will need to subscribe to the topics with the Windows command below. Give the gateway a moment to connect and point your IR remote at the sensor and press a button to find out code.
|
1 |
"C:\Program Files (x86)\mosquitto\mosquitto_sub" -t stat/# -t tele/# -t cmnd/# -t home/# -v" |
In your window, you will get something like this “home/sensors/ir 4,fb,8,” which is my power button for my TV. To test the code:
|
1 |
"C:\Program Files (x86)\mosquitto\mosquitto_pub" -t home/commands/MQTTtoIR/ -m 4,fb,8, |
With this code, the TV will toggle on and off.
After this you can use your favorite home automation project and control your IR devices with automations. You can omit any sensors that you don’t need. You will get some erroneous MQTT data if not all sensors are used. Below are the bits of Arduino code added for the IR module, and here’s the link to the github code:
|
1 2 3 4 5 6 7 8 9 10 11 12 13 14 15 16 17 18 19 20 21 22 23 24 25 26 27 28 29 30 31 32 33 34 35 36 37 38 39 40 41 42 43 44 45 46 47 48 49 50 51 52 53 54 55 56 57 58 59 60 61 62 63 64 65 66 67 68 69 70 71 72 73 74 75 76 77 78 79 80 81 |
……. // software serial : TX = digital pin 12, RX = digital pin 14 SoftwareSerial portOne(14, 12); …………. #define subject433toMQTT "home/433toMQTT" #define subjectMQTTto433 "home/commands/MQTTto433" ………. // Start IR software serial ports portOne.begin(9600); ………… //begining of IR if (portOne.available() > 0) { delay(1); int my_in_bytes[3]={0, 0, 0}; for (int i=0; i <= 2; i++){ incomingByte = portOne.read(); Serial.print("I received: "); Serial.println (String (incomingByte, HEX)); my_in_bytes [i] = incomingByte; } String IRvalue; for (int i=0; i <= 2; i++){ Serial.print(String (my_in_bytes [i], HEX) + "," ); IRvalue = IRvalue + (String (my_in_bytes [i], HEX) + "," ); } Serial.println(""); sendMQTT(subjectIRtoMQTT,String(IRvalue)); } ……………. //IR Recieved if (topicNameRec = subjectMQTTtoIR){ char input1[3]; char input2[3]; char input3[3]; int val1; int val2; int val3; uint8_t my_out_bytes[5]={0xA1, 0xF1, 0, 0, 0}; int commaIndex = callbackstring.indexOf(','); // Search for the next comma just after the first int secondCommaIndex = callbackstring.indexOf(',', commaIndex + 1); String firstValue = callbackstring.substring(0, commaIndex); String secondValue = callbackstring.substring(commaIndex + 1, secondCommaIndex); String thirdValue = callbackstring.substring(secondCommaIndex + 1); // To the end of the string firstValue.toCharArray(input1, 4); val1 = StrToHex(input1); my_out_bytes [2] = val1; secondValue.toCharArray(input2, 4); val2 = StrToHex(input2); my_out_bytes [3] = val2; thirdValue.toCharArray(input3, 4); val3 = StrToHex(input3); my_out_bytes [4] = val3; for (int i=0; i <= 4; i++){ Serial.print(String (my_out_bytes [i], HEX) + "," ); } portOne.write(my_out_bytes,sizeof(my_out_bytes)); Serial.println(""); } ………. //IR String to Hex Conversion int StrToHex(char str[]) { return (int) strtol(str, 0, 16); } |
I plan on 3D printing an enclosure with CR-10 I am reviewing, and I will remove the IR LED, and move it to a more suitable position, as both facing the same way isn’t ideal for my setup.
I would like to thank IC Station for sending the NodeMCU ($5.81 shipped) and IR transmitter and receiver ($3.39 shipped) for review. You can get 15% discount with coupon Karics. I finally have a complete gateway.

Karl is a technology enthusiast that contributes reviews of TV boxes, 3D printers, and other gadgets for makers.
Support CNX Software! Donate via cryptocurrencies, become a Patron on Patreon, or purchase goods on Amazon or Aliexpress


Awesome Project. Thanks Karls’ review for ICStation product. Looking forward to further cooperation with you and Jean. Thanks very much.
Thanks Karl. Just the thing for my 1technophile MQTT bridge!
Very useful project. If I see correctly you’ve connected 5V from IR to Vin on ESP8266?
Did you have any other issues beside required delay()?
Thanks.
IRTM write response can interfere with reading actual IR codes.
https://stackoverflow.com/questions/63401838/ir-tx-rx-issues-for-ys-irtm-receiver-transmitter