
I recently started having problems playing YouTube videos in Firefox and Chrome in Ubuntu 18.04. The video would load, and I could see frames at any time, but it would just not play. I soon discovered that killing PulseAudio, and the video would play without audio. I also noticed I had Dummy Output in Sound settings. I tried all usual tricks to fix this, but still no luck.
Then I discovered I had audio just after booting my computer, but after a while, there would be no audio at all. This seems to match the time by which the AMD GPU drives crashes (just warning), something that had happened ever since I installed Ubuntu on my Acer laptop. After more failed attempts, I decided to try to update the BIOS using Windows 10. A 10-minute task, right? I would just have to replace the hard drive with one pre-loaded with Windows 10 (I got one from warranty service a few weeks ago), download the BIOS utility, run it, and we’re done.
But as my experience often proved many 10-minute tasks often end up taking 4 to 5 hours, and that’s what happened here… I had no problem starting Windows 10, and download the BIOS/Firmware utility, but after extraction, it would just not start. My mouse pointer would just switch to loading mode for a few seconds, and then nothing… I tried to run as administrator, in compatibility mode, and from the command line to check for any error message, nothing would do. Trying earlier version of the firmware did not help either
So I opened an account on Acer Community asking for help about my inability to run Acer BIOS utility. At some point, I was asked to look into Event Viewer, and indeed there was an error:
|
1 |
Faulting application name: DH5JV115.exe, version: 4.57.0.0, time stamp: 0x00000000 |
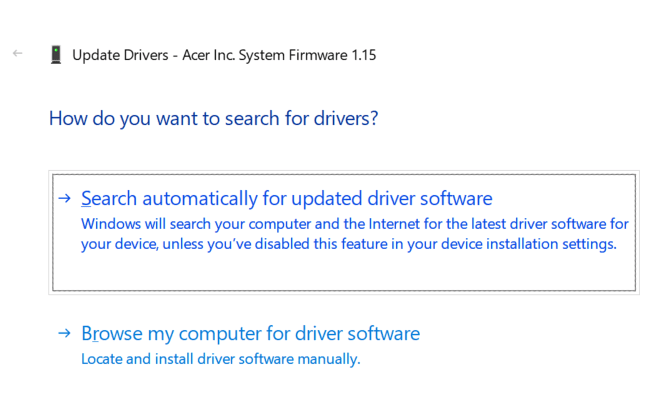
But what I learned was that BIOS update utility may not be needed in Windows, as you can update the BIOS from Windows 10 Device Manager. Simply look for Firmware, right-click on the firmware in my case Acer Inc. System Firmware 1.08, and select Update driver. I took the screenshots after a successful update, so the version is already updated to 1.15.

Next, select Search automatically for updated driver software, and after installation, you’ll be asked to reboot your computer.
 That’s during reboot that the BIOS / UEFI firmware occurs. Make sure your battery is charged and laptop connected to the mains before you perform the operation.
That method is much more convenient, as you don’t even need to look for any utility of BIOS version, but the helpful member on Acer community also warned that it may be riskier:
Yes, it is possible to update the bios via the firmware driver. However, it tends to be much more risky, as windows update usually updates this driver along with other updates.
In my case, I had no other choice, so it saved the day. The good news is that I can boot Ubuntu without having to disable ACPI. This did not fix my graphics driver/audio issue though, so I’ll have to keep on trying…

Jean-Luc started CNX Software in 2010 as a part-time endeavor, before quitting his job as a software engineering manager, and starting to write daily news, and reviews full time later in 2011.
Support CNX Software! Donate via cryptocurrencies, become a Patron on Patreon, or purchase goods on Amazon or Aliexpress. We also use affiliate links in articles to earn commissions if you make a purchase after clicking on those links.


I have the same problem although on a desktop but a workaround that fixed it for me was using the following command chain: “pulseaudio -k && pkexec alsa force-reload”. It has to be used on every boot so I added it to startup applications in Ubuntu.
I have no idea why your thought an audio issue would be fixed by a BIOS update (although it is usually good but not essential to keep it updated)
The reason why audio on “modern” GNU/Linux distributions can be so frustrating is because of the layers of software involved.
At the bottom are the ALSA kernel modules which get loaded to enable the “soundcard” (be it an actual soundcard or on-the-motherboard sound device). If you have multiple “soundcards” including any USB sound devices plugged in at boot time, there is a possibility that the order of detection changes and the default soundcard “0” varies. To avoid this make certain that the order is specified in a configuration file, typically alsa-base.conf, in the /etc/modprobe.d directory.
For example on an old hardware system including the ancient and not usually present today internal speaker in /etc/modprobe.d/alsa-base.conf, the order of sound cards including 3 potential USB sound devices (identified by the product id and vendor id) …
options snd cards_limit=4
#
alias snd-card-0 snd-sbawe
options snd-sbawe index=0
#
alias snd-card-1 snd-pcsp
options snd-pcsp index=1
#
alias snd-card-2 snd-usb-audio
alias snd-card-3 snd-usb-audio
alias snd-card-4 snd-usb-audio
options snd-usb-audio index=2,3,4 pid=0x0329,0xb001,0x3042 vid=0x0471,0x6993,0x041e
That guarantees that soundcard 0 will always be sbawe, 1 the internal speaker, and USB devices 2 -4 if plugged always numbered according to preference as 2 , 3, or 4.
dmesg which also show you information about loaded sound modules and the order of soundcard detection, eg
when a USB device is plugged in
usbcore: registered new interface driver snd-usb-audio
On top of the the ALSA sound modules is the ALSA library via which the also sound programs get the sound to the modules which then get the sound to the acual physical device.
And then on top of that is pulseaudio which in its pristine state will be sending audio to soundcard 0. Most distributions (including Debian + Ububtu + Mint and derviatives) now also include a configuration file so that old ALSA only sound programs which can only send their audio (by default) to soundcard 0, have it rerouted to actually got to pulseaudio and then back down to the ALSA layer.
Another complication is that ownership of the audio devices under the “modern” arrangement is kept restricted to user root and group audio (whereas in ancient times the actual ownership was changed at Xsession login time to the logged in user, script give_devices and at logout by take_devices). This is where the policy-kit daemon (running as user root) now comes in at login time comes in and allows the logged in use to have access to the audio devices without changing ownership of the audio devices but allows access via D-bus communication, hence why another daemon “dbus-daemon” needs to be launched at login time.
So [am I allowed to start a sentence with that word on this site] the first thing to do when dealing with audio issues is to start at the bottom and list the soundards made available by the loaded ALSA sound modules.
aplay -l (that is l as in list)
Then use an alsa playback program whose output device can be specified to play some sound file to soundcard 0, usually specified as hw:0 in ALSA terms.
This will usually need to be done via a login on a virtual console because when you login via the graphical display manager, pulseaudio will be started and you will this not be able to access the “raw” soundcard. Killing pulseuadio will not work because the graphical login is set up to automagically restart pulseaudio if it dies, as in
aplay -D hw:0 $SOUNDS/wav/Miscellaneous/stereo/16bit/moon_river.wav
aplay: main:722: audio open error: Device or resource busy
Uses alsamixer and select the actual ALSA sound card via the F6 key to access the ALSA device mixer controls.
If you can successfully hear the sound when using ALSA directory then move to the pulseaudio level.
When logged in grpahically (when pulseaudio gets started automatically) fire up pavucontrol. If pulseuadio is not running or is not accessible (running for a different user) it will tell you “connection refused”. You can then use pavucontrol to set which ALSA sound device is used by default and adjust the sound volume (at the pulse audio level, which usually also alters the ALSA mixer controls at the ALSA sound card level).
The most probably cause of no sound is most often that pulseaudio is trying to send sound to a non-existent device because it records the sound device on a per application basis. So if you were say using a USB sound device in a previous session and it is no longer plugged in, and you use the same application again, you will not hear anything.
Note that pulseaudio can also be configured to send audio output not just to a sound card but as a network stream so you can actually connect (permissions having been granted) to a remote pulse audio to hear the audio from that machine.
sound devices at the pulseaudio level can be listed with
pactl list
and those sinks (output device streams) which have a monitor sub-device can be recorded via that sub-component interface eg with parecord and the command line parameter
–monitor-stream=INDEX Record from the sink input with index INDEX.
The value of the INDEX number is determined by examining the output of the “pactl list” command.
> I have no idea why your thought an audio issue would be fixed by a BIOS update (although it is usually good but not essential to keep it updated)
Because it seems related to the graphics driver which handles HDMI and crashes just at the time I lose audio. The BIOS had some changes in that respect “Update SMU to v30.74 for R7 APU”.
It looks like installing Radeon Software for Linux 19.50 for Ubuntu 18.04 fixed the audio issue.
https://www.amd.com/en/support/kb/release-notes/rn-amdgpu-unified-linux
Edit: Nope. It was temporary, after a reboot, similar issues happen again. The install must have triggered something that made the audio work, but what? Not sure yet.
Why in the world would you install a hard drive with Windows to use a BIOS utility? That’s the most convoluted unnecessary thing I’ve ever heard.
Just load your BIOS file from the ACER support website onto a USB, reboot, and update from within the BIOS. No hardware swap.
Because I already had a hard drive with Windows 10 installed. Following your method, I would have had to download Windows, purchase a USB stick, install Windows on the USB stick, and carry on from there.
Did you even read the posting? For all of your “knowledge” you seems to have, you cannot do something as simple as a bios update? Wtf does windows have too do with a bios update?
The BIOS utility is a Windows program. ACER does not provide a method to update the BIOS from a USB stick directly from the BIOS without OS. Or if they do, they hide it well.