In this article, we will show you how to set up a WireGuard server on Ubuntu in order to use it for remote login.
Introduction to WireGuard
First of all, let’s first understand, what is WireGuard? WireGuard is a very simple and fast VPN tool with state-of-the-art encryption. Its goal is to be faster, simpler, more streamlined, and easy to use than IPsec, while avoiding the hassle of large-scale configuration. WireGuard is designed as a general-purpose VPN to run on embedded interfaces and supercomputers in many different environments. Originally released for the Linux kernel, WireGuard is now widely deployed and supported across platforms (Windows, macOS, BSD, iOS, Android). WireGuard is growing rapidly and is already considered the most secure, easiest-to-use, and simplest VPN solution in the industry.
Basic Concepts of WireGuard
Several basic concepts are involved in WireGuard:
- Peer: A node in WireGuard.
- Private key: Each node has its own private key, which can be generated using wg genkey.
- Public key: Each node has its own public key, which is also generated using wg pubkey.
- AllowedIPs: Define the IP address segments that each node is allowed to pass through.
Here are the main configuration steps for WireGuard:
- Create a virtual network card eth0
- Use the private key and the public key of the peer to configure it and establish a connection
- Start exchanging data packets through the interface
The above is the process of establishing a WireGuard VPN link. After the establishment, device A and device B need to ensure that the IP of the virtual network card is in the same network segment, and this network segment is allowed by the configuration file AllowedIPs of WireGuard. Finally, al data packets are sent through UDP in WireGuard.
WireGuard server installation in Ubuntu
The testbed includes a cloud server running Ubuntu Server 18.04.1 LTS 64-bit, one PC with networking running Windows 11. The Ubuntu server can be accessed via the IP address 42.192.113.207, the WireGuard master virtual IP address is 172.16.1.11, and the PC WireGuard peer virtual address: is 172.16.1.14.
Installing the server
We can install the WireGuard package easily through apt:
|
1 |
sudo apt install -y wireguard |
Then we can go to the wireguard directory to generate a pair of public and private keys:
|
1 2 |
cd /etc/wireguard/cd /etc/wireguard/ wg genkey | tee privatekey | wg pubkey > publickey && cat privatekey && cat publickey |
For this guide, the PublicKey generated for WireGuard is:
|
1 |
q/fe0sDI0BUzs5OwiLfyqjN5Y40LTHk01rgLkHBDgRM= |
WireGuard Peer/Client configuration
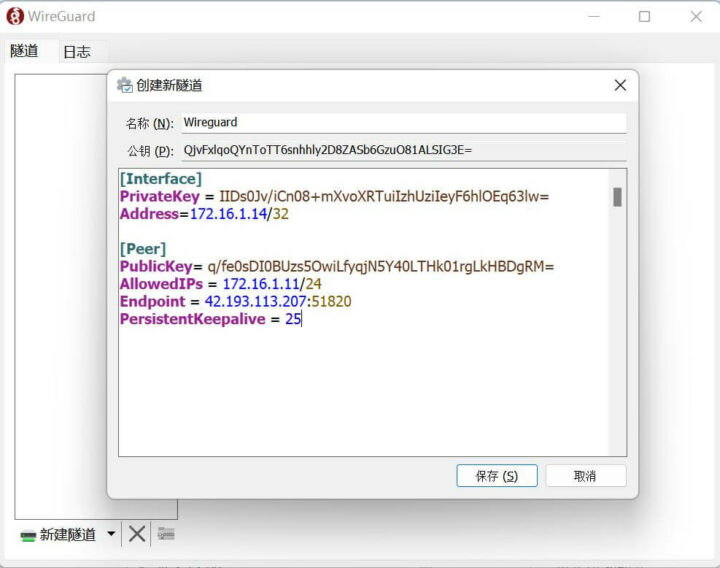
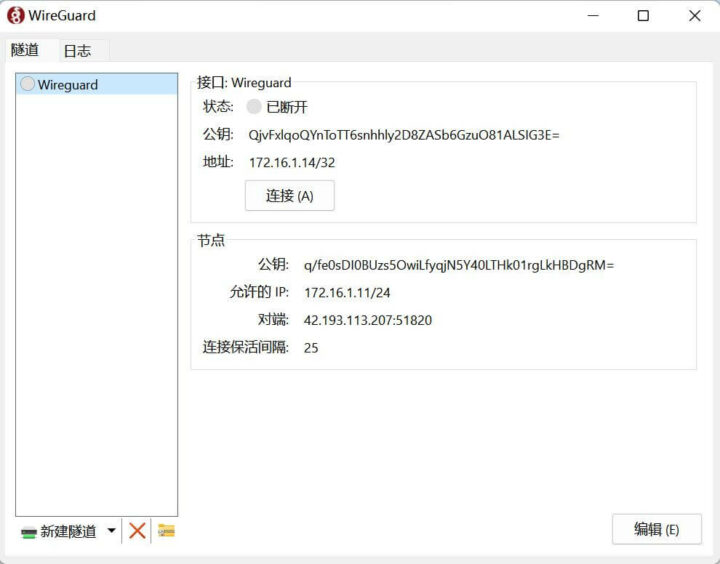
We’ll need to install the Wireguard client for Windows, and set up a new tunnel using the IP addresses defined in the introductions and the private and public key we’ve just generated.
We’ll also need the peer PublicKey generated on the client:
|
1 |
QjvFxlqoQYnToTT6snhhly2D8ZASb6GzuO81ALSIG3E= |
The configuration file then looks like that:
|
1 2 3 4 5 6 7 8 9 |
[Interface] PrivateKey = IIDs0Jv/iCn08+mXvoXRTuiIzhUziIeyF6hlOEq63lw= Address=172.16.1.14/32 [Peer] PublicKey= q/fe0sDI0BUzs5OwiLfyqjN5Y40LTHk01rgLkHBDgRM= AllowedIPs = 172.16.1.11/24 Endpoint = 42.193.113.207:51820 PersistentKeepalive = 25 |
WireGuard master file configuration
Create the server configuration file wg0.conf as follows:
|
1 2 3 4 5 6 7 8 9 10 11 |
[Interface] Address = 172.16.1.11/24 ListenPort = 51820 PrivateKey = IJ6niaDAl2/UXVApMIBAX8QjMgApDRTBtNHBsVi9z3o= # PrivateKey PostUp = iptables -A FORWARD -i %i -j ACCEPT; iptables -A FORWARD -o %i -j ACCEPT; iptables -t nat -A POSTROUTING -o wg0 -j MASQUERADE PostDown = iptables -D FORWARD -i %i -j ACCEPT; iptables -D FORWARD -o %i -j ACCEPT; iptables -t nat -D POSTROUTING -o wg0 -j MASQUERADE [Peer] PublicKey =QjvFxlqoQYnToTT6snhhly2D8ZASb6GzuO81ALSIG3E= # PublicKey AllowedIPs = 172.16.1.14/32 PersistentKeepalive = 25 |
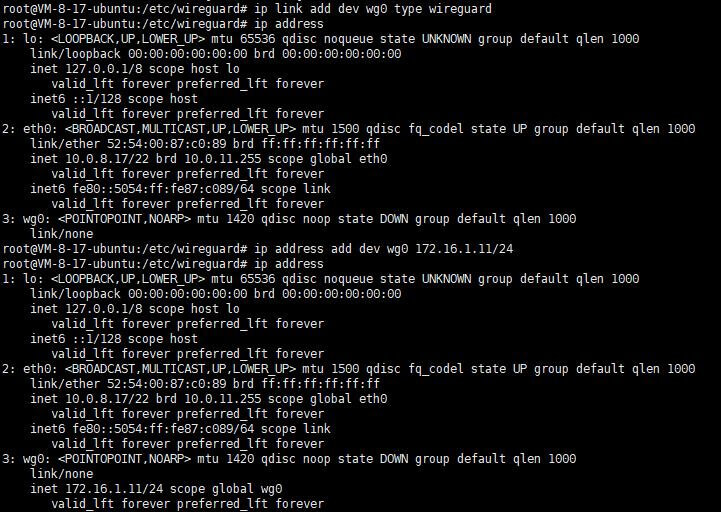
Then create a network card configuration file named wg0:
|
1 2 |
ip link add dev wg0 type wireguard ip address |
Create a private key for WireGuard and configure permissions to prevent others from accessing the server:
|
1 2 3 |
wg genkey | tee /tmp/private-key chmod 600 /tmp/private-key wg set wg0 private-key /tmp/private-key listen-port 51820 |
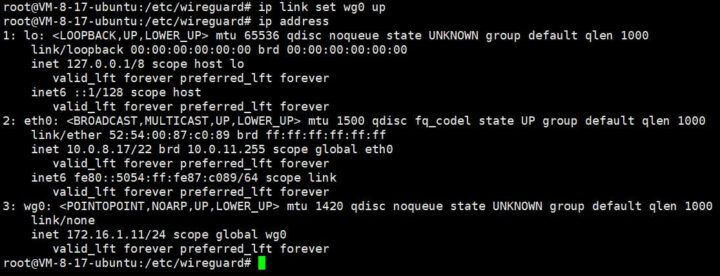
Start the network interface
|
1 2 |
ip link set wg0 up ip address |
At this point, we have created the local node, and we need to configure which nodes are our peers to establish a network connection.
Connecting a Windows 11 WireGuard client to the Ubuntu WireGuard server
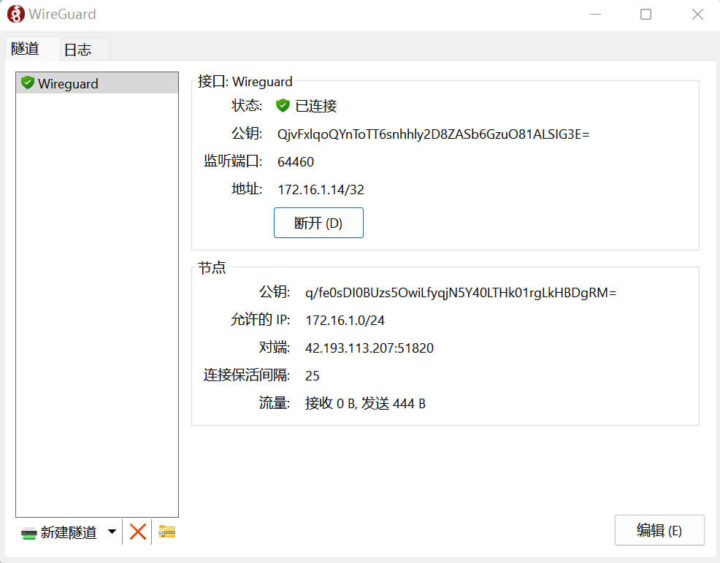
Open the WireGuard client and click on the Activate (A) button:
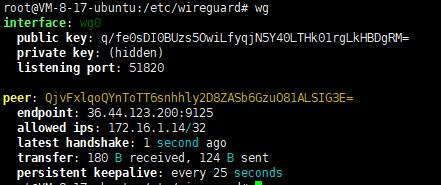
We can check the connection status with wg tool on the Ubuntu server:
The connection is successful.
Appendix – Useful commands & details
Start the WireGuard server:
|
1 |
wg-quick up wg0 |
Stop the WireGuard server:
|
1 |
wg-quick down wg0 |
Check WireGuard operational status
|
1 |
wg |
WireGuard configuration instructions
|
1 2 3 4 5 6 7 8 9 10 11 12 13 14 15 |
[Interface] Address = 172.16.1.11/24 ##Host IP address and mask (IPV4) ListenPort = 51820 #WireGuard port PrivateKey = IJ6niaDAl2/UXVApMIBAX8QjMgApDRTBtNHBsVi9z3o= #Private Key PostUp = iptables -A FORWARD -i %i -j ACCEPT; iptables -A FORWARD -o %i -j ACCEPT; iptables -t nat -A POSTROUTING -o wg0 -j MASQUERADE #Operations before starting PostDown = iptables -D FORWARD -i %i -j ACCEPT; iptables -D FORWARD -o %i -j ACCEPT; iptables -t nat -D POSTROUTING -o wg0 -j MASQUERADE #Operations after stopping [Peer] PublicKey =QjvFxlqoQYnToTT6snhhly2D8ZASb6GzuO81ALSIG3E= #Public Key of the peer machine AllowedIPs = 172.16.1.14/32 #IP address of the peer allowed by this machine (multiple peers cannot be repeated) PersistentKeepalive = 25 #When the IP address of one end of the session is a NAT address or a private network IP address, the party will periodically send a keepalive message every 25 seconds to maintain the availability of the session and prevent it from being terminated by the device. |
On the basis of the above, you need to pay extra attention to the following:
- If you have more than one [Peer], add a new [Peer] section directly below
- If multiple Peers have different IPs, please do not allow AllowedIPs to have overlapping IP address segments (such as configuring multiple identical /24s as only one takes effect)
- Endpoint supports both domain name access and IP access
- If the VPM connection is up, dynamic IP address changes will not affect the stability of the VPN
- If ListenPort is not added, a high-order port will be automatically generated for peer, and under the master-slave structure, the slave will not fill in the listenport
- The Table parameter can use auto and off, which respectively correspond to “automatically inject routing” and “prohibit injection”. Auto is not configured
- If you have a master-slave structure, you need to let the slave end add a content of 0.0.0.0/0,::0 to the “AllowedIPs =” of the slave end in the configuration to allow all traffic
- PreUp, PostUp, PreDown, PostDown – These four command parameters are executed by bash before/after wg-quick quick setting/deleting interface, and are often used to configure custom DNS or firewall rules. The special string %i is used as variable substitution to control the INTERFACE configuration name. Each command parameter supports multiple commands, and the multiple commands in the parameter will be executed sequentially, and the separator is “;” (semicolon).
Translated from the original tutorial on CNX Software China.

Jean-Luc started CNX Software in 2010 as a part-time endeavor, before quitting his job as a software engineering manager, and starting to write daily news, and reviews full time later in 2011.
Support CNX Software! Donate via cryptocurrencies, become a Patron on Patreon, or purchase goods on Amazon or Aliexpress. We also use affiliate links in articles to earn commissions if you make a purchase after clicking on those links.






> The testbed includes a cloud server running Ubuntu Server 18.04.1 LTS
Great choice in April 2023 when an up-to-date Ubuntu 18.04 release is called ‘18.04.6 LTS’ and will not receive any further security updates any more from next month on 🙂
They wrote it last August, but anyway, the OS was still rather old at that time. I’ll try it soon with Ubuntu 22.04 (or with methods from the other commenters below), since I may have to review more routers it’s better to test VPN performance in the local network than over the Internet.
> or with methods from the other commenters below
One of the methods is more of an advertisement and there’s https://github.com/Nyr/wireguard-install as well 🙂
As far as I know you can use pivpn to set up wireguard under ubuntu. Why would you want to do it by hand?
The point of wireguard is that it’s trivial to setup even by hand. So why introduce extra software on top if not needed?
Tailscale. Takes about 5 seconds.
Or ZeroTier.
+1
Or Headscale.
Or wg-easy with Docker