

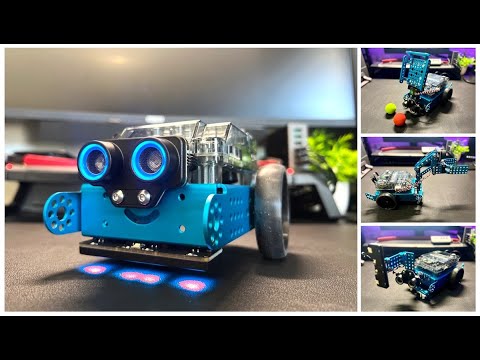
MakeBlock mBot Neo, also known as mBot2, is an educational robot that builds upon the previous generation mBot1 robot, and the company has sent us a review sample, following our earlier review of the Ultimate 2.0 10-in-1 educational robot kit, along with the Smart World Add-on Pack.
The mBot Neo features a new ESP32-based CyberPi control board with WiFi connectivity for IoT and AI support. The robot is also equipped with a 2nd generation Ultrasonic sensor with improved object detection accuracy and status indicator, a built-in 4-ch RGB line sensor that can detect colors, as well as a new drive motor that comes with an encoder for more precise motion control.
The mBot Neo robot kit is expandable with metal parts from other Makeblock models, mBuild modules and various electronic modules can be added making it also possible to build custom robots with third-party structural parts. The mBot Neo robot kit is suitable for pupils from elementary up to high school level thanks to (block-based) visual programming, drag-and-drop programming, and more advanced programming in the Python language.
Makeblock mBot Neo robot specifications and key components
The chassis is made of metal anodized blue aluminum metal parts that are colorful, beautiful, and durable.

CyberPi control board
The CyberPi is the main control board of the mBot Neo robot and was custom-designed by Makeblock themselves. It features an ESP32 WiFi and Bluetooth microcontroller, a 1.44-inch color display, a USB Type-C port for power and programming, a gyroscope and accelerometer, a light sensor, an RGB LED, a buzzer, and a microphone. User controls include an analog joystick, A/B buttons for navigating the menus, and a Home button for selecting various programs of CyberOS.

mBot Neo Shield expansion board
Equipped with a built-in rechargeable lithium-ion battery, the mBot Neo Shield can supply power to the CyberPi control board and comes with two multi-function ports that can be used to connect servos and DC motors, as well as two additional servo connectors, two extra DC motor connectors, two encoder motor connectors, and a CyberPi port for connecting it tot he control board. MakeBlock also provides Block-Base and Python libraries for the expansion board

Quad RGB Sensor
The Quad RGB sensor comes with four light sensors with a range of 5 to 15 mm and four “fill light” LEDs to reduce light interference with the sensor from the outside. The sensor can also memorize color values during use.

The Auto exposure measurement mode can be calibrated to compare two color values by pressing the button located in the center of the sensor twice. At that point, the lights on the sensor will flash quickly, and you can move the sensor back and forth between the two colors (on the track) until the LED light turns off. This typically takes around 2.5 seconds and the sensor will automatically remember both colors going forward.

Ultrasonic Sensor 2
Makeblock’s second-generation ultrasonic sensor has been improved to increase its detection accuracy. The company also added a neat protective case and a blue LED light that can be used to detect the distance to the objects in front of the robot.

The left side of the sensor comes with an ultrasonic wave transmitter, while the right side features an ultrasonic wave receiver, so when the robot comes close enough to an object it will report the distance with about +/- 5% accuracy.
Encoder Motors
The DC motors have an optical encoder that can count the revolutions of the motor which allows us to precisely control the mBot Neo robot’s wheels up to an RPM speed of 180 RPM. The motors come with two M4 threaded holes on each side for an easy connection to the Makeblock robot’s mechanical parts.
 Specifications:
- Gear ratio: 39.6
- Voltage: 7.4 volts
- Current without load: 240 mA
- Current under load: ≤750 mA
- Idle speed: 350 ± 5% (RPM)
- Starting speed: 14,000 ± 5% (RPM)
- Starting torque: 5 g·cm
- Maximum torque: 800 g·cm
- Shaft length: 9 mm
- Power: 3.7 watts
- Encoder rotation: 360°
Makeblock mBot Neo robot kit content

- CyberPi control board
- mBot Neo Shield
- 1x Ultrasonic Sensor 2
- 1x Quad RGB sensor
- 2x encoder motors with 2x cables, a wheel hub, 2x slick tyres, 2x mini wheels
- Cables – USB Type-C cable,2x 10cm mBuild cables, 1x 20cm mBuild cable
- Various screws – 4x M.2 x 12 mm,6x M4 x 25mm, 6x M4 x 14mm, 6x M4 x 8mm
- Screwdriver
- Line-following Track Map
Software used to program the Makeblock mBot Neo robot
mBlock 5 Editor is a coding platform based on Scratch 3.0, with support for visual programming and Python language, and specially designed for robotics, STEAM, and learning to code. It’s a good coding software for educators, students, creators, and kids. For reference, Scratch is a programming tool developed by MIT and is considered the world’s most popular programming language for kids. mBlock 5 also includes features such as Python programming, AI, IoT, and more.

Programming the mBot Neo robot using the mBlock5 Editor
We’ll first need to connect the mBot Neo robot to your computer using a USB Type-C cable plugged into the USB port on the right side of the CyperPi control board.

Now click on the “add” icon in the “Device” tab, then select “CyberPi” and “mBot2”

We’ll then have access to the mBot Neo robot’s command set from the mBlock 5 interface.

Next, click on “Connect” to connect to the robot, a window will pop up allowing the user to select the COM port, and once done, click on the “Connect” button.

if “Connected!” shows up, the connection has been successful, and we’re ready for the next step.

Programming the display on the mBot Neo
For the purpose of this review, we programmed the mBot Neo to display a test message (“CNX Software”) on the display using different colors.

This is what the test program looks like with block-based programming…

and in Python:
|
1 2 3 4 5 6 7 8 9 10 11 12 |
import event, time, cyberpi @event.start def on_start(): cyberpi.display.set_brush(255, 0, 135) cyberpi.display.show_label("C", 32, int(30), int(30), index = 0) cyberpi.display.set_brush(0, 182, 255) cyberpi.display.show_label("N", 32, int(51), int(30), index = 1) cyberpi.display.set_brush(76, 255, 0) cyberpi.display.show_label("X", 32, int(71), int(30), index = 2) cyberpi.display.set_brush(255, 208, 0) cyberpi.display.show_label("Software", 24, int(7), int(60), index = 3) |
RGB LED programming
Let’s now expand our code sample by programming the RGB LEDs at the from of the robot right under the display. We’ll program each of the five LEDs with a different color.

Block-based program:
 and resulting Python program:
|
1 2 3 4 5 6 7 8 9 10 11 12 13 14 15 16 17 18 19 20 21 22 23 24 25 26 27 28 29 30 31 32 33 34 35 36 |
import event, time, cyberpi @event.is_press('middle') def is_joy_press(): cyberpi.led.set_bri(30) while True: cyberpi.led.on(255, 0, 0, 1) time.sleep(1) cyberpi.led.on(0, 0, 0, 1) cyberpi.led.on(255, 187, 0, 2) time.sleep(1) cyberpi.led.on(0, 0, 0, 2) cyberpi.led.on(16, 255, 0, 3) time.sleep(1) cyberpi.led.on(0, 0, 0, 3) cyberpi.led.on(76, 0, 255, 4) time.sleep(1) cyberpi.led.on(0, 0, 0, 4) cyberpi.led.on(255, 0, 208, 5) time.sleep(1) cyberpi.led.on(0, 0, 0, 5) cyberpi.led.on(255, 0, 0, "all") time.sleep(1) cyberpi.led.on(0, 0, 0, "all") cyberpi.led.on(255, 187, 0, "all") time.sleep(1) cyberpi.led.on(0, 0, 0, "all") cyberpi.led.on(42, 255, 0, "all") time.sleep(1) cyberpi.led.on(0, 0, 0, "all") cyberpi.led.on(0, 242, 255, "all") time.sleep(1) cyberpi.led.on(0, 0, 0, "all") cyberpi.led.on(255, 0, 246, "all") time.sleep(1) cyberpi.led.on(0, 0, 0, "all") |
Playing music through the buzzer
The mBot Neo robot also comes with a buzzer, so we wrote a program to play music with various notes (frequencies) and durations.
Block-Bases programming sample program: Python code:
|
1 2 3 4 5 6 7 8 9 10 11 12 13 14 15 16 17 18 19 |
import event, time, cyberpi @event.is_press('middle') def is_joy_press(): cyberpi.audio.set_vol(30) cyberpi.audio.play_until('hi') cyberpi.audio.play_drum('snare', 0.25) for count in range(2): cyberpi.audio.play_music(62, 0.25) cyberpi.audio.play_music(63, 0.25) for count2 in range(2): cyberpi.audio.play_tone(700, 0.5) cyberpi.audio.play_tone(600, 0.5) cyberpi.audio.play_drum('bass-drum', 0.25) cyberpi.audio.play_drum('side-stick', 0.25) cyberpi.audio.play_until('running-water') cyberpi.audio.play_until('bye') |
mBot Neo motor control
As we noted in the description of the Mbot Neo / mBot2 robot, the kit comes with encoder motors and sensors such as an accelerometer. We used those to control the motors of the robot.
Visual programming sample:

Resulting Python program:
|
1 2 3 4 5 6 7 8 9 10 11 12 13 14 15 16 |
import event, time, cyberpi, mbot2 @event.is_press('middle') def is_joy_press(): mbot2.forward(100) mbot2.straight(100) mbot2.turn_left(50) mbot2.turn(-90) mbot2.forward(80) mbot2.straight(120) mbot2.backward(50) mbot2.straight(-50) mbot2.turn_right(50) mbot2.turn(90) mbot2.forward(70) mbot2.straight(50) |
Time-based movement of the mBot Neo robot
Instead of using sensors to control the mBot2 movement, we can also program it to move in a direction for a specific amount of time. The block-based program below shows how to do that.
 Python program:
|
1 2 3 4 5 6 7 8 9 10 11 12 13 14 |
import event, time, cyberpi, mbot2 @event.is_press('middle') def is_joy_press(): mbot2.forward(100, 1) mbot2.turn_right(100, 0.5) mbot2.forward(100, 1) mbot2.turn_left(100, 0.5) mbot2.forward(100, 1) mbot2.turn_right(100, 0.5) mbot2.backward(100, 1) mbot2.turn_right(100, 0.5) mbot2.backward(100, 1) mbot2.turn_right(100, 0.5) |
Obstacle avoidance program
After the basic sample above, let’s now switch to something a bit more fun, as we’ll use the ultrasonic sensor to detect obstacles and make sure the robot does not collide with any object. If an object is detected less than 10 cm away, the mBot2 robot will turn 90 degrees to the left, and if no object is detected, it will move forward at a speed of 50 rpm. Note: additional obstacle avoidance sample programs are available in the example programs in the mBlock 5 program.

This seems more complicated, but visual programming makes it rather easy.

The Python program is also short thanks to the CyberPi API:
|
1 2 3 4 5 6 7 8 9 10 11 12 13 14 |
import event, time, cyberpi, mbuild, mbot2 @event.is_press('middle') def is_joy_press(): while True: if mbuild.ultrasonic2.get(1) < 10: cyberpi.display.set_brush(0, 191, 255) cyberpi.display.show_label("Detected !", 16, "center", index= 0) mbot2.turn(-90) else: cyberpi.display.set_brush(255, 0, 0) cyberpi.display.show_label("No Detected !", 16, "center", index= 1) mbot2.forward(50) |
Line-following demo
In the test, we wrote a line-following program using a PID (proportional–integral–derivative) equation to make the mBot2 robot follow the line on the map as best as possible.

Example program using visual programming:

Here’s the Python program for this slightly more complex demo:
|
1 2 3 4 5 6 7 8 9 10 11 12 13 14 15 16 17 18 19 20 21 22 23 24 25 26 27 28 29 30 31 32 33 34 35 |
import event, time, cyberpi, mbot2, mbuild import time # initialize variables base_power = 0 kp = 0 left_power = 0 right_power = 0 @event.is_press('a') def is_btn_press(): global base_power, kp, left_power, right_power cyberpi.stop_other() mbot2.drive_power(0, 0) @event.is_press('b') def is_btn_press1(): global base_power, kp, left_power, right_power cyberpi.stop_other() base_power = 30 kp = 0.8 while True: left_power = (base_power - kp * mbuild.quad_rgb_sensor.get_offset_track(1)) # As a "deviation quantity", line offset position can be used for deviation correction of automatic line-following tasks. It is the "P" in what we call PID control. # # I and D involve integral and differential knowledge, and have high requirements for mathematics, programming and hardware efficiency, which will not be expanded here. right_power = -1 * ((base_power + kp * mbuild.quad_rgb_sensor.get_offset_track(1))) mbot2.drive_power(left_power, right_power) @event.is_press('middle') def is_joy_press(): global base_power, kp, left_power, right_power cyberpi.stop_other() while True: cyberpi.console.println(mbuild.quad_rgb_sensor.get_red("R2",1)) time.sleep(0.1) |
Play with the Makeblock mBot Neo robot through the Makeblock mobile app.
Makeblock app is available for both iOS and Android operating systems. Once the installation is complete, start the Makeblock app, select the “Device” sub-menu, and then select “mBot2/mBot Neo”.

Now turn on the mBot2 robot switch, tap on the Bluetooth symbol, and select the Bluetooth MAC address that appears in the app.

The app will then try to automatically connect to the robot and report success if everything worked smoothly.
The Play menu enables user to quickly start with the robot without having to write a single line of code.

Four modes can be selected in the Play menu.

Mode 1: Drive – It comes with a joystick, buttons to change the color of the RGB LEDs, and various action buttons for example to play sound or move the robot quickly.

Mode 2: Draw and Run – As its name implies you can draw a virtual track in the app such as the heart below and the robot will run along the map drawn in the application once we tap on the start icon.

Mode 3: Musician – This mode will show a small piano that allows the user to play music and also comes with four icons to automatically play birthday or Christmas songs.

Mode 4: Voice Control. The robot follows voice commands (in English only) with six commands supported at the time of the review
- Go Forward
- Go Backward
- Turn Left
- Turn Right
- Dance
- Stop

The Code menu is used to write code on your smartphone like you would on a computer through the mBlock 5 IDE, and you can also upload the programs via Bluetooth.

The Code mode will automatically connect to the mBlock app on your smartphone provided you’ve already instead it on Android or iOS.

Smart World Add-on Pack review
We’ve just reviewed some of the features of the mBot Neo robot, but our kit also came with the Smart World Add-on Pack that further enhances the STEAM learning experience with parts and instructions to build a robotics carrier, a surveying robot, and/or a robotics arm.

Smart World Add-on pack content

- 1x Beam 036, 2x Beam 060, 4x Beam 076, 1x Beam 092
- 1x Slide Beam 016, 2,x Slide Beam 032
- 6x Stiffener
- 1x Bracket 3×3
- 2x Plate 3×6, 1x Plate B 7×9
- Screws – 15x M4 x 8mm, 8x M4 x 10mm, 5x M4 x 10mm, 3x M4 x 16mm, 2x M4 x 22mm, 2x M4 x 25mm
- 6x headless set screw M3 x 5mm
- 2x Brass stud M4 x 8+6mm
- 2x universal wheels
- 2x 9g Servo (MS-1,5A)
- 7x Nut M4
- 6x Shaft Collar 4mm
- 7x Plastic Ring 4x7x3mm, 2x Plastic Ring 4x7x2mm
- 1x Wrench, 1x HEX Allen key 1,5mm, 1x HEX Allen key 2,5mm
- A 20 cm connection cable
- 3x D-Shaft 4x56mm
- 2x color balls
Assembly and test of the mBot Neo’s Robotics Carrier kit
The mBot Neo Robotics Carrier robot can transport things to various points as we program it. In this test, we’ll make the robot move forward for 5 seconds, then set the servo motor at 0 degrees to deliver a package, then set the servo motor at 90 degrees and back for 5 seconds to pick up a parcel (See the video embedded at the end of the post for a demo)

Block-based sample program:

Python program:
|
1 2 3 4 5 6 7 8 9 10 11 12 13 14 15 16 17 18 19 20 21 22 23 |
import event, time, cyberpi, mbot2 import time @event.start def on_start(): mbot2.servo_set(90,"S4") @event.is_press('middle') def is_joy_press(): for count in range(3): cyberpi.led.on(255, 0, 0, "all") cyberpi.display.set_brush(255, 0, 0) cyberpi.display.show_label("Forward", 16, "center", index= 0) mbot2.forward(50, 5) mbot2.servo_set(0,"S4") time.sleep(1) mbot2.servo_set(90,"S4") cyberpi.led.on(29, 255, 0, "all") cyberpi.display.set_brush(114, 255, 0) cyberpi.display.show_label("Backward", 16, "center", index= 0) mbot2.backward(50, 5) mbot2.EM_stop("ALL") time.sleep(6) |
Test and assembly of Makeblock’s mBot Neo Surveying Robot
The mBot Neo Surveying Robot uses servo motors to rotate and find objects. It works with the Ultrasonic 2 sensor to detect the distance of objects and leverages the Quad RGB sensor to detect objects of various colors. (See a working example in the video below).

Both the block-based program…

… and the Python program start to be a bit more complicated:
|
1 2 3 4 5 6 7 8 9 10 11 12 13 14 15 16 17 18 19 20 21 22 23 24 25 26 27 28 29 30 31 32 33 34 35 36 37 38 39 40 41 42 43 44 45 46 47 48 49 50 51 52 53 54 55 56 57 58 59 60 61 62 63 64 65 66 67 68 69 70 71 72 |
import event, time, cyberpi, mbot2, mbuild import time @event.start def on_start(): mbot2.servo_set(10,"S3") cyberpi.led.show('red orange yellow green cyan') mbuild.ultrasonic2.play("sleepy", 1) mbuild.ultrasonic2.set_bri(0, "all", 1) mbuild.quad_rgb_sensor.color_mode("enhance") while True: for count in range(43): mbot2.servo_add(2,"S3") if mbuild.ultrasonic2.get(1) < 10: mbot2.EM_stop("ALL") CheckColor() time.sleep(0.05) mbot2.forward(50) for count2 in range(43): mbot2.servo_add(2,"S3") if mbuild.ultrasonic2.get(1) < 10: mbot2.EM_stop("ALL") CheckColor() time.sleep(0.05) for count3 in range(43): mbot2.servo_add(-2,"S3") if mbuild.ultrasonic2.get(1) < 10: mbot2.EM_stop("ALL") CheckColor() time.sleep(0.05) for count4 in range(43): mbot2.servo_add(-2,"S3") if mbuild.ultrasonic2.get(1) < 10: mbot2.EM_stop("ALL") CheckColor() time.sleep(0.05) def CheckColor(): if (mbuild.quad_rgb_sensor.is_color("red","any",1)): mbot2.EM_stop("ALL") time.sleep(1) cyberpi.led.on(208, 2, 27, "all") mbot2.forward(50, 0.5) mbot2.turn(-110) if (mbuild.quad_rgb_sensor.is_color("green","any",1)): mbot2.EM_stop("ALL") time.sleep(1) cyberpi.led.on(1, 208, 15, "all") mbot2.forward(50, 0.5) mbot2.turn(-110) if (mbuild.quad_rgb_sensor.is_color("blue","any",1)): mbot2.EM_stop("ALL") time.sleep(1) cyberpi.led.on(1, 12, 208, "all") mbot2.forward(50, 0.5) mbot2.turn(-110) if (mbuild.quad_rgb_sensor.is_color("yellow","any",1)): mbot2.EM_stop("ALL") time.sleep(1) cyberpi.led.on(250, 255, 2, "all") mbot2.forward(50, 0.5) mbot2.turn(-110) |
Makeblock mBot Neo’s robotic arm
The mBot Neo robotic arm can lift and pick up objects through an arm that can go up and down vertically and can catch objects no larger than 15 centimeters. The demo program drives the robot to an object to pick it up and move it to another location. Again, you’ll find a demo in the video below.

Visual programming demo:

Corresponding Python program:
|
1 2 3 4 5 6 7 8 9 10 11 12 13 14 15 16 17 18 19 20 21 22 23 24 25 26 27 28 29 30 31 32 |
import event, time, cyberpi, mbot2 import time @event.is_press('middle') def is_joy_press(): mbot2.straight(10) mbot2.turn(-100) mbot2.straight(15) cyberpi.display.set_brush(0, 255, 255) cyberpi.display.show_label("Found things", 16, "center", index= 0) mbot2.servo_set(140,"S3") time.sleep(1) for count in range(18): mbot2.servo_add(-5,"S4") time.sleep(0.1) mbot2.straight(-15) mbot2.turn(100) for count2 in range(18): mbot2.servo_add(5,"S4") time.sleep(0.1) mbot2.servo_set(90,"S3") time.sleep(1) mbot2.straight(-15) for count3 in range(16): cyberpi.led.show('red orange yellow green cyan') mbot2.turn(-90) @event.start def on_start(): mbot2.servo_set(90,"all") |
Video review and demo of the Makeblock mBot Neo with the Smart World Add-on Pack
Conclusion
The mBot Neo educational robot kit and the optional Smart World Add-on pack are ideal for learning to build robots. Whether you are learning by yourself, or are teaching robotics to students from primary to high-school level it’s a good platform to learn programming thanks to its block-based programming and Python support.
The design of the robot is strong and durable, with bright colors, and it can be extended to various structural parts from third parties as well. The new ESP32-case CyberPi control board enables wireless connectivity which makes it more convenient to use for both IoT and AI applications. Software support is good thanks to a complete library that covers all the main features of the robot.
The mBot Neo robot also comes with an encoder motor for precise motor control, a line sensor that can compare lines automatically, and the second revision of the company’s Ultrasonic model that’s an improvement over the previous generation with better stability and accuracy. Some other highlights include a high-quality servo motor, the integration of a compass sensor, as well as both a color LCD display and several RGB LEDs. The robot kit is expandable with support for various MakeBlock modules, and an added advantage over competing solutions is the ability to program the robot both in a computer or smartphone since drag-and-drop programming is also supported in the latter.
We would like to thank MakeBlock for sending the mBot Neo robot kit and Smart World add-on kit for review. The mBot Neo robot kit with the Smart World Add-on Pack can be purchased for $218.99 on the company’s online store. The coupon “NEW10 ” can get you an extra $10 discount.
CNXSoft: This review has been translated from the original article on CNX Software Thailand by Kajornsak Janjam, and edited by Suthinee Kerdkaew.

Jean-Luc started CNX Software in 2010 as a part-time endeavor, before quitting his job as a software engineering manager, and starting to write daily news, and reviews full time later in 2011.
Support CNX Software! Donate via cryptocurrencies, become a Patron on Patreon, or purchase goods on Amazon or Aliexpress. We also use affiliate links in articles to earn commissions if you make a purchase after clicking on those links.


