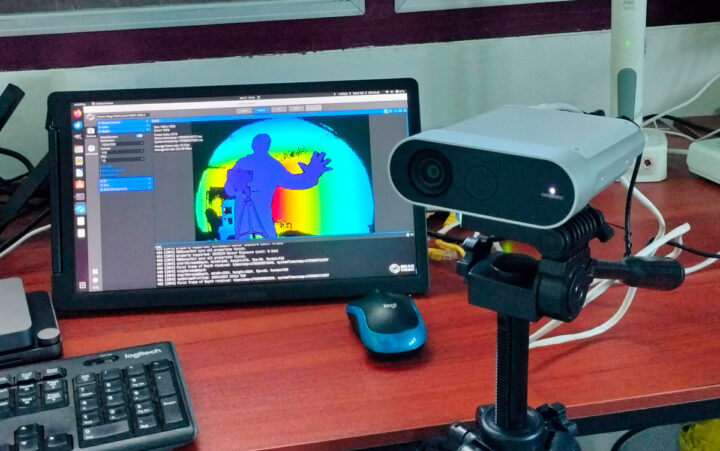
We had a quick look at the Orbbec Femto Mega 3D depth and 4K RGB camera at the end of last year with a look at the hardware and a quick try with the OrbbecViewer program in Ubuntu 22.04. I’ve now had the time to test the OrbbecViewer in more detail, check out the Orbbec SDK in Linux and various samples, and finally test the Femto Mega with a body tracking application using Unity in Windows 11.
A closer look at OrbbecViewer program and settings
As noted in the first part of the review, the OrbbecViewer program provides color, depth, and IR views for the camera. Let’s go into details for each.
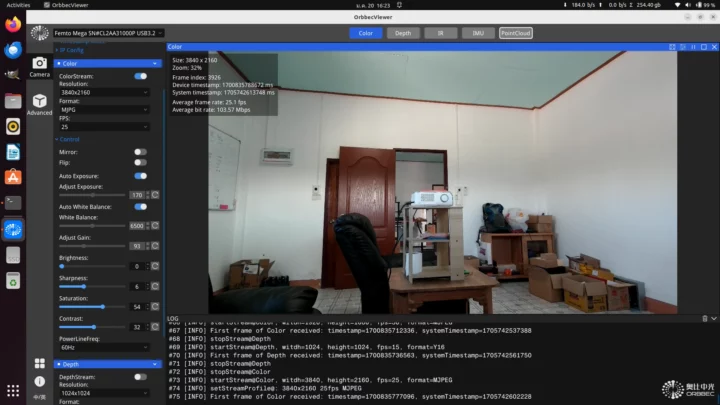
The Color mode would be the same as your standard USB color camera. The Femto Mega supports resolution from 1280×720 at 30 fps to 3840×2160 at 25 fps using MJPG, H.264, H.265, or RGB (converted from MJPG). We can flip/mirror the image, and there are some usual parameters for cameras such has while balance, contrast, saturation, and so on.
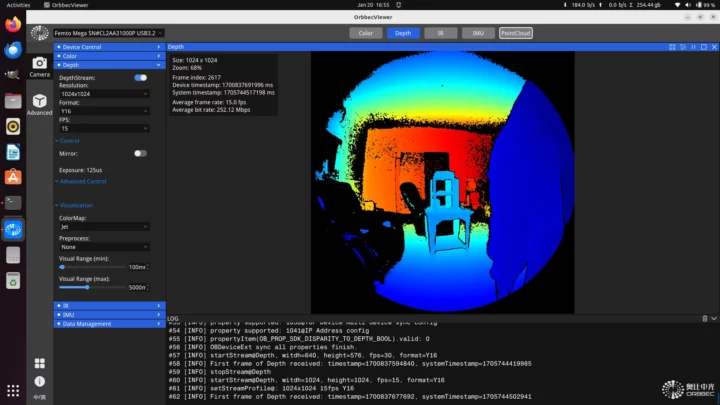
The Depth mode – which I would call the “Fun” mode – represents depth data with colors ranging from red (far) to dark blue (close) although this can be reversed in the “Jet Inv” colormap mode. The resolution can be set from 320×288 at 30 FPS to 1024×1024 at 15 fps using Y16 format. Other parameters include the selection of the Color Map, optional preprocessing options, and setting the visual range from 0 to 12,000 mm, with the default being 100mm to 5,000mm.
You can see how the color changes within a room and when an object (yours truly) moves elegantly inside the room in the screencast above
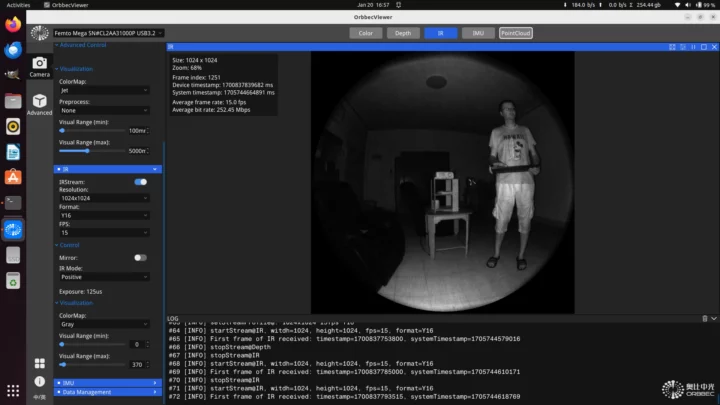
The Infrared (IR) view also supports 320×288 at 30 FPS to 1024×1024 at 15 fps using Y16 format. IR mode can be set to positive or passive, and the default color map is set to gray, but you can also switch it to “Jet” or “Jet Inv” to have an effect similar to the depth mode. The visual range can also be set from 0 to 12,000 mm.
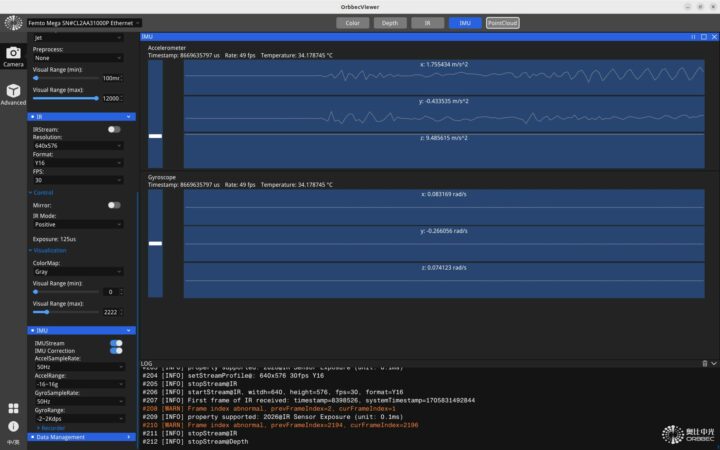
The IMU section did not work in OrbbecViewer 1.8.3, but once I updated the firmware to version 1.2.8 and the application to version 1.9.3 (see below), both the accelerometer and gyroscope data would show properly.
This data could be useful when the camera is mounted on a robot or to detect vibration when mounted on a machine.
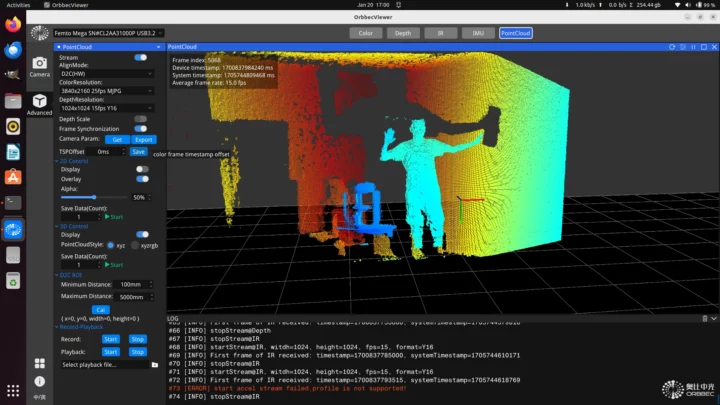
The Pointcloud is part of the Advanced settings and will show both color and depth data with X, Y, and Z coordinates. There are 2D and 3D controls, ROI (region of interest) range, and the ability to record and playback 2D data.
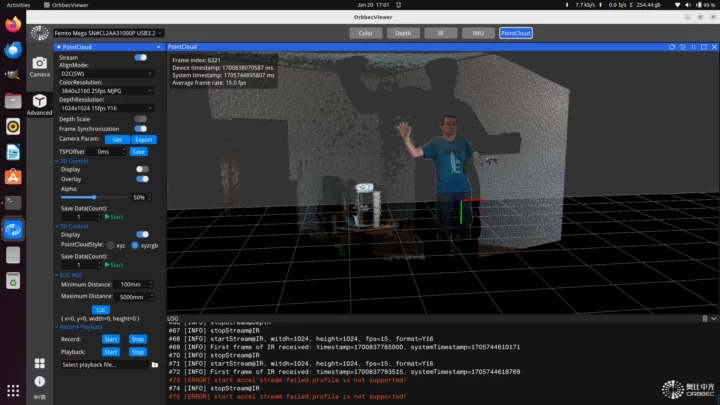
Switching to xyzrgb style will show objects within the D2C ROI range.
Testing the Femto Mega with the Orbbec SDK in Ubuntu 22.04
The OrbbecViewer is nice to evaluate and play with the Femto Mega camera, but if you’re going to integrate the camera into your application, you’ll need to use the Orbbec SDK.
The documentation is distributed as MD files which may be fine for Windows users, but not be the smartest move for Linux users. I had to spend close to one hour to find a program that renders the documentation properly with illustrations and Typora does the trick (to some extent):
|
1 |
sudo snap install typora |
That part of the documentation is somewhat OK, but I’d consider the overall documentation to be mediocre at best. There’s plenty of it, but it’s not always correct, and sometimes clearly incomplete or confusing.
I’ll be using the Khadas Mind mini PC with Ubuntu 22.04 to check out the Orbbec SDK. The documentation also mentions:
So I had plans to test it with the Raspberry Pi 5, but I wasted a lot of time on a specific part for this Femto Mega review (body tracking sample) and due to time constraints I had to skip that part.
Before installing the Orbbec SDK, we’ll need to install dependencies (some not listed in the docs):
|
1 |
sudo apt install libudev-dev libusb-dev libopencv-dev cmake |
After downloading the Orbbec C/C++ SDK 1.8.3, I unzipped and ran a script to install udev rules so that normal users can access the camera:
|
1 2 3 4 5 6 |
unzip OrbbecSDK_C_C++_v1.8.3_20231124_6c51dc1_linux_x64_release.zip cd OrbbecSDK_v1.8.3/Script chmod +x install.sh sudo ./install.sh usb rules file install at /etc/udev/rules.d/99-obsensor-libusb.rules exit |
USBFS buffer size needs to be set to 128MB to process high-resolution images from the camera. But by default, it is set to 16MB:
|
1 2 |
cat /sys/module/usbcore/parameters/usbfs_memory_mb 16 |
This can be changed to 128MB temporarily (until the next reboot);
|
1 |
sudo sh -c 'echo 128 > /sys/module/usbcore/parameters/usbfs_memory_mb' |
or permanently by adding parameters to grub, for example (the docs have the complete procedure to follow):
|
1 |
GRUB_CMDLINE_LINUX_DEFAULT="quiet splash usbcore.usbfs_memory_mb=128" |
Now we can prepare the build for the examples:
|
1 2 3 4 |
cd ../Example/ mkdir build cd build cmake .. |
Output:
|
1 2 3 4 5 6 7 8 9 10 11 12 13 14 15 16 |
-- The CXX compiler identification is GNU 11.4.0 -- The C compiler identification is GNU 11.4.0 -- Detecting CXX compiler ABI info -- Detecting CXX compiler ABI info - done -- Check for working CXX compiler: /usr/bin/c++ - skipped -- Detecting CXX compile features -- Detecting CXX compile features - done -- Detecting C compiler ABI info -- Detecting C compiler ABI info - done -- Check for working C compiler: /usr/bin/cc - skipped -- Detecting C compile features -- Detecting C compile features - done -- Found OpenCV: /usr (found version "4.5.4") -- Configuring done -- Generating done -- Build files have been written to: /home/jaufranc/edev/OrbbecSDK_v1.8.3/Example/build |
If you have some errors here you may have to install extra dependencies.
Let’s build the samples:
|
1 |
make -j 16 |
It just took 5 seconds to compile on my system, and we have a range of samples:
|
1 2 3 4 5 6 7 8 9 |
ls bin/ color_viewer double_infrared_viewer ImuReader Playback ColorViewer DoubleInfraredViewer infrared_viewer point_cloud CommonUsages firmware_upgrade InfraredViewer PointCloud DepthPrecisionViewer FirmwareUpgrade MultiDevice Recorder depth_viewer hello_orbbec MultiDeviceSync SaveToDisk DepthViewer HelloOrbbec MultiStream sensor_control depth_work_mode hot_plugin net_device SensorControl DepthWorkMode HotPlugin NetDevice SyncAlignViewer |
The description for each is available in readme and the documentation has ore details explaining each functions:
- HelloOrbbec – Demonstrate connect to device to get SDK version and device information
- DepthViewer – Demonstrate using SDK to get depth data and draw display, get resolution and set, display depth image
- ColorViewer – Demonstrate using SDK to get color data and draw display, get resolution and set, display color image |
- InfraredViewer – Demonstrate using SDK to obtain infrared data and draw display, obtain resolution and set, display infrared image
- DoubleInfraredViewer – Demonstrate obtain left and right IR data of binocular cameras
- SensorControl – Demonstrate the operation of device, sensor control commands
- DepthWorkMode – Demonstrate get current depth work mode, obtain supported depth work mode list, switch depth work mode.
- Hotplugin – Demonstrate device hot-plug monitoring, automatically connect the device to open depth streaming when the device is online, and automatically disconnect the device when it detects that the device is offline
- PointCloud – Demonstrate the generation of depth point cloud or RGBD point cloud and save it as ply format file
- NetDevice – Demonstrates the acquisition of depth and color data through network mode
- FirmwareUpgrade – Demonstrate upgrade device firmware
- CommonUsages – Demonstrate the setting and acquisition of commonly used control parameters
- IMUReader – Get IMU data and output display
- SyncAlignViewer – Demonstrate operations on sensor data stream alignment
Most of the samples are available in both C and C++ languages, but some have only been written in either one of the languages.
Let’s run the most basic sample:
|
1 2 3 4 5 6 7 8 9 10 11 12 13 14 15 16 17 18 19 20 21 22 23 |
jaufranc@Khadas-Mind-CNX:~/edev/OrbbecSDK_v1.8.3/Example/build/bin$ ./hello_orbbec SDK version: 1.8.3 SDK stage version: main [01/20 14:42:22.214994][info][31868][Context.cpp:67] Context created with config: default config! [01/20 14:42:22.215000][info][31868][Context.cpp:72] Context work_dir=/home/jaufranc/edev/OrbbecSDK_v1.8.3/Example/build/bin [01/20 14:42:22.295390][info][31868][LinuxPal.cpp:110] Create PollingDeviceWatcher! [01/20 14:42:22.295405][info][31868][DeviceManager.cpp:15] Current found device(s): (1) [01/20 14:42:22.295410][info][31868][DeviceManager.cpp:24] - Name: Femto Mega, PID: 0x0669, SN/ID: , Connection: USB3.2 [01/20 14:42:22.295486][error][31868][ObV4lDevice.cpp:594] ObV4lDevice constructed. [01/20 14:42:22.313301][info][31868][FemtoMegaUvcDevice.cpp:50] FemtoMega UVC device created! PID: 0x0669, SN: CL2AA31000P [01/20 14:42:22.313309][info][31868][DeviceManager.cpp:154] Device created successfully! Name: Femto Mega, PID: 0x0669, SN/ID: Device name: Femto Mega Device pid: 1641 vid: 11205 uid: 2-3-6 Firmware version: 1.1.5 Serial number: CL2AA31000P ConnectionType: USB3.2 Sensor types: IR sensor Color sensor Depth sensor Accel sensor Gyro sensor Press ESC_KEY to exit! |
This shows the device name, firmware version, serial number, connection type, and sensors.
For reference, here’s the C source code for the “hello orbbec” program in Example/c/Sample-HelloOrbbec:
|
1 2 3 4 5 6 7 8 9 10 11 12 13 14 15 16 17 18 19 20 21 22 23 24 25 26 27 28 29 30 31 32 33 34 35 36 37 38 39 40 41 42 43 44 45 46 47 48 49 50 51 52 53 54 55 56 57 58 59 60 61 62 63 64 65 66 67 68 69 70 71 72 73 74 75 76 77 78 79 80 81 82 83 84 85 86 87 88 89 90 91 92 93 94 95 96 97 98 99 100 101 102 103 104 105 106 107 108 109 110 111 112 113 114 115 116 117 118 119 120 121 122 123 124 125 126 127 128 129 130 131 132 133 134 135 136 137 138 139 140 141 142 143 144 145 146 |
#include <stddef.h> #include <stdio.h> #include <stdlib.h> #include "utils.hpp" #include <libobsensor/ObSensor.h> #define ESC_KEY 27 void check_error(ob_error *error) { if(error) { printf("ob_error was raised: \n\tcall: %s(%s)\n", ob_error_function(error), ob_error_args(error)); printf("\tmessage: %s\n", ob_error_message(error)); printf("\terror type: %d\n", ob_error_exception_type(error)); ob_delete_error(error); exit(EXIT_FAILURE); } } int main(int argc, char **argv) { // print sdk version number printf("SDK version: %d.%d.%d\n", ob_get_major_version(), ob_get_minor_version(), ob_get_patch_version()); // print sdk stage version printf("SDK stage version: %s\n", ob_get_stage_version()); // Create a Context. ob_error *error = NULL; ob_context *ctx = ob_create_context(&error); check_error(error); // Query the list of connected devices ob_device_list *dev_list = ob_query_device_list(ctx, &error); check_error(error); // Get the number of connected devices int dev_count = ob_device_list_device_count(dev_list, &error); check_error(error); if(dev_count == 0) { printf("Device not found!\n"); return -1; } // Create a device, 0 means the index of the first device ob_device *dev = ob_device_list_get_device(dev_list, 0, &error); check_error(error); // Get device information ob_device_info *dev_info = ob_device_get_device_info(dev, &error); check_error(error); // Get the name of the device const char *name = ob_device_info_name(dev_info, &error); check_error(error); printf("Device name: %s\n", name); // Get the pid, vid, uid of the device int pid = ob_device_info_pid(dev_info, &error); check_error(error); int vid = ob_device_info_vid(dev_info, &error); check_error(error); const char *uid = ob_device_info_uid(dev_info, &error); check_error(error); printf("Device pid: %d vid: %d uid: %s\n", pid, vid, uid); // Get the firmware version number of the device by const char *fw_ver = ob_device_info_firmware_version(dev_info, &error); check_error(error); printf("Firmware version: %s\n", fw_ver); // Get the serial number of the device const char *sn = ob_device_info_serial_number(dev_info, &error); check_error(error); printf("Serial number: %s\n", sn); // Get the connection type of the device const char *connectType = ob_device_info_connection_type(dev_info, &error); check_error(error); printf("ConnectionType: %s\n", connectType); printf("Sensor types: \n"); // Get a list of supported sensors ob_sensor_list *sensor_list = ob_device_get_sensor_list(dev, &error); check_error(error); // Get the number of sensors int sensor_count = ob_sensor_list_get_sensor_count(sensor_list, &error); check_error(error); for(int i = 0; i < sensor_count; i++) { // Get sensor type ob_sensor_type sensor_type = ob_sensor_list_get_sensor_type(sensor_list, i, &error); check_error(error); switch(sensor_type) { case OB_SENSOR_COLOR: printf("\tColor sensor\n"); break; case OB_SENSOR_DEPTH: printf("\tDepth sensor\n"); break; case OB_SENSOR_IR: printf("\tIR sensor\n"); break; case OB_SENSOR_IR_LEFT: printf("\tIR Left sensor\n"); break; case OB_SENSOR_IR_RIGHT: printf("\tIR Right sensor\n"); break; case OB_SENSOR_ACCEL: printf("\tAccel sensor\n"); break; case OB_SENSOR_GYRO: printf("\tGyro sensor\n"); break; default: break; } } printf("Press ESC_KEY to exit! \n"); while(true) { // Get the value of the pressed key, if it is the esc key, exit the program int key = getch(); if(key == ESC_KEY) break; } // destroy sensor list ob_delete_sensor_list(sensor_list, &error); check_error(error); // destroy device info ob_delete_device_info(dev_info, &error); check_error(error); // destroy device ob_delete_device(dev, &error); // destroy context ob_delete_context(ctx, &error); check_error(error); return 0; } |
And the C++ source code can be found in Example/cpp/Sample-HelloOrbbec:
|
1 2 3 4 5 6 7 8 9 10 11 12 13 14 15 16 17 18 19 20 21 22 23 24 25 26 27 28 29 30 31 32 33 34 35 36 37 38 39 40 41 42 43 44 45 46 47 48 49 50 51 52 53 54 55 56 57 58 59 60 61 62 63 64 65 66 67 68 69 70 71 72 73 74 75 76 77 78 79 80 81 82 83 84 85 86 87 88 89 90 91 92 93 94 |
#include <iostream> #include "utils.hpp" #include "libobsensor/ObSensor.hpp" #include "libobsensor/hpp/Error.hpp" #define ESC 27 int main(int argc, char **argv) try { // Print the sdk version number, the sdk version number is divided into major version number, minor version number and revision number std::cout << "SDK version: " << ob::Version::getMajor() << "." << ob::Version::getMinor() << "." << ob::Version::getPatch() << std::endl; // Print sdk stage version std::cout << "SDK stage version: " << ob::Version::getStageVersion() << std::endl; // Create a Context. ob::Context ctx; // Query the list of connected devices auto devList = ctx.queryDeviceList(); // Get the number of connected devices if(devList->deviceCount() == 0) { std::cerr << "Device not found!" << std::endl; return -1; } // Create a device, 0 means the index of the first device auto dev = devList->getDevice(0); // Get device information auto devInfo = dev->getDeviceInfo(); // Get the name of the device std::cout << "Device name: " << devInfo->name() << std::endl; // Get the pid, vid, uid of the device std::cout << "Device pid: " << devInfo->pid() << " vid: " << devInfo->vid() << " uid: " << devInfo->uid() << std::endl; // By getting the firmware version number of the device auto fwVer = devInfo->firmwareVersion(); std::cout << "Firmware version: " << fwVer << std::endl; // By getting the serial number of the device auto sn = devInfo->serialNumber(); std::cout << "Serial number: " << sn << std::endl; // By getting the connection type of the device auto connectType = devInfo->connectionType(); std::cout << "ConnectionType: " << connectType << std::endl; // Get the list of supported sensors std::cout << "Sensor types: " << std::endl; auto sensorList = dev->getSensorList(); for(uint32_t i = 0; i < sensorList->count(); i++) { auto sensor = sensorList->getSensor(i); switch(sensor->type()) { case OB_SENSOR_COLOR: std::cout << "\tColor sensor" << std::endl; break; case OB_SENSOR_DEPTH: std::cout << "\tDepth sensor" << std::endl; break; case OB_SENSOR_IR: std::cout << "\tIR sensor" << std::endl; break; case OB_SENSOR_IR_LEFT: std::cout << "\tIR Left sensor" << std::endl; break; case OB_SENSOR_IR_RIGHT: std::cout << "\tIR Right sensor" << std::endl; break; case OB_SENSOR_GYRO: std::cout << "\tGyro sensor" << std::endl; break; case OB_SENSOR_ACCEL: std::cout << "\tAccel sensor" << std::endl; break; default: break; std::cout << "Press ESC to exit! " << std::endl; while(true) { // Get the value of the pressed key, if it is the esc key, exit the program int key = getch(); if(key == ESC) break; } return 0; } catch(ob::Error &e) { std::cerr << "function:" << e.getName() << "\nargs:" << e.getArgs() << "\nmessage:" << e.getMessage() << "\ntype:" << e.getExceptionType() << std::endl; exit(EXIT_FAILURE); } |
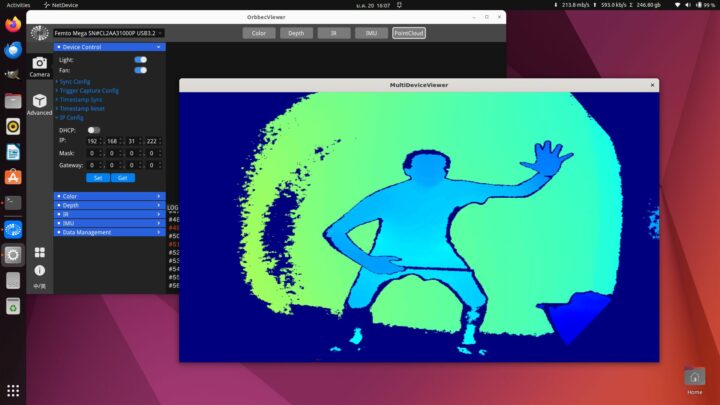
I wanted to test the NetDevice application next since I didn’t try the Ethernet port with OrbbecViewer. The IP address still needs to be set in OrbbecViewer since DHCP did not work in version 1.8.3, so I to use fixed IP. Note that OrbecViewer fixes that issue.
We can run the application and enter the IP address we’ve defined in OrbbecViewer:
|
1 2 3 4 5 6 7 8 9 10 11 12 13 14 15 16 17 18 |
jaufranc@Khadas-Mind-CNX:~/edev/OrbbecSDK_v1.8.3/Example/build/bin$ ./NetDevice [01/20 15:02:27.825366][info][31997][Context.cpp:67] Context created with config: default config! [01/20 15:02:27.825374][info][31997][Context.cpp:72] Context work_dir=/home/jaufranc/edev/OrbbecSDK_v1.8.3/Example/build/bin [01/20 15:02:27.898646][info][31997][LinuxPal.cpp:110] Create PollingDeviceWatcher! [01/20 15:02:27.898712][info][31997][DeviceManager.cpp:15] Current found device(s): (1) [01/20 15:02:27.898725][info][31997][DeviceManager.cpp:24] - Name: Femto Mega, PID: 0x0669, SN/ID: , Connection: USB3.2 Input your device ip(default: 192.168.1.10):192.168.31.222 [01/20 15:12:10.281079][info][31997][FemtoMegaNetDevice.cpp:130] FemtoMega Net device created! PID: 0x0669, SN: CL2AA31000P [01/20 15:12:10.281132][info][31997][DeviceManager.cpp:102] create Net Device success! address=192.168.31.222, port=8090 [01/20 15:12:10.281210][info][31997][Pipeline.cpp:44] Pipeline created with device: {name: Femto Mega, sn: CL2AA31000P}, @0x564447B31B80 [01/20 15:12:10.281785][info][31997][FemtoMegaNetDevice.cpp:325] Depth sensor has been created! [01/20 15:12:10.282249][info][31997][FemtoMegaNetDevice.cpp:352] Color sensor has been created! [01/20 15:12:10.286253][info][31997][Pipeline.cpp:238] Try to start streams! [01/20 15:12:10.286357][info][31997][VideoSensor.cpp:590] start OB_SENSOR_DEPTH stream with profile: {type: OB_STREAM_DEPTH, format: OB_FORMAT_Y16, width: 640, height: 576, fps: 30} [01/20 15:12:11.346211][info][31997][VideoSensor.cpp:590] start OB_SENSOR_COLOR stream with profile: {type: OB_STREAM_COLOR, format: OB_FORMAT_H264, width: 1280, height: 720, fps: 30} [01/20 15:12:12.938254][info][31997][Pipeline.cpp:251] Start streams done! [01/20 15:12:12.938334][info][31997][Pipeline.cpp:234] Pipeline start done! Color Frame: index=0, timestamp=24458703Color Frame: index=30, timestamp=24459685Color Frame: index=60, timestamp=24460667Color Frame: index=60, timestamp=24460667Color Frame: index=90, timestamp=24461649Color Frame: index=90, timestamp=24461649Color Frame: index=120, timestamp=24462631Color Frame: index=180, timestamp=24464596Color Frame: index=210, timestamp=24465578Color Frame: index=240, timestamp=24466560Color Frame: index=270, timestamp=24467543Color Frame: index=300, timestamp=24468525Color Frame: index=330, timestamp=24469507Color Frame: index=360, timestamp=24470489Color Frame: index=390, timestamp=24471471Color Frame: index=420, timestamp=24472454Color Frame: index=420, timestamp=24472454Color Frame: index=450, timestamp=24473436Color Frame: index=480, timestamp=24474418Color Frame: index=510, timestamp=24475400Color Frame: index=540, timestamp=24476383Color Frame: index=570, timestamp=24477365Color Frame: index=600, timestamp=24478347^C |
This will start a new window called “MultiDeviceViewer” with a representation of depth data.
Firmware upgrade
Since we have an older firmware (Firmware version: 1.1.5), I decided to upgrade it to a more recent version 1.2.8 released on GitHub just a few days ago.
|
1 2 |
wget https://github.com/orbbec/OrbbecFirmware/releases/download/Femto-Mega-Firmware/FemtoMega_20240103153450_v1.2.8_2b5db3b-489cbcd.tbz2 tar xvf FemtoMega_20240103153450_v1.2.8_2b5db3b-489cbcd.tbz2 |
We get a directory with a bunch of files, but the sample in the SDK does not seem to be designed for this as it’s expecting a bin file instead of a directory…
|
1 2 3 4 |
./FirmwareUpgrade Please input firmware path. command: $ ./FirmwareUpgrade[.exe] firmwareFile.bin |
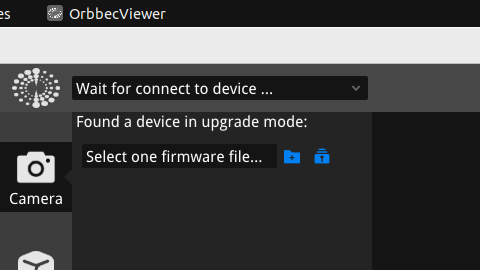
Playing it safe I decided to do the update with the latest version of OrbbecViewer (1.9.3) and follow the instructions provided on GitHub. We need a micro USB to USB-A cable to do the update. It’s not provided with the kit, so I use the cable that comes with my headphones for charging. So I connected the micro USB cable to the Khadas Mind, inserted a needle in the “Registration Pin” pinhole, and connected the USB-C cable for power, before removing the needle. But nothing happened.
After several tries, I decided to look for another micro USB cable, and this time the OrbbecViewer “found a device in upgrade mode”. It probably failed the first time because my headphones’ micro USB cable likely lacks data wires… It wasted a little over 30 minutes on this.
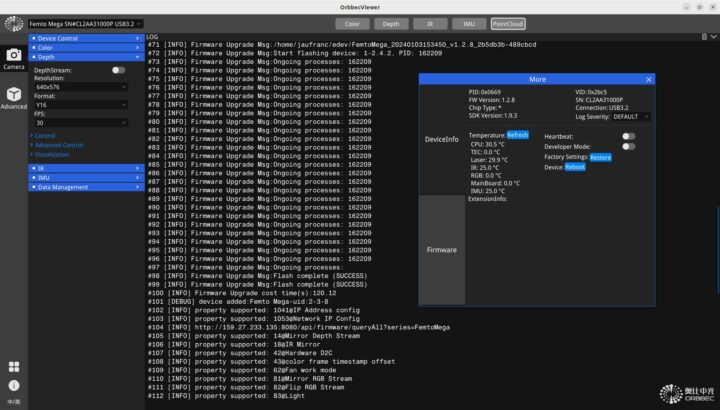
But I then selected “one firmware file”, which really means “one firmware directory” and could complete the update successfully in two minutes.
After the update, I could confirm the camera was still working normally and noted some improvements such as DHCP working and the IMU was now supported properly.
Femto Mega’s Body Tracking sample with Unity (Windows 11)
I was first expecting to be able to run high-level samples such as body segmentation with the Orbbec SDK, but all samples are pretty much low-level ones showing how to get data from the Femto Mega camera, but not do something useful with it.
The Femto Mega, and some other Orbbec cameras, are compatible with Microsoft Azure Kinect and Microsoft provides several samples including a Body Tracking demo that works with Unity and can enable applications such as people counting, fall detection, etc… But we’re told the following:
Due to the samples being provided from various sources they may only build for Windows or Linux. To keep the barrier for adding new samples low we only require that the sample works in one place.
The body tracking sample looks to only work in Windows since it involved running a bat script, and no other script is present. So I’ll reboot the Khadas Mind into Windows 11… and give it a try.
The first step of the instructions read as follows:
Open the sample_unity_bodytracking project in Unity. Open the Visual Studio Solution associated with this project. If there is no Visual Studio Solution yet you can make one by opening the Unity Editor and selecting one of the csharp files in the project and opening it for editing. You may also need to set the preferences->External Tools to Visual Studio
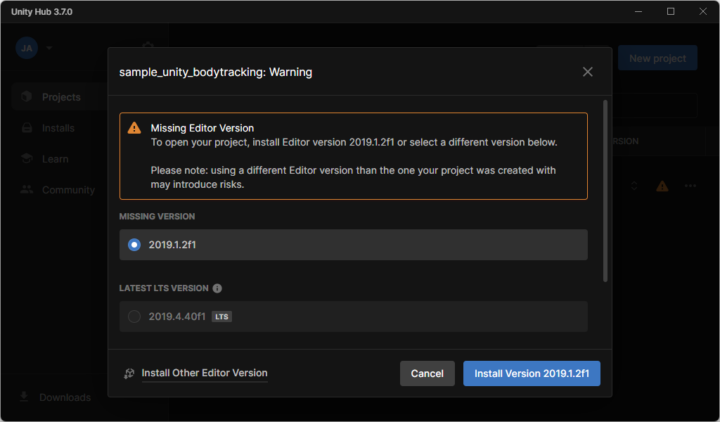
So I installed the latest version of Visual Studio (2022 CE) and Unity Editor (2022). But when I tried to add the Body Tracking demo project to Unity Hub, a “Missing Editor Version” warning popped up telling me to install Unity Editor 2019.1.2f1 instead…
Oh well, so I did that and it also installed Visual Studio 2017 automatically. So I removed both Unity 2022 and Visual Studio 2022 CE which I had installed to avoid potential conflicts.
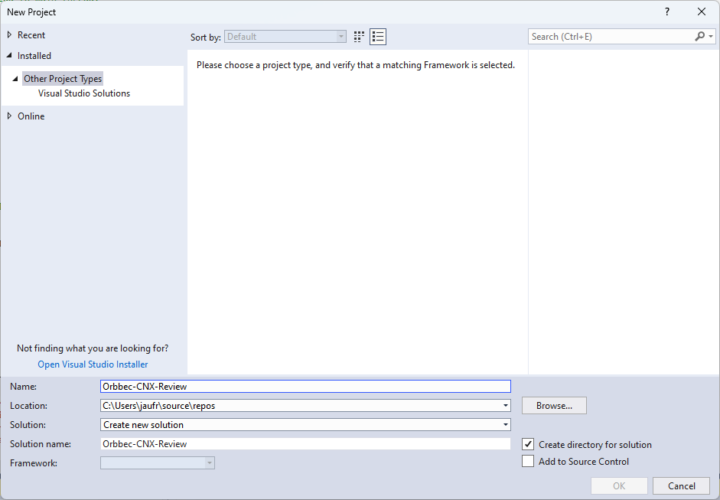
I could open the project in Unity. The next step was to find a CSharp file and click on it to open Visual Studio. There was no “Solution” in VS, and it took me a little while to find out what it meant. So I had to go to the top menu to create a New Project, select “Visual Studio Solutions”, and give it a name.
Once done, I could add the body tracking sample to the Solution. At this point, I’m supposed to go to Tools->NuGet Package Manager-> Package Manager Console. But there’s nothing called NuGet Package Manager. That’s because it needs to be installed via “Tools->Get Tools and Features”. All good. I could then start the console and type:
|
1 |
Update-Package -reinstall |
The first time it failed because I had not created a Solution. Then something failed again (not sure in Unity or Visual Studio, that was 10 days ago…) because of path length limitations in Windows… I had checked out of the GitHub repo in Documents/Orbbec, so I extracted the sample project in a directry in C:\ to shorten the path length and that part now works…
The next part of the instructions is a bit insane. You have to copy a bunch of files (around 30) from various directories. But luckily a script “MoveLibraryFile.bat” is supposed to help with that. The Visual C++ Redistributable must be installed too, and some other files must be copied manually.
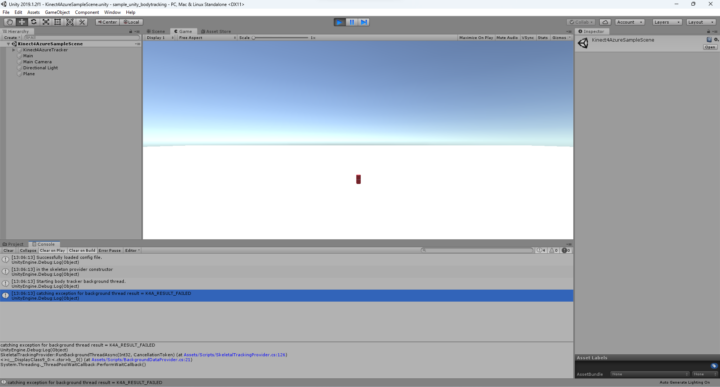
The “\sample_unity_bodytracking\Assets\Scripts\SkeletalTrackingProvider.cs” file supports several tracking modes for rendering on the host machine and it is set to TrackerProcessingMode.GPU, which means DirectML in Windows, and I did not change that initially. The final step is to open the Unity Project, select Kinect4AzureSampleScene under Scenes, and click on the play button at the top. In theory, I can now dance in front of the camera and the system will track my movements.
But it failed with the error “catching exception for background thread result = K4A_RESULTS_FAILED” and nothing happened. The error message is pretty much useless and failed to find a solution, so I asked on Orbbec Forums and was told to use the CPU renderer instead:
|
1 |
ProcessingMode = TrackerProcessingMode.Cpu |
I did that, but still no luck. So I printed the file of files in the documentation and checked them one by one. All were there. I eventually contacted the PR company that arranged the sample and was put in contact with Orbbec engineers. After a few back-and-forth, I received the project folder from one of the engineers are could make it work.
I was initially confused because of the Timeout error shown above. After clicking on Play I waved my hand in front of the camera and nothing happened so I assumed it did not work. But it turns out the timeout message can be safely ignored, it takes a while for the program to start (5 seconds on Khadas Mind Premium), and you need to be at an adequate distance from the camera for this to work properly.
CPU rendering is a bit slow (so there’s a lag), but Orbbec confirmed GPU rendering is not working right now. You can see some of my Kung Fu moves and a Wai greeting in the video below.
The issue with my project was that I clicked the wrong link in Orbbec documentation and it led me to Microsoft’s official Azure Kinet samples instead of the fork by Orbbec. The fun part is that I had installed the Microsoft sample in Windows while reading the documentation from the right repo in Linux… Anyway, it’s working now. I just wish overall documentation was more clear and error messages in Unity were more relevant… The body tracking sample can serve as a starting point to develop fall detection solutions or games based on the Femto Mega 3D depth camera.
I’d like to thank Orbbec for sending the Femto Mega 3D depth camera for review. The camera can be purchased on Amazon for $909, but at this time it’s cheaper to purchase it on Orbbec’s website for $694.99.

Jean-Luc started CNX Software in 2010 as a part-time endeavor, before quitting his job as a software engineering manager, and starting to write daily news, and reviews full time later in 2011.
Support CNX Software! Donate via cryptocurrencies, become a Patron on Patreon, or purchase goods on Amazon or Aliexpress


