
GeekBox is both an Android TV box based on Rockchip RK3368 octa-core processor, and a Linux development kit thanks to the CPU module inside the device, a baseboard and various accessories. The company has sent me a review sample, as well as the accessories currently available. So today, I’ll have a look at the box, and show how to connect everything together.
GeekBox TV Box Unboxing
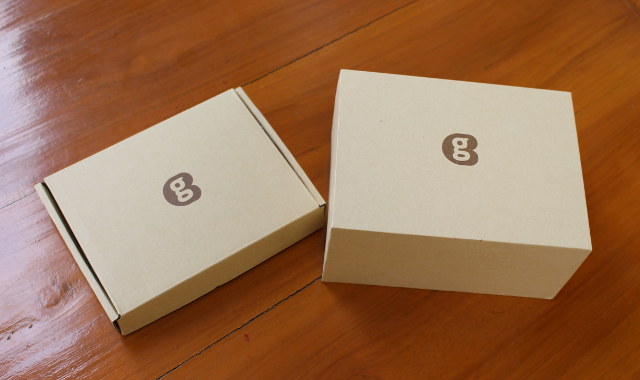
I’ve received two carton boxes via DHL, one with GeekBox itself, and the other with some accessories.
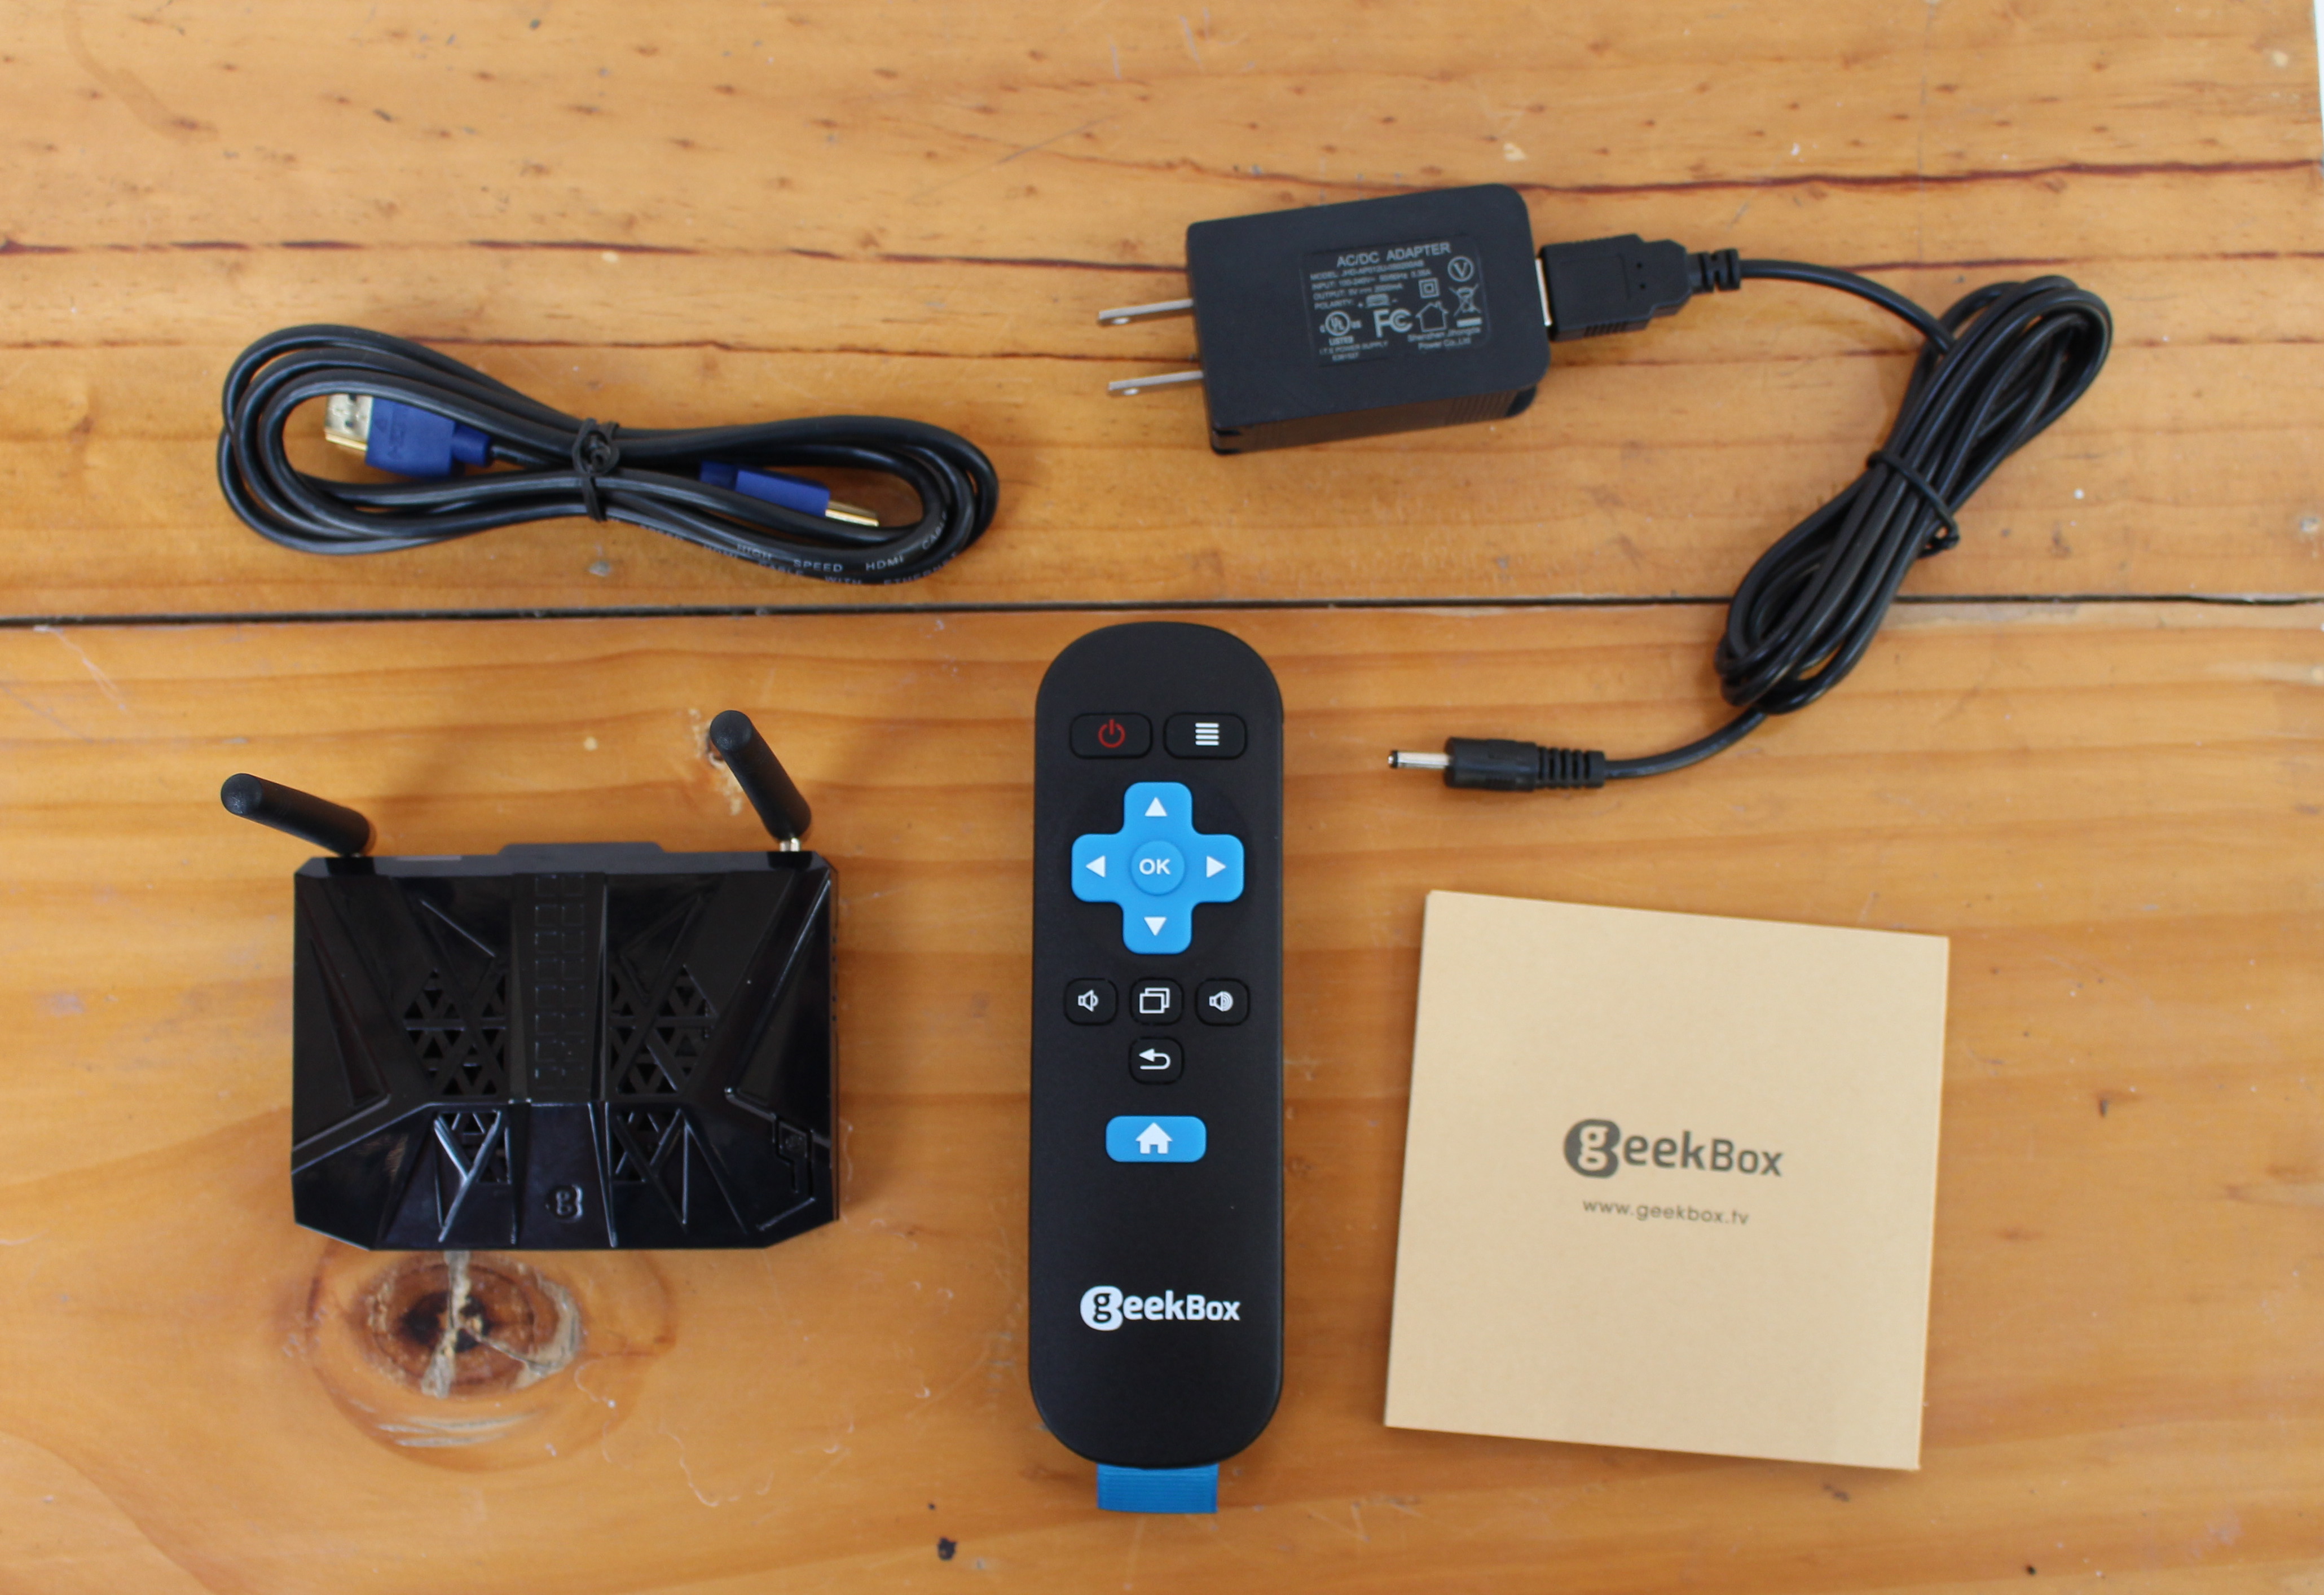
 You could use GeeBox has a TV box, and forget about its development attributes, as the device comes with the usual accessories include a case, an HDMI cable, an infrared remote control, and a 5V/2A power supply.
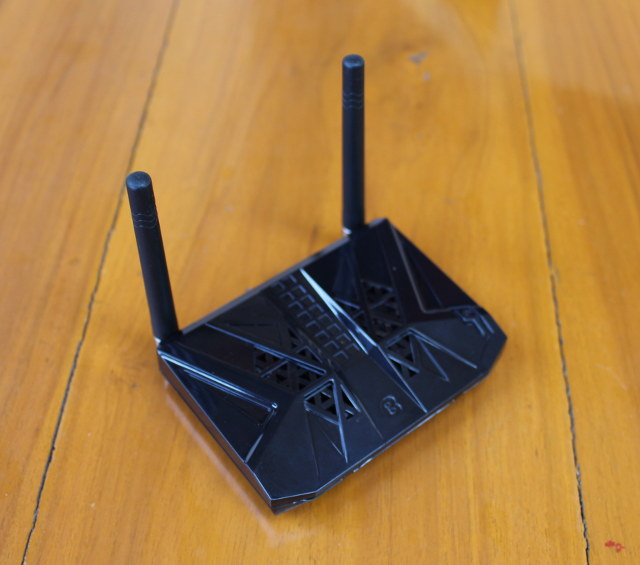
I was really surprised by how small it was compared to other 64-bit ARM TV boxes recently launched on the market, and looks very much like a small router with its two antennas.
When you look the user’s manual, you quickly realized the GeekBox is targeting… Geeks, as it shows the actual board and description of the external and internal interfaces and ports.

You’ll get all of this if you buy the GeekBox, but you may want to add Landingship baseboard and some add-on boards to your purchase to have some more fun.
LandingShip and Geekbox’ Add-ons
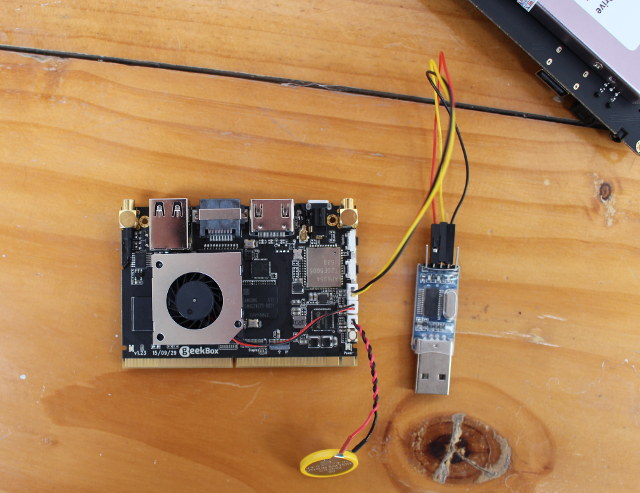
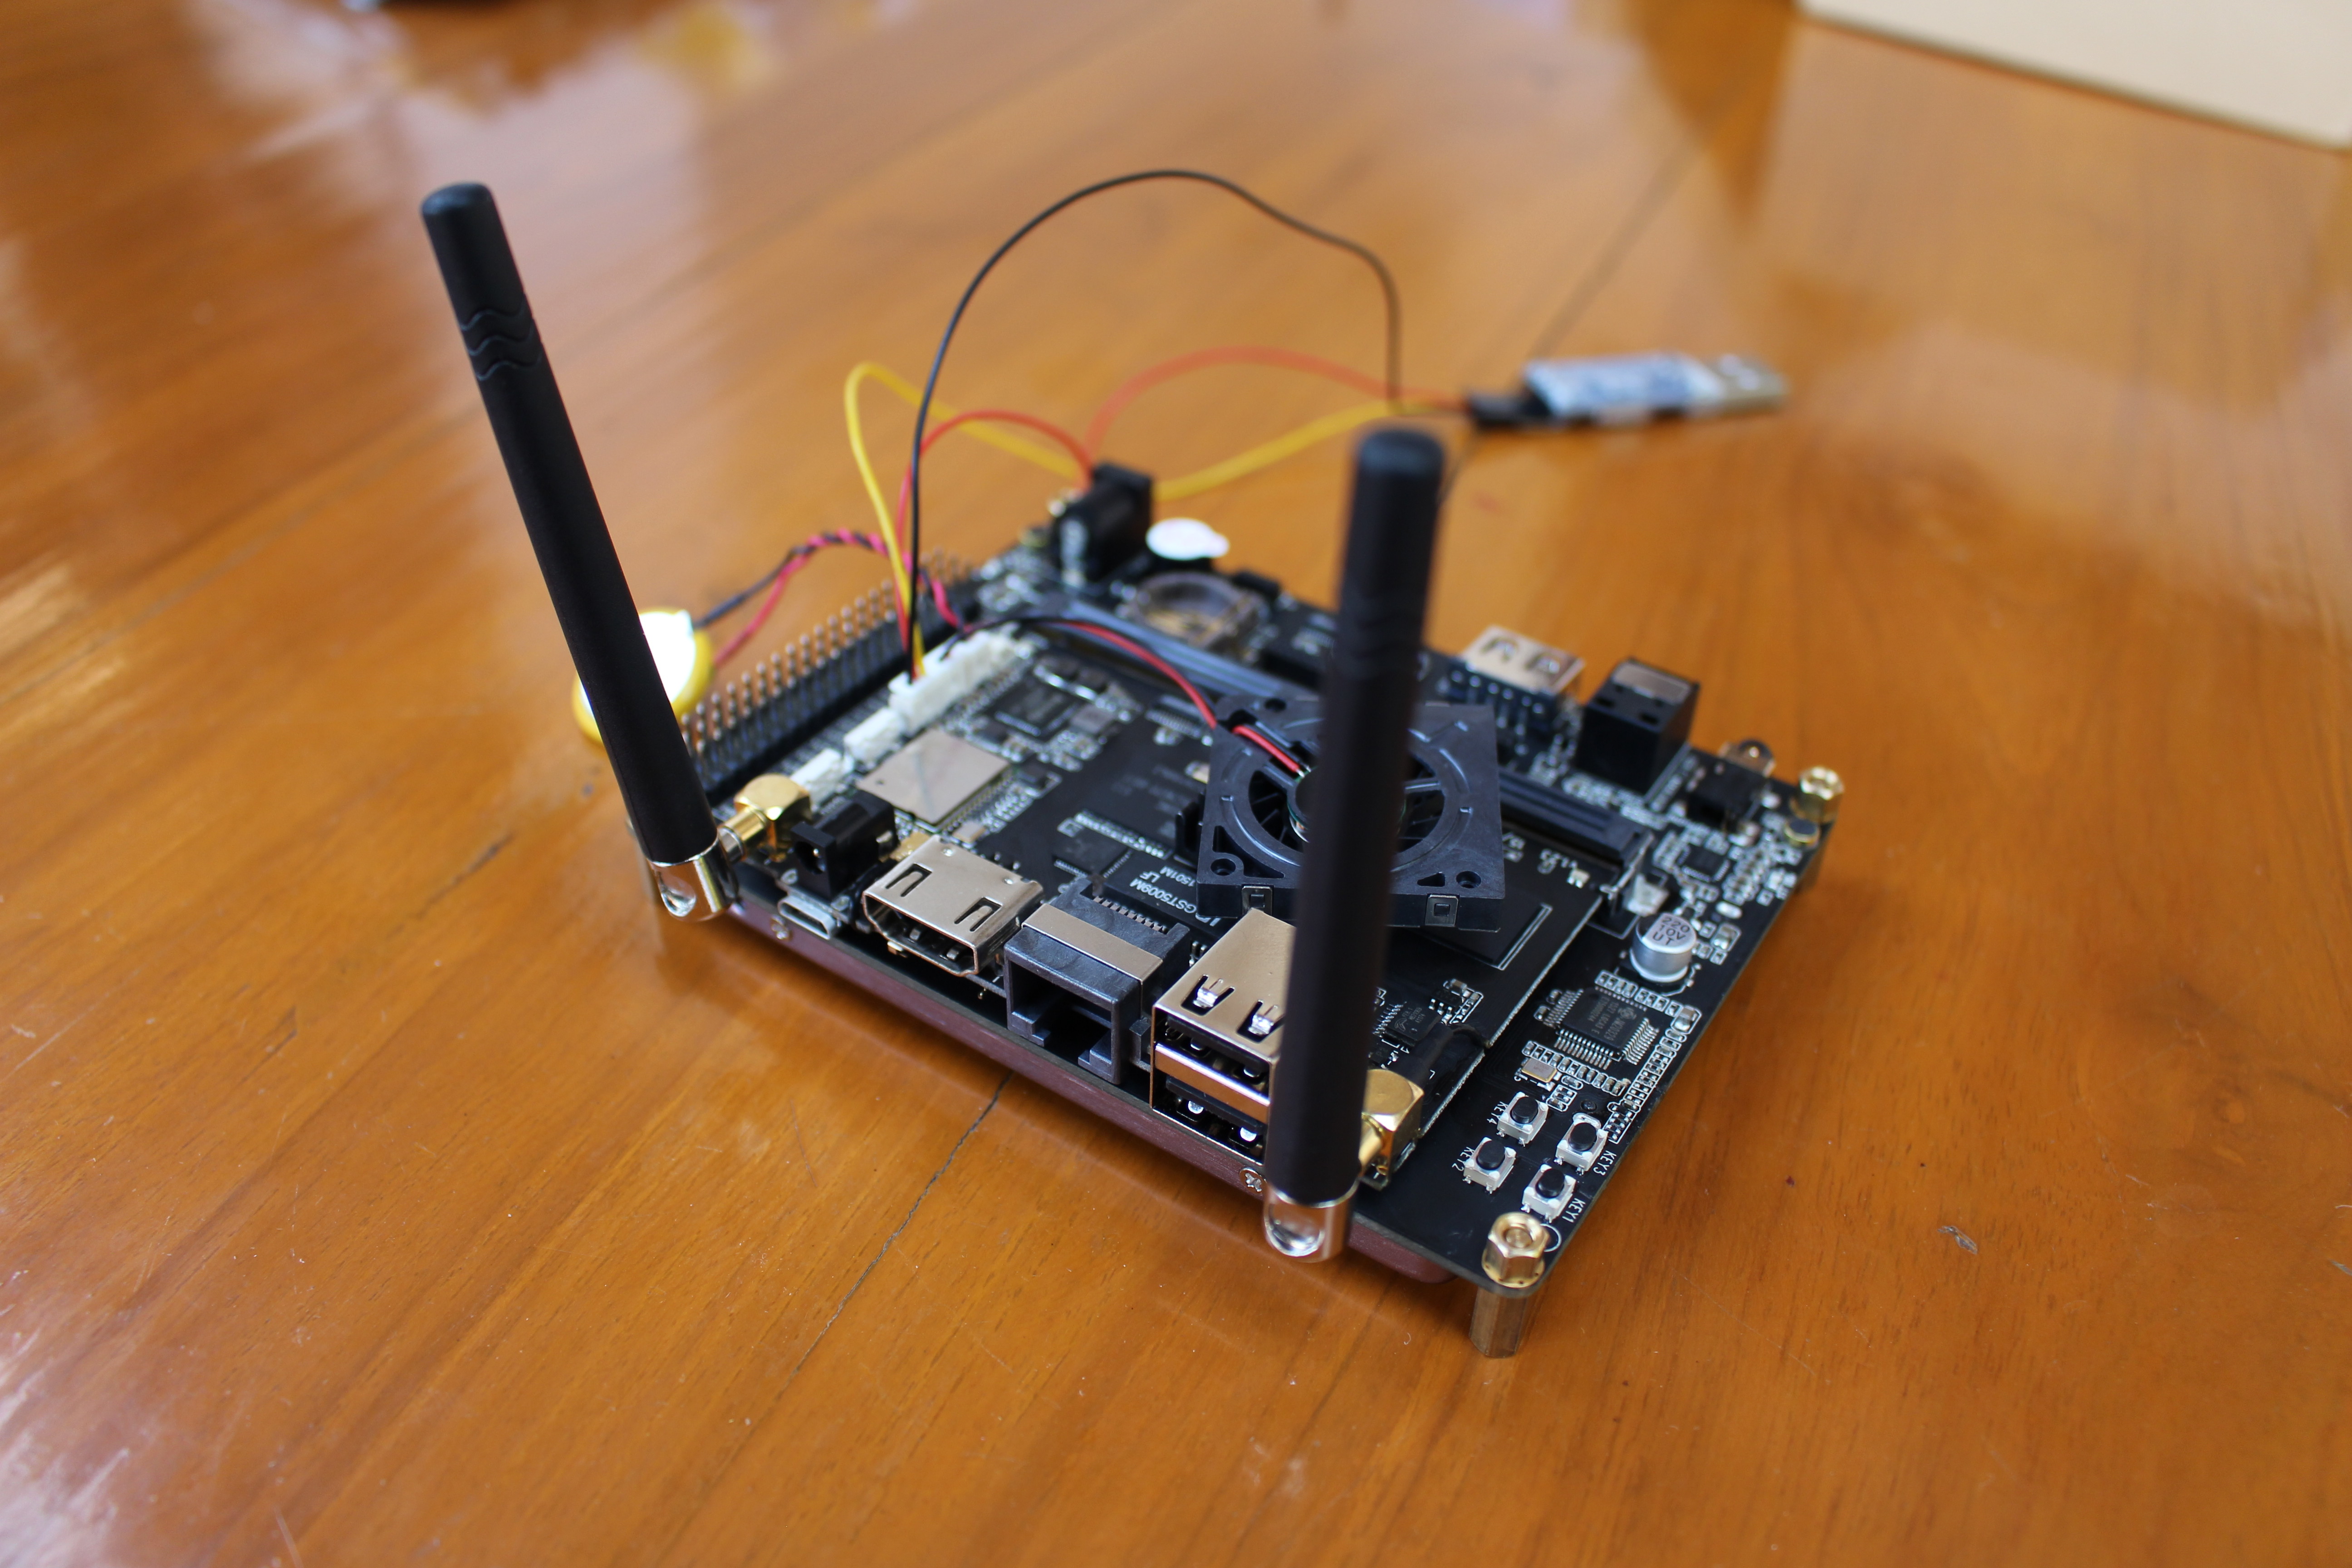
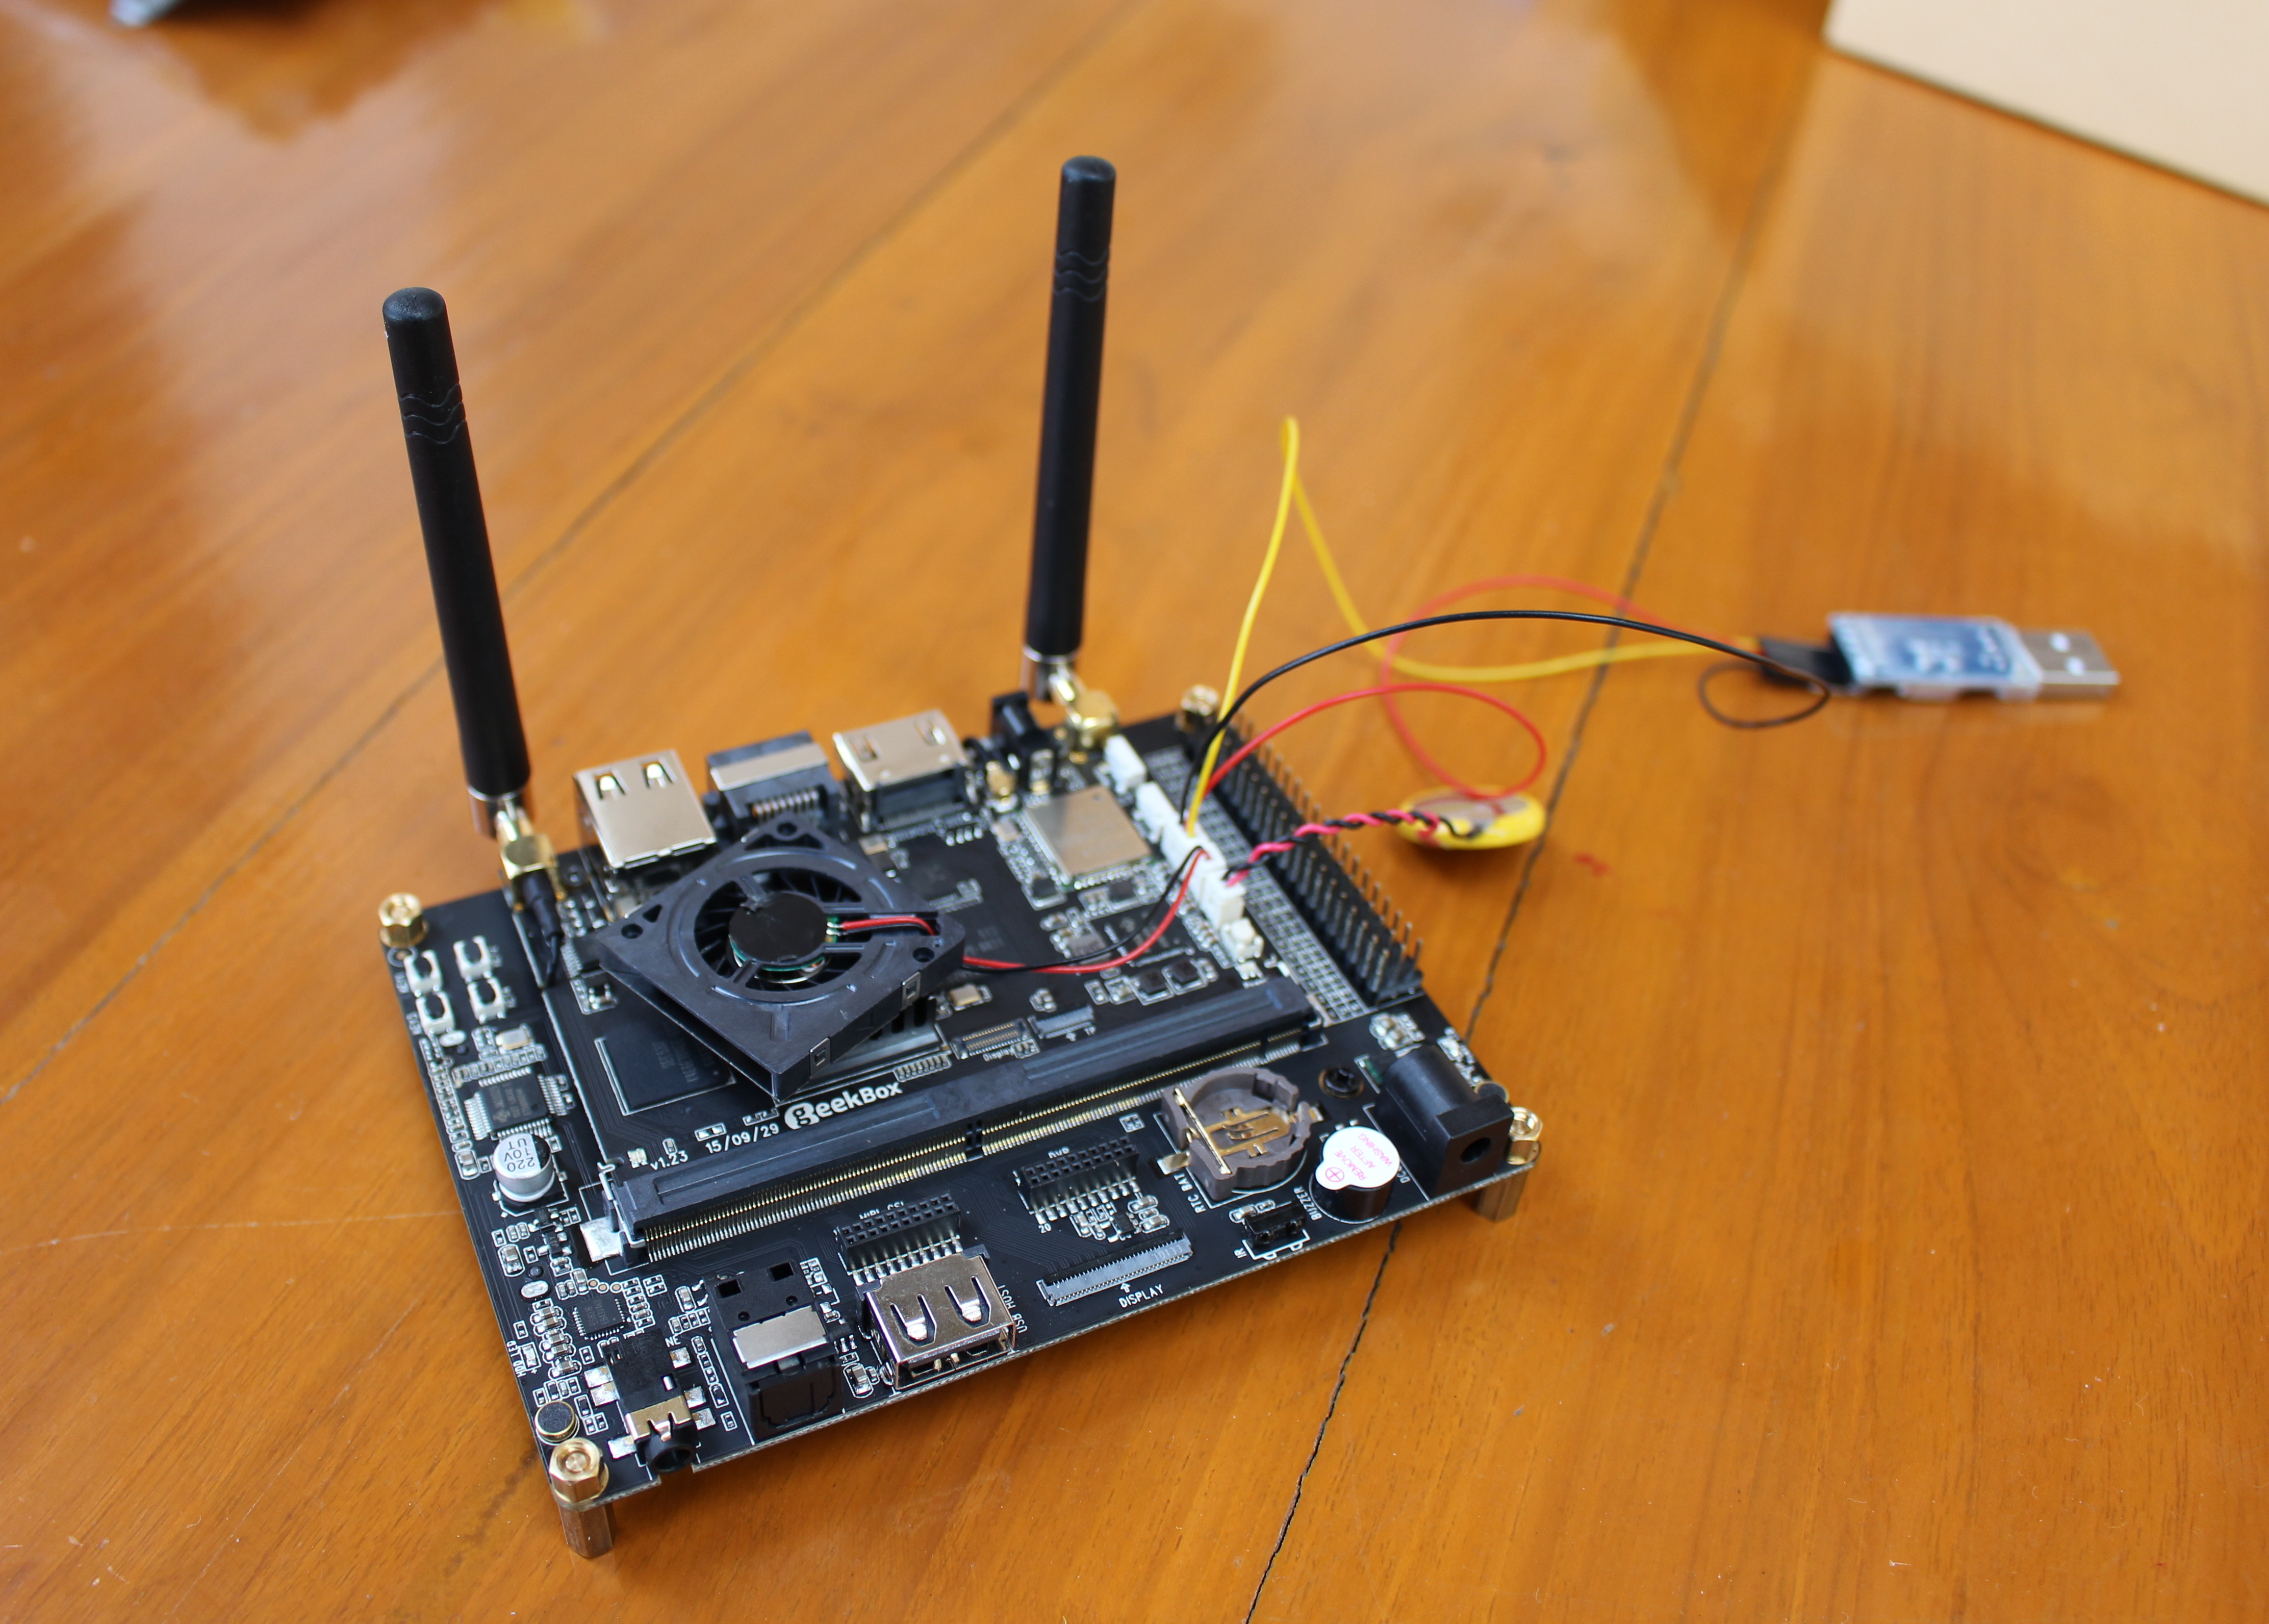
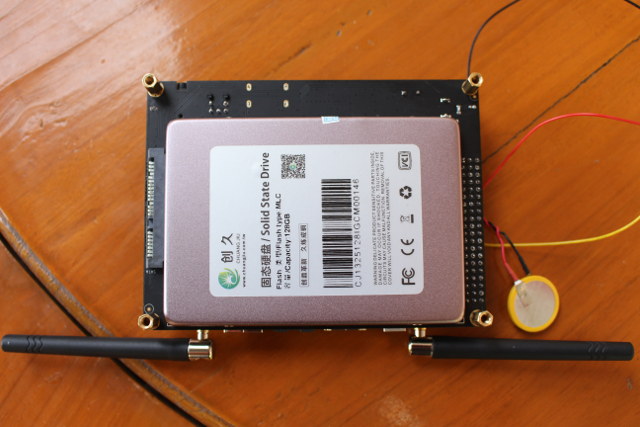
Some GeekBuying sent me the second box with a Landingship carrier board (aka baseboard) with four spacers and nuts, and two black screws for 2.5″ SATA drives, as well as a CR2032 battery, a cooling fan, and a USB to TTL debug board with 3 wires for GND, Tx and Rx.
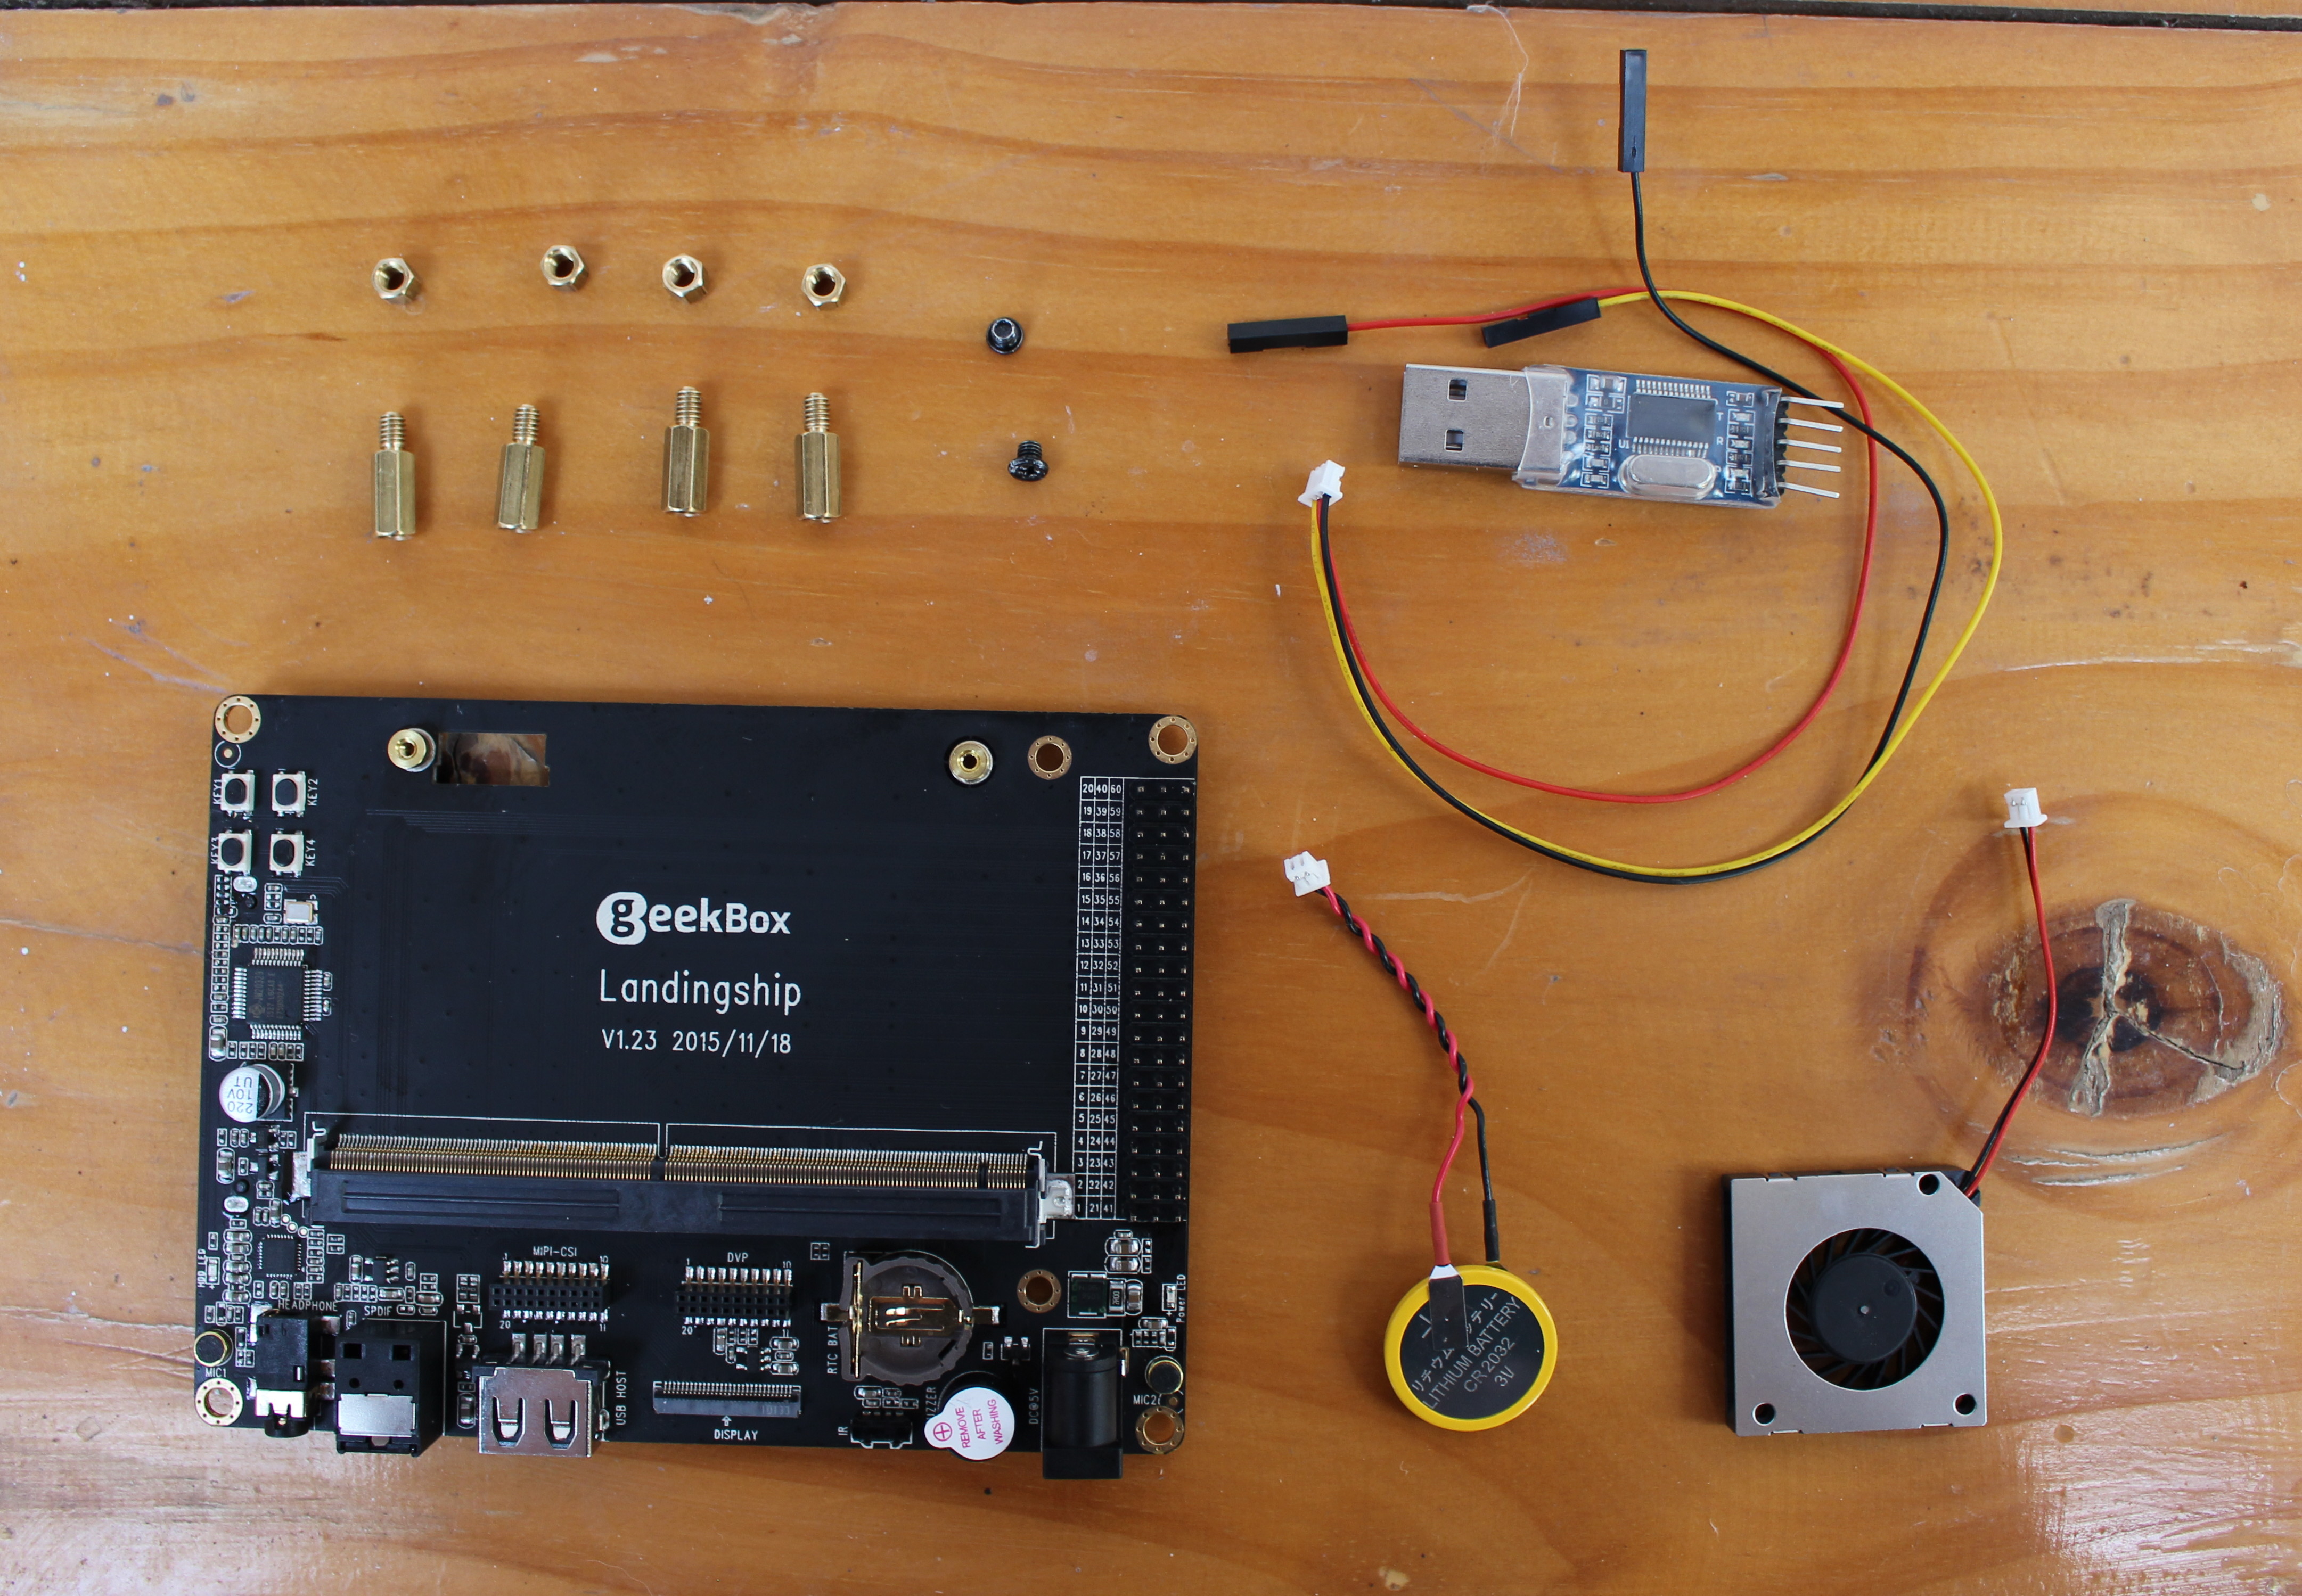
The Landingship feature a large MXM3 connector for GeekBox module, a 3x 20-pin expansion header, as well as MIPI-CSI, DVP, and Display headers. All ports are on the back with a 3.5mm audio jack, optical S/PDIF, USb port, IR receiver, and a power jack.
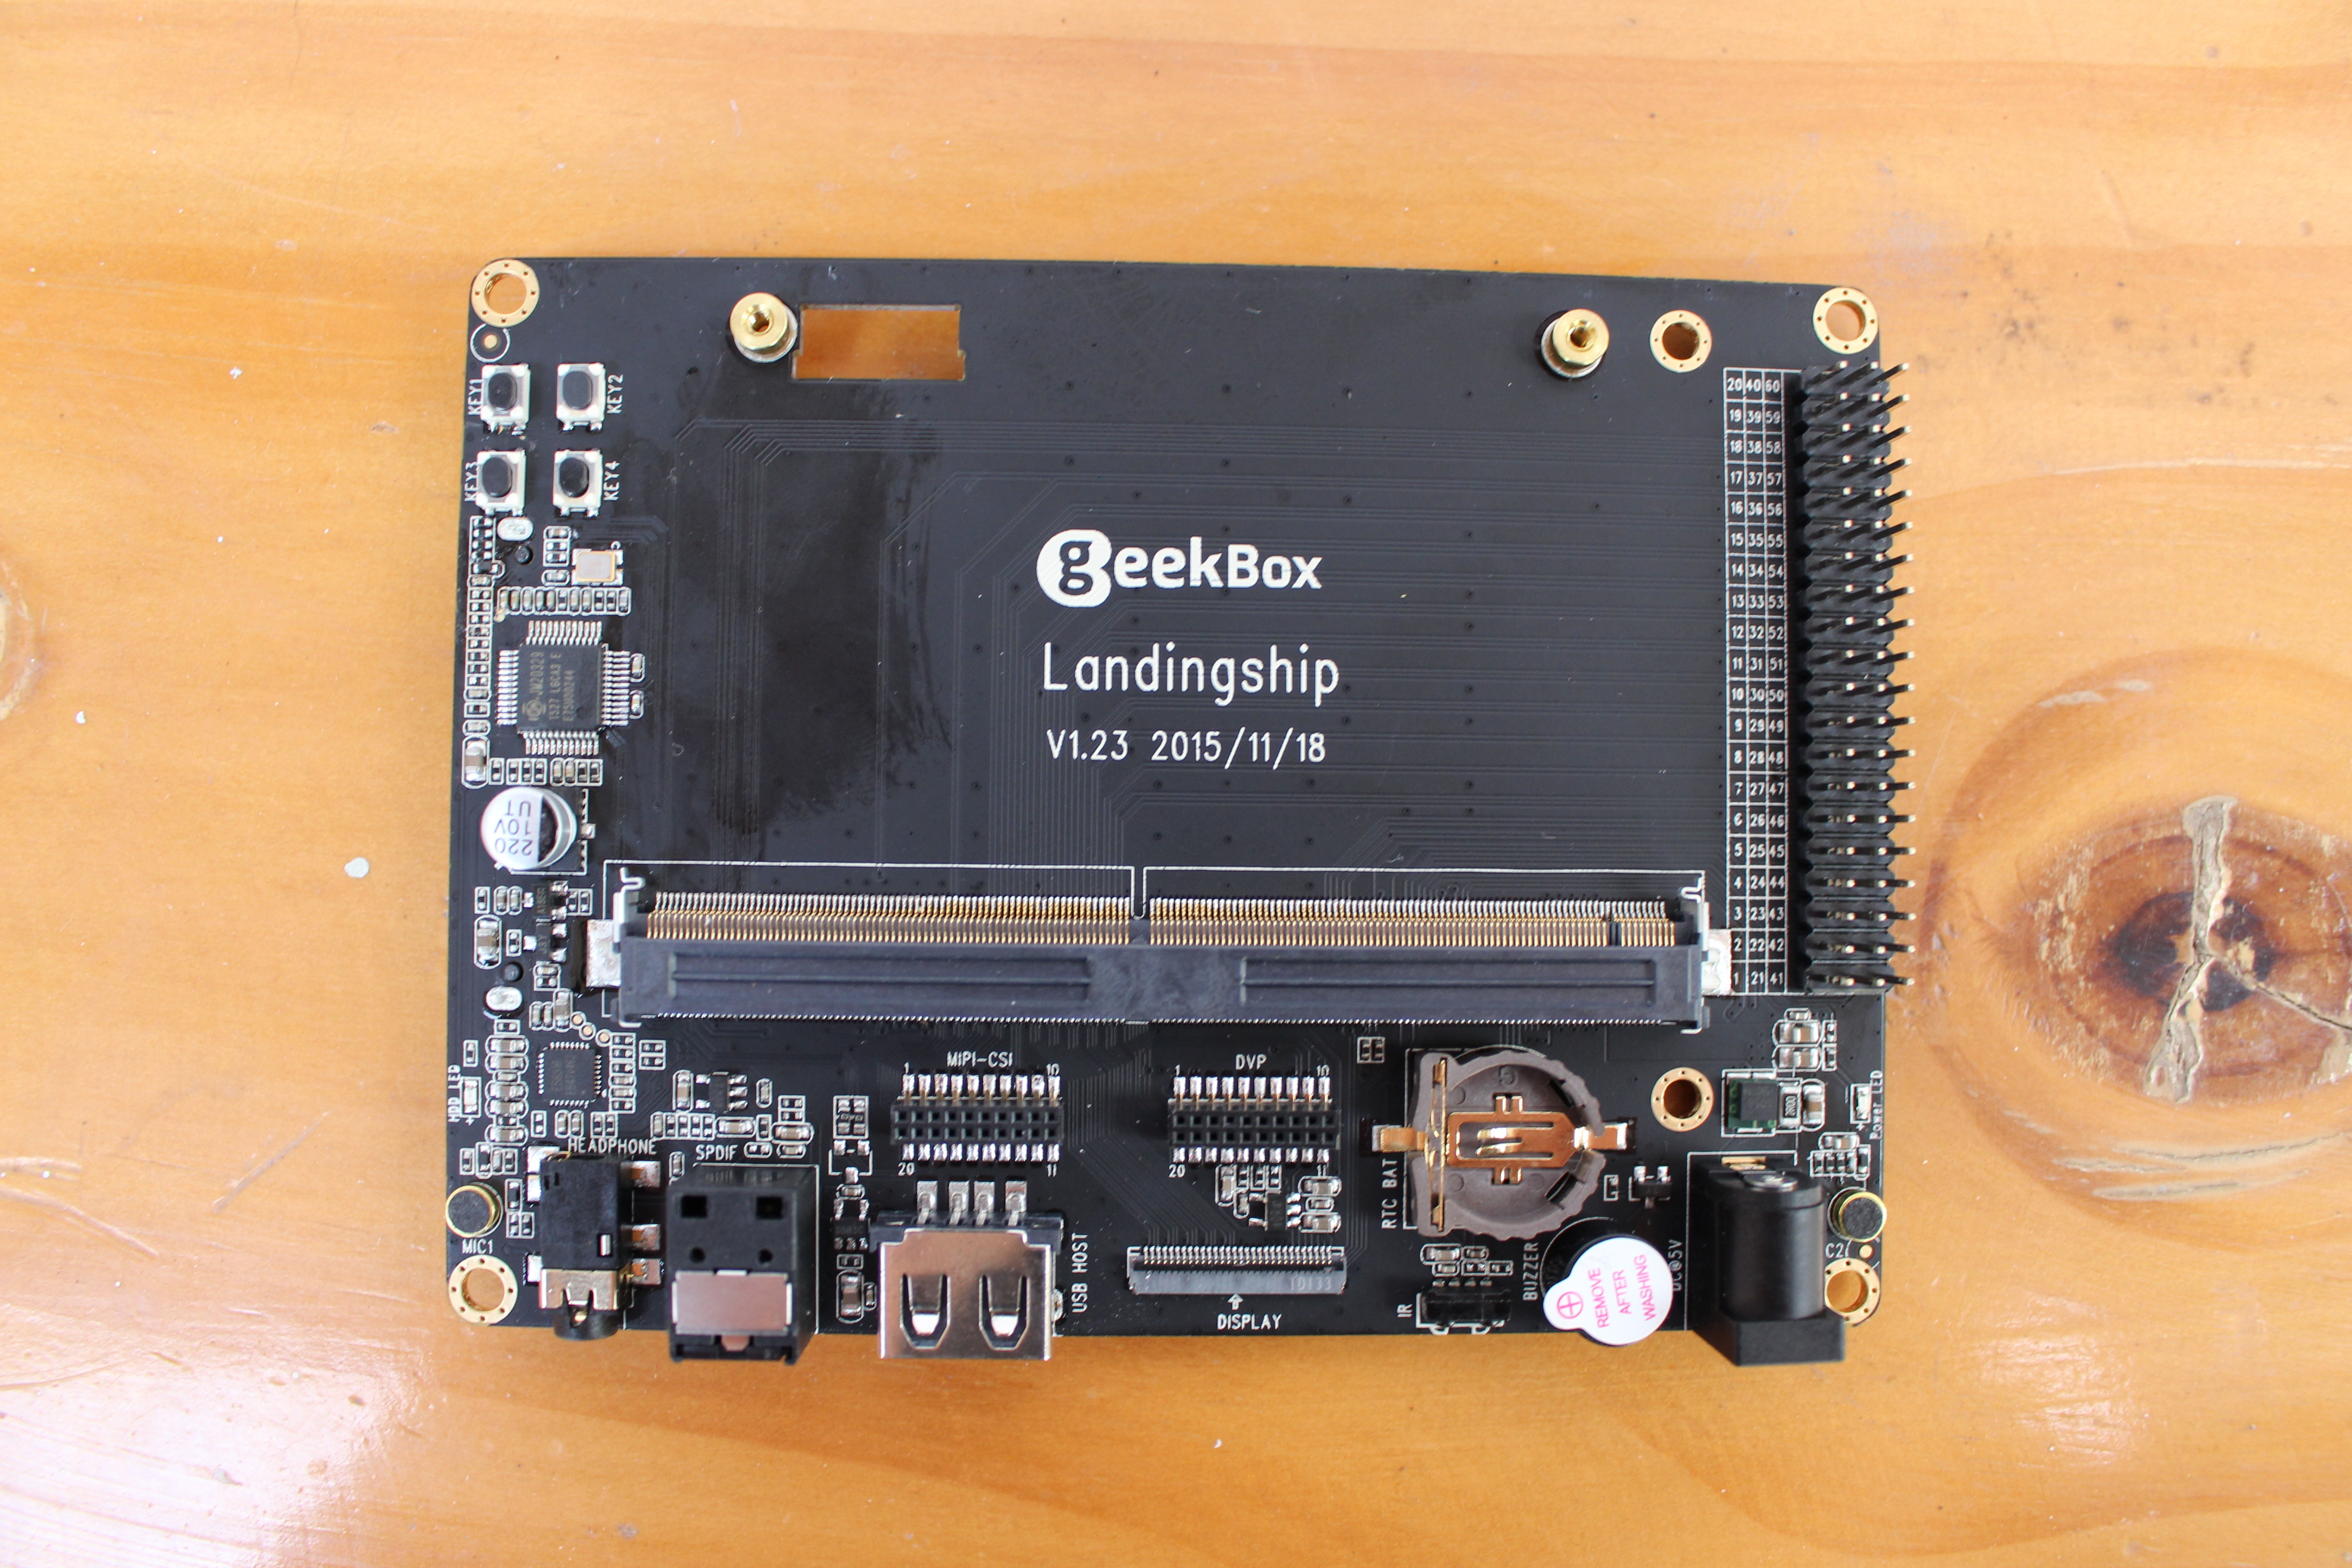
We’ll also find a buzzer, two microphone on each side of the battery, 4 user buttons, and a battery slot for RTC on the top of the board. There are only two noticeable chips on the board: JM20329 USB to SATA bridge, and ESS318 audio codec.
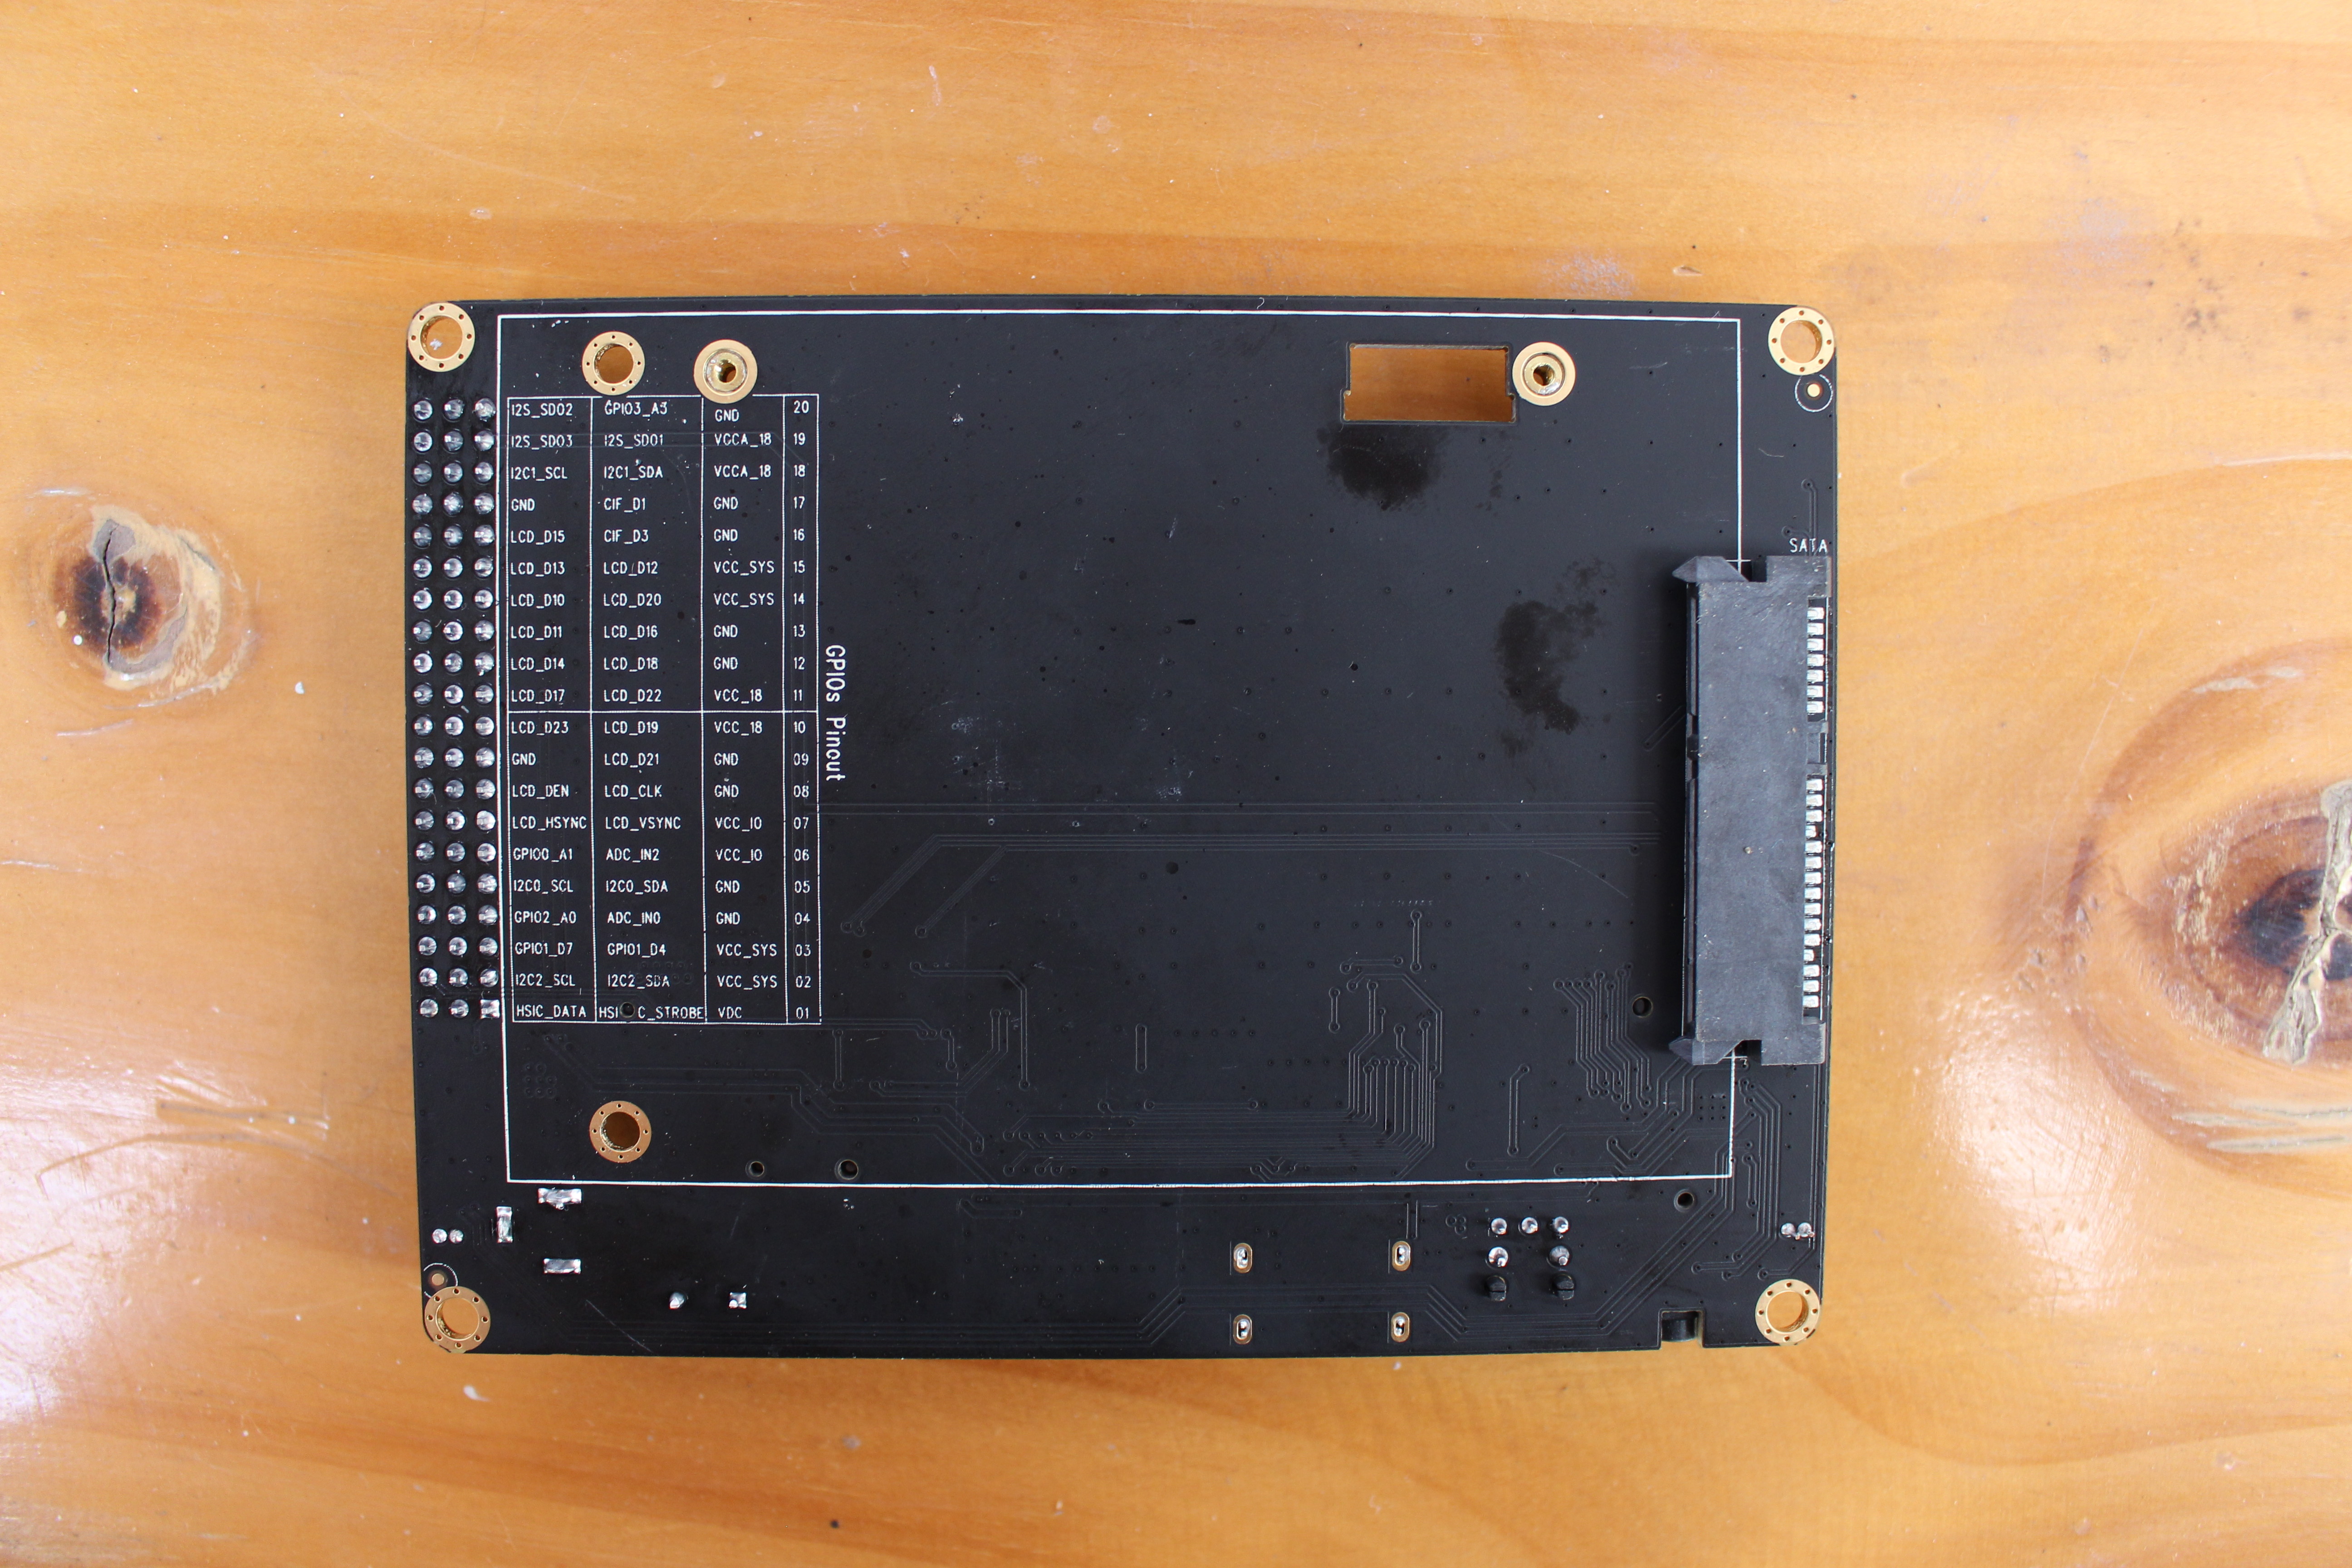
On the back of the board, we’ll find the GPIO header pin description, as well as the SATA connector for 2.5″ SSD or hard drive.
GeekBox Teardown
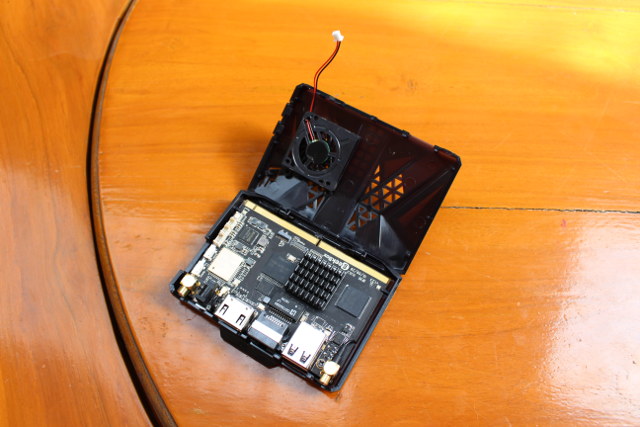
Before we can play with the development board, we need to open GeekBox to take out the board by pulling out the two WiFi antennas, and loosen two screws that hold the board/module to the plastic case.
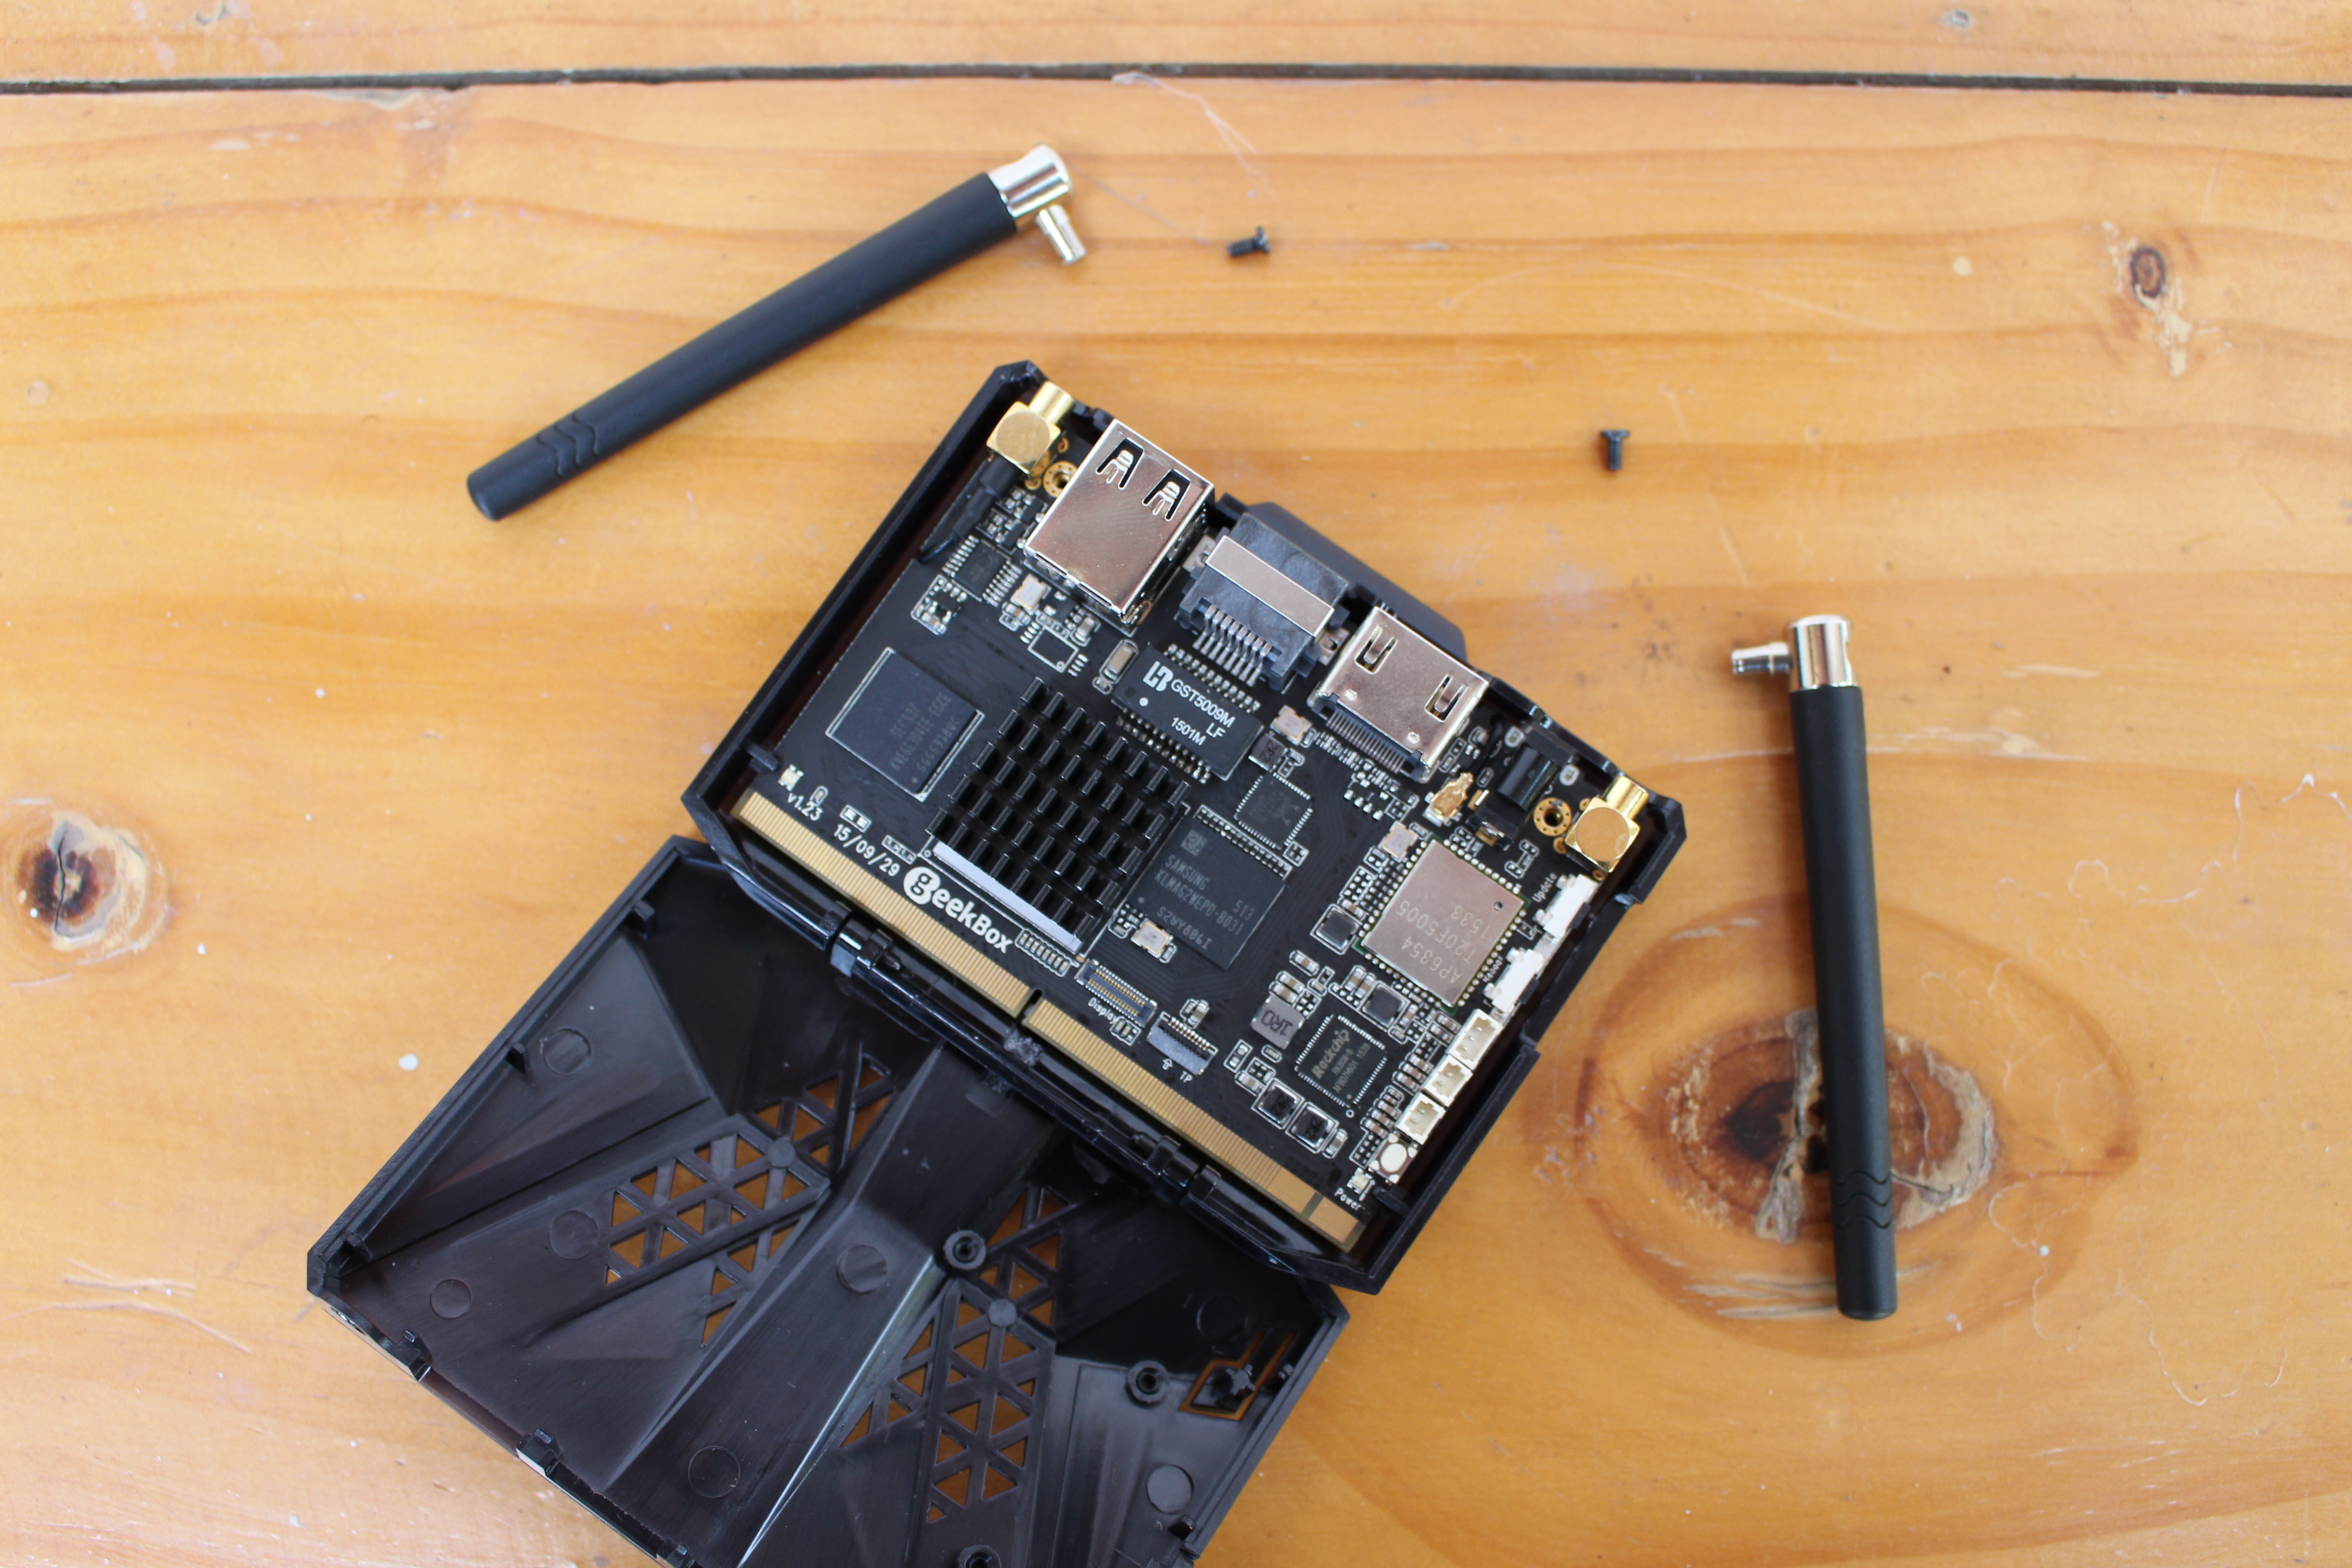
We can now have a clear look at GeekBox system-on-module with two USB 2.0 host ports, Gigabit Ethernet, HDMI 2.0 port, and the 5V power jack. Rockchip RK3368 SoC is covered by a small heatsink, and coupled with Samsung KLMAG2WEPD-B031 eMMC 5.0 flash with 16GB capacity and 150/12MB read and write sequential speed, as well as Samsung K4E6E304EE-EGCE LPDDR3 chip (2GB RAM).

Gigabit Ethernet is handled by the ubiquitous Realtek RTL8211F transceiver and GST5009M magnetics, while Ampak AP6354 wireless module takes care of 802.11ac WiFi up to 867 Mbps and Bluetooth 4.1 connectivity, and so both wired and wireless networking performance should really be good. Rockchip RK808 PMIC takes care of power management. There are also some connectors and headers on the board for display and touchscreen, RTC battery, and UART console as well as button for power, reset and firmware update.

There’s no much to see on the other side of the board except the micro USB OTG port, and the micro SD card.
GeekBox and Landingship Assembly guide
Connect the add-on boards to the module and the module to Landingship baseboard is pretty straightforward, but there are still a few useful tips to learn.
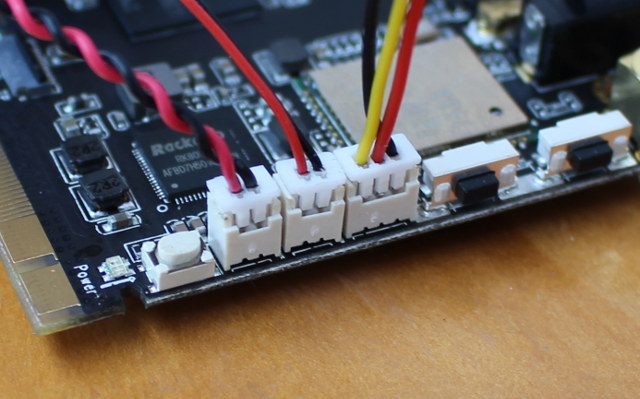
From bottom to top on GeekBox module, we’ve got the RTC, fan and serial connector where you can insert the wires of the corresponding module…
So you end-up having an actively cooled board with a real-time clock, and some hardware for debugging, that you can use without a baseboard.
 Once the 7.9″ touch screen display is available, you’ll also be able to connect it to the Display and TP connectors of the GeekBox SoM without additional hardware. There’s no direct way to secure the fan on top of the heatsink, so you may want to either use some hot glue or double-sided sticky tape to hold it in place.
[Update: The fan can be attached to the top of the case via three mounting holes. The screws were not included, or I missed them.
 ]
]
If you plan to connect a 2.5″ hard drive or SSD to the Landingship baseboard, that’s the first thing that you should do because of the location of screw holes and spacers may prevent an easy installation later on.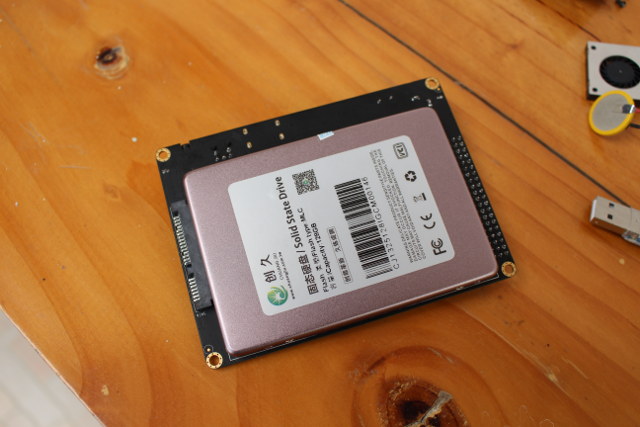 You’ll need to secure the SATA drive with the two black screws provided with the spacers and nuts.
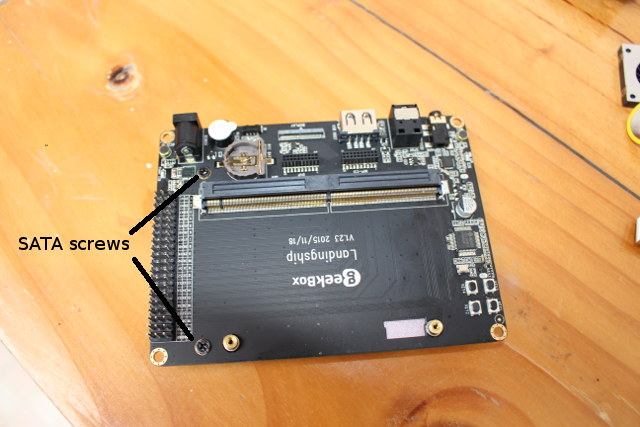 Now you can insert the four spacers in the holes at the corner of the board, and tighten them with the nuts. The next step is to peel off the protective tape on GeekBox module’s MXM3 edge connector, before inserting the module into the MXM3 socket on the Landingship at an angle, pushing it down, and tightening it with the two screws that held Geekbox in its own case. Now put back the WiFi antennas in the module, and you’re done.
 If you prefer a more visual unboxing and assembly guide instead, please watch the video below.

GeekBuying kindly send me GeekBox and accessory kit for review, and GeekBox sells for $109.99 shipped on their website, where you’ll also find Landingship for $29.99, the RTC battery for $4.99, the fan for $8.99, and the USB to TTL debug board for $1.99. You’ll get a slightly better deal if you combine all these on GeekBox page, as the complete kit I received sells for $154.55 as a bundle. Another interesting item that I did not receive is the 7.9″ touchscreen display with 2048×1536 resolution going for $69.99.
There are quite a few things to experiment with GeekBox, such as using a standard Android TV box, running Rockchip Light Biz OS desktop operating system, or instead transforming it into an Ubuntu mini PC and/or playing with its I/O capabilities. I’ll probably start with Light Biz OS…

Jean-Luc started CNX Software in 2010 as a part-time endeavor, before quitting his job as a software engineering manager, and starting to write daily news, and reviews full time later in 2011.
Support CNX Software! Donate via cryptocurrencies, become a Patron on Patreon, or purchase goods on Amazon or Aliexpress. We also use affiliate links in articles to earn commissions if you make a purchase after clicking on those links.


Does it run GeeXboX? 😀 http://www.geexbox.org/
@TLS
Not sure, but I think you can listen to GeekBox (http://www.geekbox.net/) comic audio books.
@cnxsoft, can you measure the size of the SoC heatsink, please? It looks like a 25x25mm one, but I just want to be sure.
@blu
Should be 20x20mm (MXM has a 82mm width)
@tkaiser
Thanks. My 25x25mm fan should still do then.
Finally, a box with top vents. Why this is not always done is a mystery to me. Nice system.
Hot glue on something that produces heat? Really?
Thanks for the sharing!
And just one more information for all users: the cooling fan can be secured on the shell of Geekbox directly, there are 3 mounting point inside of it.
How is the fan supposed to be mounted? I see 3 holes, but where do they fit into the SoC?
@blu
Will a 12V 2-Pin 25mm 25x25x7mm fit in here you think?
On a serious note, I appreciate that geekbuying are doing something like this but am not sure about the SoC being used.
I know in the comments section geekbuying often get people who are butt hurt about their service but personally I’ve never had any problems with them. Sure, things might take a while to get delivered, but you’ve got to expect that if you live in the West and things are shipped from the East.
Back to the board, I wish they’d have waited until there was something with USB 3. Otherwise, GBit ethernet is a boon and something that similar devices shouldn’t be being shipped without.
Also the fact that it’s a PowerVR GPU means that it’s basically useless under anything other than Android, although the same could also be said for Mali and Adreno. 🙁
@blu
It’s actually 30x30mm. just checked
@blu
And @tkaiser is the winner! I measured 20.07 x 20.20 mm
The fan is 30×30.4 mm
@Geekbox
Right, I saw the holes, but still don’t see how to use them since there are not corresponding holes in the board, and they are spaced in a way that’s wider than the heatsink.Ah OK. I read too fast. It would have been nice to include the screws too…@The Cageybee
I’m not sure at what temperature hot glue melts… Maybe it will get a bit too hot there…
The fan will start to spin at 80C by default -> http://forum.geekbox.tv/viewtopic.php?f=13&t=20&p=62&hilit=fan#p77
@cnx I’ve got a bit of experience using hot glue in PC cases. I built a mini-itx system into a 1970’s Millennium Falcon toy a few years back and the cd/dvd drive was held in place by hot glue. Whilst the temperatures in the “case” weren’t hot enough to turn the glue to a molten state, it didn’t hold very well after a while.
BTW And the winner is … I LOL’ed IRL
Rather unique hardware design. Looking forward to seeing how it performs with Ubuntu!
@The Cageybee Agreed. RK3288 would be better.
@miniNodes
Very slow, no 3D or 2D acceleration for menus, no VPU drivers(Imagination Technologies don’t provide Linux support) and black screen when trying video playback in Ubuntu.
The RK3288 at least have Mali 3D drivers to enable gaming and app support that require 3D and have working video playback by flashing certain dual-boot firmware.
User MAC_L1 might get video playback working by using Android drivers through libhybris but the 2D, 3D GPU drivers are still missing which make Linux very slow. If Imagination Technologies can’t provide Linux GPU drivers in the future it will cause problems.
@mo123
Is the VPU also provided by Imagination in RK3368? I remember other Rockchip SoCs were using On2 VPUs -> http://linux-rockchip.info/mw/index.php?title=VideoAcceleration#Overview
I think @miniNodes might be more specifically interested in CPU, networking and storage performance.
does the fan come with the geekbox or with the landingship.
@Fossxplorer
The stock fan is a 5V one. A 12V one *might* work at 5V (some do) – if you have something in mind you need to try it with a 5V supply to be sure. A 25x25mm will work for the geekbox, but the attachment is more complicated, compared to a 20x20mm one. A fan of the dimensions of the heatsink can be trivially fixed onto the latter. Anyway, mine is a 25x25mm, so I will post my solution, once I have one.
@mo123 –
Video playback, menus, and 3D acceleration, etc. are not necessary for use as micro servers accessed via SSH. @cnxsoft is correct, CPU, network, and storage performance in Linux are the interesting pieces to us. =)
@miniNodes
Actually I care about using the GPU in the GeekBox. I have a project that has a good appetite for multi-core, CPU and GPU alike ; )
@adem
Neither, it’s a separate $8.99 purchase.
Merhabalar, Adem Hocam eline cihaz ulaştımı.. bir inceleme bekliyoruz… performansı nasıldır ?
@RednE
I’ve just finished running some benchmarks. http://www.cnx-software.com/2015/12/21/geekbox-and-landingship-android-overview-and-benchmarks/
I have not tried any video playback.
thnks cnxsoft..
Mac1 did get the gpu fix and Followmsi got marshmellow rocking. They need to design aftermarket case and I love this device so far looking to add the drive anyone know if 1 tara gig would be seen in marshmellow?
Seems development slowed a bit but keep it up this is fantasic device….