
Computer Vision, Artificial Intelligence, Machine Learning, etc.. are all terms we hear frequently those days. JeVois-A33 smart machine vision camera powered by Allwinner A33 quad core processor was launched last year on Indiegogo to bring such capabilities in a low power small form factor devices for example to use in robotics project.
The company improved the software since the launch of the project, and has now sent me their tiny Linux camera developer kit for review, and I’ve already checked out the hardware and accessories in the first post. I’ve now had time to test the camera, and I’ll explained how to set it up, test some of the key features via the provided guided tour, and show how it’s possible to customize the camera to your needs with one example.
Getting Started with JeVois-A33
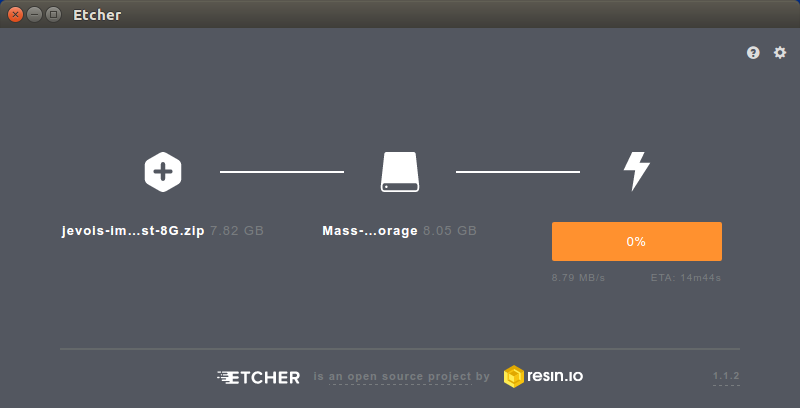
In theory, you could just get started by inserting the micro SD card provided with the camera, connect it to your computer via the USB cable, and follow the other instructions on the website. But to make sure you have the latest features and bug fixed, you’d better download the latest firmware (jevois-image-latest-8G.zip), and flash it to the micro SD card with the multi-platform Etcher tool.
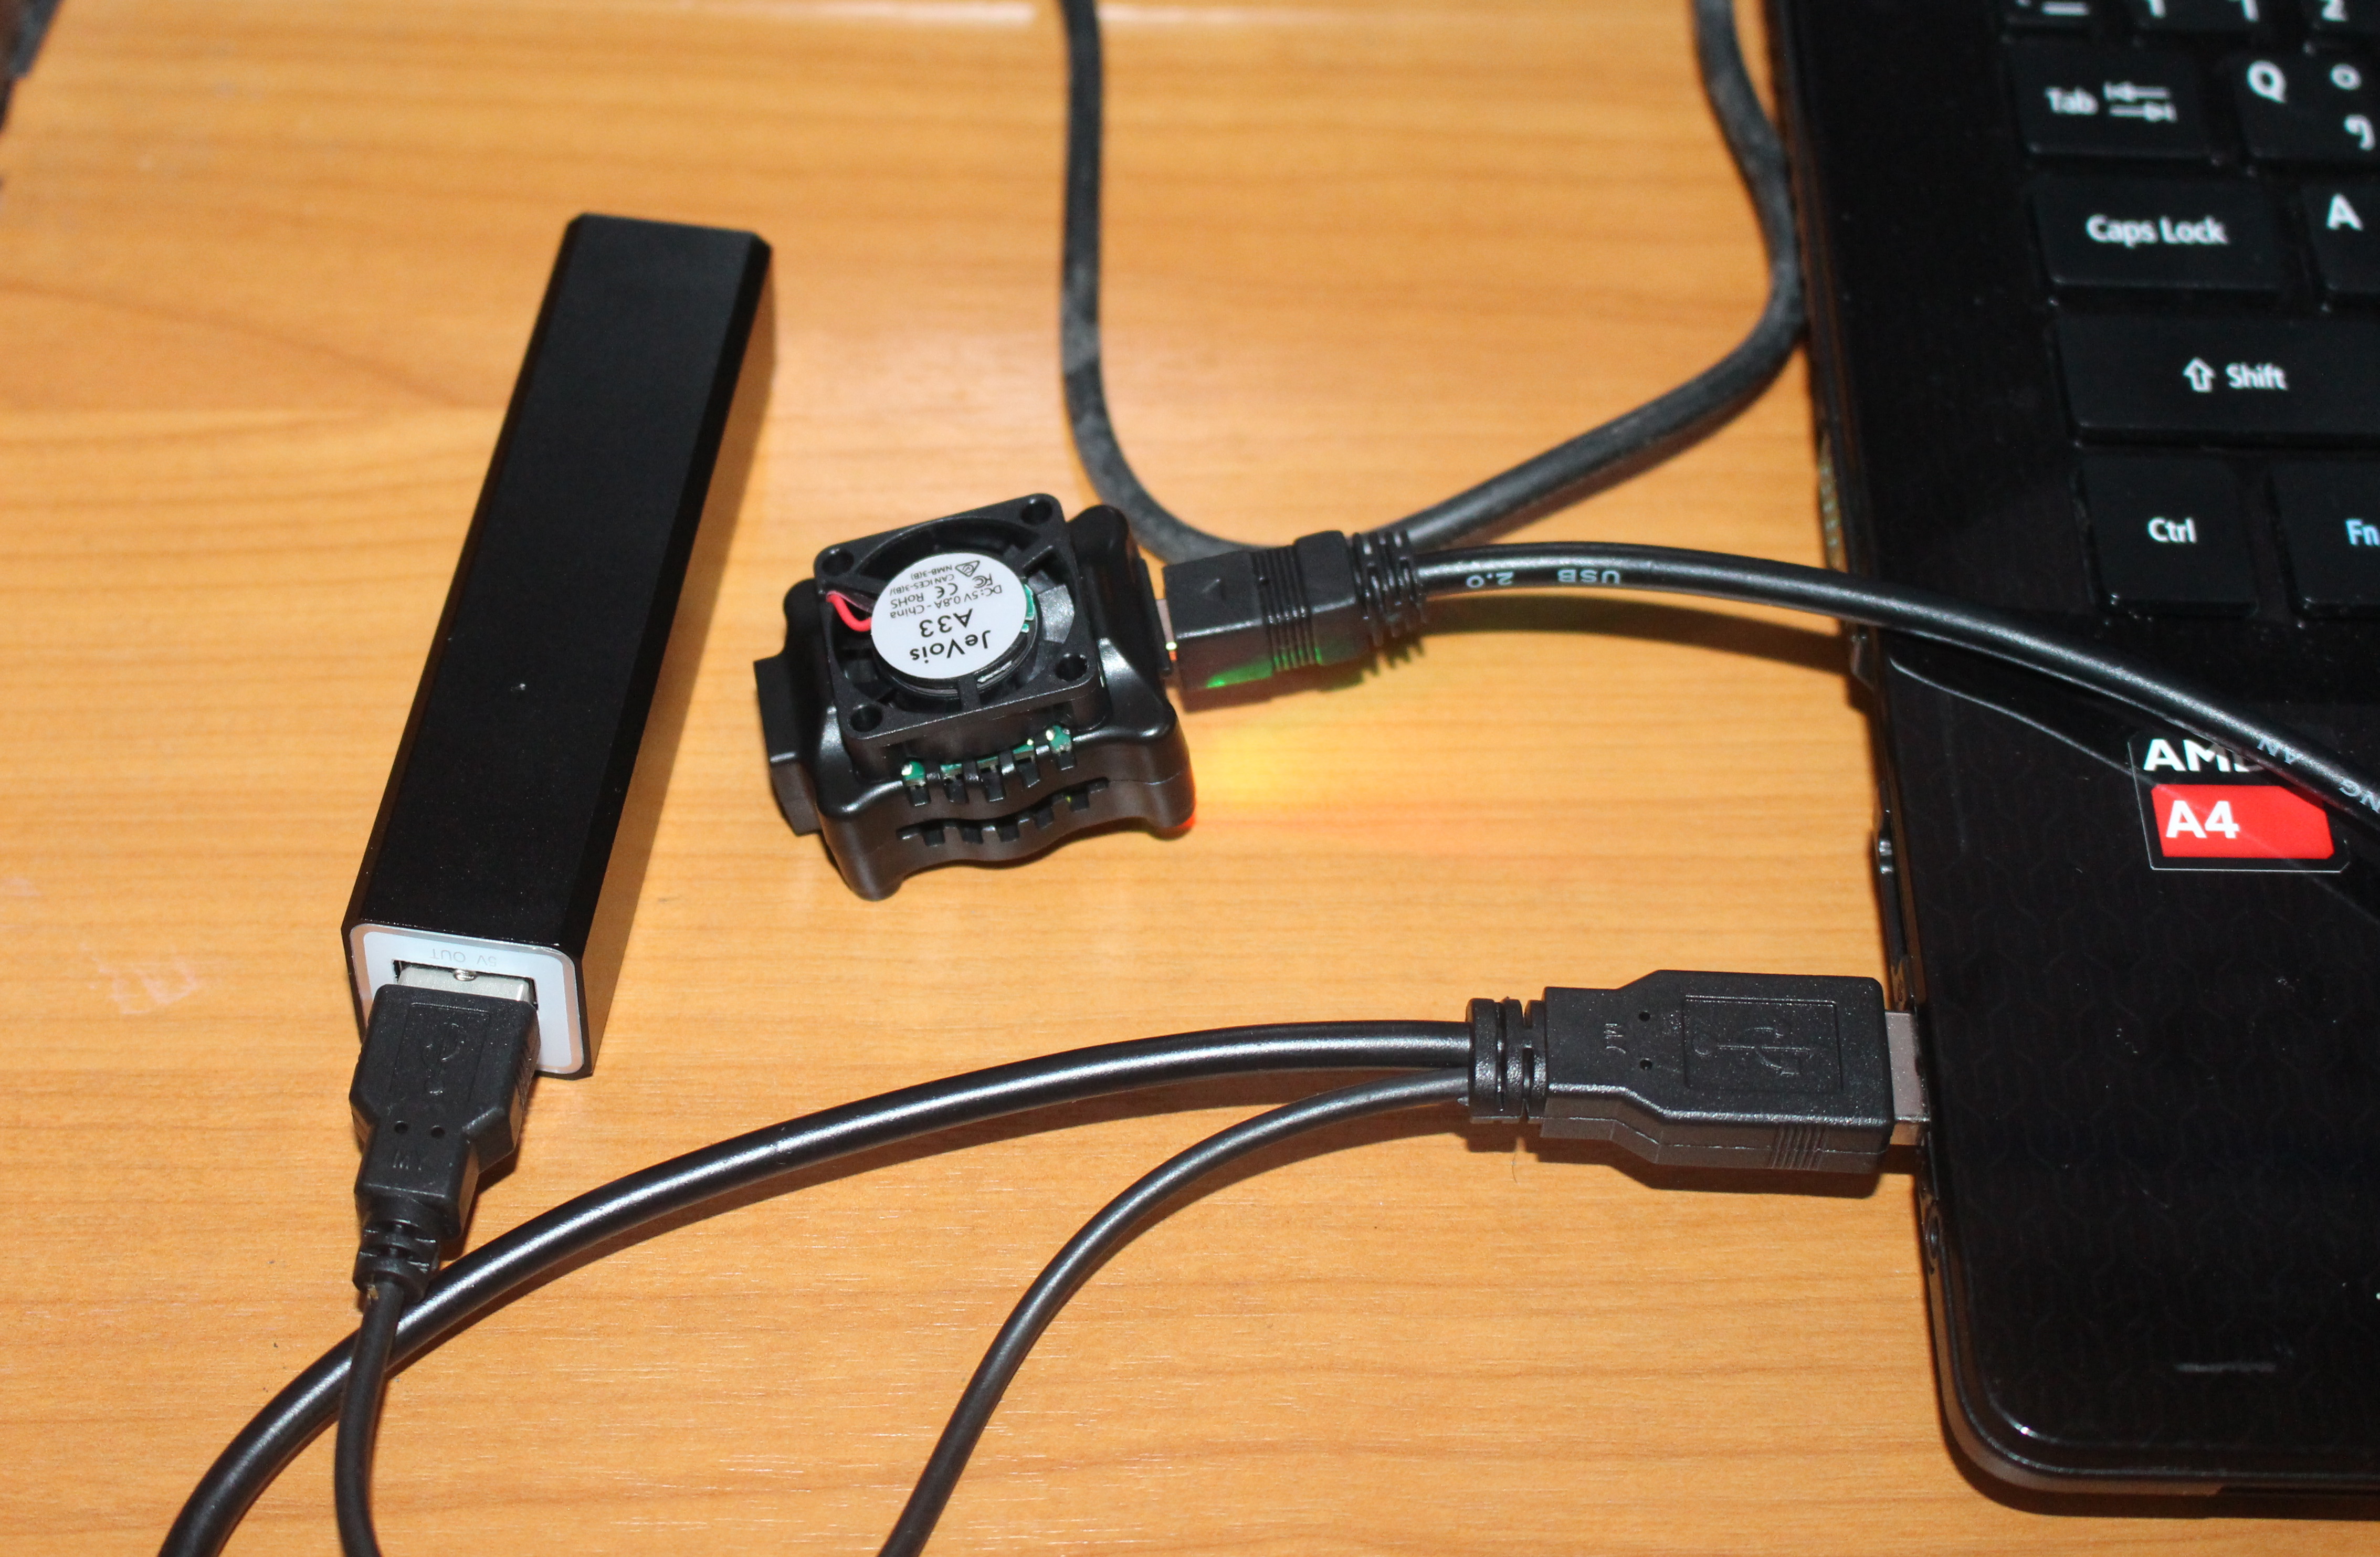
 You could also use your own micro SD card, as long as it has 8GB or more capacity. Once this is done, insert the micro SD card into the camera with the fan of the camera and the golden contact of the micro SD card both facing upwards. Connect the camera to your computer with the provided mini USB to USB cable. I also added the USB power meter to monitor the power consumption for the different use cases, and USB serial cable to checkout output from the console. At least that was the plan, but I got no lights from the camera, and voltage was reported to be only 4V. Then I read the guide a little better, and found out I had to use a USB 3.0 port, or two USB 2.0 ports for power.
Once I switched to using two USB 2.0 ports from a powered USB 2.0 hub, I could see output from the serial console…
|
1 2 3 4 5 6 7 8 9 10 11 12 13 14 15 16 |
minicom --baudrate 115200 --device /dev/ttyUSB0 Welcome to minicom 2.7 OPTIONS: I18n Compiled on Feb 7 2016, 13:37:27. Port /dev/ttyUSB0, 16:49:02 Press CTRL-A Z for help on special keys INFO: JeVois 1.5.2 INFO: Linux version 3.4.39 INFO: CPU: 1344MHz, 34C, load: 0.16 0.03 0.01 1/58 88 INFO: MemTotal: 238452 kB, MemFree: 157400 kB INFO: OUT: YUYV 640x300 @ 60fps CAM: YUYV 320x240 @ 60fps MOD: JeVois:DemoSaliey INF READY JEVOIS 1.5.2 |
and both green and orange/red LEDs were lit. The instructions to use JeVois camera are mostly OS agnostic, except for the video capture software. If you are using Windows you can use the free OBS Studio or AMCap programs, and on Mac, select either PhotoBooth or OBS Studio. I’m a Ubuntu user, so instead I installed guvcview:
|
1 |
sudo apt-get install guvcview |
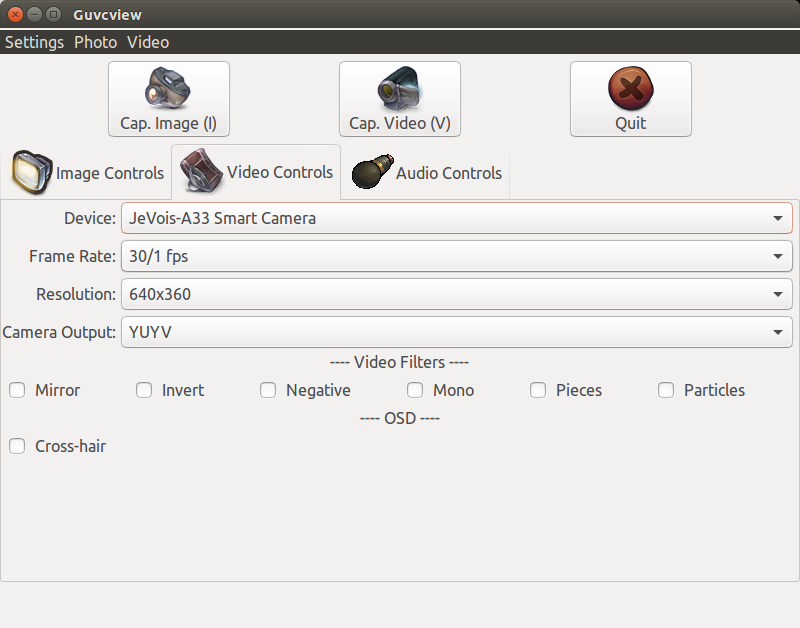
and ran it use 640×360 resolution and YUYV format as instructed in the getting started guide:
|
1 |
guvcview -ao none -f YUYV -x 640x360 |
But then I got no output at all in the app:
|
1 2 3 4 5 6 7 8 9 10 11 12 13 14 15 16 17 18 19 20 21 22 23 24 |
GUVCVIEW: version 2.0.2 V4L2_CORE: (UVCIOC_CTRL_MAP) Error: No such file or directory V4L2_CORE: (UVCIOC_CTRL_MAP) Error: No such file or directory V4L2_CORE: (UVCIOC_CTRL_MAP) Error: No such file or directory V4L2_CORE: (UVCIOC_CTRL_MAP) Error: No such file or directory V4L2_CORE: (UVCIOC_CTRL_MAP) Error: No such file or directory V4L2_CORE: (UVCIOC_CTRL_MAP) Error: No such file or directory V4L2_CORE: (UVCIOC_CTRL_MAP) Error: No such file or directory V4L2_CORE: (UVCIOC_CTRL_MAP) Error: No such file or directory V4L2_CORE: (UVCIOC_CTRL_MAP) Error: No such file or directory ALSA lib pcm.c:2266:(snd_pcm_open_noupdate) Unknown PCM cards.pcm.rear ALSA lib pcm.c:2266:(snd_pcm_open_noupdate) Unknown PCM cards.pcm.center_lfe ALSA lib pcm.c:2266:(snd_pcm_open_noupdate) Unknown PCM cards.pcm.side ALSA lib pcm_route.c:867:(find_matching_chmap) Found no matching channel map Cannot connect to server socket err = No such file or directory Cannot connect to server request channel jack server is not running or cannot be started JackShmReadWritePtr::~JackShmReadWritePtr - Init not done for 4294967295, skipping unlock JackShmReadWritePtr::~JackShmReadWritePtr - Init not done for 4294967295, skipping unlock libv4l2: error turning on stream: Connection timed out libv4l2: error turning on stream: Input/output error V4L2_CORE: (VIDIOC_STREAMON) Unable to start stream: Input/output error V4L2_CORE: (get_v4l2_frame) video stream must be started first V4L2_CORE: (get_v4l2_frame) video stream must be started first |
The last line above would repeat in a loop. The kernel log (dmesg) also reported a crash linked to guvcview:
|
1 2 3 4 5 6 7 8 9 10 11 12 13 14 15 16 17 18 19 20 21 22 23 24 25 26 27 28 29 30 31 32 33 34 35 36 37 38 39 40 41 |
[29974.372063] ------------[ cut here ]------------ [29974.372070] WARNING: CPU: 3 PID: 31692 at /build/linux-hwe-lyR8gz/linux-hwe-4.10.0/fs/sysfs/group.c:237 sysfs_remove_group+0x8c/0x90 [29974.372071] sysfs group 'power' not found for kobject 'event4' [29974.372071] Modules linked in: uvcvideo videobuf2_vmalloc videobuf2_memops videobuf2_v4l2 videobuf2_core videodev cdc_acm media pl2303 usbserial brd arc4 ppp_mppe ppp_async nf_conntrack_pptp nf_conntrack_proto_gre nls_iso8859_1 nls_utf8 isofs rfcomm ipt_MASQUERADE nf_nat_masquerade_ipv4 xfrm_user xfrm_algo iptable_nat nf_conntrack_ipv4 nf_defrag_ipv4 nf_nat_ipv4 xt_addrtype iptable_filter ip_tables xt_conntrack x_tables nf_nat nf_conntrack libcrc32c br_netfilter bridge stp llc aufs pci_stub vboxpci(OE) vboxnetadp(OE) vboxnetflt(OE) vboxdrv(OE) bnep binfmt_misc snd_hda_codec_hdmi joydev input_leds btusb btrtl btbcm btintel bluetooth edac_mce_amd edac_core crct10dif_pclmul crc32_pclmul ghash_clmulni_intel pcbc snd_hda_codec_via snd_hda_codec_generic snd_hda_intel aesni_intel snd_hda_codec aes_x86_64 [29974.372104] crypto_simd snd_hda_core glue_helper cryptd snd_hwdep snd_pcm serio_raw snd_seq_midi snd_seq_midi_event snd_rawmidi fam15h_power k10temp snd_seq nvidia_uvm(POE) snd_seq_device snd_timer snd i2c_piix4 shpchp soundcore wmi mac_hid tpm_infineon kvm_amd kvm irqbypass it87 hwmon_vid nfsd parport_pc auth_rpcgss ppdev nfs_acl lockd grace lp sunrpc parport autofs4 uas usb_storage pata_acpi hid_generic usbhid hid nvidia_drm(POE) nvidia_modeset(POE) nvidia(POE) drm_kms_helper syscopyarea sysfillrect sysimgblt fb_sys_fops drm r8169 pata_atiixp ahci libahci mii fjes [29974.372133] CPU: 3 PID: 31692 Comm: guvcview Tainted: P OE 4.10.0-38-generic #42~16.04.1-Ubuntu [29974.372134] Hardware name: Gigabyte Technology Co., Ltd. GA-970A-D3/GA-970A-D3, BIOS F11 10/18/2012 [29974.372135] Call Trace: [29974.372139] dump_stack+0x63/0x90 [29974.372141] __warn+0xcb/0xf0 [29974.372142] warn_slowpath_fmt+0x5f/0x80 [29974.372143] ? kernfs_find_and_get_ns+0x48/0x60 [29974.372145] sysfs_remove_group+0x8c/0x90 [29974.372147] dpm_sysfs_remove+0x57/0x60 [29974.372149] device_del+0x12d/0x350 [29974.372151] evdev_disconnect+0x23/0x60 [29974.372153] __input_unregister_device+0xb5/0x160 [29974.372154] input_unregister_device+0x47/0x70 [29974.372159] uvc_status_cleanup+0x42/0x50 [uvcvideo] [29974.372161] uvc_delete+0x18/0x160 [uvcvideo] [29974.372163] uvc_release+0x23/0x30 [uvcvideo] [29974.372171] v4l2_device_release+0xe6/0x120 [videodev] [29974.372173] device_release+0x32/0x90 [29974.372175] kobject_release+0x6a/0x170 [29974.372176] kobject_put+0x27/0x50 [29974.372177] put_device+0x17/0x20 [29974.372181] v4l2_release+0x50/0x80 [videodev] [29974.372183] __fput+0xe7/0x220 [29974.372184] ____fput+0xe/0x10 [29974.372186] task_work_run+0x7e/0xa0 [29974.372188] exit_to_usermode_loop+0xaa/0xb0 [29974.372190] syscall_return_slowpath+0x59/0x60 [29974.372192] entry_SYSCALL_64_fastpath+0xab/0xad [29974.372193] RIP: 0033:0x7fc6ec1d4499 [29974.372194] RSP: 002b:00007ffd56f7e4b8 EFLAGS: 00000246 ORIG_RAX: 0000000000000003 [29974.372195] RAX: 0000000000000000 RBX: 00007fc6ec0d0348 RCX: 00007fc6ec1d4499 [29974.372196] RDX: 0000000000000000 RSI: 0000000000000000 RDI: 0000000000000004 [29974.372197] RBP: 0000000000000004 R08: 0000000000000001 R09: 000000000000001f [29974.372197] R10: 00000000014d4330 R11: 0000000000000246 R12: 00007fc6ec0cc1a0 [29974.372198] R13: 0000000000000000 R14: 00007fc6ec0cc1a0 R15: 0000000000000000 [29974.372199] ---[ end trace 4e989629054e62eb ]--- |
Another person had the same problem a few months ago, and it was suggested it may be a USB problem. So I connect the camera to directly to two of the USB ports on my tower, and it worked…

The important part of the settings are in the Video Controls tab, where we can change resolution and frame rate to switch between camera modes as we’ll see later on.
But since my tower is under the desk, the USB cable is a bit too short, and the program crashed with the same error message a few minutes later. So I went with my Ubuntu 16.04 laptop instead. Powering the camera via the USB 3.0 port worked until I started deep learning modes, where the camera would stop, causing guvcview to gray out. Finally, I connected the camera to both my USB 3.0 port, and the power bank part of the kit, and the system was then much more stable.
I contacted the company about the issues I had, but they replied this problem was not often reported:
… we have only received very few reports like that but we were able to confirm here using front panel ports on one machine. On my desktop I have a hub too, but usb3 and rated for fast charging (60W power supply for 7+2 ports) and it works ok with jevois. A single usb3 port on my mac laptop is also ok.
So maybe it’s just me with all my cheap devices and accessories…
So three main points to get started:
- Update the firmware
- Install the camera software
- Check power in case of issues / crashes (Both LEDs should be on if the camera is working)
JeVois-A33 Guided Tour
Now we have the camera running, we can try the different features, and the best way to do so is to download Jevois Guided Tour (PDF) that will give you an overview of the camera and how it works, as well as examples.
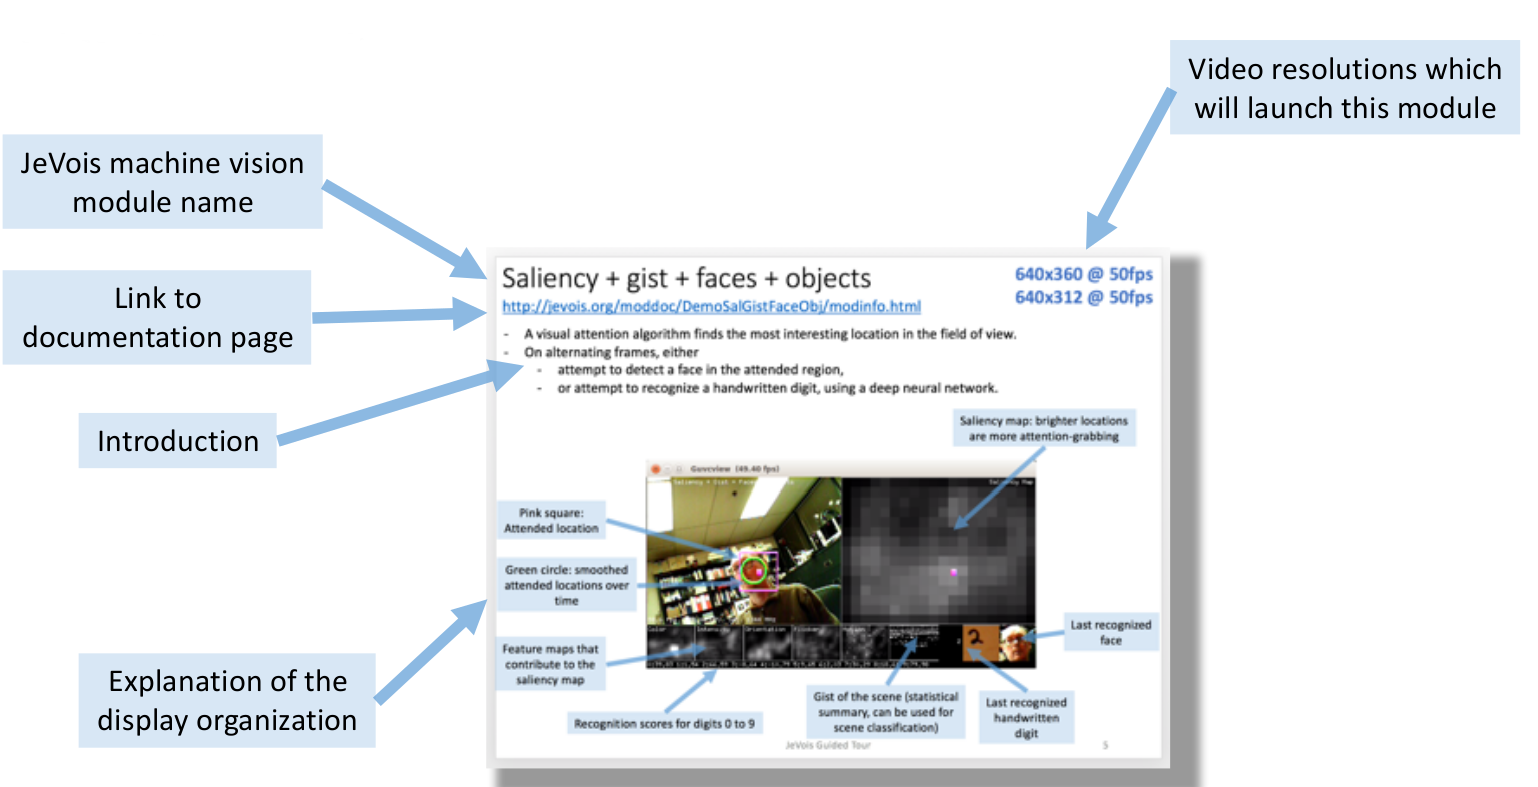
As shown above, the PDF includes information for each module with the name, link to documentation, introduction, display explanation, and on the top right the resolution/framerate that can be used to launch a given module. On following pages, there will be example pictures that you can point to with the camera.
Some of modules include:
- Visual attention – finding interesting things
- Face and handwritten digit recognition
- QR-codes and other tags
- Road detection
- Object matching
- Object recognition with deep neural networks
- Color-based object tracking
- Moving object detection
- Record video to the microSD card inside JeVois
- Motion flow detection
- Eye tracking
- and more…
You could print the guide with a color printer, but the easiest way is problem to use two screens, once with the PDF guide open, and the other running the camera application (guvcview, OBS Studio…). I’ve gone through some of the example in the guided tour in the video below, with PDF shown on a TV box, and the camera application output shown on the laptop screen on the top bottom corner.

That’s lot of fun, and everything works pretty well most of the time. Some of the tests are quite demanding for such low power device, as for example Darknet based “Deep neural scene analysis” using 1280×480 @ 15 fps with the ability to recognize multiple object types would only refresh the results every 2.7 seconds or so.
Documentation & Customization of Salient SURF Module
If you’ve gone through the guide tour, you should now have a good understanding of what the camera is capable of. So now, let’s take one of the modules, and try to adjust it to our needs. I picked SaliencySURF module with the documentation available here for this section of the review. Introduction for the module:
Trained by default on blue iLab logo, point JeVois to it and adjust distance so it fits in an attention box.
Can easily add training images by just copying them to microSD card.
Can tune number and size of salient regions, can save regions to microSD to create a training set
So let’s take a few other images (Tux logo), copy them to the micro SD card in the camera, and tune some of the settings.
Ideally the camera should also be detected, as a storage device, so that we can easily copy files and edit parameters, and in my computer it was shown as a UVC camera, a USB ACM device, and USB storage device when I connect it:
|
1 2 3 4 5 6 7 8 9 10 11 12 13 14 15 16 17 18 19 |
[ 232.242386] usb 2-1.4: New USB device found, idVendor=0489, idProduct=e078 [ 232.242394] usb 2-1.4: New USB device strings: Mfr=0, Product=0, SerialNumber=0 [ 323.203288] usb 3-1: new high-speed USB device number 2 using xhci_hcd [ 323.336282] usb 3-1: New USB device found, idVendor=1d6b, idProduct=0102 [ 323.336294] usb 3-1: New USB device strings: Mfr=1, Product=2, SerialNumber=0 [ 323.336302] usb 3-1: Product: JeVois-A33 Smart Camera [ 323.336308] usb 3-1: Manufacturer: JeVois Inc [ 323.338846] uvcvideo: Found UVC 1.00 device JeVois-A33 Smart Camera (1d6b:0102) [ 323.341045] input: JeVois-A33 Smart Camera as /devices/pci0000:00/0000:00:10.0/usb3/3-1/3-1:1.0/input/input14 [ 323.453873] cdc_acm 3-1:1.2: ttyACM0: USB ACM device [ 323.455233] usbcore: registered new interface driver cdc_acm [ 323.455241] cdc_acm: USB Abstract Control Model driver for USB modems and ISDN adapters [ 323.471869] usb-storage 3-1:1.4: USB Mass Storage device detected [ 323.472090] scsi host2: usb-storage 3-1:1.4 [ 323.472263] usbcore: registered new interface driver usb-storage [ 323.497892] usbcore: registered new interface driver uas [ 324.472464] scsi 2:0:0:0: Direct-Access JeVois Smart Camera 0333 PQ: 0 ANSI: 2 [ 324.473378] sd 2:0:0:0: Attached scsi generic sg2 type 0 [ 324.474530] sd 2:0:0:0: [sdb] Attached SCSI removable disk |
But for some reasons, I could not see the /dev/sdb storage after that:
|
1 2 3 4 5 6 7 8 9 10 |
lsblk NAME MAJ:MIN RM SIZE RO TYPE MOUNTPOINT sda 8:0 0 465.8G 0 disk ├─sda1 8:1 0 512M 0 part /boot/efi ├─sda2 8:2 0 461.8G 0 part / └─sda3 8:3 0 3.5G 0 part [SWAP] sr0 11:0 1 1024M 0 rom sudo fdisk -l /dev/sdb fdisk: cannot open /dev/sdb: No medium found |
[Update: We can use use jevois-usbsd script to access the camera storage from the host computer / board:
|
1 |
sudo ./jevois-usbsd start |
]
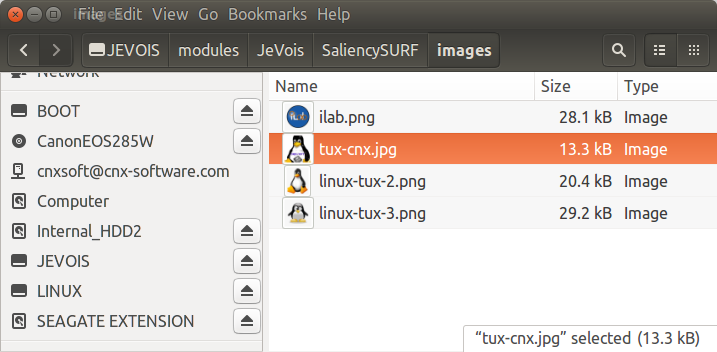
So instead I had to take out the micro SD card from the camera, and copy the files in /modules/JeVois/SaliencySURF/images/ directory in JEVOIS partition.
The module will process those photo when we start it, and return the name of the file when detected.
We can go back to SaliencySURF directory to edit params.cfg file, and change some parameters to determine how strict a match should be, taking into account that a stricter matching may mean the object was not be detected, and looser matching that we get some false positives. But this is where it gets a little more complicated, as we’ll see from a subset of the list of parameters.
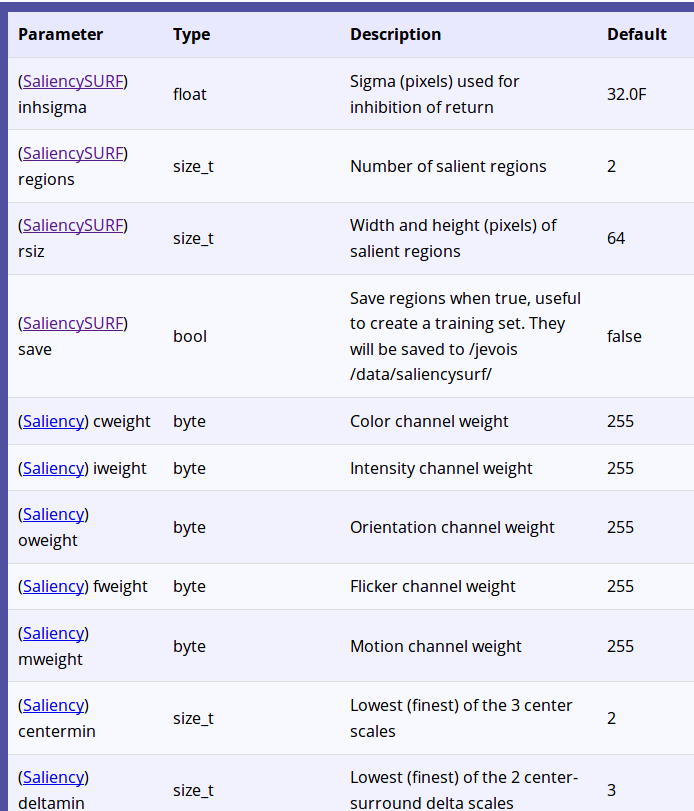
I cannot understand what half of the parameters are supposed to do. That’s where you can click on the SaliencySURF / Saliency links to access the base documentation. and find out how the module works, find out more about each parameter, and easily access the source code for the functions used by the module. That type of documentation is available for all modules used in JeVois C++ framework, and it’s a very good learning tool for people wanting to know more about computer vision. You’ll have to be familiar with C++ to understand the code, and what it really does, beside learning jargon and acronyms specific to computer vision or machine learning.
By default params.cfg file includes just two lines:
|
1 2 3 |
# Default parameters that are set upon loading the module goodpts = 4...15 distthresh = 0.4 |
Those are the parameters for ObjectMatcher module, with goodpts corresponding to the number range of good matches considered, and distthresh being the maximum distance for a match to be considered good.
I’ve set looser settings in params.cfg:
|
1 2 |
setpar goodpts 5 ... 100 setpar distthresh 0.5 |
I saved the file, put the micro SD card back into the camera, and launch guvcview with 320×288 @ 30 fps resolution/framerate to enter SaliencySURF mode.
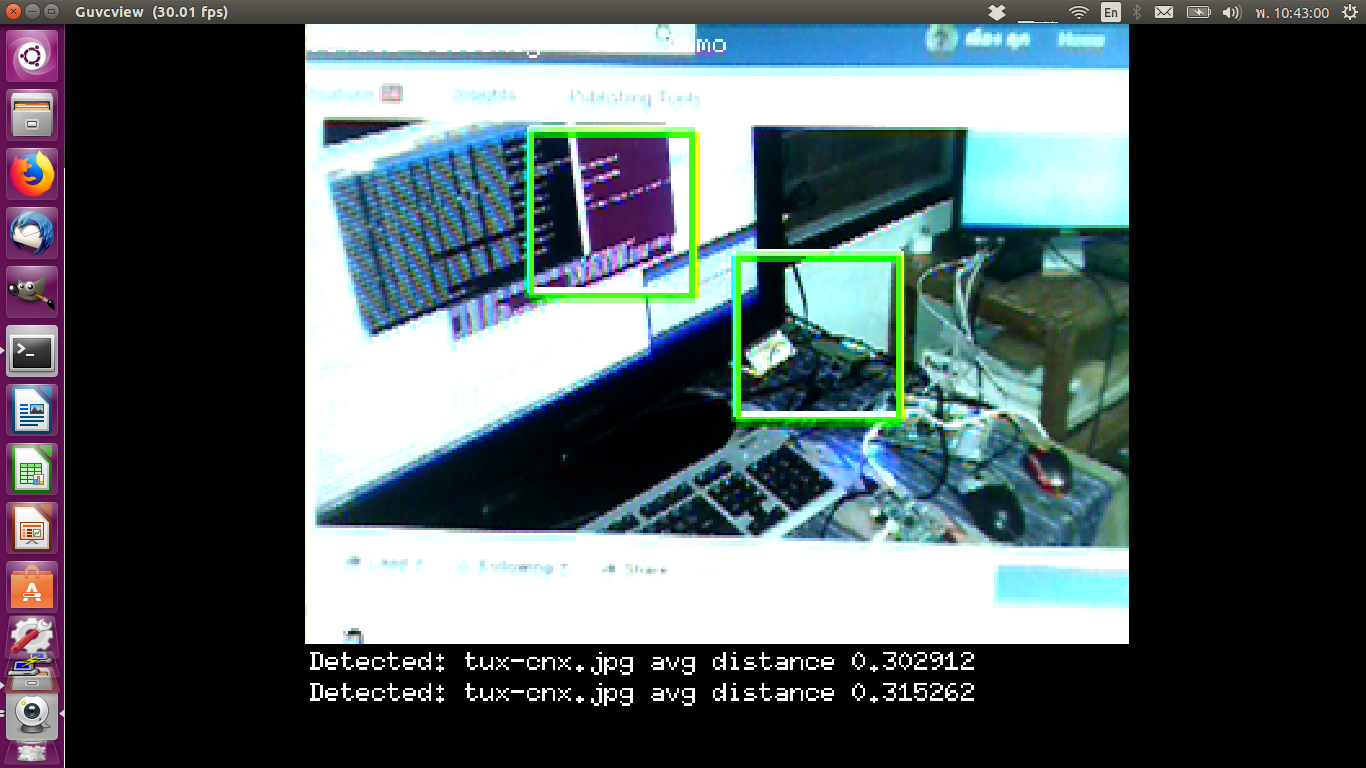
Oops, it’s seeing Tux logos everywhere, even when there are none whatsoever, so our settings are clearly too loose. So I went back to the default settings, but the rsults was still similar, so since the distance was shown to be 0.30 in my first attempt, I reduced distthresh to 0.2. False positive are now mostly gone, except for very short period od time, and it’s now detecting CNX Tux logo accuractely. Note that Green square is for object detection, and the white squares for saliency zones.
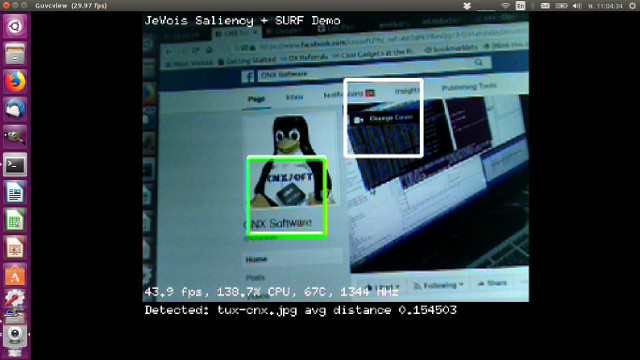
However, it struggles to detect my third Tux logo repeatedly, often following back to CNX Tux logo.
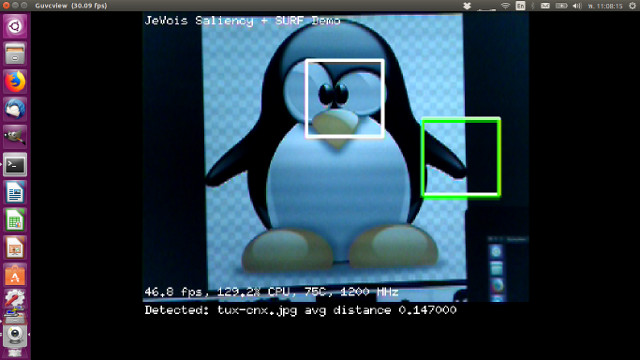 But as you could see with the green square, the detection was done on the left flap of the penguin. That’s because SaliencySURF detection is done in a fixed size zone (64×64 pixels per detault), so camera distance, or size of the zone matter. You can change the size of the salient regions with SaliencySURF rsiz parameter which defined the height and length of the quare in pixel. When I did the test I first tried to detected if from the list of Tux images from DuckDuckGo search ut it was not small or blurry. After switchign to a bigger photo, the cable was too short to cover the logo, so instead I copied to gimp and resized it so that it could fit in the 64×64 square while using the camera, and in this case detection worked resaonably well.
 The more you use the camera, the better you’ll be at understanding how it works, and leverage its capabilities.
Final Words
JeVois-A33 camera is an inexpensive way to get started with computer vision and deep learning, with excellent documentation, and if you put the efforts, you’ll even understand how it works at the source code level. It’s also fun to use with many different modules to try. I have not tried it n this review due to time limitations, but you could also connect the camera to an Arduino board controlling a robot (Cat chasing bot anyone?) via the serial interface.
The main challegenges you may face while getting started ar:
- Potential crashes due to power issues, but that’s solvable, and a power issues troubleshooting guide has even been published
- For robotics projects, you have to keep in mind there will be some lag for some modules, for example from 500ms (single object) to 3 seconds (YOLO test with multiple object types) for deep learning algorithms. Other modules such as ArUco marker are close to real-time performance however.
Bear in mind all processing is done by the Allwinner A33 CPU cores, as the Mali-400MP GPU is not suitable for GPGPU. As more affordable SoC with OpenCL/Vulkan capable GPU (e.g. Mali-T720) are launched, and in some cases even NNA (Neural Network Accelerator), we’ll be able to get similar low power smart cameras, but with much better computer vision performance.
JeVois-A33 can be purchased for $49, but to avoid wasting time with power issues, and give you more options, I’d recommend to go with JeVois-A33 Developer/Robotics Kit reviewed here, going for $99.99 on Amazon, RobotShop, or JeVois Store.

Jean-Luc started CNX Software in 2010 as a part-time endeavor, before quitting his job as a software engineering manager, and starting to write daily news, and reviews full time later in 2011.
Support CNX Software! Donate via cryptocurrencies, become a Patron on Patreon, or purchase goods on Amazon or Aliexpress. We also use affiliate links in articles to earn commissions if you make a purchase after clicking on those links.


Nice tour 😉
Take note that its easier to access the file system using the command “usbsd” , no need to take out the micro SD card from the camera
For robotic projects, the fastest the better, these modules have been successfully tested;
QR-codes and other tags
Road detection
Object matching
Color-based object tracking
Here is a demo of a Jevois tracking Aruco TAGS and controlling the Landing of an ArduPilot based Quadcopter
https://youtu.be/9PHOhTJ3eSI?t=40
I’m wait to get cheap SOCs with sufficiently powerful GPUs, then vision processing in the camera will be useful to me. Meanwhile I continue to play with the free tier of AWS Rekognition. https://aws.amazon.com/rekognition/
@Patrick Poirier
Thanks. I did not see usbsd command. I’ve updated the post accordingly.
The micro SD card will mount for me in /media/username/JEVOIS, and I can use it, but the script will return an error:
@cnxsoft
Hello,
Actually this command should be invoked as a command line sent to the Jevois over serial: http://jevois.org/doc/UserCli.html#cmdlinestart
example:
sudo screen /dev/ttyACM0 115200
usbsd