
Last week, I reviewed Ubuntu 18.04 on ODROID-XU4 board testing most of the advertised features. However I skipped on the features listed in the Changelog:
GPU hardware acceleration via OpenGL ES 3.1 and OpenCL 1.2 drivers for Mali T628MP6 GPU
While I tested OpenGL ES with tools like glmark2-es2 and es2gears, as well as WebGL demos in Chromium, I did not test OpenCL, since I’m not that familiar with it, except it’s used for GPGPU (General Purpose GPU) to accelerate tasks like image/audio processing. That was a good excuse to learn a bit more, try it out on the board, and write a short guide to get started with OpenGL on hardware with Arm Mali GPU. The purpose of this tutorial is to show how to run an OpenCL sample, and OpenCL utility, and I won’t go into the nitty gritty of OpenCL code. If you want to learn more about OpenCL coding on Arm, one way would be to check out the source code of the provided samples.
Arm Compute Library and OpenCL Samples
Since I did not know where to start, Hardkernel redirected me to a forum thread where we are shown how to use Arm Compute Library to test OpenCL on the board.
The relevant post is dated January 2018, and relies on Compute Library 17.12, but you can check out the latest version and documentation @ https://arm-software.github.io/ComputeLibrary/latest/. The latest version is 18.03 at the time of writing this post, so I retrieved it, and tried to build it as instructed:
|
1 2 3 4 5 |
wget https://github.com/ARM-software/ComputeLibrary/archive/v18.03.tar.gz tar xvf v18.03.tar.gz cd ComputeLibrary-18.03/ sudo apt install scons scons Werror=1 -j8 debug=0 neon=1 opencl=1 embed_kernels=1 os=linux arch=armv7a build=native |
However, It failed with:
|
1 |
g++: internal compiler error: Killed (program cc1plus) |
Looking at the kernel log with dmesg, it was clear the board ran out of memory: “Out of memory: Kill process 4984 (cc1plus) Out of memory: Kill process 4984 (cc1plus)“. So I had to setup a swap file (1GB):
|
1 2 3 4 5 |
sudo dd if=/dev/zero of=/swapfile bs=1024 count=1M sudo chown root.root /swapfile sudo chmod 0600 /swapfile sudo mkswap /swapfile sudo swapon /swapfile |
…giving us more memory…
|
1 2 3 4 |
free -m total used free shared buff/cache available Mem: 1994 336 520 34 1137 1568 Swap: 1023 0 1023 |
before restarting the build with NEON and OpenCL enabled:
|
1 |
scons Werror=1 -j8 debug=0 neon=1 opencl=1 embed_kernels=1 os=linux arch=armv7a build=native |
and this time it could complete:
|
1 |
scons: done building targets. |
[Update: Based on comments below, setting up ZRAM instead of swap is usually better in case you run out of memory]
And we can copy the libraries to /usr/lib:
|
1 |
sudo cp build/*.so /usr/lib/ |
We have a bunch of samples to play with:
|
1 2 3 4 5 6 7 8 9 10 11 12 13 |
ls examples/ SConscript graph_mobilenet_qasymm8.cpp cl_convolution.cpp graph_resnet50.cpp cl_events.cpp graph_squeezenet.cpp cl_sgemm.cpp graph_squeezenet_v1_1.cpp gc_absdiff.cpp graph_vgg16.cpp gc_dc.cpp graph_vgg19.cpp graph_alexnet.cpp neon_cartoon_effect.cpp graph_googlenet.cpp neon_cnn.cpp graph_inception_v3.cpp neon_convolution.cpp graph_inception_v4.cpp neon_copy_objects.cpp graph_lenet.cpp neon_scale.cpp graph_mobilenet.cpp neoncl_scale_median_gaussian.cpp |
Note that some are NEON only, not using OpenCL, and the prefix explains the type of sample:
- cl_*.cpp –> OpenCL examples
- gc_*.cpp –> GLES compute shaders examples
- graph_*.cpp –> Graph examples
- neoncl_*.cpp –> NEON / OpenCL interoperability examples
- neon_*.cpp –> NEON examples
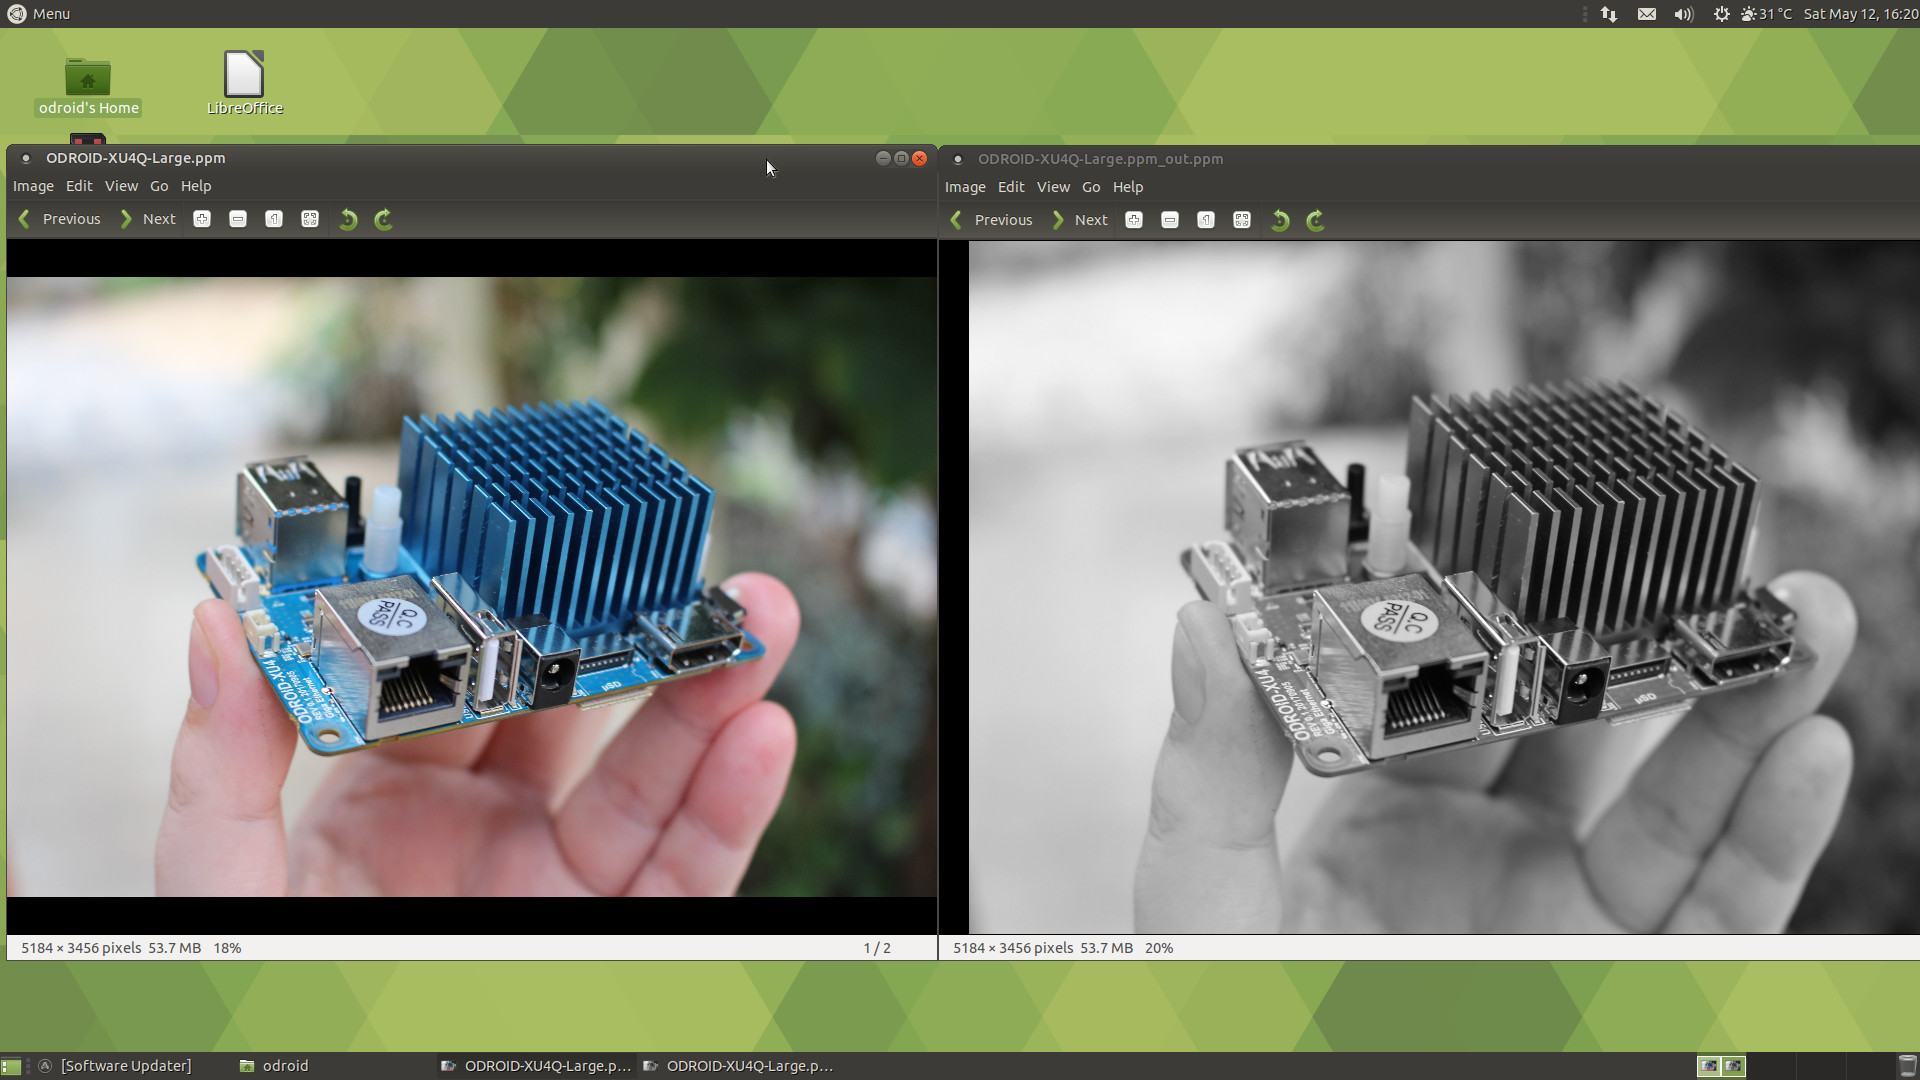
All samples have also been built and can be found in build/examples directory. I ran cl_convolution after generating a Raw ppm image using Gimp:
|
1 2 3 4 5 6 7 8 9 10 |
time ./cl_convolution ~/ODROID-XU4Q-Large.ppm ./cl_convolution Test passed real 0m5.814s user 0m4.893s sys 0m0.758s |
It could process the photo (5184 x 3456) in less than 6 seconds. If we look at the resulting image, we can see the OpenCL convolution converts the image to grayscale.
So I’ve repeated a similar operation with convert which has not been compiled with OpenCL support, so using software only:
|
1 2 3 4 5 |
time convert ODROID-XU4Q-Large.ppm -colorspace Gray ODROID-XU4Q-Large-Grayscale.ppm real 0m10.475s user 0m0.724s sys 0m2.957s |
It took a little over 10 seconds, so almost twice the time used by the OpenCL demo. The PPM image files are however over 50MB, so part of the time is used to read and save the file from the eMMC flash. Repeating the tests provide similar performance (~6s vs ~11s), so it may be negligible.
convert version output showing OpenCL is not part of the enabled features in ImageMagick:
|
1 2 3 4 5 6 |
convert -version Version: ImageMagick 6.9.7-4 Q16 arm 20170114 http://www.imagemagick.org Copyright: © 1999-2017 ImageMagick Studio LLC License: http://www.imagemagick.org/script/license.php Features: Cipher DPC Modules OpenMP Delegates (built-in): bzlib djvu fftw fontconfig freetype jbig jng jpeg lcms lqr ltdl lzma openexr pangocairo png tiff wmf x xml zlib |
It’s fun, so I tried another sample:
|
1 2 3 4 5 6 7 8 9 10 |
time ./cl_events ~/ODROID-XU4Q-Large.ppm ./cl_events Test passed real 0m3.068s user 0m2.527s sys 0m0.369s |
What did it do? When I open the file it looks the same of the first sample (Grayscale image), but it actually scaled the image (50% width, 50% height):
|
1 2 |
file ~/ODROID-XU4Q-Large.ppm_out.ppm /home/odroid/ODROID-XU4Q-Large.ppm_out.ppm: Netpbm image data, size = 2592 x 1728, rawbits, pixmap |
The last sample cl_sgemm manipulates matrices. The main goal of the three OpenCL (cl_xxx_ samples) is to show how to use OpenCL Convolution, Events and SGEMM (Single-precision GEneral Matrix Multiply) using the Compute Library.
You can also play with other samples for NEON and OpenGL ES, and Arm Community published a blog post explaining how to run neon_cartoon_effect on Raspberry Pi , and explaining the source code in details. You don’t actually need an RPi board for that as any Arm board with a processor supporting NEON should do.
clinfo Utility
clinfo is a utility that print information about OpenCL platforms and devices in the system. So I install it in the board:
|
1 |
sudo apt install clinfo |
But running the program does not return any useful information:
|
1 2 |
clinfo Number of platforms 0 |
Not what I expected. Luckily, setting up clinfo is explained in ODROID Magazine, so let’s have a try.
We need to Mali’s framebuffer driver:
|
1 |
sudo apt install mali-fbdev |
and setup the vendor ICD file:
|
1 2 |
sudo mkdir -p /etc/OpenCL/vendors sudo sh -c 'echo "/usr/lib/arm-linux-gnueabihf/mali-egl/libOpenCL.so" > /etc/OpenCL/vendors/armocl.icd' |
Now we can run clinfo:
|
1 2 3 4 5 6 7 8 9 10 11 12 13 14 15 16 17 18 19 20 21 22 23 24 25 26 27 28 29 30 31 32 33 34 35 36 37 38 39 40 41 42 43 44 45 46 47 48 49 50 51 52 53 54 55 56 57 58 59 60 61 62 63 64 65 66 67 68 69 70 71 72 73 74 75 76 77 78 79 80 81 82 83 84 85 86 87 88 89 90 91 92 93 94 95 96 97 98 99 100 101 102 103 104 105 106 107 108 109 110 111 112 113 114 115 116 117 118 119 120 121 122 123 124 125 126 127 128 129 130 131 132 133 134 135 136 137 138 139 140 141 142 143 144 145 146 147 148 149 150 151 152 153 154 155 156 157 158 159 160 161 162 163 164 165 166 167 168 169 170 171 172 173 174 175 176 177 178 179 180 181 182 183 184 185 186 187 188 189 190 191 192 193 194 195 196 197 198 199 200 201 202 203 204 205 206 207 208 209 210 211 |
clinfo Number of platforms 1 Platform Name ARM Platform Platform Vendor ARM Platform Version OpenCL 1.2 v1.r12p0-04rel0.03af15950392f3702b248717f4938b82 Platform Profile FULL_PROFILE Platform Extensions cl_khr_global_int32_base_atomics cl_khr_global_int32_extended_atomics cl_khr_local_int32_base_atomics cl_khr_local_int32_extended_atomics cl_khr_byte_addressable_store cl_khr_3d_image_writes cl_khr_fp64 cl_khr_int64_base_atomics cl_khr_int64_extended_atomics cl_khr_fp16 cl_khr_gl_sharing cl_khr_icd cl_khr_egl_event cl_khr_egl_image cl_arm_core_id cl_arm_printf cl_arm_thread_limit_hint cl_arm_non_uniform_work_group_size cl_arm_import_memory Platform Extensions function suffix ARM Platform Name ARM Platform Number of devices 2 Device Name Mali-T628 Device Vendor ARM Device Vendor ID 0x6200010 Device Version OpenCL 1.2 v1.r12p0-04rel0.03af15950392f3702b248717f4938b82 Driver Version 1.2 Device OpenCL C Version OpenCL C 1.2 v1.r12p0-04rel0.03af15950392f3702b248717f4938b82 Device Type GPU Device Profile FULL_PROFILE Device Available Yes Compiler Available Yes Linker Available Yes Max compute units 4 Max clock frequency 600MHz Device Partition (core) Max number of sub-devices 0 Supported partition types None Max work item dimensions 3 Max work item sizes 256x256x256 Max work group size 256 Preferred work group size multiple 4 Preferred / native vector sizes char 16 / 16 short 8 / 8 int 4 / 4 long 2 / 2 half 8 / 8 (cl_khr_fp16) float 4 / 4 double 2 / 2 (cl_khr_fp64) Half-precision Floating-point support (cl_khr_fp16) Denormals Yes Infinity and NANs Yes Round to nearest Yes Round to zero Yes Round to infinity Yes IEEE754-2008 fused multiply-add Yes Support is emulated in software No Single-precision Floating-point support (core) Denormals Yes Infinity and NANs Yes Round to nearest Yes Round to zero Yes Round to infinity Yes IEEE754-2008 fused multiply-add Yes Support is emulated in software No Correctly-rounded divide and sqrt operations No Double-precision Floating-point support (cl_khr_fp64) Denormals Yes Infinity and NANs Yes Round to nearest Yes Round to zero Yes Round to infinity Yes IEEE754-2008 fused multiply-add Yes Support is emulated in software No Address bits 64, Little-Endian Global memory size 2090397696 (1.947GiB) Error Correction support No Max memory allocation 522599424 (498.4MiB) Unified memory for Host and Device Yes Minimum alignment for any data type 128 bytes Alignment of base address 1024 bits (128 bytes) Global Memory cache type Read/Write Global Memory cache size 131072 (128KiB) Global Memory cache line size 64 bytes Image support Yes Max number of samplers per kernel 16 Max size for 1D images from buffer 65536 pixels Max 1D or 2D image array size 2048 images Max 2D image size 65536x65536 pixels Max 3D image size 65536x65536x65536 pixels Max number of read image args 128 Max number of write image args 8 Local memory type Global Local memory size 32768 (32KiB) Max number of constant args 8 Max constant buffer size 65536 (64KiB) Max size of kernel argument 1024 Queue properties Out-of-order execution Yes Profiling Yes Prefer user sync for interop No Profiling timer resolution 1000ns Execution capabilities Run OpenCL kernels Yes Run native kernels No printf() buffer size 1048576 (1024KiB) Built-in kernels Device Extensions cl_khr_global_int32_base_atomics cl_khr_global_int32_extended_atomics cl_khr_local_int32_base_atomics cl_khr_local_int32_extended_atomics cl_khr_byte_addressable_store cl_khr_3d_image_writes cl_khr_fp64 cl_khr_int64_base_atomics cl_khr_int64_extended_atomics cl_khr_fp16 cl_khr_gl_sharing cl_khr_icd cl_khr_egl_event cl_khr_egl_image cl_arm_core_id cl_arm_printf cl_arm_thread_limit_hint cl_arm_non_uniform_work_group_size cl_arm_import_memory Device Name Mali-T628 Device Vendor ARM Device Vendor ID 0x6200010 Device Version OpenCL 1.2 v1.r12p0-04rel0.03af15950392f3702b248717f4938b82 Driver Version 1.2 Device OpenCL C Version OpenCL C 1.2 v1.r12p0-04rel0.03af15950392f3702b248717f4938b82 Device Type GPU Device Profile FULL_PROFILE Device Available Yes Compiler Available Yes Linker Available Yes Max compute units 2 Max clock frequency 600MHz Device Partition (core) Max number of sub-devices 0 Supported partition types None Max work item dimensions 3 Max work item sizes 256x256x256 Max work group size 256 Preferred work group size multiple 4 Preferred / native vector sizes char 16 / 16 short 8 / 8 int 4 / 4 long 2 / 2 half 8 / 8 (cl_khr_fp16) float 4 / 4 double 2 / 2 (cl_khr_fp64) Half-precision Floating-point support (cl_khr_fp16) Denormals Yes Infinity and NANs Yes Round to nearest Yes Round to zero Yes Round to infinity Yes IEEE754-2008 fused multiply-add Yes Support is emulated in software No Single-precision Floating-point support (core) Denormals Yes Infinity and NANs Yes Round to nearest Yes Round to zero Yes Round to infinity Yes IEEE754-2008 fused multiply-add Yes Support is emulated in software No Correctly-rounded divide and sqrt operations No Double-precision Floating-point support (cl_khr_fp64) Denormals Yes Infinity and NANs Yes Round to nearest Yes Round to zero Yes Round to infinity Yes IEEE754-2008 fused multiply-add Yes Support is emulated in software No Address bits 64, Little-Endian Global memory size 2090397696 (1.947GiB) Error Correction support No Max memory allocation 522599424 (498.4MiB) Unified memory for Host and Device Yes Minimum alignment for any data type 128 bytes Alignment of base address 1024 bits (128 bytes) Global Memory cache type Read/Write Global Memory cache size 131072 (128KiB) Global Memory cache line size 64 bytes Image support Yes Max number of samplers per kernel 16 Max size for 1D images from buffer 65536 pixels Max 1D or 2D image array size 2048 images Max 2D image size 65536x65536 pixels Max 3D image size 65536x65536x65536 pixels Max number of read image args 128 Max number of write image args 8 Local memory type Global Local memory size 32768 (32KiB) Max number of constant args 8 Max constant buffer size 65536 (64KiB) Max size of kernel argument 1024 Queue properties Out-of-order execution Yes Profiling Yes Prefer user sync for interop No Profiling timer resolution 1000ns Execution capabilities Run OpenCL kernels Yes Run native kernels No printf() buffer size 1048576 (1024KiB) Built-in kernels Device Extensions cl_khr_global_int32_base_atomics cl_khr_global_int32_extended_atomics cl_khr_local_int32_base_atomics cl_khr_local_int32_extended_atomics cl_khr_byte_addressable_store cl_khr_3d_image_writes cl_khr_fp64 cl_khr_int64_base_atomics cl_khr_int64_extended_atomics cl_khr_fp16 cl_khr_gl_sharing cl_khr_icd cl_khr_egl_event cl_khr_egl_image cl_arm_core_id cl_arm_printf cl_arm_thread_limit_hint cl_arm_non_uniform_work_group_size cl_arm_import_memory NULL platform behavior clGetPlatformInfo(NULL, CL_PLATFORM_NAME, ...) ARM Platform clGetDeviceIDs(NULL, CL_DEVICE_TYPE_ALL, ...) Success [ARM] clCreateContext(NULL, ...) [default] Success [ARM] clCreateContextFromType(NULL, CL_DEVICE_TYPE_DEFAULT) Success (1) Platform Name ARM Platform Device Name Mali-T628 clCreateContextFromType(NULL, CL_DEVICE_TYPE_CPU) No devices found in platform clCreateContextFromType(NULL, CL_DEVICE_TYPE_GPU) Success (2) Platform Name ARM Platform Device Name Mali-T628 Device Name Mali-T628 clCreateContextFromType(NULL, CL_DEVICE_TYPE_ACCELERATOR) No devices found in platform clCreateContextFromType(NULL, CL_DEVICE_TYPE_CUSTOM) No devices found in platform clCreateContextFromType(NULL, CL_DEVICE_TYPE_ALL) Success (2) Platform Name ARM Platform Device Name Mali-T628 Device Name Mali-T628 ICD loader properties ICD loader Name OpenCL ICD Loader ICD loader Vendor OCL Icd free software ICD loader Version 2.2.11 ICD loader Profile OpenCL 2.1 |
That’s a lot of information, and it shows one platform with two OpenCL devices (both Mali-T628) supporting OpenCL 1.2.
That’s all for this little getting started guide. Now if you actually want to make something with OpenCL, it’s time to read Arm Compute Library documentation, and other resources on the web.

Jean-Luc started CNX Software in 2010 as a part-time endeavor, before quitting his job as a software engineering manager, and starting to write daily news, and reviews full time later in 2011.
Support CNX Software! Donate via cryptocurrencies, become a Patron on Patreon, or purchase goods on Amazon or Aliexpress. We also use affiliate links in articles to earn commissions if you make a purchase after clicking on those links.


I wonder why everyone is using swap when it’s so easy to activate zram on Ubuntu?
Also it should be noted when comparing execution times that the ImageMagick version you’re using is Q16 and not Q8 (internal bit depth, defaults to 16 bit which results in more precise operations with some tasks but with a simple grayscale conversion or downscaling only slows things unnecessarily down — this can only be specified at build time ‘–with-quantum-depth’)
It would be worth a try to repeat the test with GraphicsMagick which should default to Q8 (can be checked with ‘gm version’). Execution syntax as above just prefixed with ‘gm ‘. Installation is just the usual ‘sudo apt install graphicsmagick’
And on a big.LITTLE platform I would try to ensure execution on an A15 core: So prefixing IM commands with
ImageMagick is considered the ‘swiss army knife’ of image processing for whatever reasons but usually it’s slow as hell and we try to avoid it whereever possible (using GraphicsMagick instead usually results in better performance, avoiding it altogether and using tools that are optimized for the task is an even better idea)
Just mentioning since comparing ‘convert’ execution times with the OpenCL examples is not comparing efficiency of CPU vs. GPU but most probably just unoptimized vs. optimized software in this case.
gm is also build with Q16
Result if I force convert / gm convert to run on the big core
So gm is much faster, but not related to Q8 or Q16.
Full result of gm version for reference:
> So gm is much faster, but not related to Q8 or Q16.
Thank you for the tests which simply show one more time that ImageMagick is just slow as hell. When I tested last time with Q8 vs. Q16 I got a performance improvement of 20% for Q8 (with a task that involved loading the rather large images through a slow GbE network so no filesystem buffers/caches involved as in your example).
So by using GraphicsMagick vs. ImageMagick now CPU processing easily outperforms OpenCL on the GPU. This should be taken into account by people really interested in doing high performance image processing (or other tasks that could run via OpenCL on the GPU).
BTW: ‘Converting to grayscale’ can be done in many ways. The most primitive and fastest is to add the values of the 3 RGB channels and divide by 3. A more complicated variant would be to transform the RGB image into a ‘device independent color space’ and then reducing saturation to 0. This is way more ‘expensive’ in terms of processing power but results in a slightly better image result. Next improvement is to take ICC profiles into account (assuming something generic like sRGB for source and destination images if the fileformat doesn’t support color profiles).
I would assume the OpenCL example uses the most primitive and fastest algorithm while GraphicsMagick implements the latter variant. Would be interesting to compare the two grayscale results:
Usually this will result in a pretty dark image so adding ‘-normalize’ or inverting the resulting image helps in spotting differences.
Before this discussion goes further off the rails, the cl_convolution example’s function is not to convert to grayscale:
https://github.com/ARM-software/ComputeLibrary/blob/master/examples/cl_convolution.cpp
// Apply a Gaussian 3×3 filter to the source image followed by a Gaussian 5×5:
A convolution filter in this context is explained here:
https://en.wikipedia.org/wiki/Kernel_(image_processing)
The function it performs depends on the filter values used. Since the operation is scaler (single value) and not vector (multiple values), the output is typically represented as grayscale.
Further information (and uses) can be found here:
http://www.roborealm.com/help/Convolution.php
For an ImageMagic comparison, the appropriate convolution filter operation should be used.:
https://www.imagemagick.org/Usage/convolve/
Note there are two passes (3×3 and 5×5). The kernel filter values used are here:
https://github.com/ARM-software/ComputeLibrary/blob/02c62c8030e7aca592b294396556a93c6bfb9f7a/examples/cl_convolution.cpp#L36-L54
Interesting. So it’s a gaussian blur applied twice in reality and for whatever reasons color information has been dropped from the final image (5184 x 3456 in grayscale is 17.9 MB in size but resulting image is 53.7 MB, so it’s not a Graymap but still a Pixmap)
Another way to avoid costly swapfiles is to lower the -jN option to the compiler. In this particular case -j4 would have utilized the big cores and likely not needed the swapfile.
Good point, but I think the build failed at the link stage, which I believe only uses one core. I’m compiling the thing with -j1 to see if it goes through, then I’ll try with ZRAM enabled.
-j1 could complete, but I repeated with -j8 with zram nor swap, and completed too. Maybe it was just at the limit…
[ additional zram (<3/4 of ram, because of fs overhead for zram, if not used) together with conventional swap space (file/partition), could be recommendable when compiling ]
echo lz4 into /sys/block/zram0/comp_algorithm
Thanks for this guide!
Pretty sure clinfo is not reporting anything but support for OpenCL 1.2 — there is no 2.1 support listed.
Also, I find it odd that the MP6 GPU is listed as *two* devices: one with 4 compute units (MPs) and one with 2… I’ve never seen that before!
hmm, you’re right the drivers only show OpenCL 1.2. I saw OpenCL 2.1 at this line:
Since we have two devices, I wonder if the selection of the device matters, especially one has 4 compute units, and the other has both, or do OpenCL code just run on both at the same time?
I really depends how the client code was written — while a CL kernel would not care on how many devices it would run, the client-side context and queue setup would need to be carried properly for multi-device dispatch.
For client code that was not written to run on multiple devices, the user has to make sure they run the test on the most performant device — in this case on the 4-CU one.
@ASM, Indeed, the T628 in the exynos 5422 is a 6-cluster setup, which apparently comes at 4 + 2 CUs.
I was pondering not long ago how to split a workload for it, and one inevitably gets to a 3-way split, which is, well, odd for most workloads.
@BLU, thanks for confirming the 4+2 split!
I didn’t know and don’t understand why ARM would ever split their GPUs !
This may be useful for a reliable embedded application but it’s still odd.
It’s a challenge to program and coordinate multiple GPUs.
Furthermore, OpenCL 1.2+ already supports a “device fission” feature (clCreateSubDevices()) in case you wanted to logically split the CL device into sub-devices.
Too bad… as an OpenCL dev I would prefer using all 6 MPs in one device. 🙁
FWIW, here is the clinfo for the HiKey 960 and the G71 MP8: https://pastebin.com/RTjNdKyT
Thanks for the G71 clinfo — that’s the first time I see it.
‘Max work group size: 384’ — apparently ARM have a thing for the number 3..
The error “Out of memory: Kill process 4984 (cc1plus) Out of memory: Kill process 4984 (cc1plus)” happens rarely if you choose to build on all eight cores -j8
“Now if you actually want to make something with OpenCL, it’s time to read Arm Compute Library documentation….”
Unless you’re interested in deep learning, and use Keras, in which case PlaidML* can make things quite simple:
1) pip install plaidml
2 plaidml-setup
Great, there’s ‘experimental support’ for the Nvidia NVS 5200M in my laptop
3) Pull Keras code for MNIST digit recognition code into a Jupyter notebook**
4) Add two lines at top:
import plaidml.keras
plaidml.keras.install_backend()
5) Run. Fails: Great Firewall of China is blocking dataset download. Fortunately, it’s on Baidupan (Chinese Google Drive). Modify code slightly to use downloaded data.
6) Run. “ERROR:plaidml:unable to fill buffer: CL_INVALID_OPERATION”
7) Could be out of memory – an Nvidia NVS 5200M only has 1GB. Cutting the batch size / layers sizes doesn’t seem to help. Let’s just kill a layer:
##model.add(Conv2D(64, (3, 3), activation=’relu’))
8) Success! Kind of…
About 15s/epoch, but with a far smaller network.
Eliminating that layer did away with a lot of weights and the network’s capacity to fit the data, with accuracy of only 98,35% after 12 epochs (CF 99.25% reported for the original network).
That said, PlaidML can turn even an aging laptop’s GPU into a ‘just works’ platform for experimenting with fairly small, fairly standard networks.
Love to hear how it works on cheapish new ARM devices!
*https://github.com/plaidml/plaidml
**https://github.com/keras-team/keras/blob/master/examples/mnist_cnn.py
That name is familiar… It’s been a while. Welcome back!
Thanks – I’m hoping to tempt you into trying this on some ARM boards from that big stack you must have in Chiang Mai!
The networks they can train might be limited (big neural networks takes a lot of memory). But some ARM GPUs may quite useful for inference (predicting with pre-trained models). PlaidML’s support of ONNX (an open format to represent deep learning models, https://onnx.ai/) should make it fairly easy to test how well they work.
In particular, the Intel Movidius and AAEON UP AI Core only have 512-1024MB ram, which I think (?) is comparable with the RAM ARM GPUs can often access. So some people may find projects they thought would need a Movidius/UP AI Core/Jetson will work on other cheaper devices.
(I also stumbled across Qualcomm’s Neural Processing Engine (NPE) SDK while googling for this:
https://developer.qualcomm.com/blog/run-your-onnx-ai-models-faster-snapdragon )