
I’ve been thinking about installing one or more IP camera in my home for a while, and for ease of installation and considering I’m renting, my preference was to go with one of those battery IP cameras similar to Amazon (Immedia) Blink IP camera or Eufy EverCam security camera that last six months to one year on a single charge.
But earlier this year I came across Reolink Argus 2 battery powered security camera that looks like good value at $100, and also came with an optional solar panel so you don’t have to ever charge the camera. The company latter contacted me to know whether I’d be willing to try out their latest Reolink Argus Eco camera with similar features but an even lower $89.99 price tag. I got my sample a few weeks ago, and I had time to install it, and play around with the camera during that time, so I’m now ready to report my experience in this review of Reolink Argus Eco security camera.
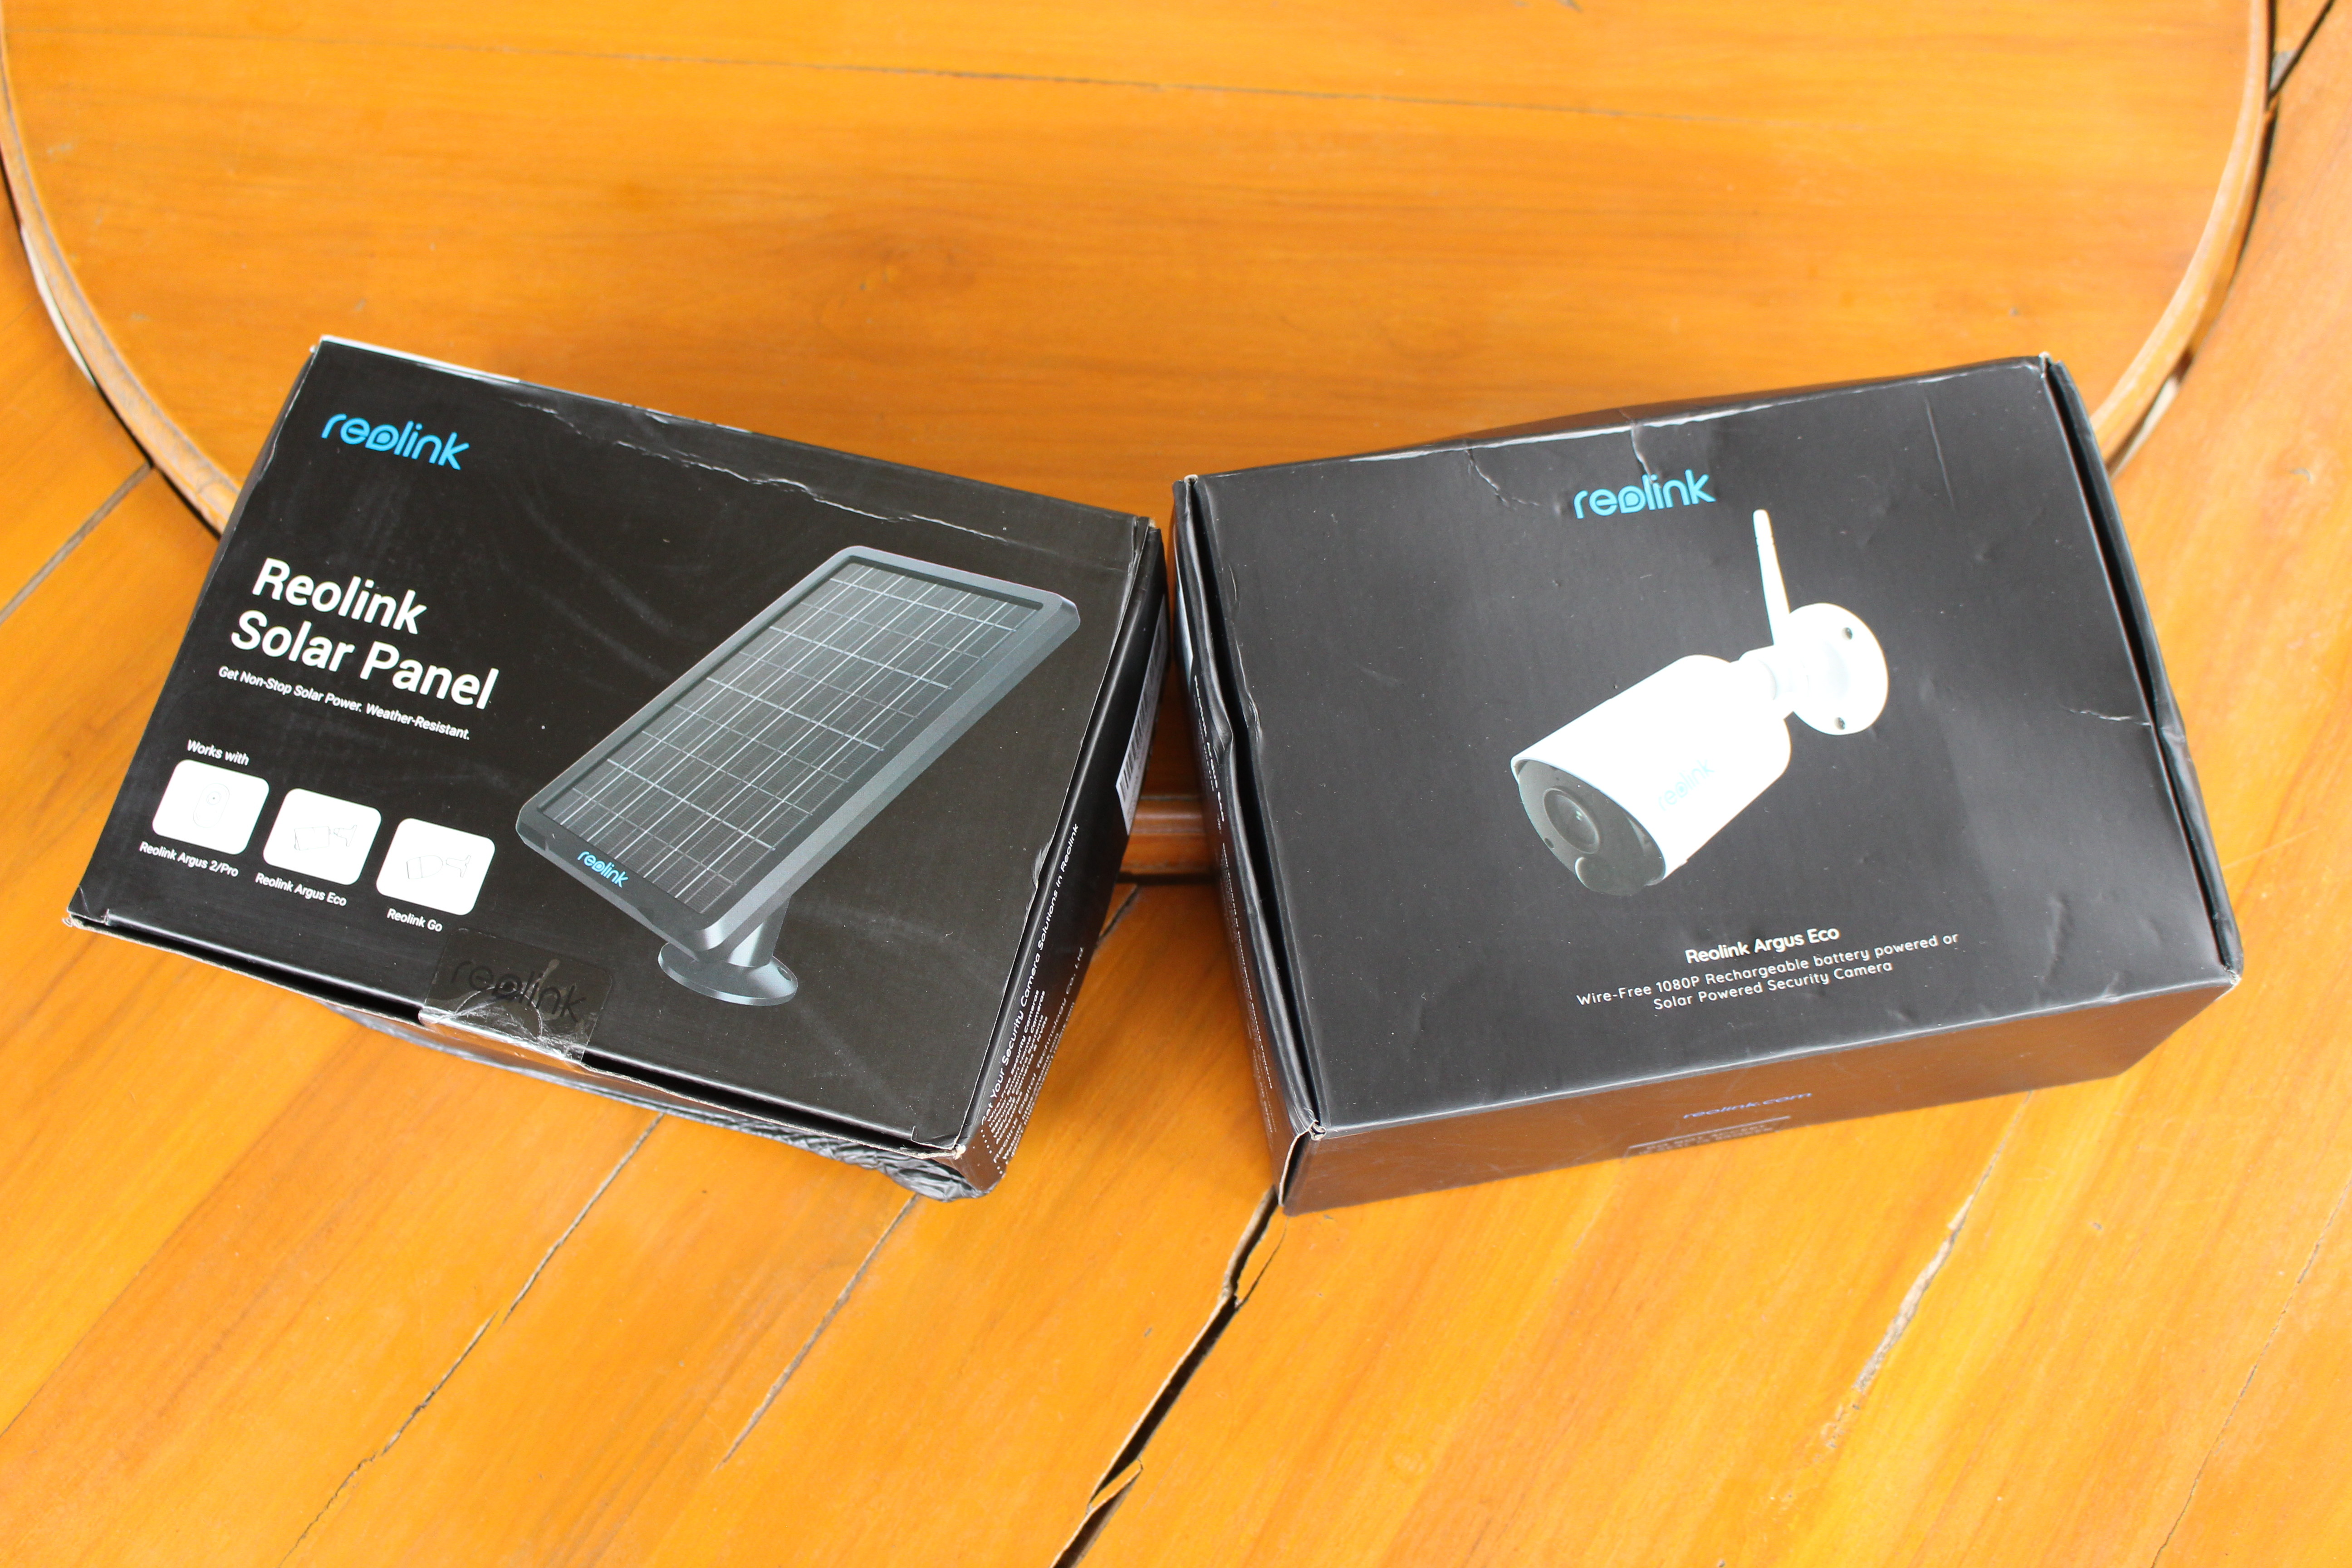
Reolink Argus Eco & Solar Panel Unboxing
I received two packages one for the camera itself, and another for the (optional) solar panel.
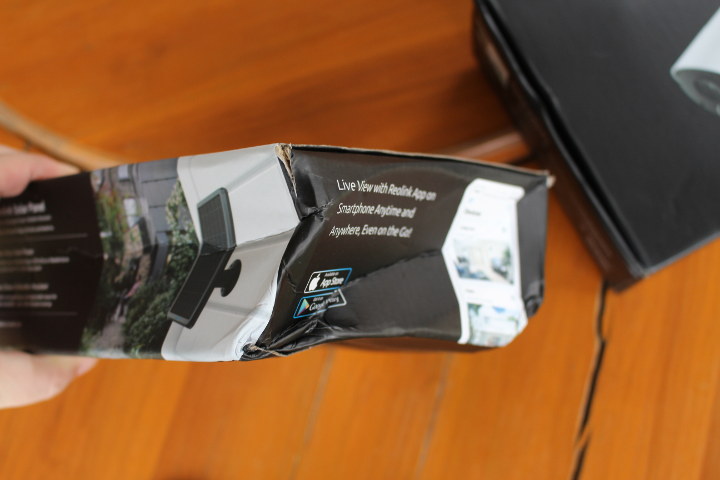
The Reolink Solar Panel package did not arrive in the best conditions, but the panel was not damaged at all so everything is good.
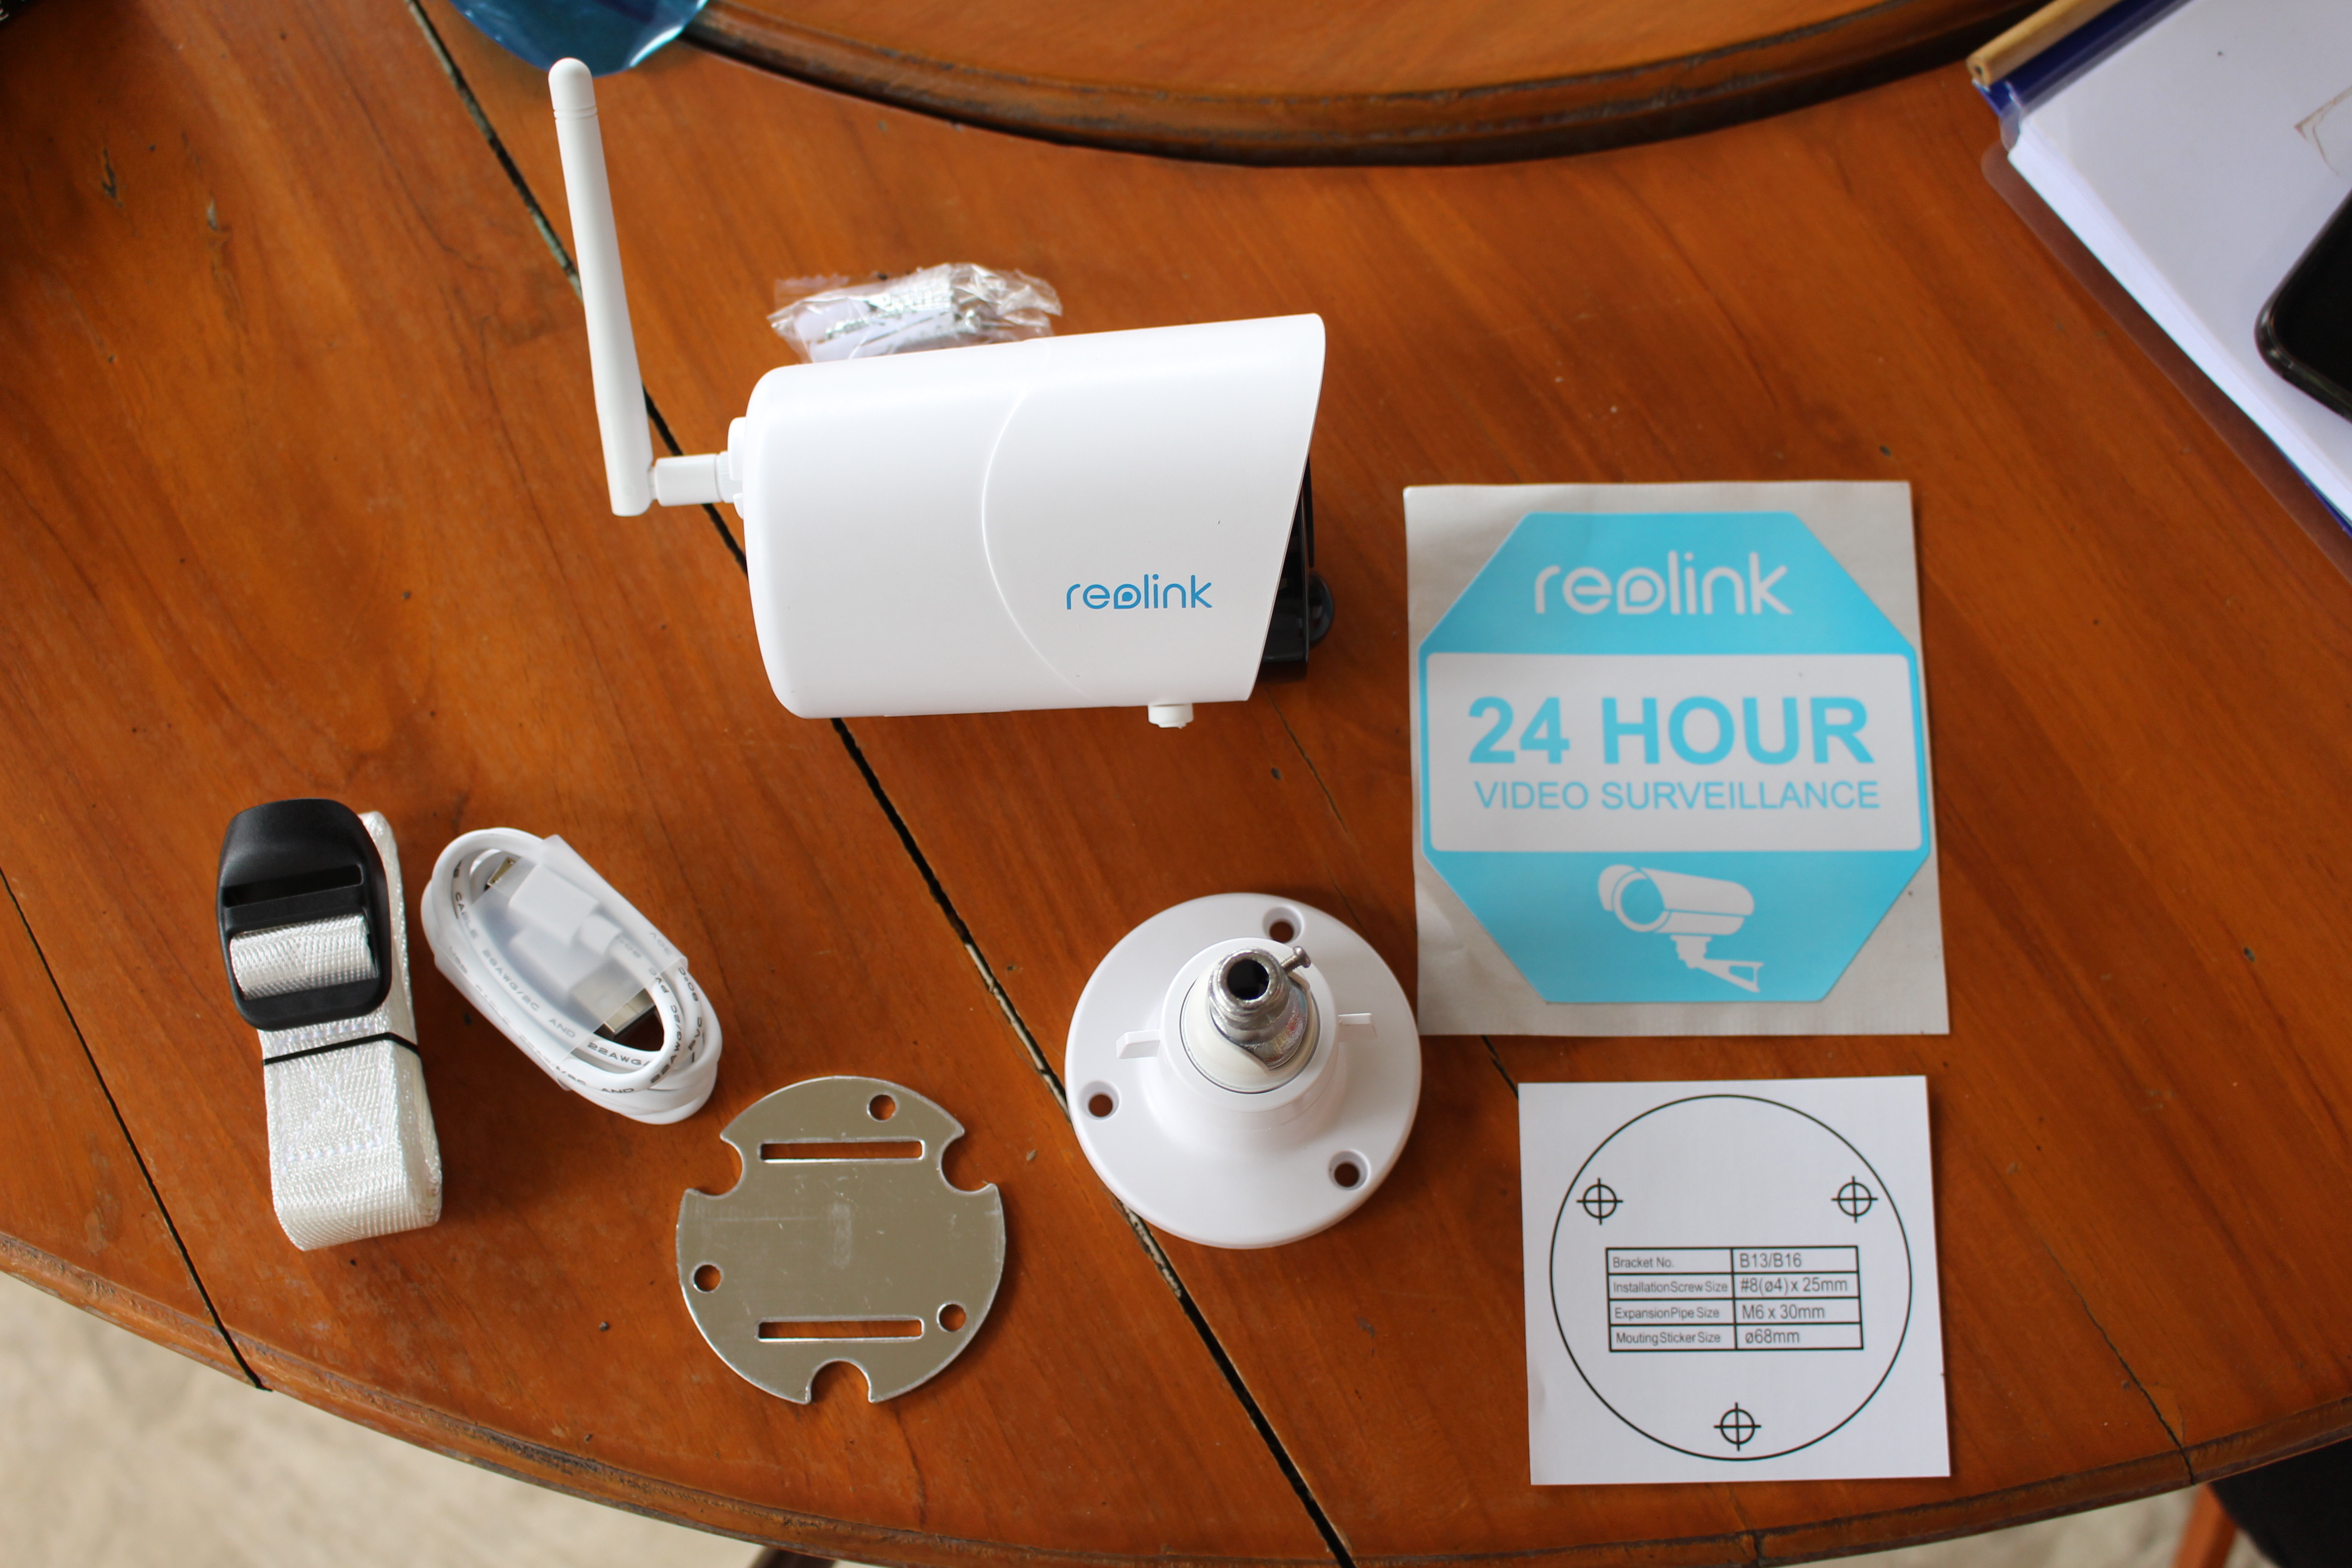
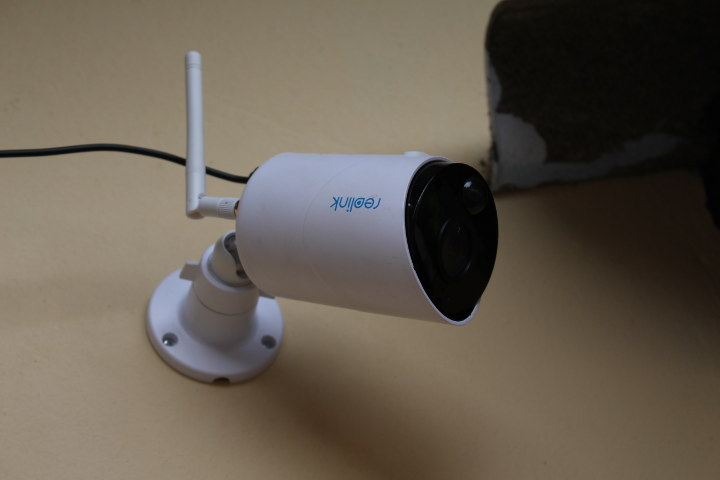
Open the camera package, we’ll find the camera itself, a WiFi antenna (which I installed below), a wall mount, a tree/pole mount and corresponding belt, a micro USB to USB cable, a 24-hour video surveillance sticker, and a piece of paper to help with the mount.
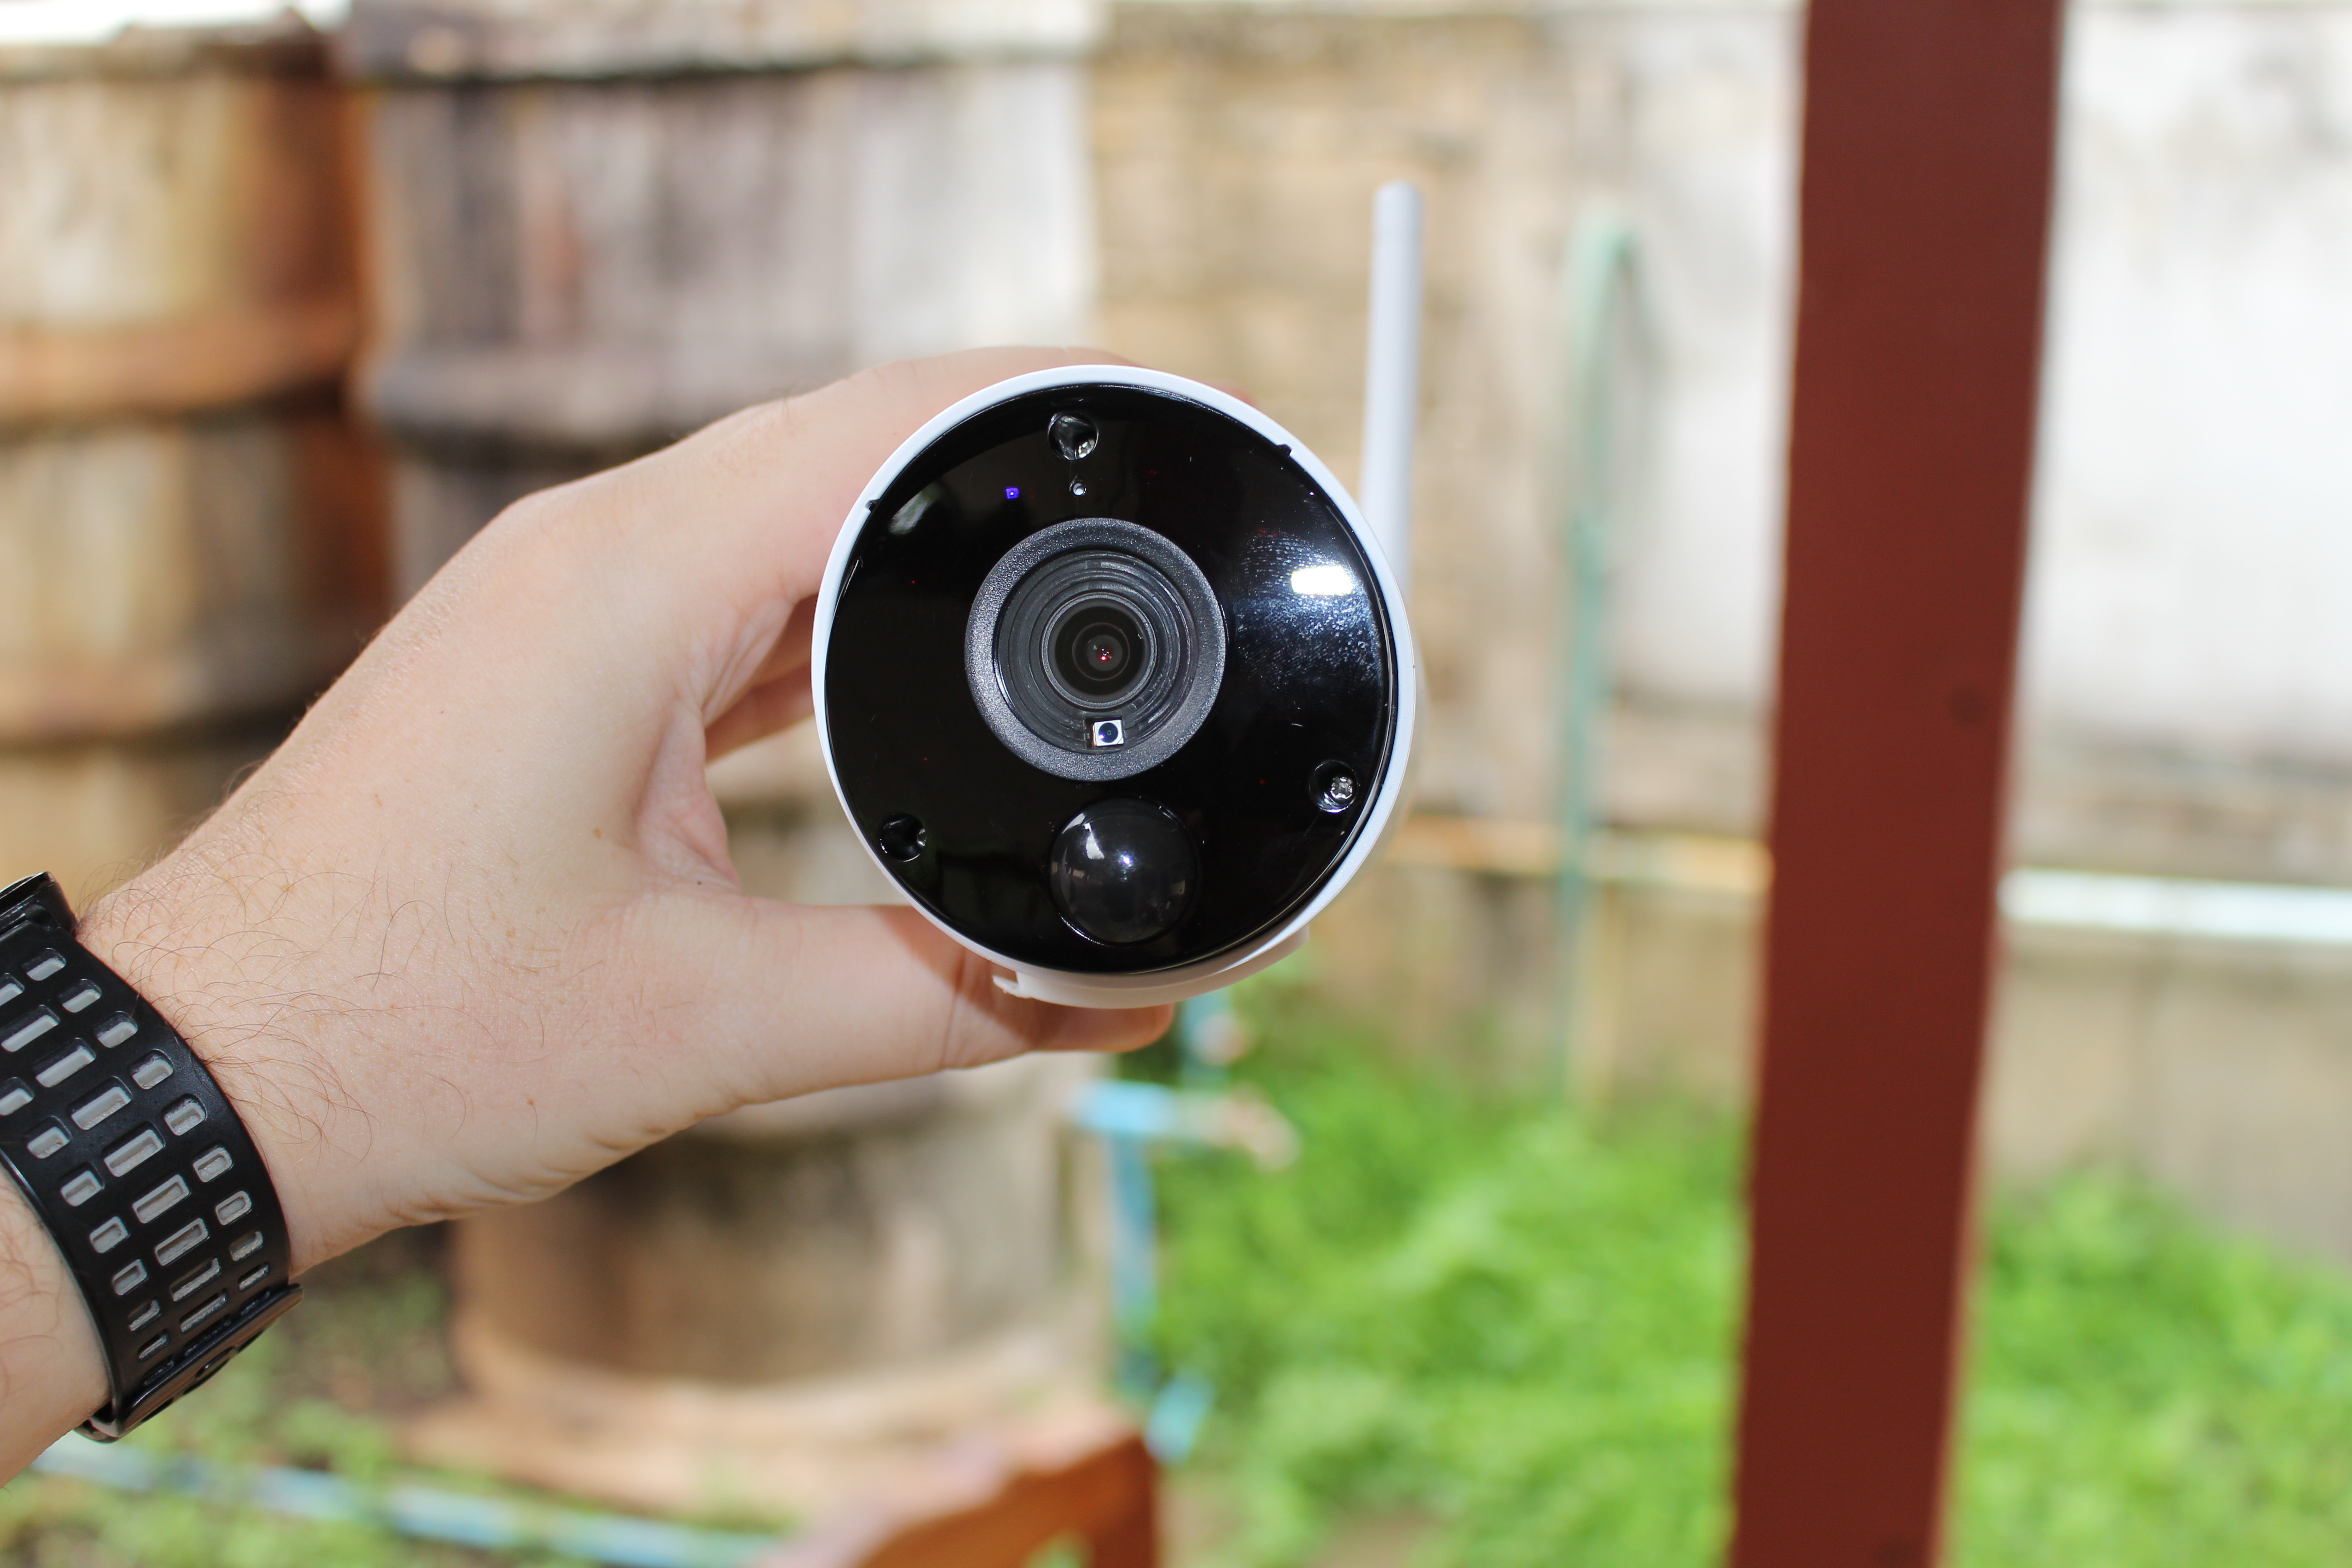
The front of the security camera comes with the camera sensor, a PIR sensor, infrared sensors, and various LEDs.
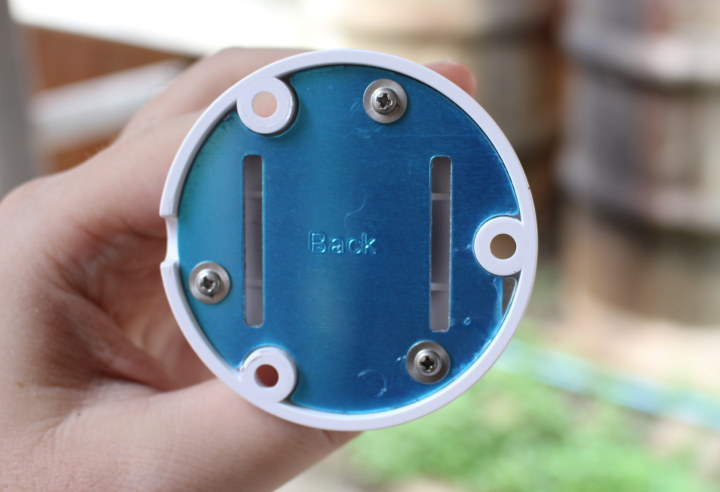
At the back we’ve got the thread for the wall mount, and a waterproof micro USB port for charging the camera through a power supply or solar panel.
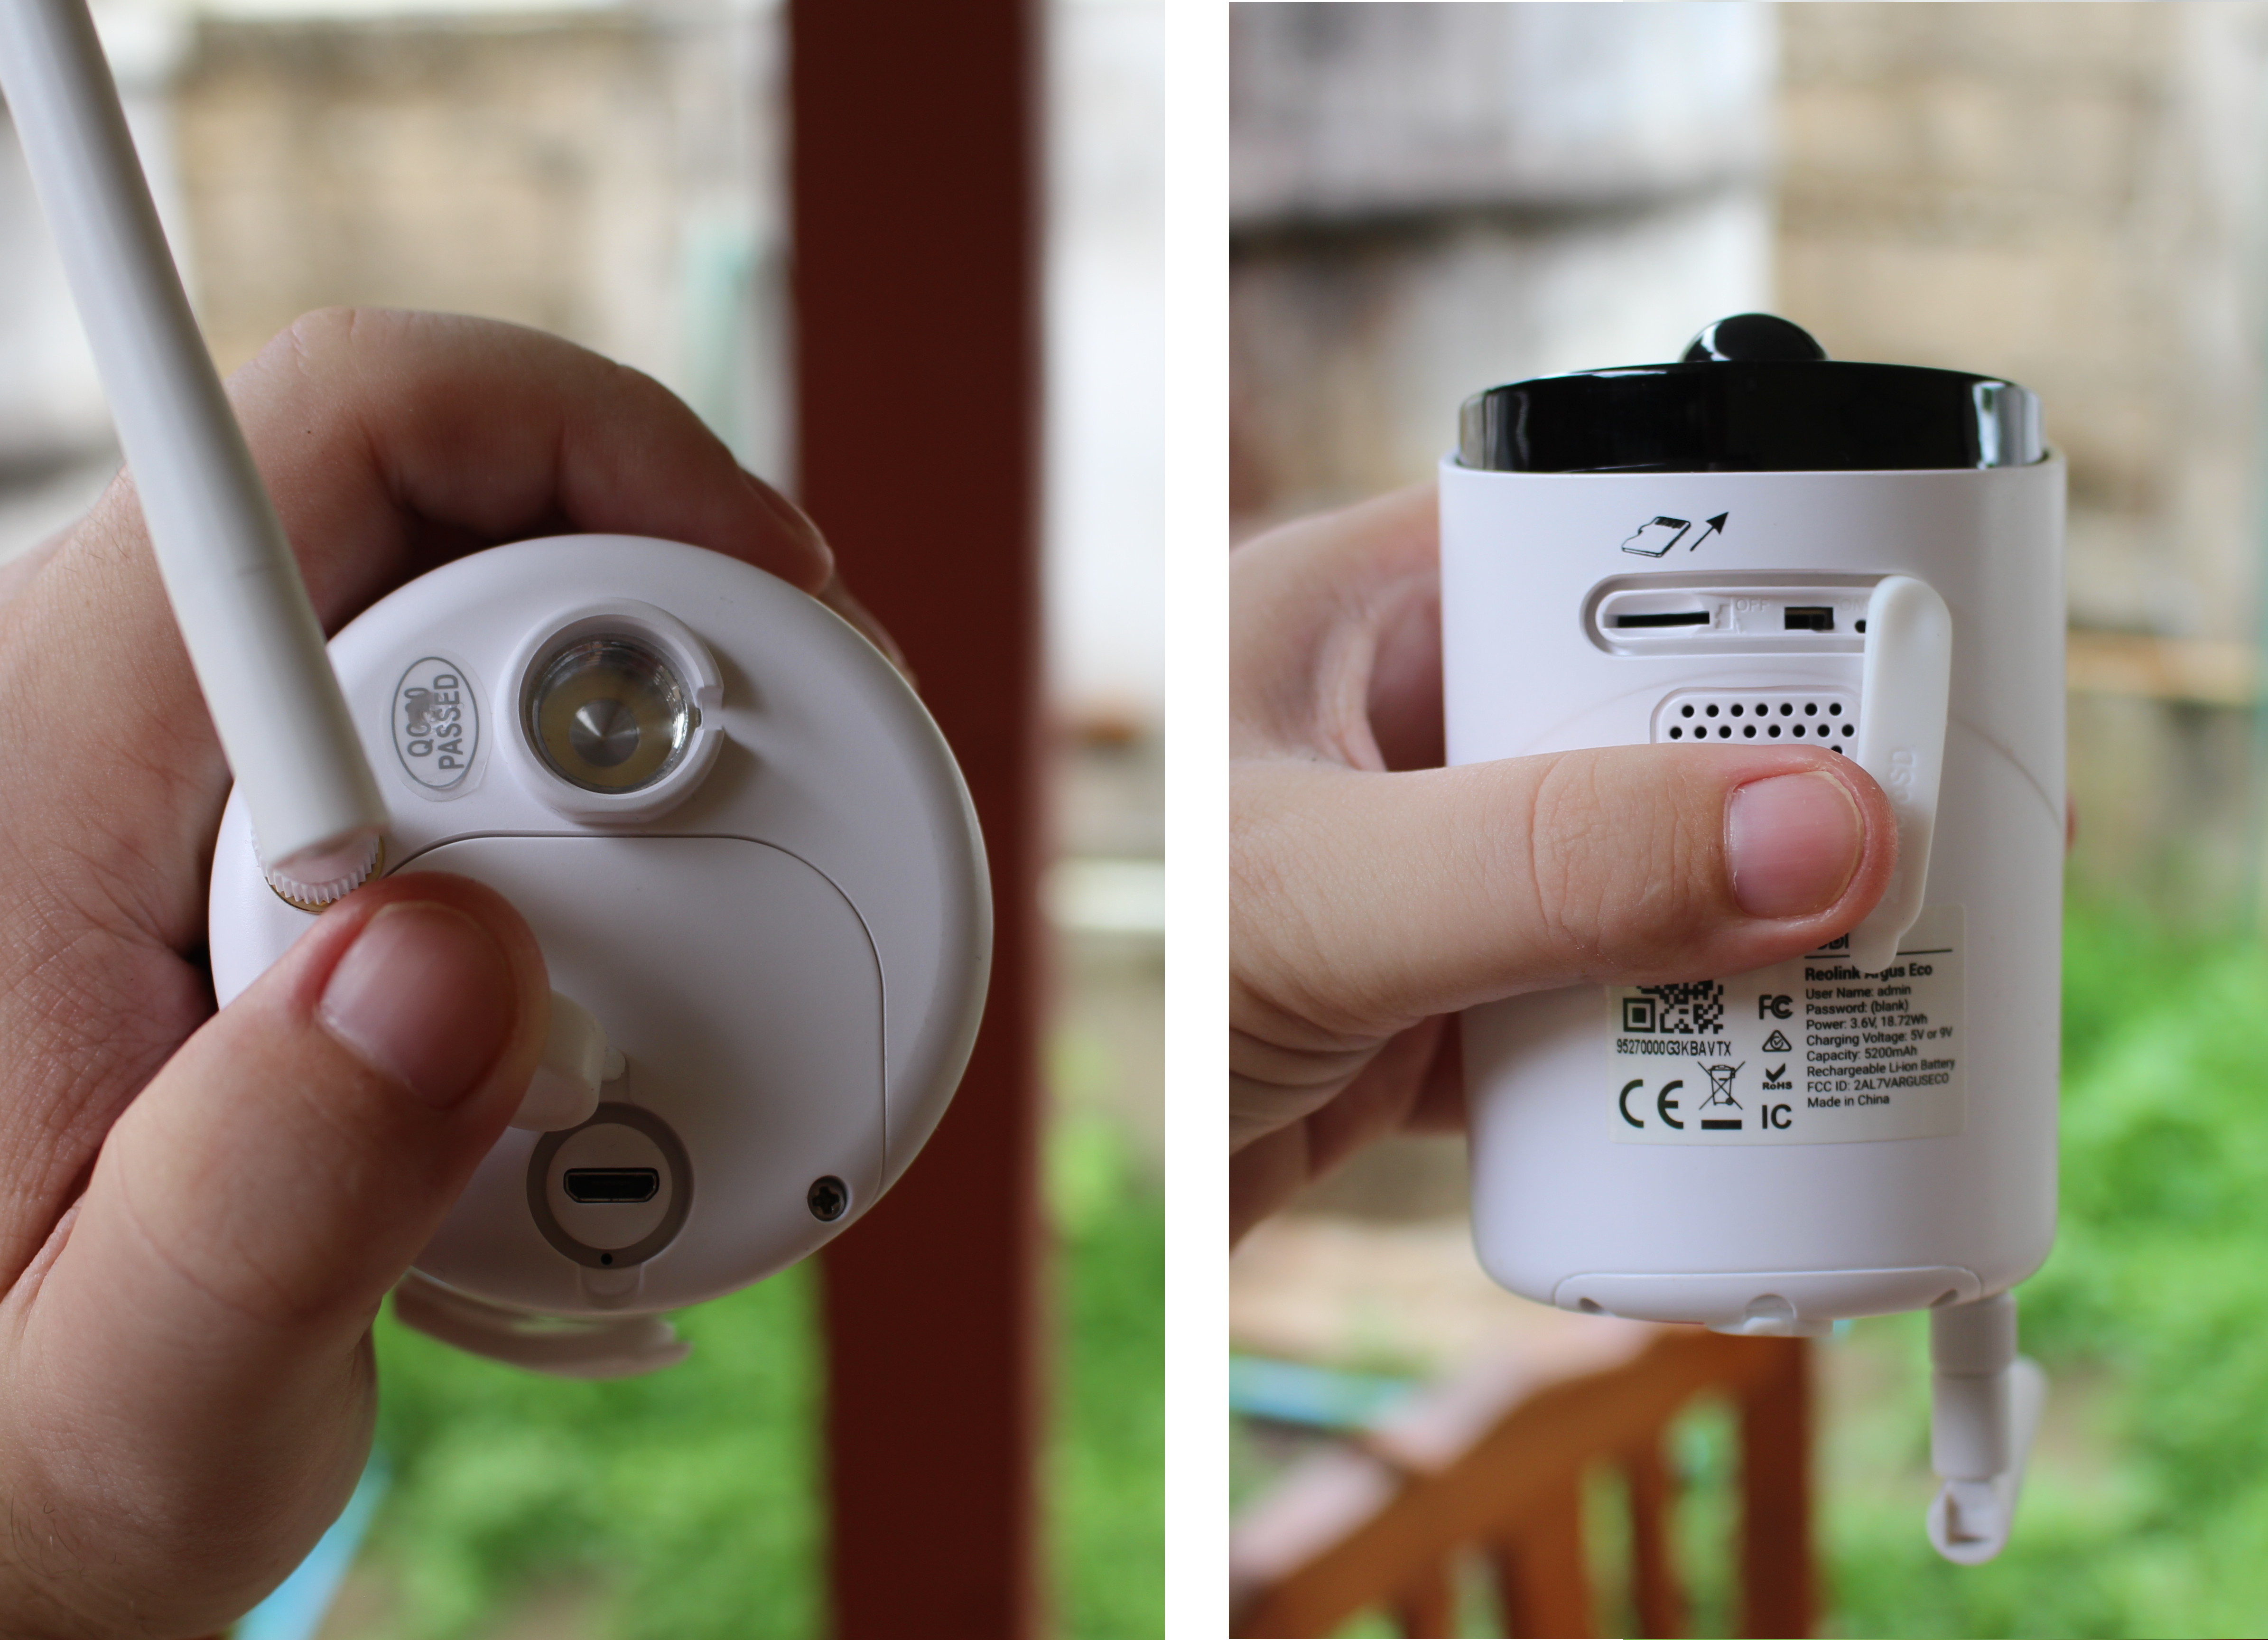
The bottom of the camera features a microSD socket, a power switch, and a grid for the speaker.
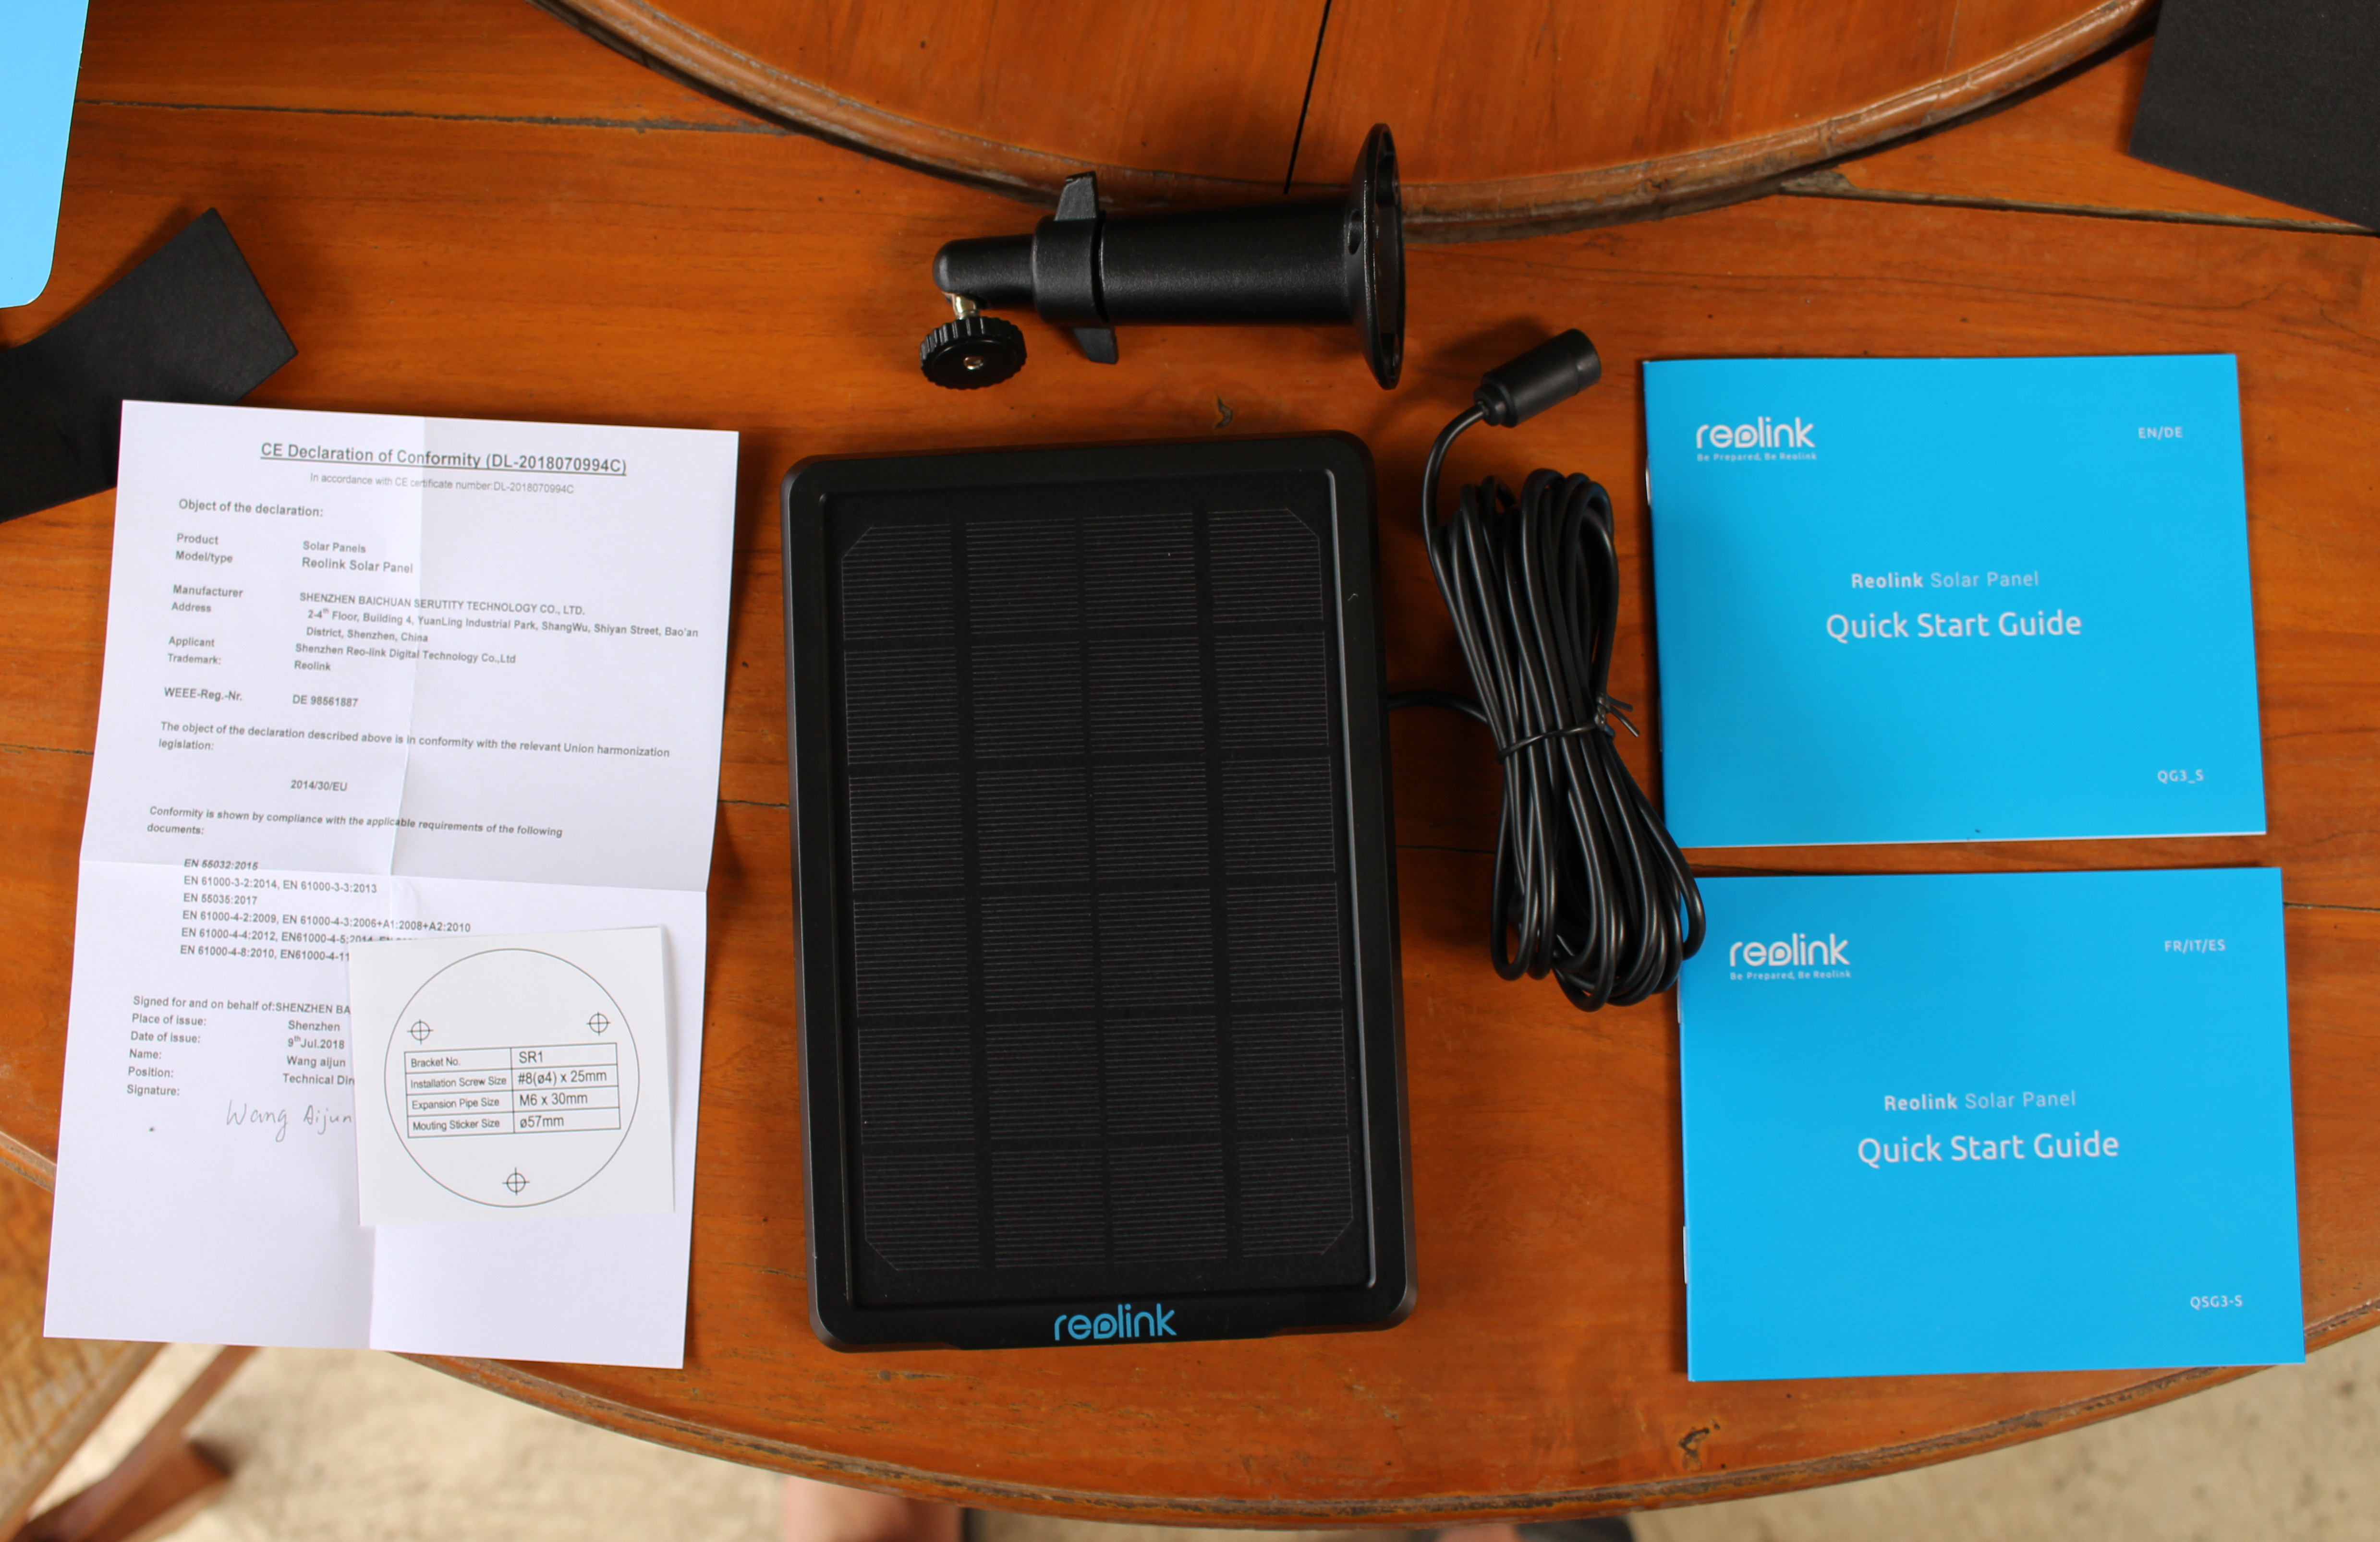
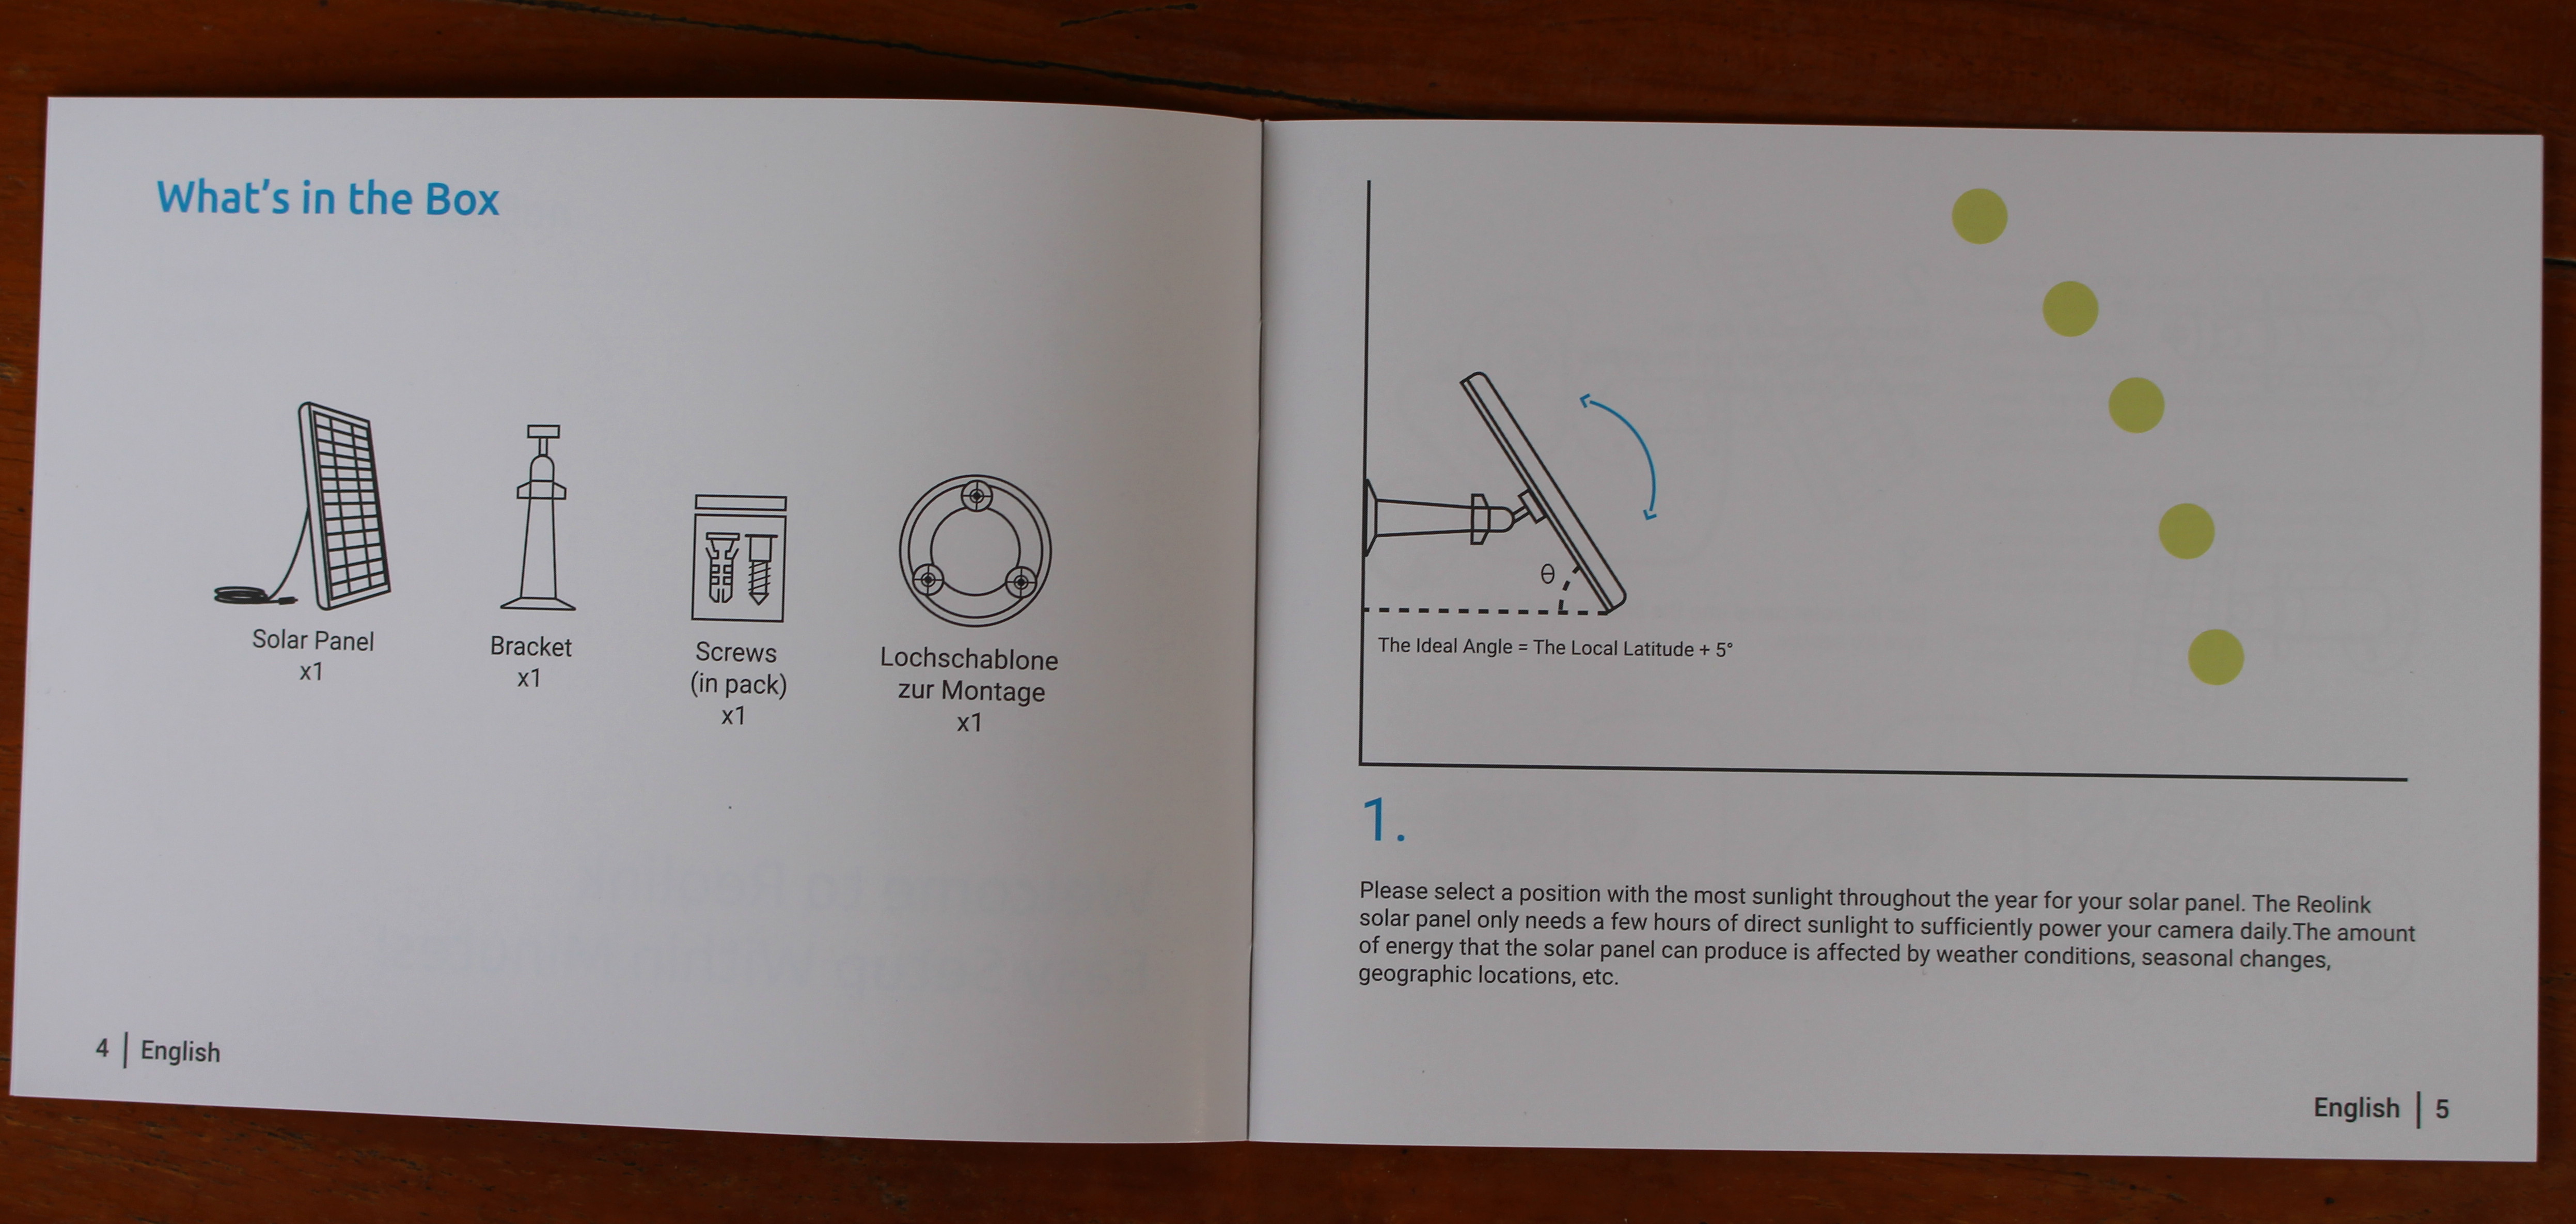
Reolink Solar panel is fitted with a 5-meter cable that ends with a weather-proof micro USB port, a black wall mount, a CE confirmity document, a piece of paper to help with the wall mount, and two user manuals for instructions in English, German, French, Italian, and Spanish.
You can watch the unboxing video below if you please.
Android App Configuration
But before mounting the camera and solar panel to the wall/roof, let’s install Reolink Android app and turn the camera on by sliding the On/Off slide to begin configuration.
The user manual is actually pretty good, so I recommend you follow the instructions there as well.
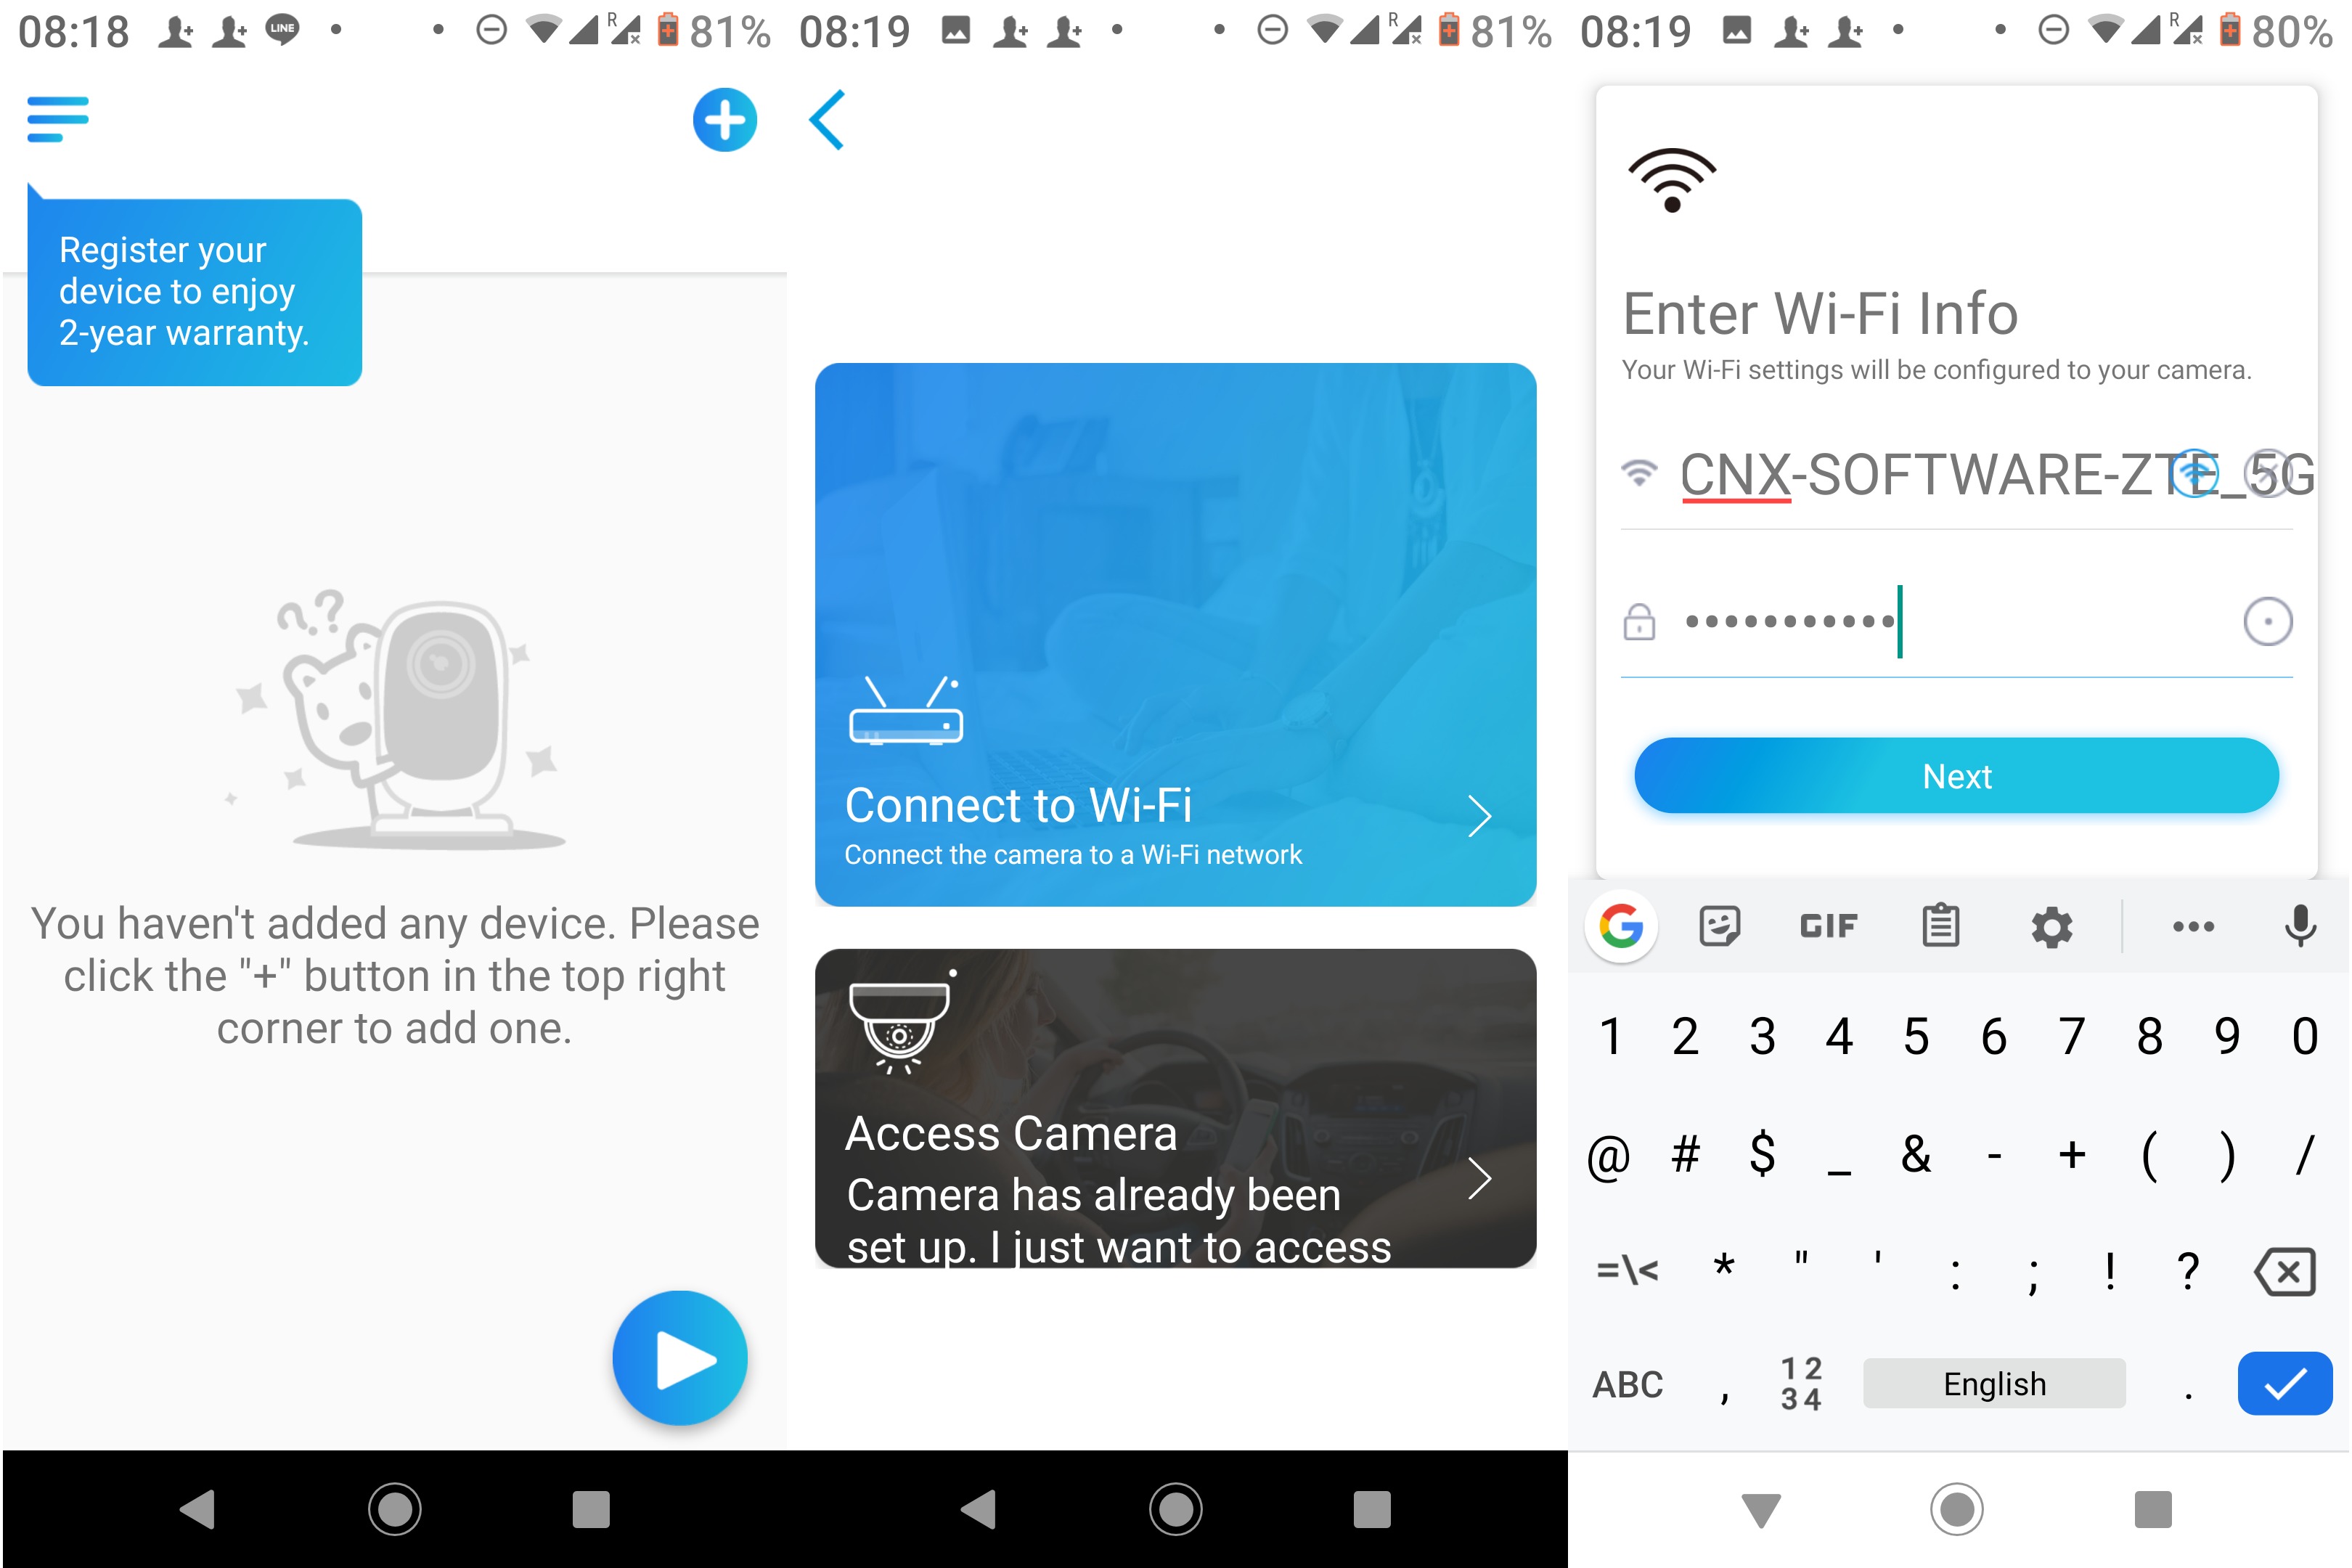
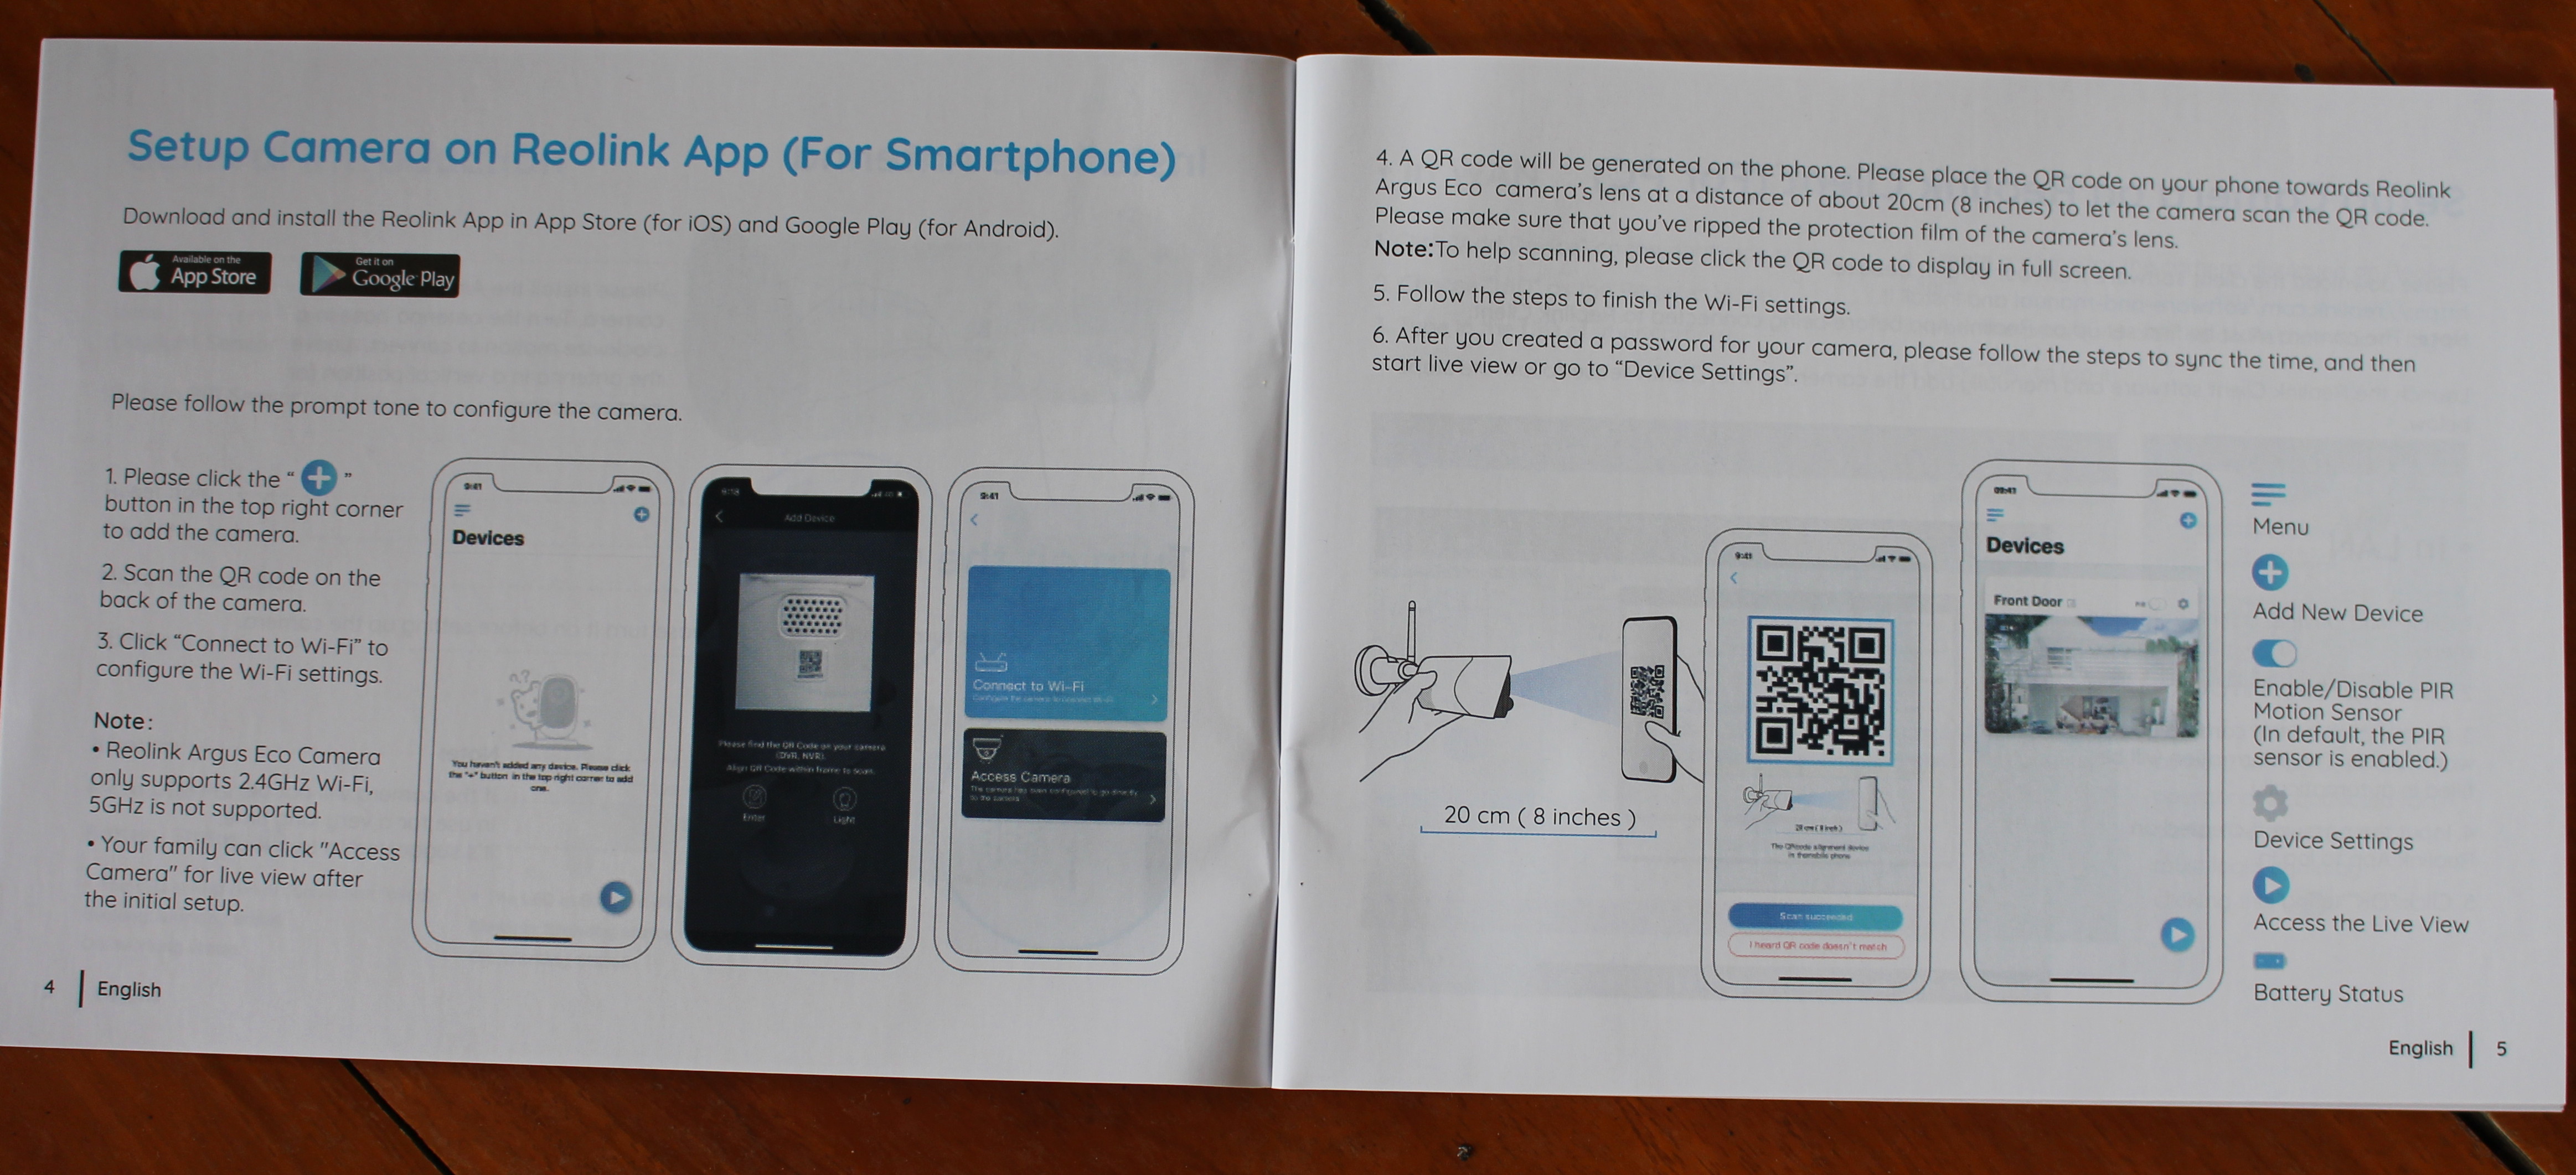
We can take on the + button in the first screen, then select “Connect to Wi-Fi” to complete wireless configuration of the camera. ote that the app will automatically select the current access point your phone is connected to. At first, it would just not work for me, until I realize my phone was connected to my router over 5 GHz, and the camera only support 2.4 GHz WiFi. So I connected my phone to a 2.4 GHz WiFi network to complete the configuration, and once it was done I switched back to the 5 GHz on my phone.
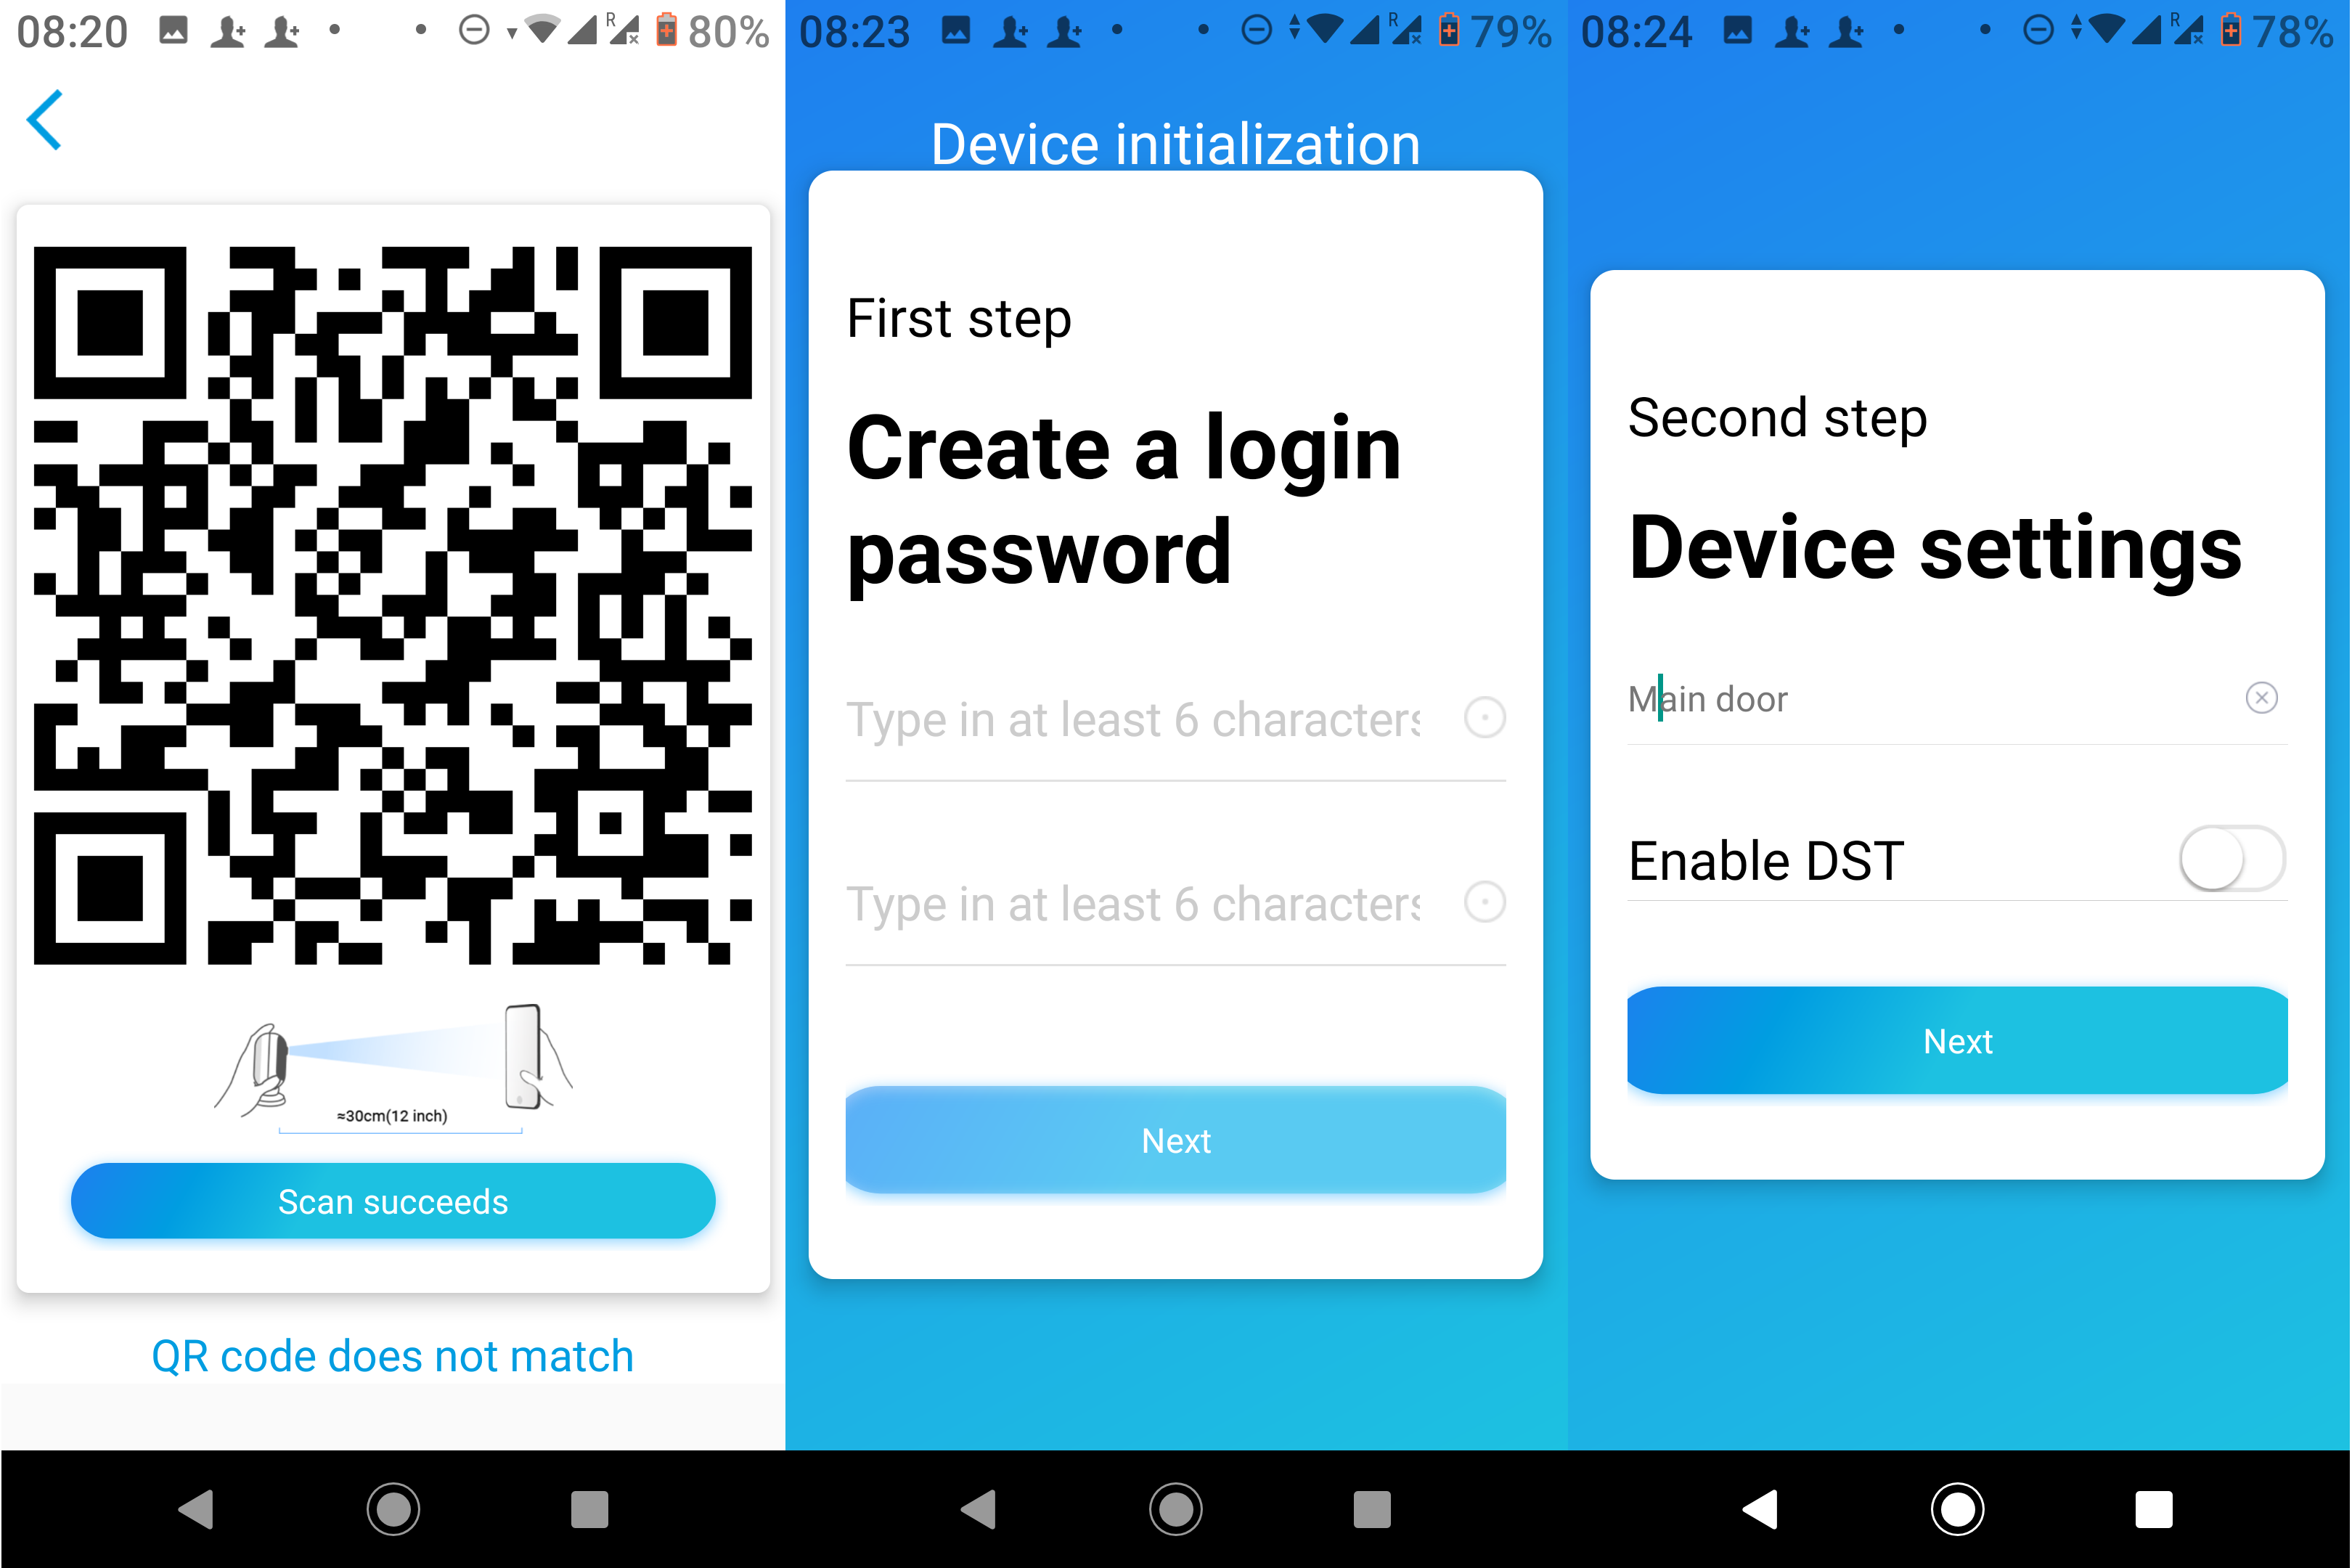
After connection to the WiFi router, you’ll be shown a QR code in the app. Simply point the camera to scan this QR code by placing less than 30 cm away. Note that you’ll get audio feedback during configuration with a female voice telling you what’s going on so it’s relatively easy to solve issues. Reading the manual may help too.
The final steps were to give a password, useful to share the camera with other members of your family, and name the camera.
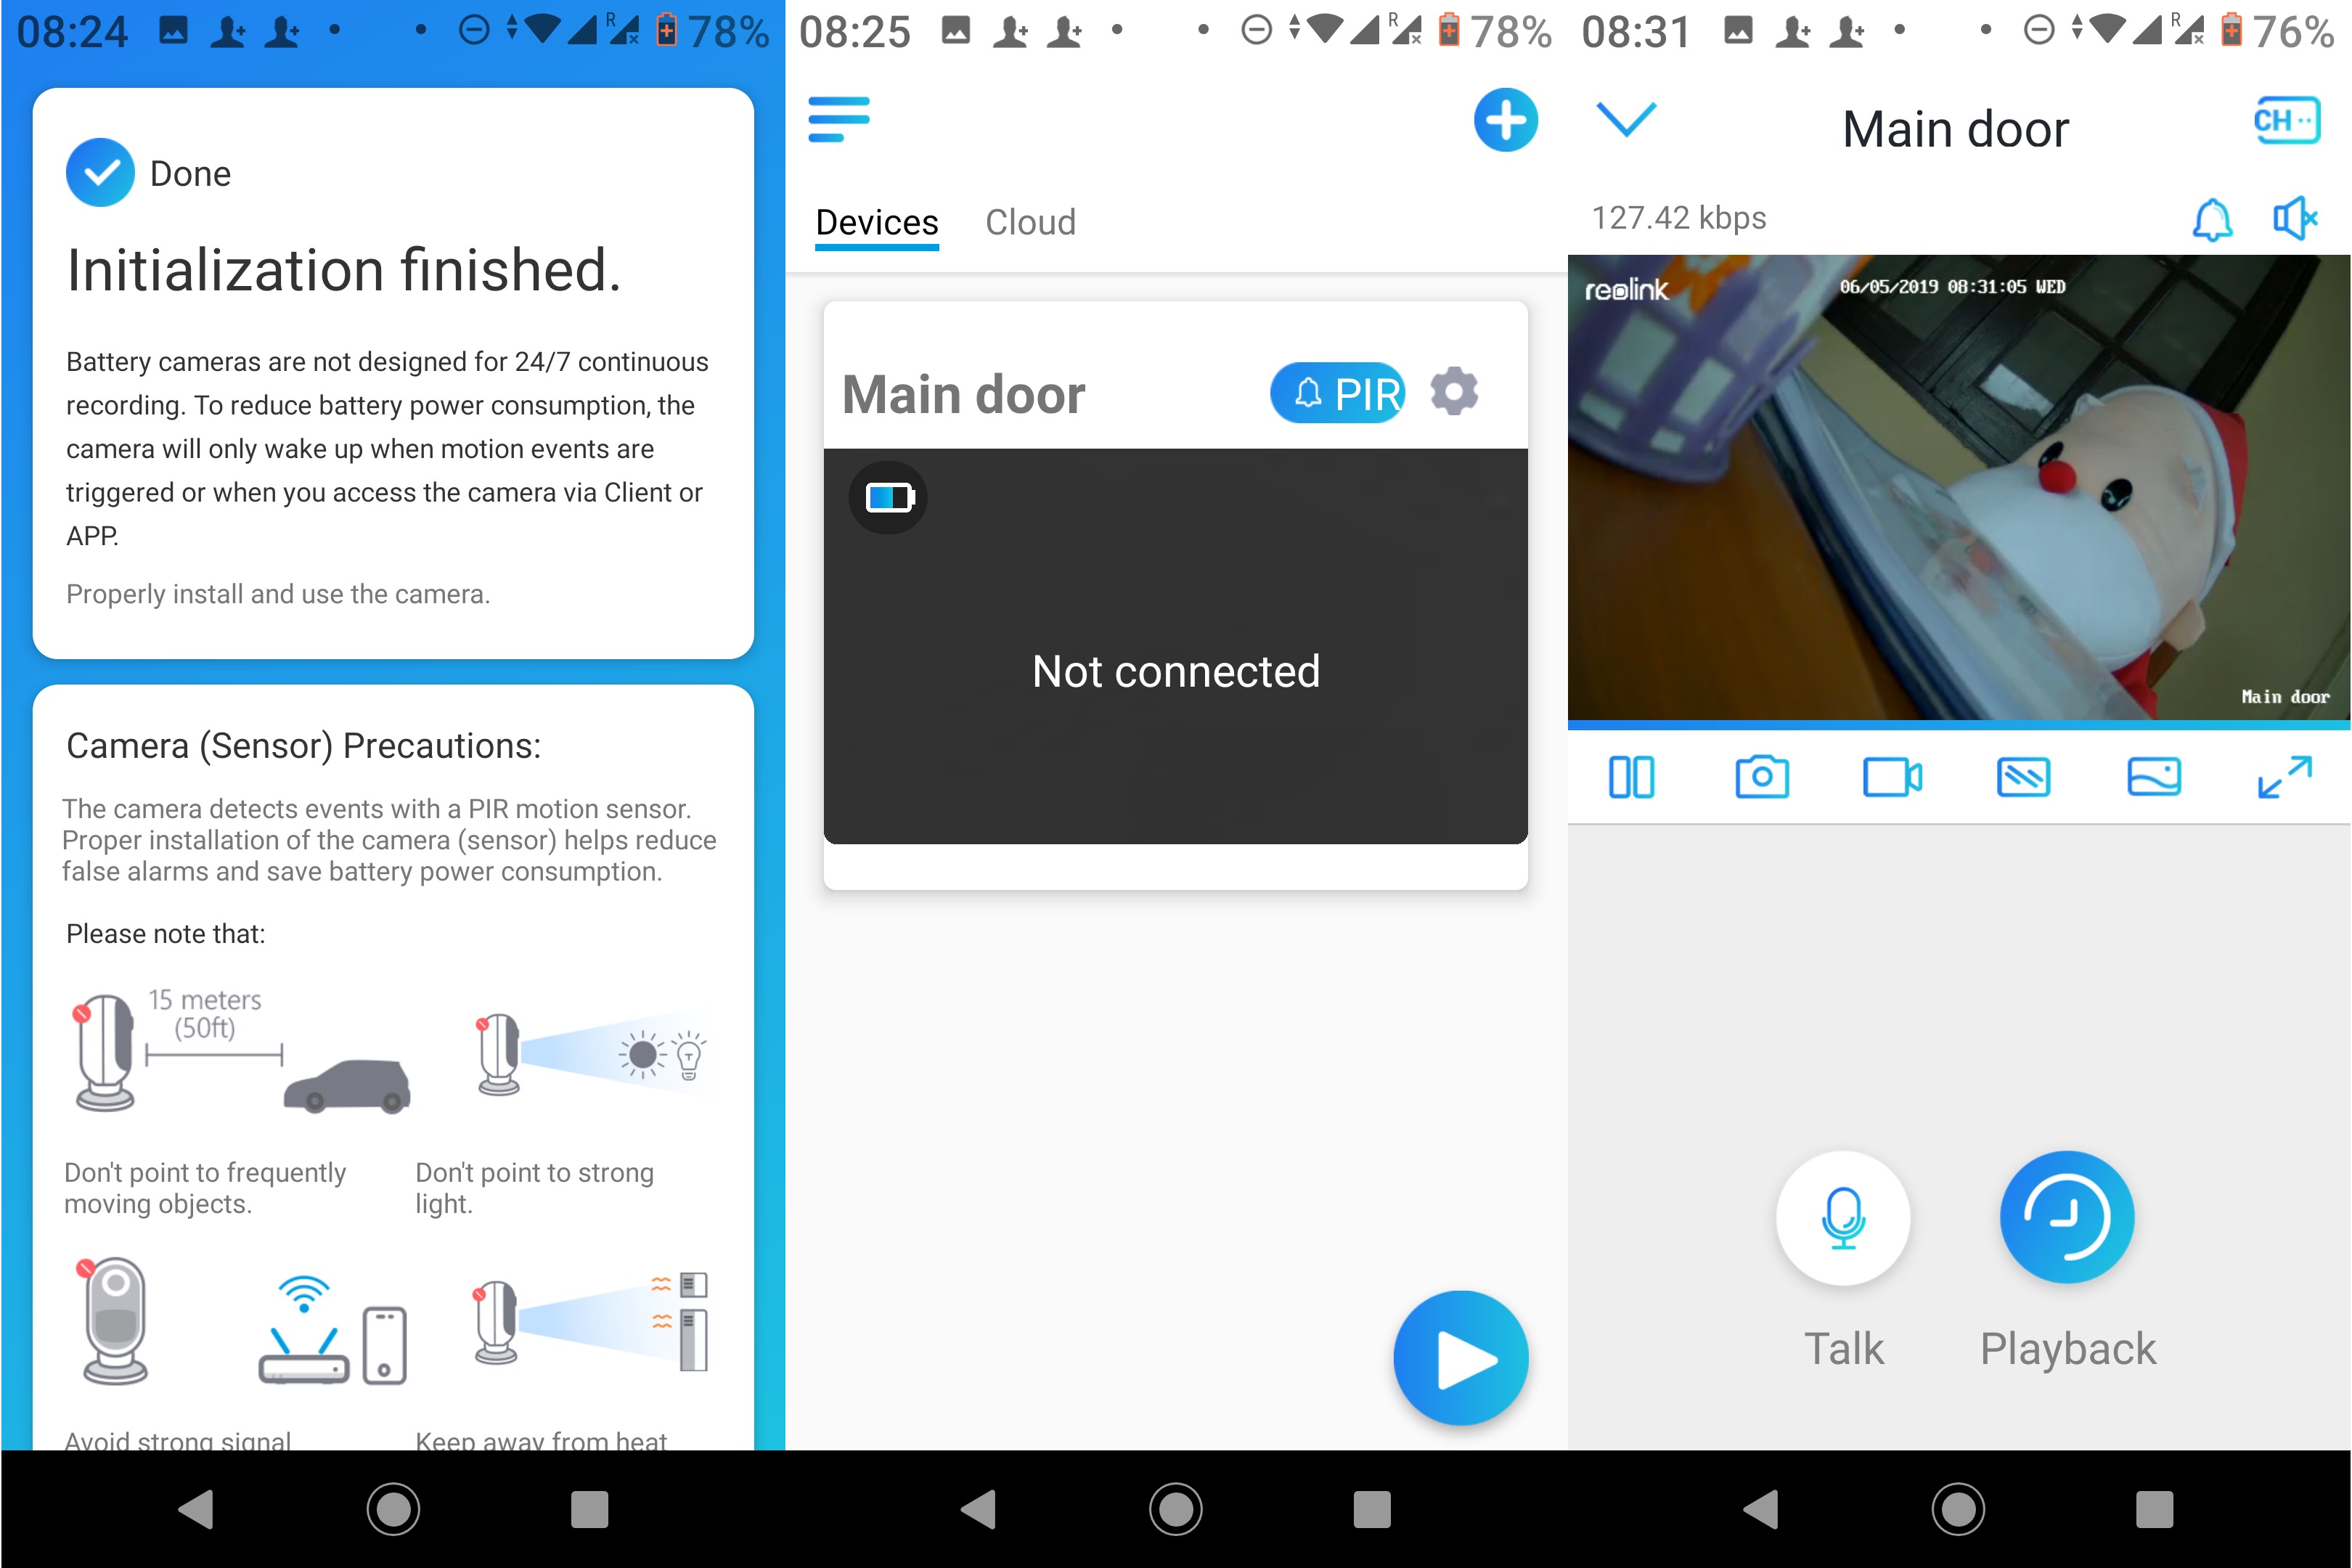
The app gives come advice you may want to follow to physically install the camera, and I could soon see output from the camera in the Android app.

The Cloud tab lets you register to the company online backup services, and it’s free as long as you only use one camera. If you plan to get more than one Reolink camera and use the cloud services instead of the microSD card only, it will cost between $3.49 and $10.49 per month depending on the number of cameras. See Reolink Cloud page for further details. A microSD card is apparently required to use the Cloud service, or any part of the features that rely on video recording. It’s also possible to use the camera without microSD card if you use the email alert option that sends photo to your email each time motion is detected.
Mounting Reolink Argus Eco Camera & Solar Panel to a Wall
Now that we have the camera up and running, we can mount it to a strategic location, in my case to check out the front door. At first I did not understand clearly what the plate with a Blue cover was for, so I installed it anyway. but it’s actually meant to be use with the provided belt for tree or pole mount. It won’t impede installation on a wall though.
We’ll need a ladder (maybe), and a power drill in order to first install the wall mount with the provided screws and anchors.
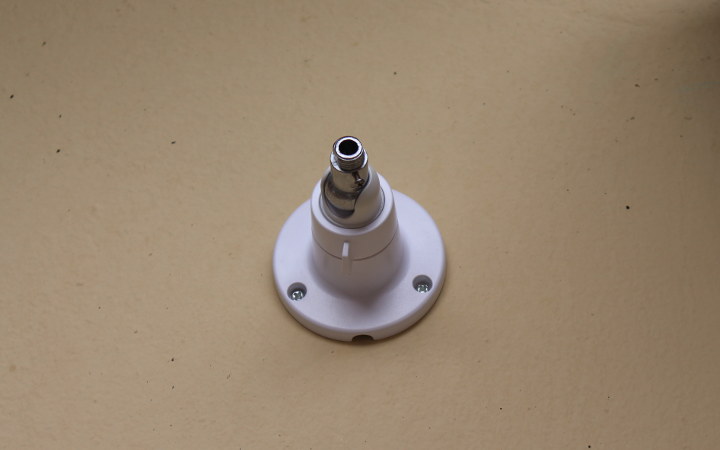
Now we can screw the camera on the mounting, and orient it to our liking.

However, I install the camera on the left of the door, and while turning the camera on the right side, while securing the camera with the plastic screw I quickly found out I was unable to oriented to my wish, as the WiFi antenna got in the way.
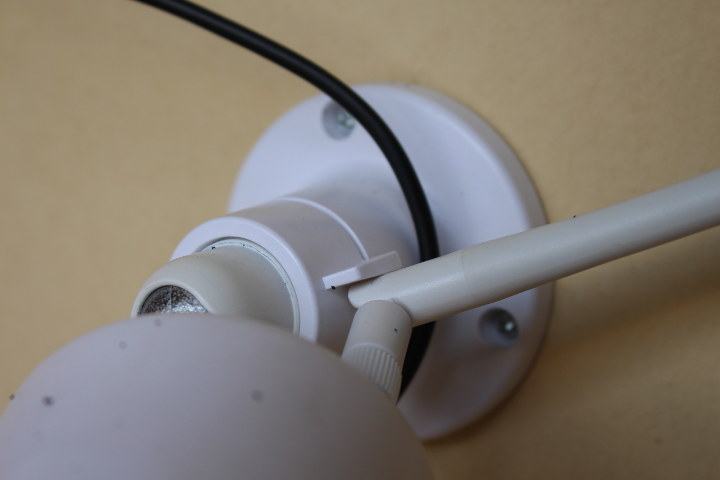
So I had to move the camera back to the left a little in order to turn the screw. Not really ideal since the door was not in the frame, but as least most of the porch was. I used it that way a few days, but then realized a Rotation button in the app (in Settings -> Display), so I climbed back on my ladder, and turned the camera 180° (i.e. upside down) in order to make sure the door was in the frame as well, and tighten the screw without hindrance from the antenna.
 Finally I tapped on the Rotation button in the app, and I got the result I wanted.
If you’ve purchased the solar panel, you’ll want to install it following the instructions in the user manual. It’s pretty straightforward, and you should try to incline the panel by 5° plus your local latitude.
This is the final result of my installation.
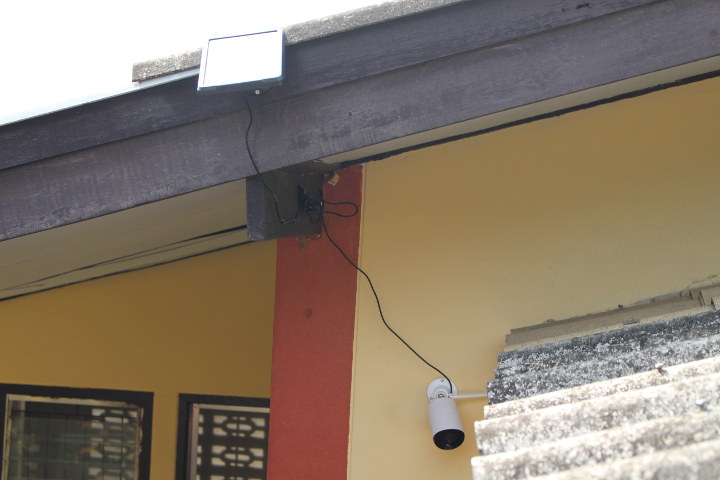
I was worried the solar would not be enough to constantly charge the battery in the camera, especially considering its the rainy season here, but I was surprised to find out the battery charge is basically always over 90%. Of course you have to consider your own situation as recording are enable when motion is detected. So if you are in a place with continuous pedestrian traffic the battery may be depleted. The Quick Start Guide of the camera explains the camera is not design for 24-hour continuous video recording, so if for some reasons, you need this type of setup, you’d have to find another solution.
Reolink Argus Eco Camera Review
Let’s talk about my actual experience with the camera and the app. At first I did not insert a microSD card in the camera, and instead I used emails alerts and/or phone notifications to inform me of motion.
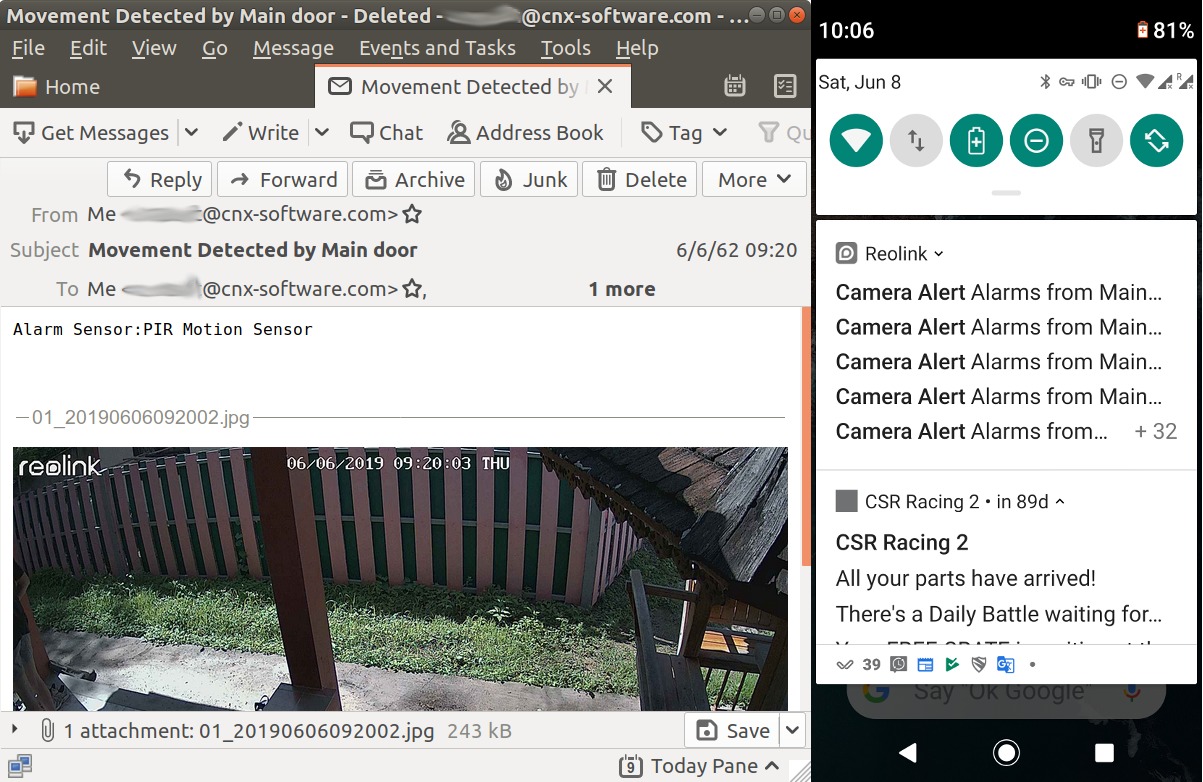
If you don’t use a microSD card the camera alert in your phone won’t do much good, since no media can be shared, but email alerts do the job as you’ll received a full HD capture for each alert.
Here’s a night sample above with “individual 1” coming back home on his bicycle… The image is quite blurry if people are in fast motion, especially at night.
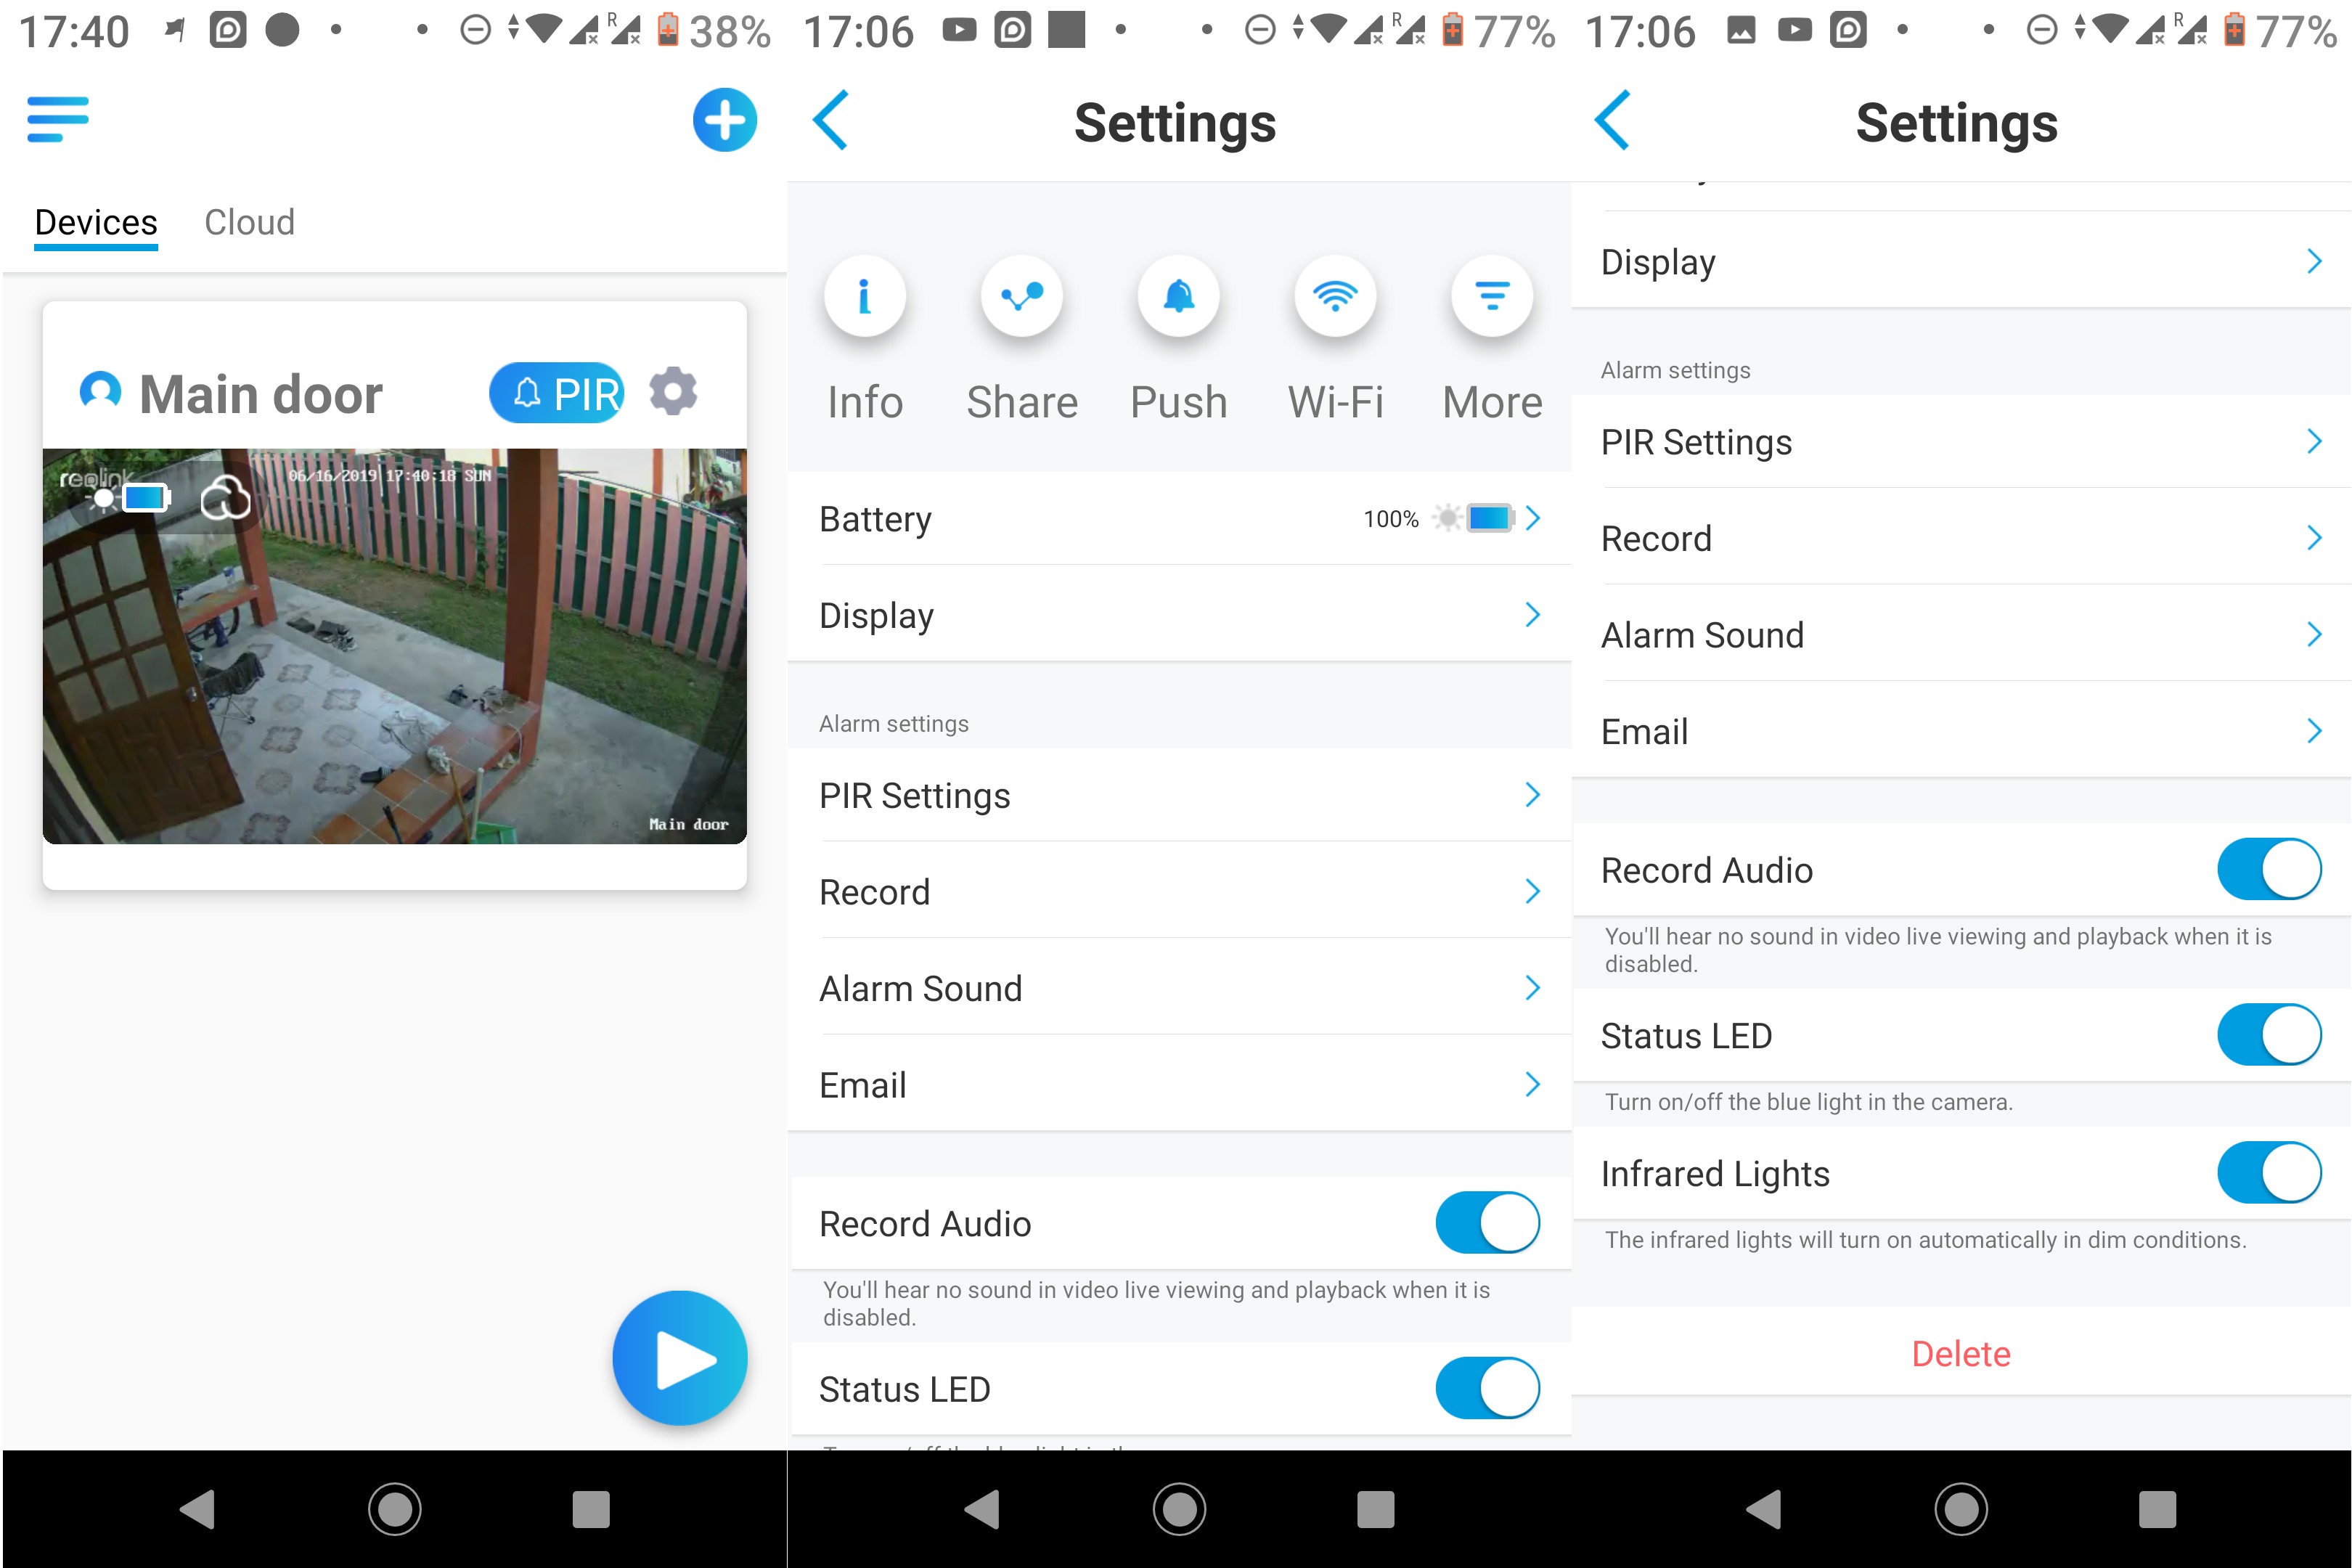
If you go the Device tab of the app, you’ll find all your camera, and be easily able to enable / disable PIR (meaning you could only watch the live video when accessing the app), and access the Settings menu by tapping on the Setup icon. Let’s have a closer look at some of the options in the settings.
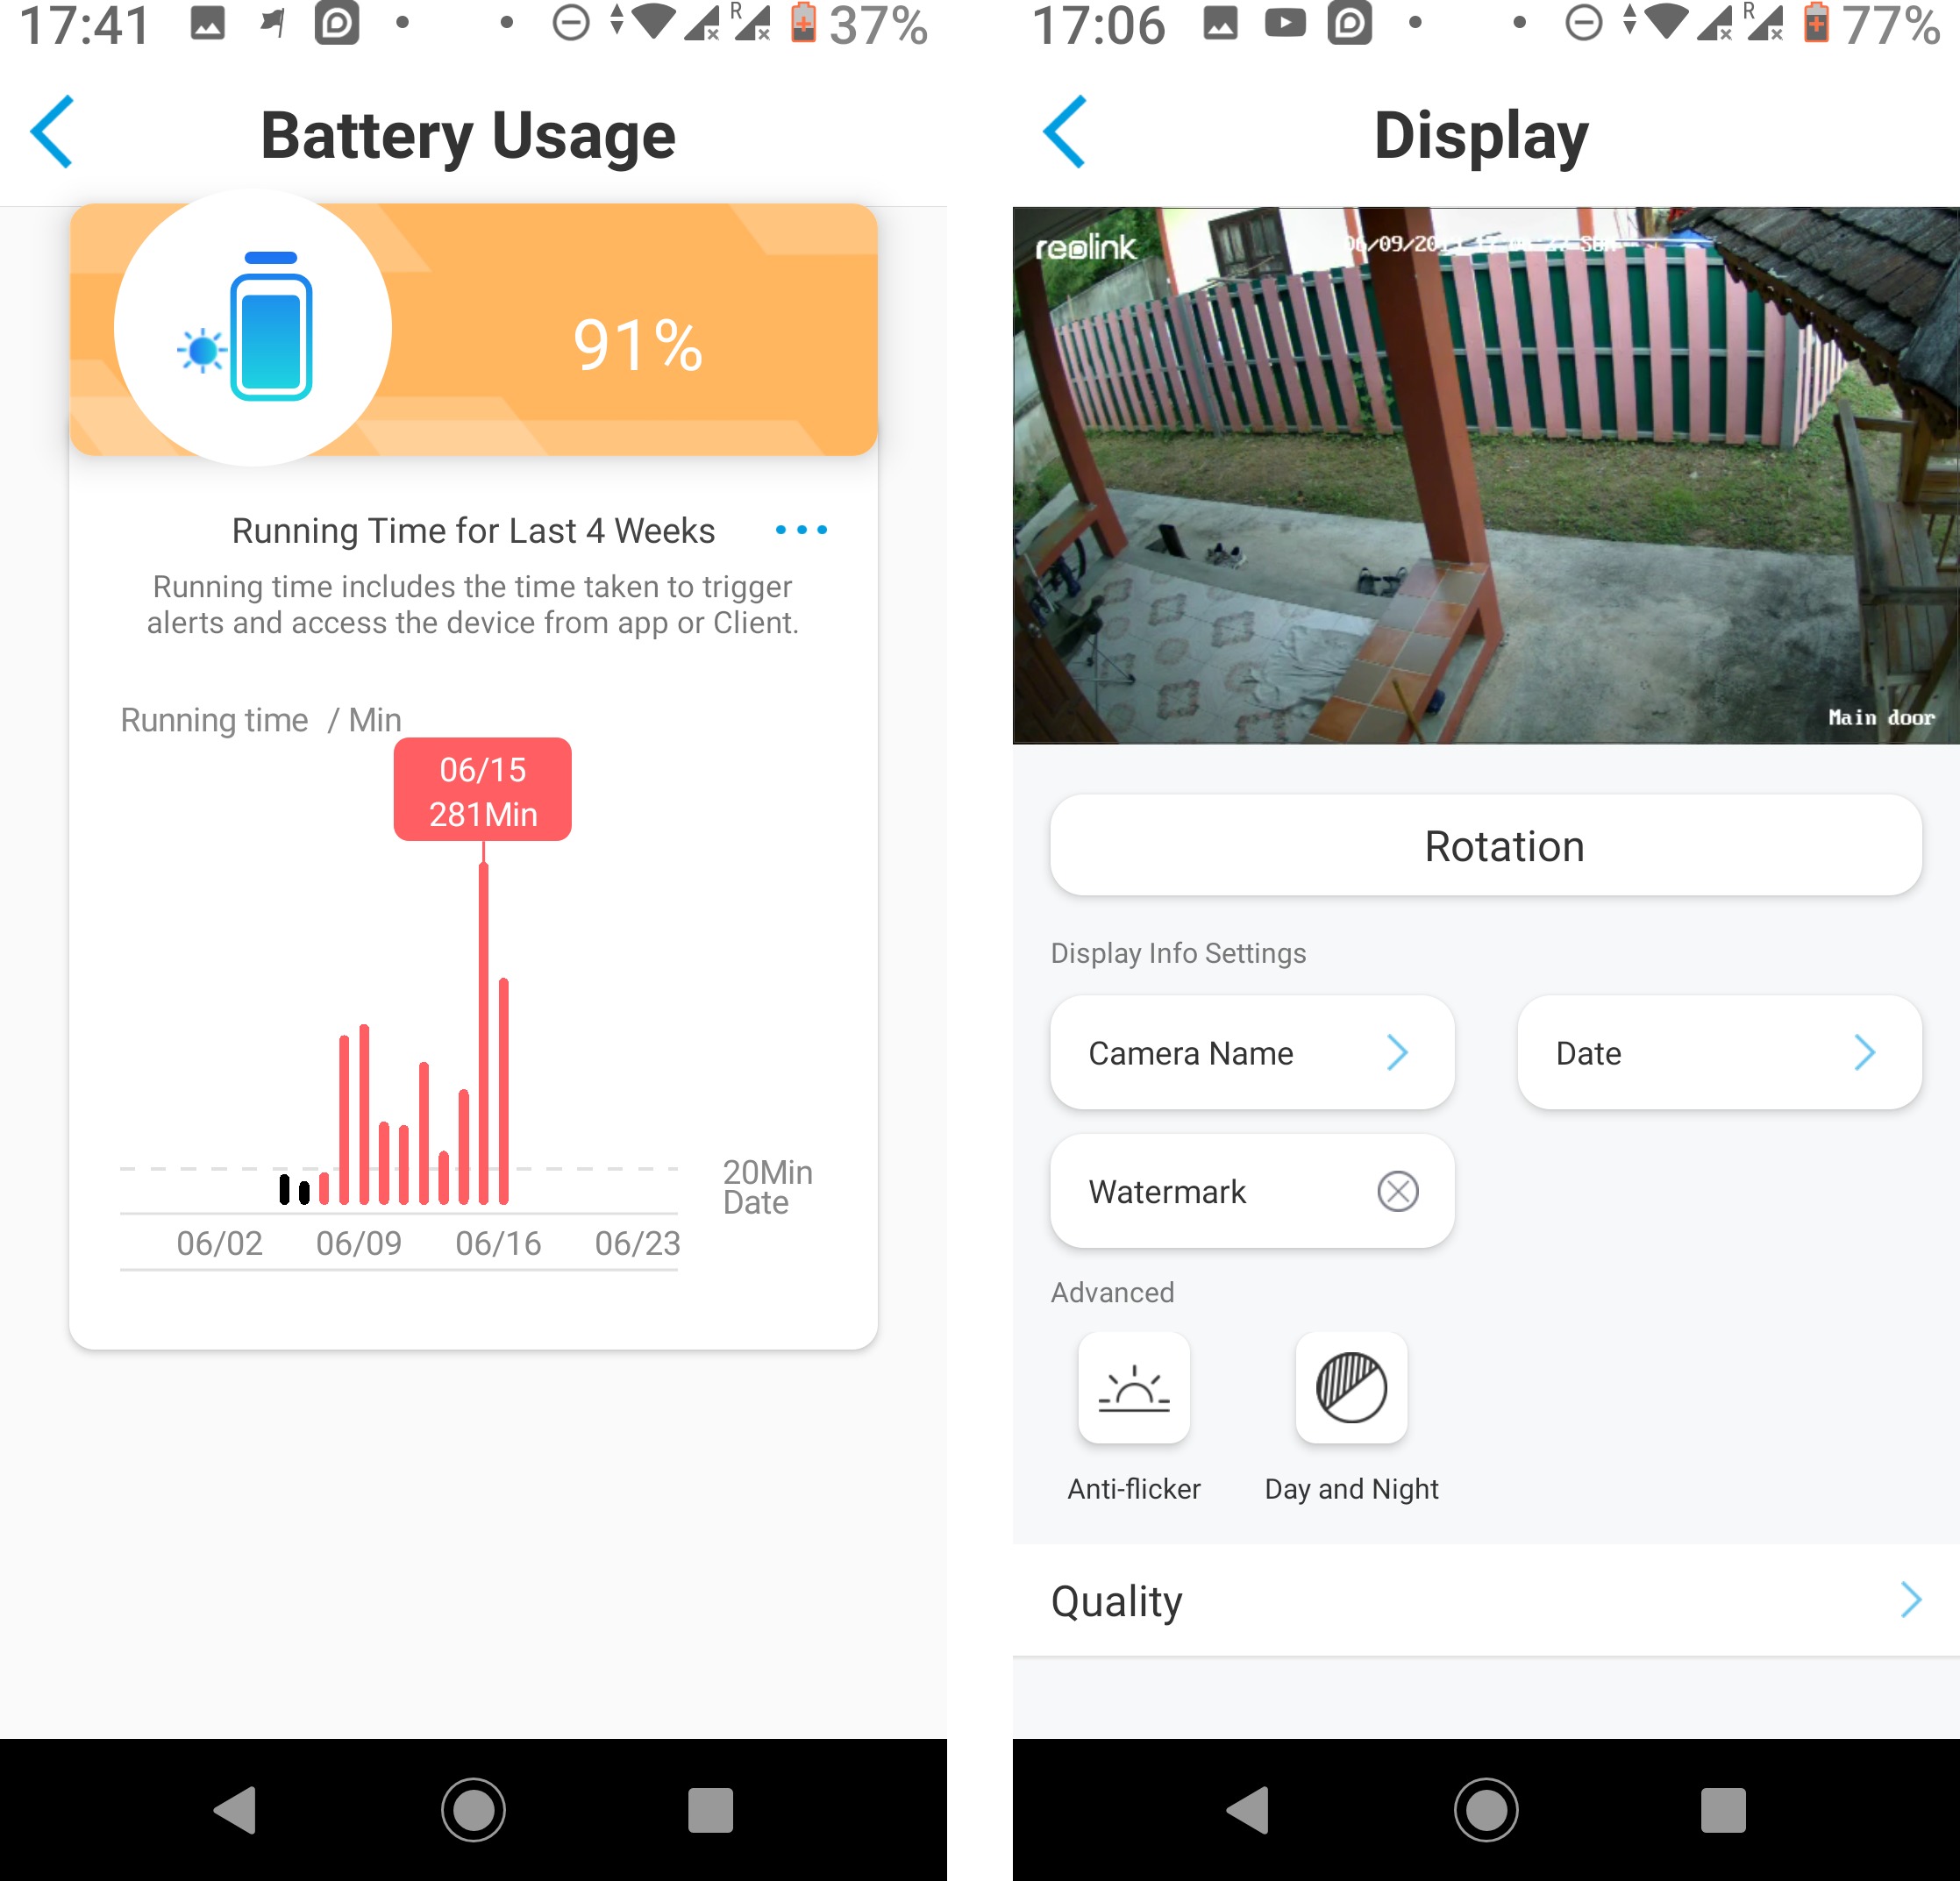
The battery menu will show the current battery, and usage in minutes per day. The Display menu is where you can rotate the output, and add overlay information like camera name, date or Reolink watermark. The quality settings provides two default choices: 1080p @ 15 fps (max), or 640×360 @ 5 fps. Those can be adapted but the maximum frame rate is 15 fps.
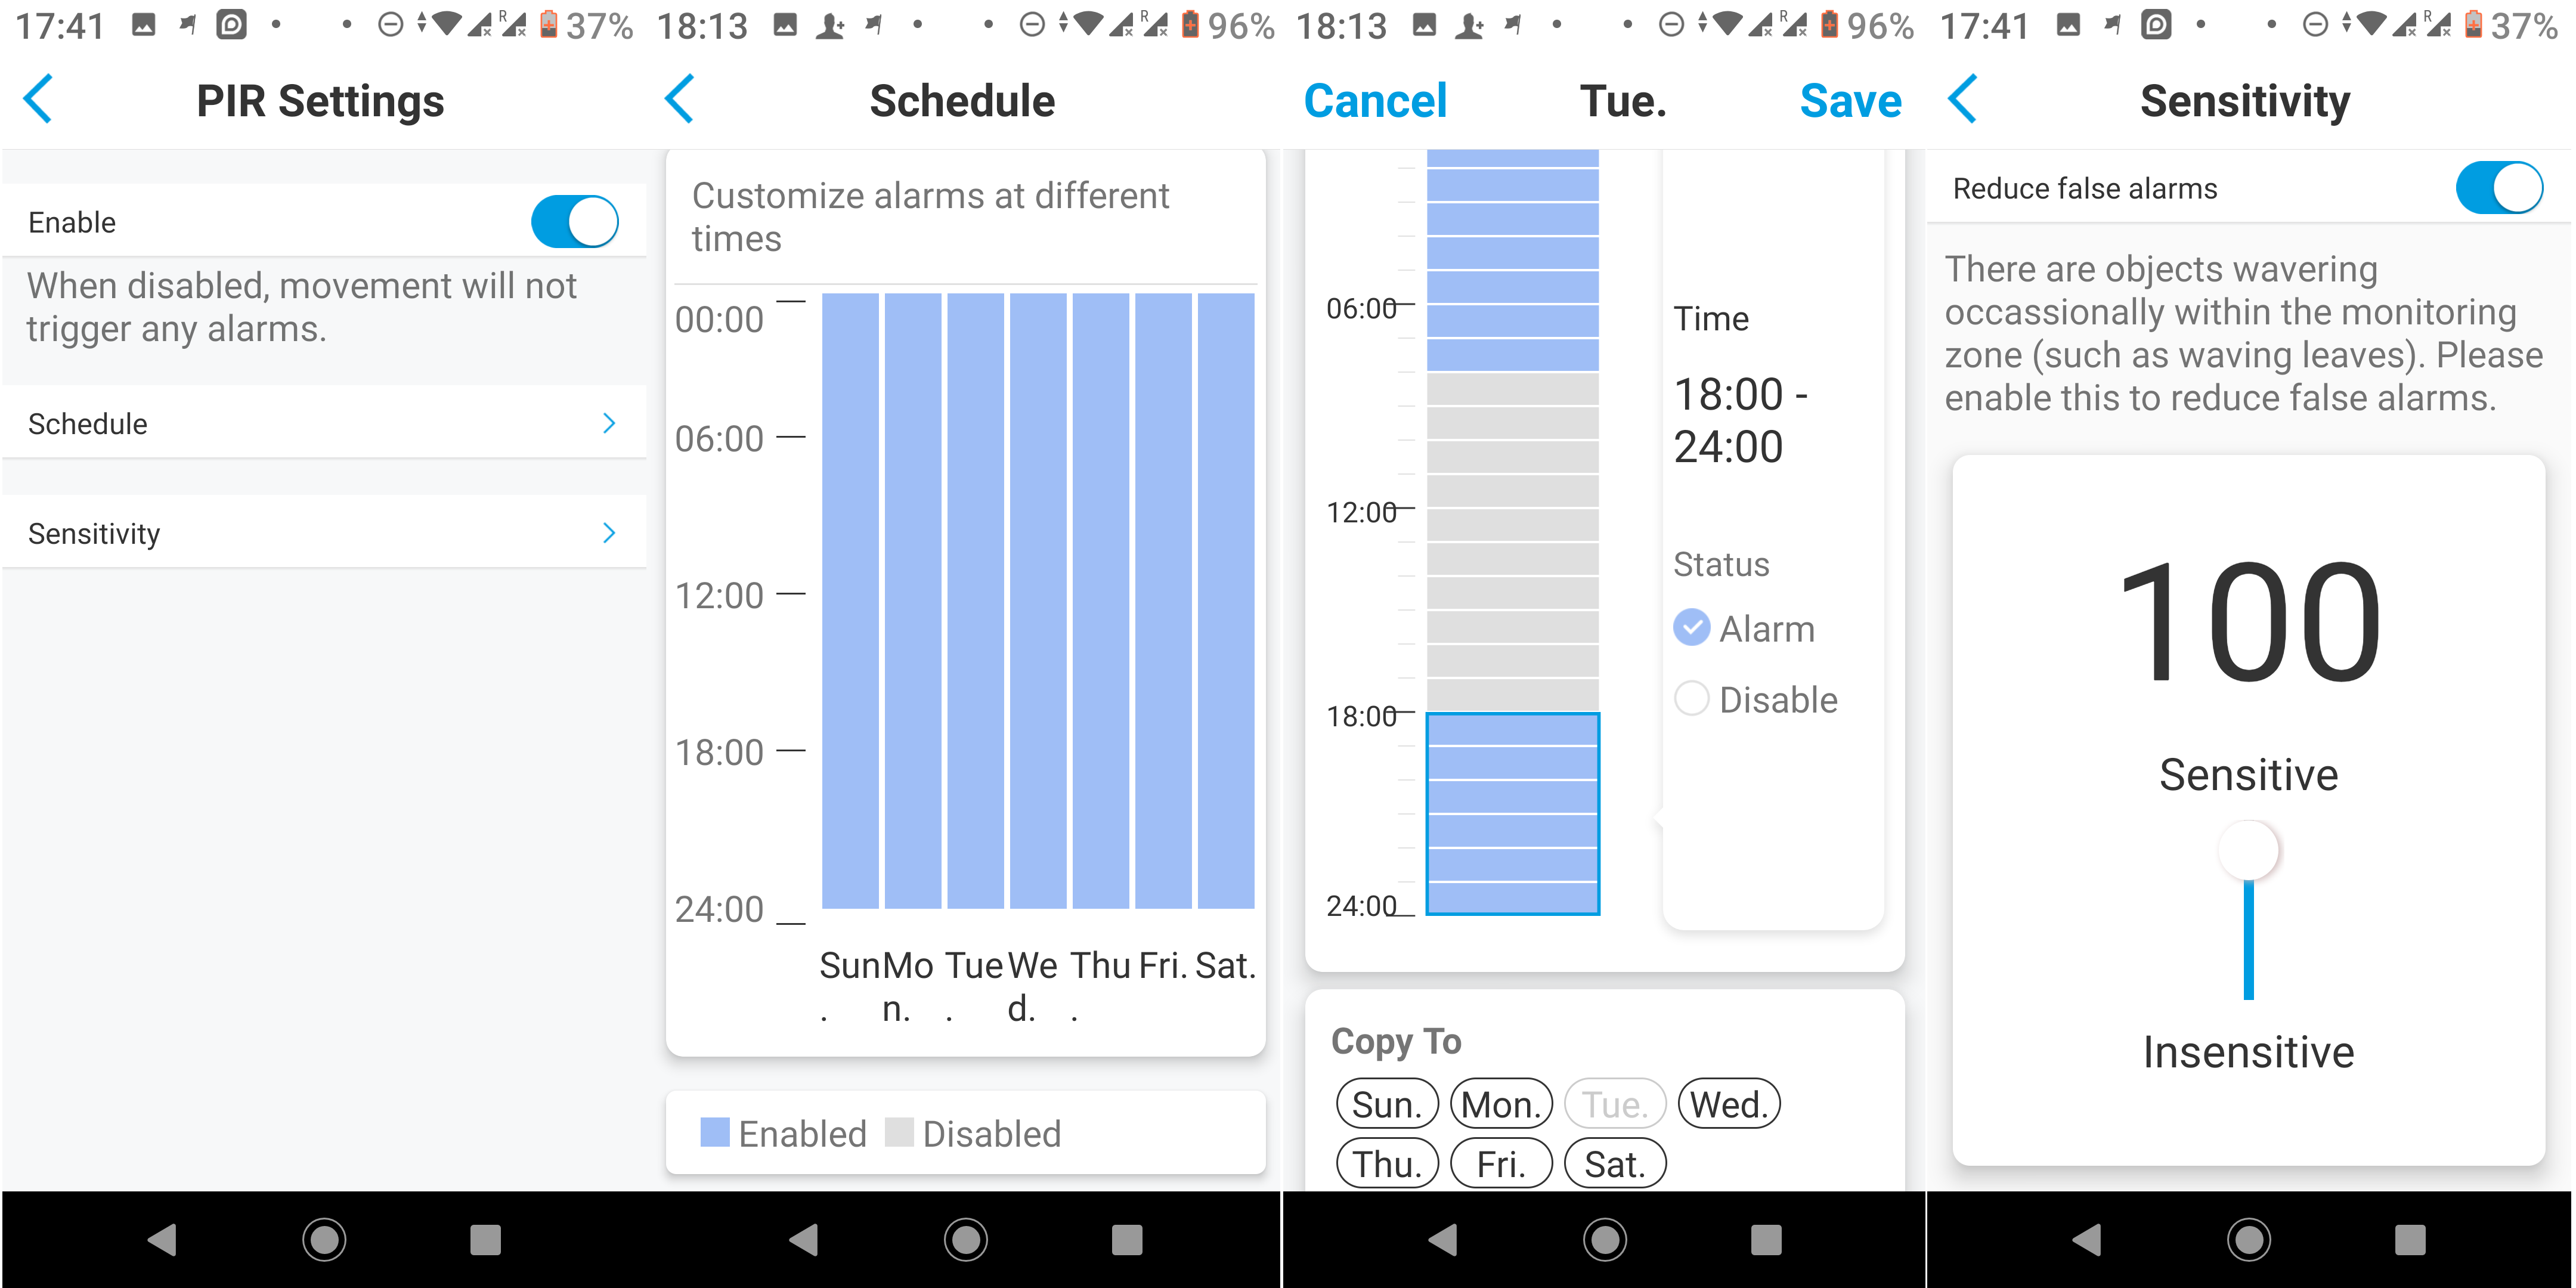
PIR Settings will be important for two reasons: it will let you schedule when PIR is active, and adjust the sensitivity of motion detection. The first is important as if you’re at home most of the time then the alarm will be triggered for no good reason, and the second needs to be adjusted to find the good balance to lower the number of missing alerts and false positives.
The Record menu enables video recording and allows you to set the duration (8 seconds by default). Alarm sound can enable the camera to emit a default siren sound, or your own voice recording when motion is detected. The siren can be heard easily although not too loud, but voice recording are quite low volume and hard to hear as you’ll see in the short video below.
The Email alarm will send an alert optionally with a photo if you’ve enabled it to a choice of email addresses.
They are also five icons at the top of the Settings menu to get system information about the camera, share it to your family members via a QR code, enable/disable push notifications, configure WiFi, and access More settings sub-menu to change the password,adjust the date & time, check storage usage and/or format the microSD card, and upgrade the firmware.
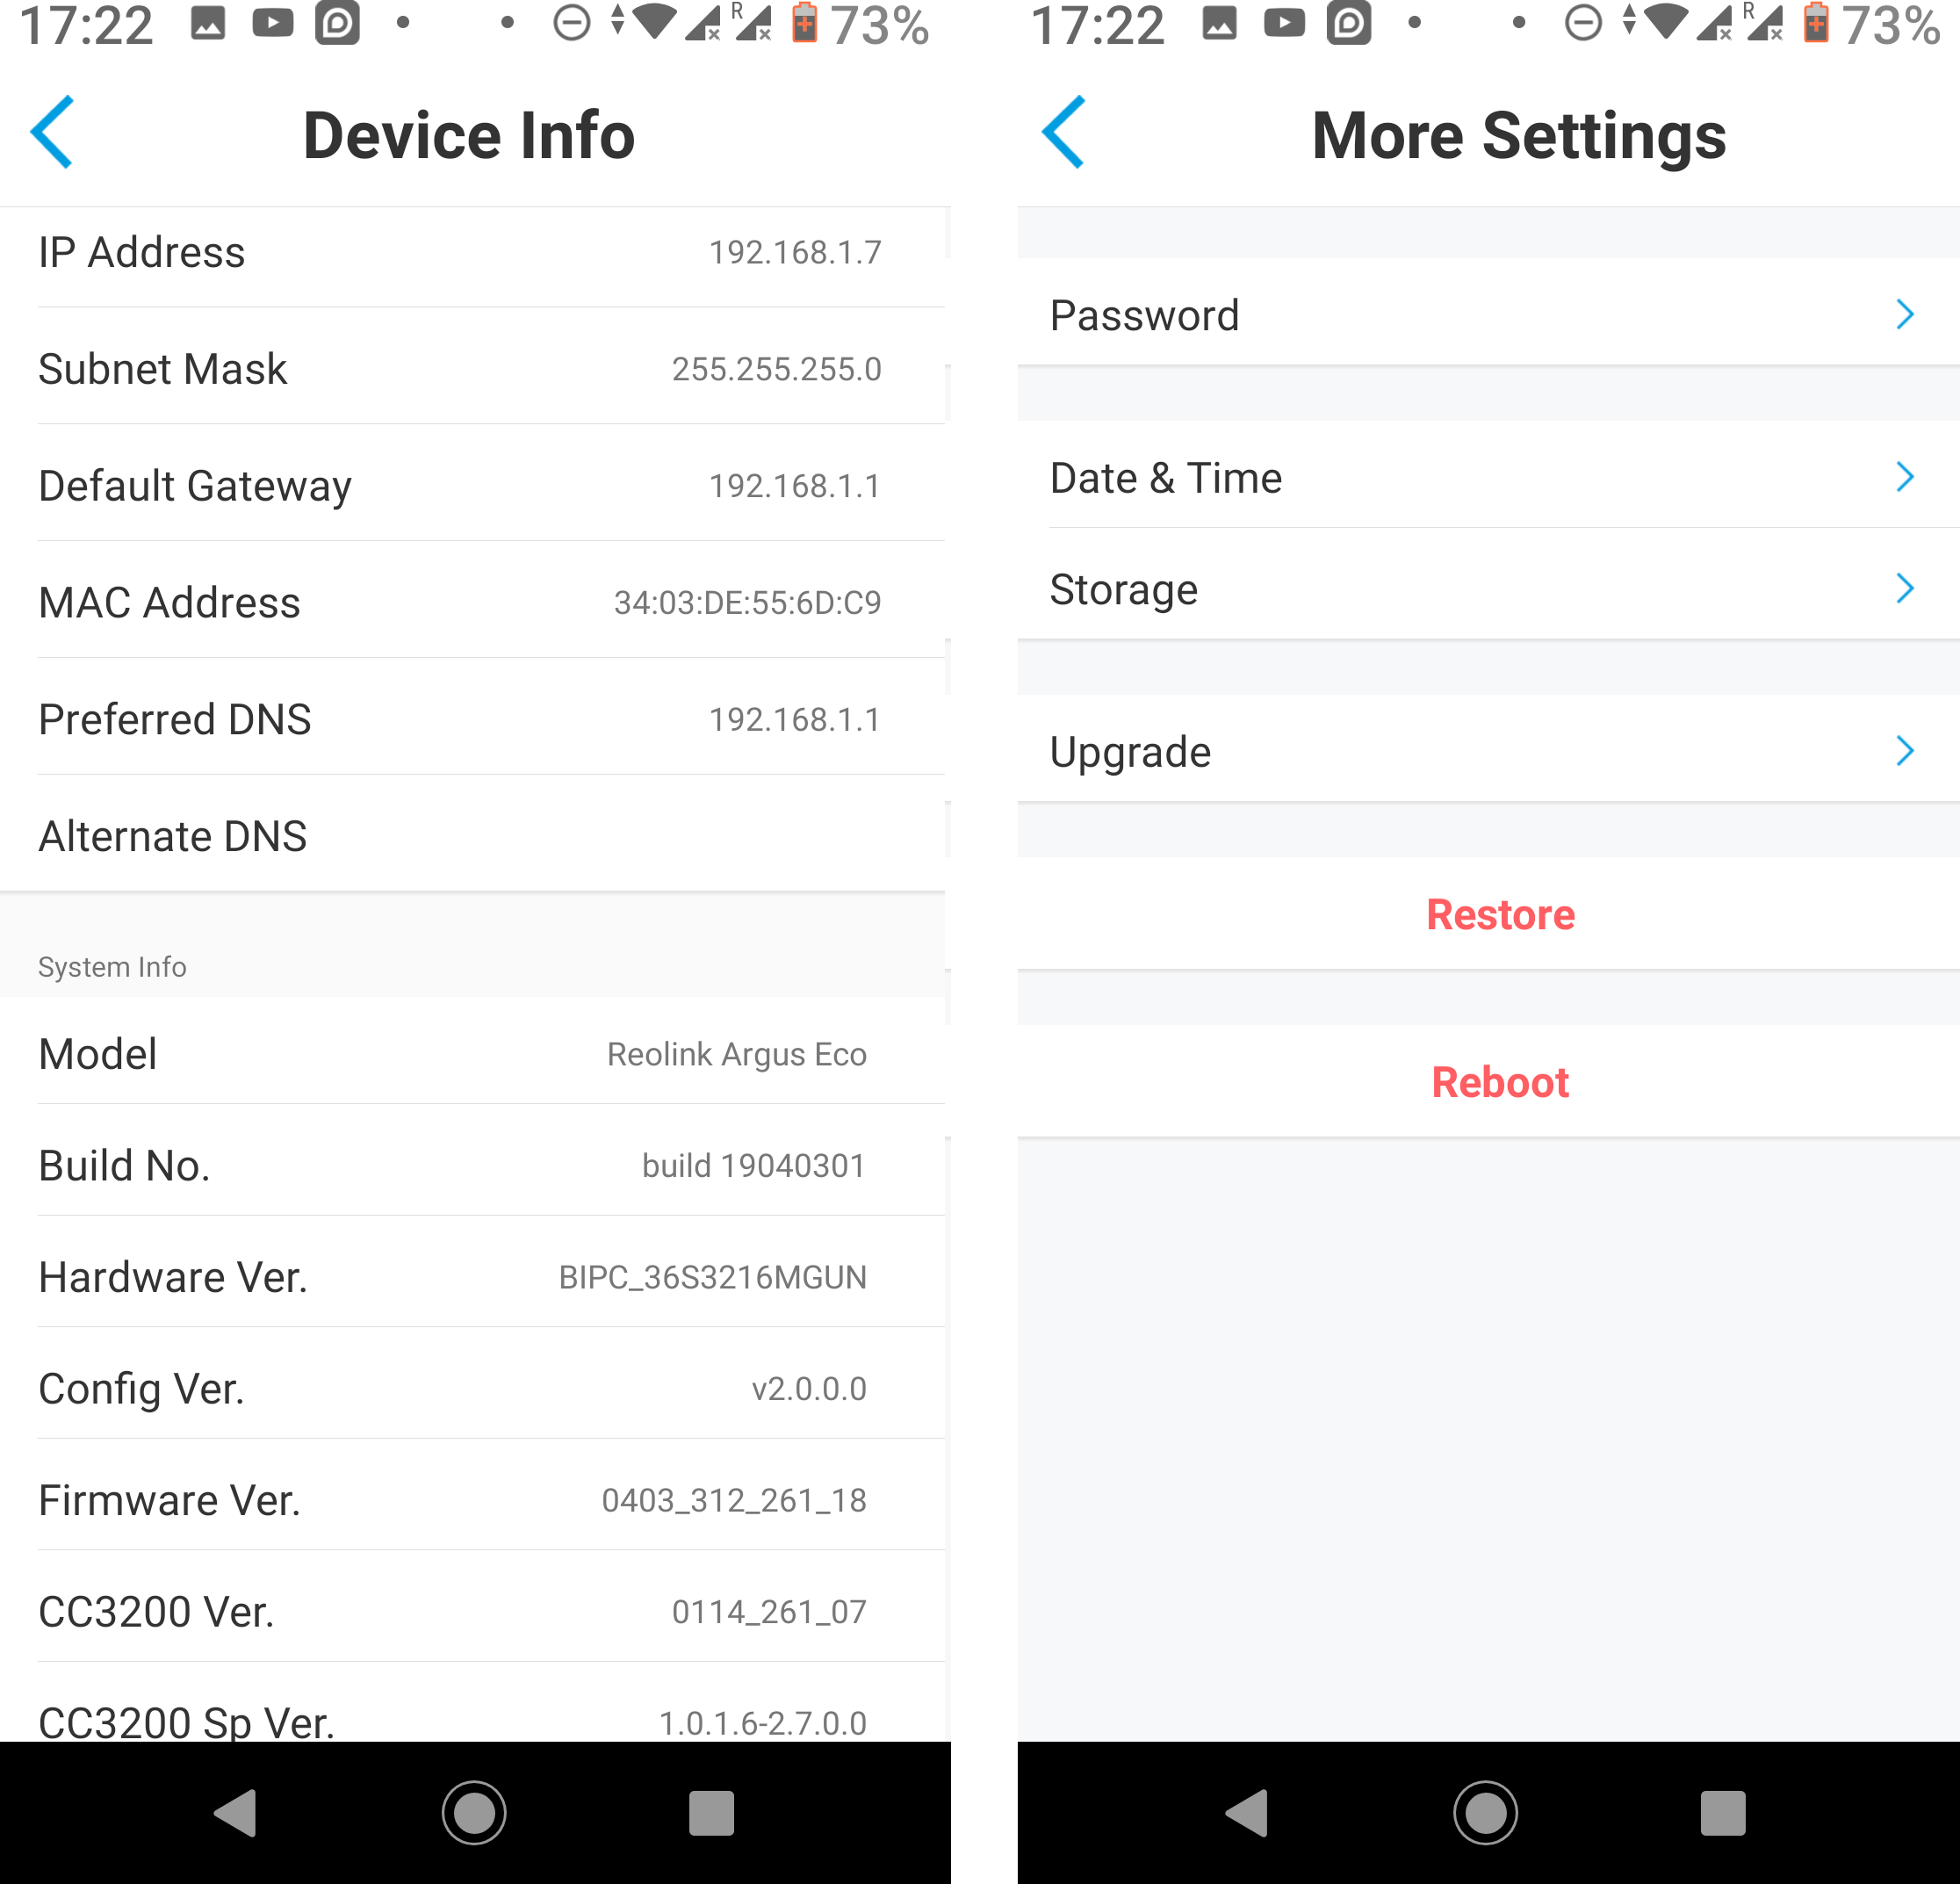
The WiFi part looks to be based on Texas Instruments CC3200. Since I got the IP address, I ran a simple scan to check the most common TCP port, and good news for security, none are open:
|
1 2 3 4 5 6 7 8 9 10 |
sudo nmap -sS 192.168.1.7 [sudo] password for jaufranc: Starting Nmap 7.60 ( https://nmap.org ) at 2019-06-09 17:22 +07 Nmap scan report for 192.168.1.7 (192.168.1.7) Host is up (0.066s latency). All 1000 scanned ports on 192.168.1.7 (192.168.1.7) are closed MAC Address: 34:03:DE:55:6D:C9 (Unknown) Nmap done: 1 IP address (1 host up) scanned in 91.80 seconds |
I order to test the camera and provide a sample, I asked “individual 1” to break into my house. He had to repeat the effort 5 times as the camera would not pick this fast moving thief. He eventually had to dance his way out with a Santa Claus doll and a bottle of my favorite beverage to be detected by the motion sensor…
After that I discovered the PIR settings mentioned above might be useful. Turning the camera upside down with a view on the actual may also prove to be useful, as people have to slow down to open the door. While I manage to get back my belongings, “individual 1” was back at night, and this time the camera picked the event on the first time.
So it’s important to adjust the settings to get satisfying results with the camera. It would be pretty bad if you bought a security camera, and it missed an actual theft. So make sure you test it yourself, and adjust the PIR settings, and position of the camera.
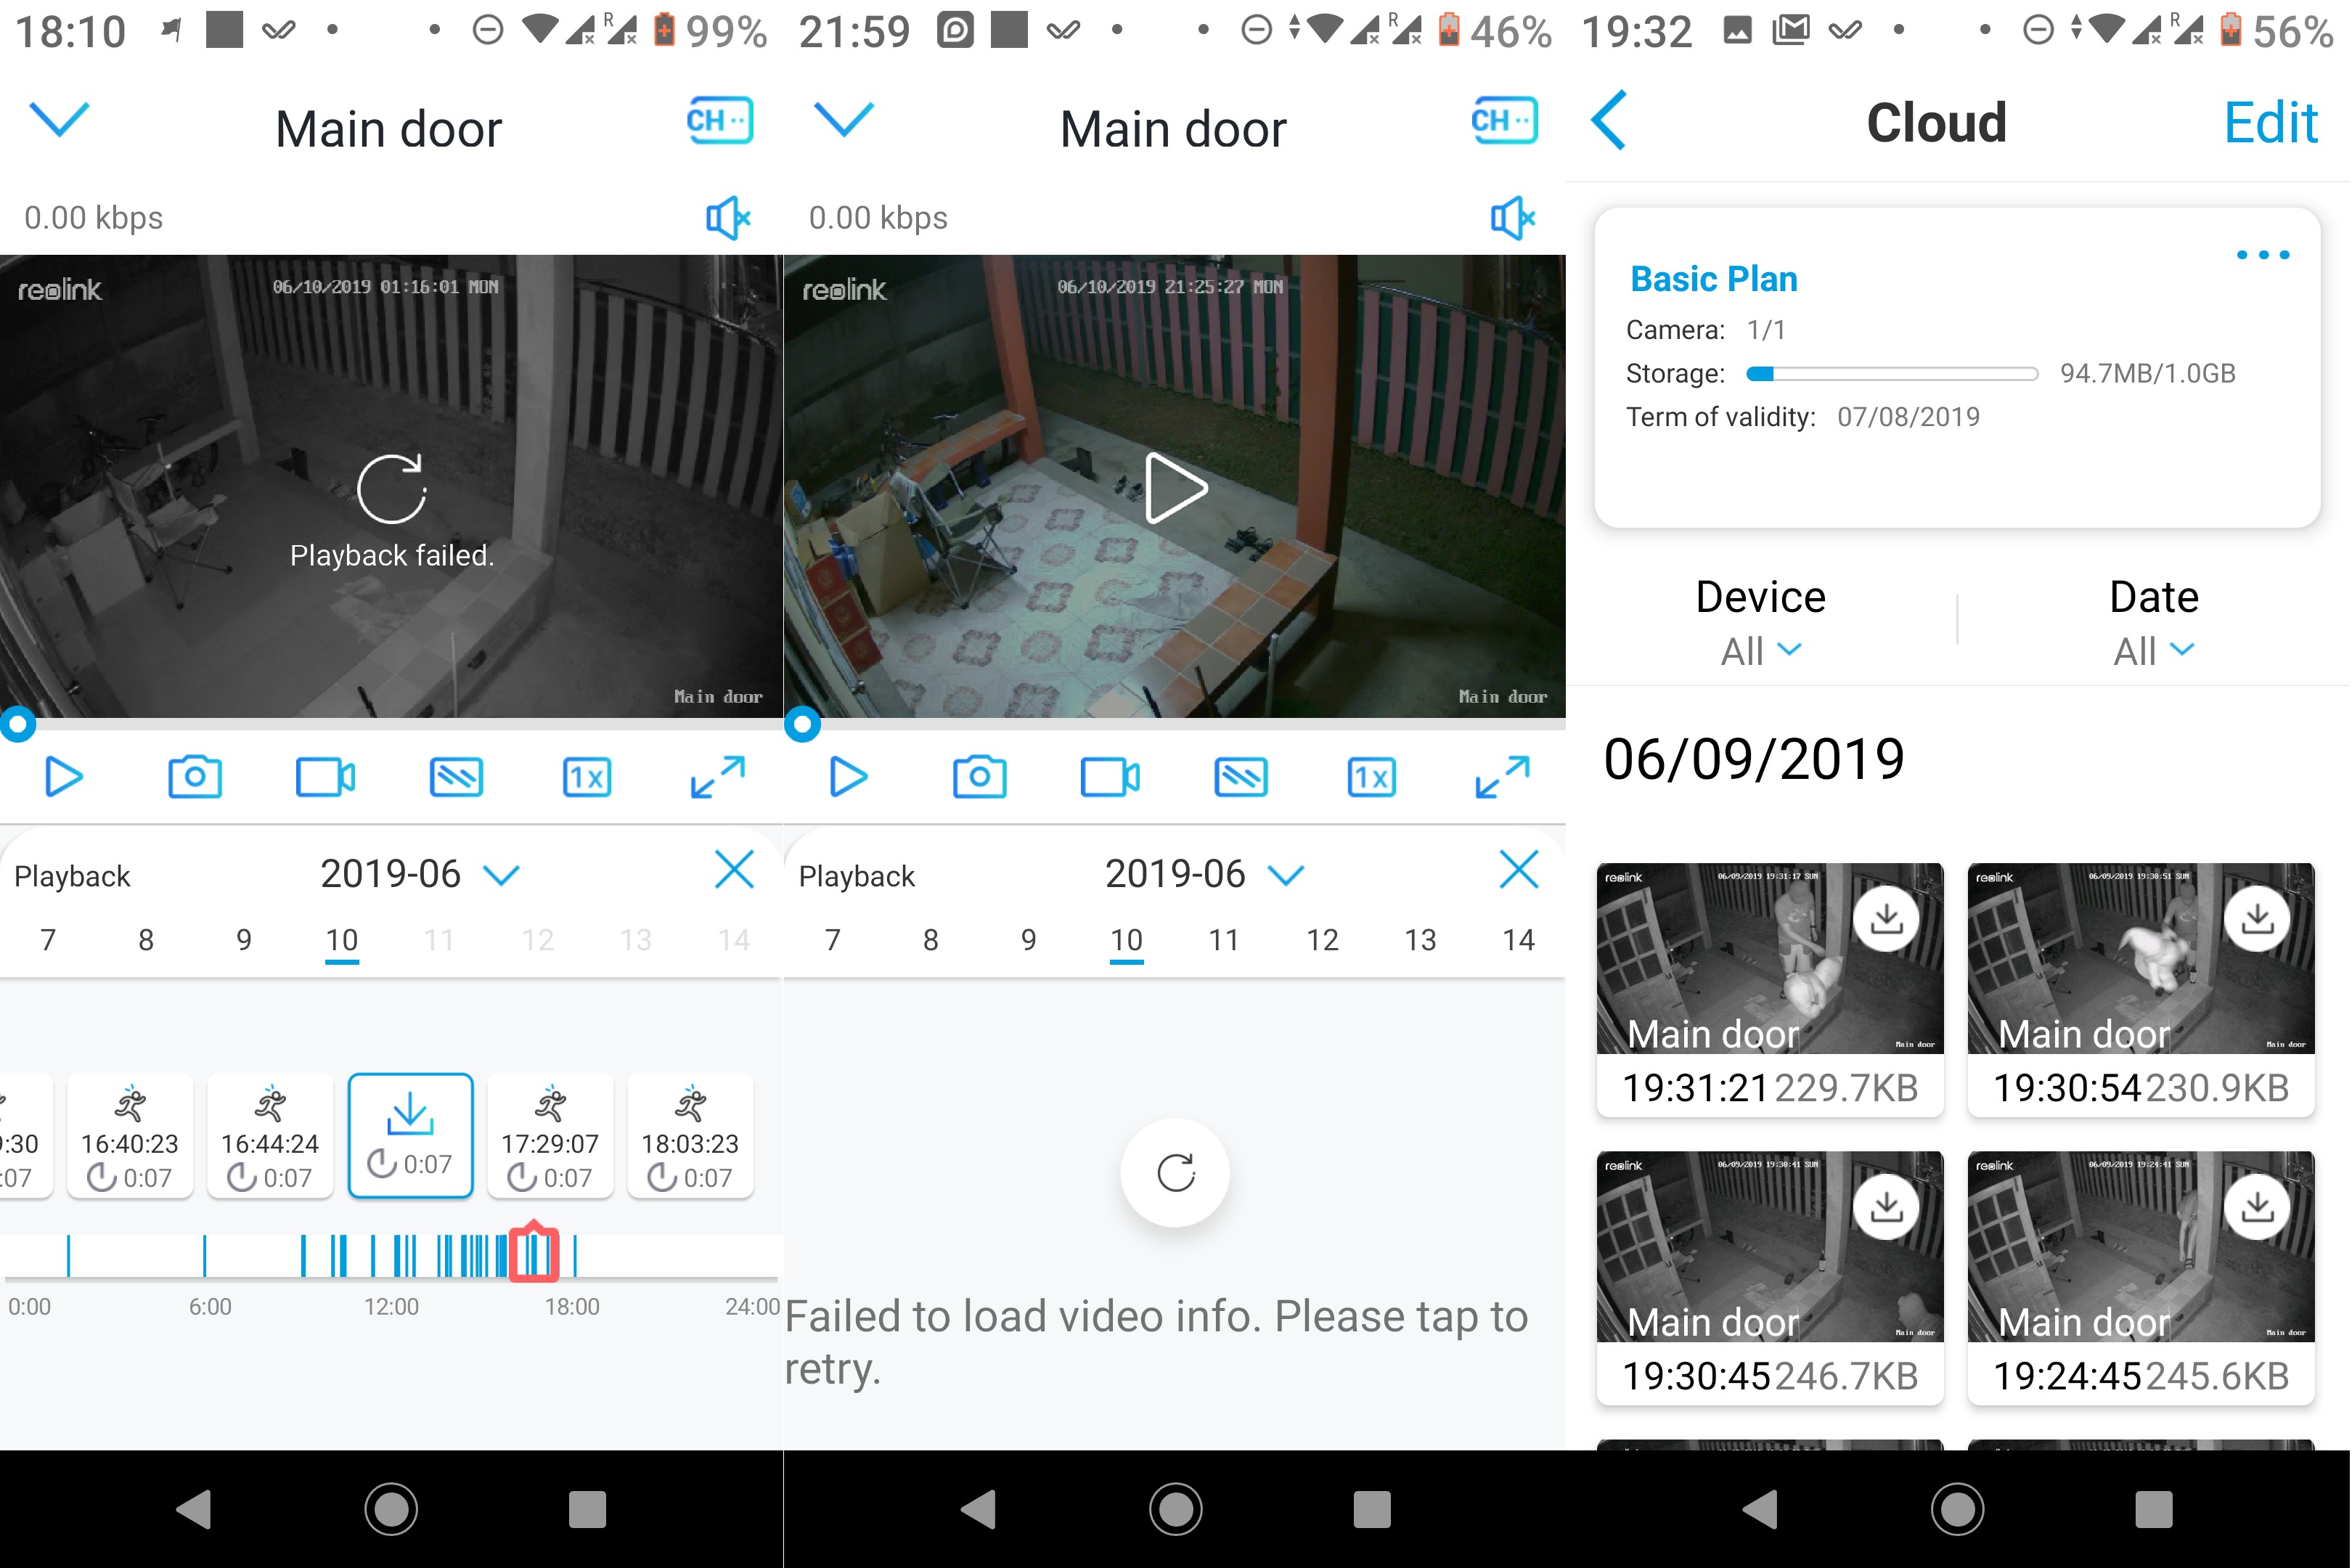
For some reasons, although the camera is not that far from the router (6 meters plus many walls), local access to the camera does not always work reliably. Something the list of recorded videos loads, but the video fails to play, or the list of videos simply won’t load. It’s another advantage of using the cloud, as it seems more reliable. The cloud also helps with smarter thieves who may take out the microSD card as they leave…
Conclusion
After over 10 days with the camera I’ve had a fairly positive experience, but you’ll have to make sure to adjust the settings for it to work reliably, and adjust the position make sure it’s not triggered to often, or on the contrary miss important event. I’m very happy about battery life and the solar panel, as I don’t expect to ever have to charge it manually.
Reolink Argus Eco security camera sells for $89.99 on the company’s website, but it’s out of stock. This may not be a bad thing, as it allowed to find out it’s also listed on Amazon for $79.99. Reolink Solar Panel is shown as coming soon on the official product page, but somehow it’s also available on Amazon for $24.99. Strangely there’s no kit on either Reolink or Amazon, but you can now get the camera plus the solar panel for under $100 on Aliexpress.

Jean-Luc started CNX Software in 2010 as a part-time endeavor, before quitting his job as a software engineering manager, and starting to write daily news, and reviews full time later in 2011.
Support CNX Software! Donate via cryptocurrencies, become a Patron on Patreon, or purchase goods on Amazon or Aliexpress


What video encoding does it use? I purchased a Reolink 5MP camera and it only supports H.264 (and not H.265) which makes it a lot less useful than it should be.
Also, if you don’t like their app, see if it supports ONVIF. If it does, then the Android app Onvifer does a good job with cameras.
The video samples are H.264. Why would the video codec matter apart from potentially the space savings? ONVIF is not mentioned so I doubt it supports it.
While I’m at it, Reolink battery powered cameras do not support RTSP either, but their other models do.
ONVIF not very useful on a battery powered camera. The battery powered camera is not full on most of the time to save power. They must have some power efficient way to wake it for live viewing. In general ONVIF is designed for cameras that are always on. ONVIF protocol assumes the camera is always on and waiting for you to connect to it. When a battery power camera is asleep, the camera itself it not operating, only the PIR sensor is. When the PIR see something it powers on the rest of the camera. That’s why Amazon bought Blink.… Read more »
Mostly it’s an indication of how modern the SoC used in the camera is–and likely how new the software it’s running is as well. If you want a newer kernel, that’s one way to get it. Aside from that, H.265 is quite a bit more efficient than H.264, so it’s helpful for higher MP count cameras–probably not a problem with this 2MP one, but a concern for my 5MP camera. I have two different models of camera from the same company. One is 1.3MP and the other is 2MP. The latter supports H.265 and has a vastly faster web server,… Read more »
Only the newest cell phones can display h.265, but h.264 works on virtually all phones. At best h.265 would make the video 15-20% smaller and it would also make the camera more expensive. It is cheaper just to buy a slightly larger SD card.
> Only the newest cell phones can display h.265
iPhones starting with the 5s (from 2013) can display h.265.
Some backing info for Thomas’s post: https://www.scientiamobile.com/growing-support-of-hevc-or-h-265-video-on-mobile-devices/
Given modem needs to be on to use the internet, I surprise modem does not have a function to email you if a defined WiFi device is activated.
Personally, I have always been suspicious about Wifi cameras… Wifi jammer are easily available and cheap, this would render the mail notification and push notifications to phone(s) useless. If a loss of connectivity to the cam is detected somehow you could trigger some alarm with some simple scripts on a wired raspberry pi for e.g., but seriously who do such things @home ? In this case, even this is not a solution because the cam have to be sleeping between PIR detection to save power. Local sd card recording can mitigate that, but it is far too accessible for an… Read more »
>To my experience cheap IP cams have often buggy firmwares full of security holes and instabilities
In my experience they are all based on 3.x kernels. So even if the vendor software wasn’t crap the kernel has a load of known exploits.
Alas getting the camera IP blocks to work in a mainline kernel without vendor support is going to be next to impossible so the chances of having a camera like this that isn’t a disaster waiting to happen is pretty slim.
That antenna getting in the way of rotation is a serious design flaw. I wonder if they even tried it themselves before selling to customers!
Yes, it looked quite a bad design at first, but since they have the rotation function there’s at least a workaround.
It’s not explained in the user manual though, so I’d assume some people may have missed this trick.
From the photos it looks like you can unscrew the antenna. Position it where you want, then replace the antenna. Looks like a standard 2.4Ghz whip. You could try buying another antenna, maybe even a direction one which would help with signal strength.
Unscrewing the antenna before mounting it is one solution, but it does not quite work since it’s not possible to screw it back on the camera is mounted. Just not enough space between the wall and the camera. It will depend where the screw is after mounting. Rotating the camera by 180 degrees is a better solution.
There is any secure way to replace the battery after the battery die?
It does not look like the camera has been made to be opened.
It’s madness. You’ll be asked to renew the cloud service every month, even the free plan.
Login to the dashboard, click on renew and accept conditions.