
Leon ANAVI is a software engineer with an interest in open-source hardware, and he had previously launched several ANAVI boards for home automation based on Espressif ESP8266 or for Raspberry Pi boards including ANAVI thermometer, ANAVI light controller, and ANAVI Infrared pHAT among others.
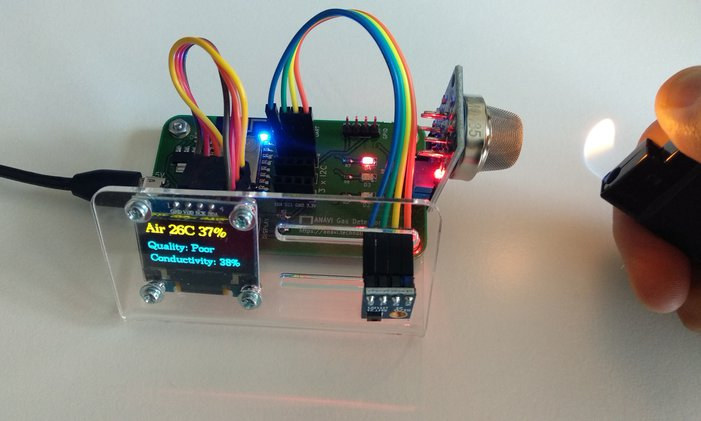
Leon has now introduced a new board on Crowd Supply: ANAVI gas detector. The board is powered by ESP8266 WiSoC providing WiFI connectivity, and supports MQ gas sensor modules such as MQ-135, MQ-2, or MQ-3 in order to monitor air quality and detect gas leaks.
 ANAVI gas detector board specifications:
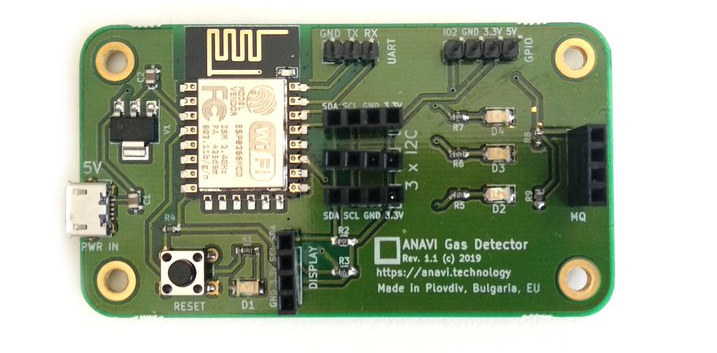
- Wireless Module – Based on ESP8266 Tensilica L106 32-bit processor with Wi-Fi 4 802.11 b/g/n connectivity
- Display – Optional Mini OLED display
- Gas sensor support – MQ-135 for air quality or any other 5V MQ analog gas sensor
- Expansion – 3x slots for I²C sensors
- Debugging / Programming – UART pins for flashing custom firmware
- Misc – Button
- Power Supply – 5V via micro USB port
- Dimensions – 75 mm x 40 mm
- Certifications – Open Source Hardware Association (OSHWA) BG000018
 ANAVI Gas Detector works with the Arduino IDE, PlatformIO, as well as the popular open-source home automation platforms such as Home Assistant and OpenHAB via MQTT protocol. You’ll find the KiCad schematics and PCB layout on Github, as well as an Arduino code sample, and documentation. The latter still needs to be updated since it’s still about the earlier ANAVI Thermometer board 🙂
MQ-135 sensor can be purchased as part of the some of the kits, but if you’d like to get your own sensors, any of the following should work:
- MQ-135 for air quality
- MQ2 for methane, butane, LPG, smoke
- MQ-3 for alcohol, ethanol, smoke
- MQ-7 for carbon monoxide
- MQ-9 for carbon monoxide and flammable gasses
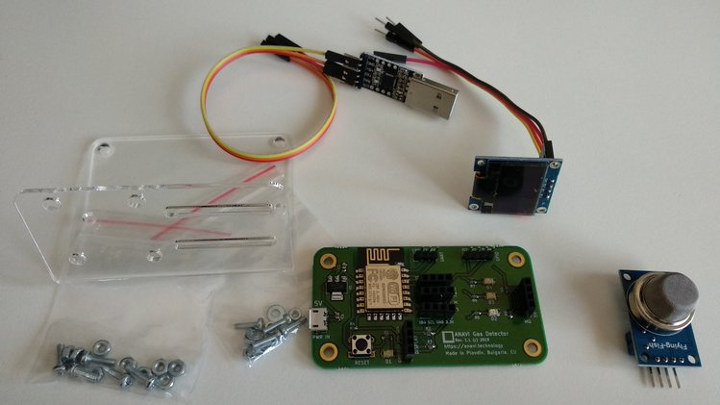 The campaign had a $10 funding target which obviously has already been surpassed. Rewards start at $25 for the board only, but most people will likely go with the $39 starter kit that adds an acrylic case, OLED mini display, MQ-135 gas sensor module, and USB to UART debug cable in order to get started out of the box. There are other perks with more sensors as well. Shipping is free to the US, and adds $12 to the rest of the world. The boards and kits are expected to start shipping on November 22nd.

Jean-Luc started CNX Software in 2010 as a part-time endeavor, before quitting his job as a software engineering manager, and starting to write daily news, and reviews full time later in 2011.
Support CNX Software! Donate via cryptocurrencies, become a Patron on Patreon, or purchase goods on Amazon or Aliexpress


I wonder why people keep using LDOs on USB powered things like this. A richtek buck regulator and cheap inductor won’t change the BOM price in any meaningful way but it’ll mean you actually have half a chance of supplying your peak current without the input voltage dropping. A lot of the AMS1117 LDOs everyone seems to love are fake and drop out well before 4.3V.
.. and if you’re going to put kicad files on github for everyone else’s sanity include the rendered schematic and gerbers.
I remember modding a Fonera a decade ago to replace the overheating LDO in it with a cheap MAX something which was not the most efficient by then but still managed to reduce the losses and heat by 50%. Many buck regulators are not capable of working with too low a difference between in and out however, while LDOs by definition support this better.
>Many buck regulators are not capable of working with too low a difference between in and out Many buck regulators including the super cheap richtek ones have pass through modes that connect vin to vout when they can’t regulate. Many of the cheap (not)Low Drop Out regulators need vin to be a good 1v above vout to regulate. With a cheap buck regulator you should have 80-90% efficiency for vin = 5v vout = 3.3v and if vin gets close to close to 3.3v you will get somewhere around 3.3v out where as with a cheap LDO you’ll only get… Read more »
Note, I’m not contesting your point, I just mean to say that a cheap buck is not better than a cheap LDO. You’ll find a lot of cheap buck not working correctly in the gray area between the max Vout your device stands, and the lowest Vin they start to regulate it. Typically if you have a 1V min between Vin and Vout, the device requires 4.3V to work and could connect this to Vout when it cannot regulate anymore, resulting in the ESP being particularly angry. In practice it’s not just the inability to regulate, it’s often due to… Read more »
>but this requires good buck converters.
Even the cheapies now have under voltage lockout, different regulation modes for light load and so on.
The 10 cent richtek ones state they can regulate between vref and vin – 0.2v. Inductor selection is a problem if you have really high currents but an off brand one from “sunlord” or whatever that’s good for 1.5A is 5 cents. On a lightly populated board like that you could splash out a whole 5 cents more and buy one that’s twice the size just for lols.
OK I agree that Vin-0.2V is perfectly fine and covers the needs that any LDO addresses. 15 cents to replace an LDO with a buck converter is definitely worth it for me (might not be for all projects but for most use cases it should be fine).
KiCad is a free and open source software that runs on MS Windows, Mac and GNU/Linux distributions. Anyone can quickly download it, clone my project in GitHub and load it in KiCad. Different PCB manufacturers have different requirements for exporting gerber files therefore I decided not including these in the GitHub repository. Anyone can export them from KiCad. I’ve shared all schematics and KiCad projects files in GitHub under CC BY-SA 4.0. ANAVI Gas Detector is certified open source with OSHWA UID BG000018. As for any open source project, GitHub pull requests with improvements are always welcome. I am using… Read more »
That’s great and all but what if I just want to view the schematic when I’m poking around your github project? If the rendered schematic is included in the source or as a release then I can just open it up and take a look.
Including the manufacturing outputs too means that I can download a known good set of files that have been exported with the correct options and send it to whatever PCB vendor is the cheapest that day.
What are the components of Developer Kit?
The developer kit includes ANAVI Gas Detector, acrylic case, OLED mini display, MQ-135 gas sensor module, USB to UART debug cable, HTU21D temperature and humidity module, BMP180 sensor module for barometric pressure and BH1750 sensor module for light.
Have a look at section “What Comes In A Kit” for more details.
Jean-Luc, thanks for spreading the word about the project! As you have already noticed still have some work on the software and the documentation, after that I will send you a prototype for testing 🙂
No sensor for Carbon Dioxide? That is killing the whole planet in the next 10 years!
/sarc
Seriously, what about PM2.5 and PM size particle measurement?
Luftdaten already has an excellent platform for particle measurement in the outdoor air, including step by step instructions for building a sensor with NodeMCU. ANAVI Gas Detector is for a different purpose – it is for indoor use and detects another threat: dangerous gases via MQ analog gas sensor modules.