
Laser ranging has many applications in production and life, such as ranging, positioning, obstacle avoidance, and so on. Time-of-Flight (ToF) ranging, as a type of laser ranging technology, is often used for real-time object detection in robots, autonomous vehicles, and traffic management because of its accuracy, fast response, and low power consumption. The face detection function of mobile phones also uses this technology.
This article will introduce the WisBlock RAK12014 ToF laser ranging sensor module, and use the WisBlock development board to demonstrate how the module works.
What is a ToF laser ranging sensor module?
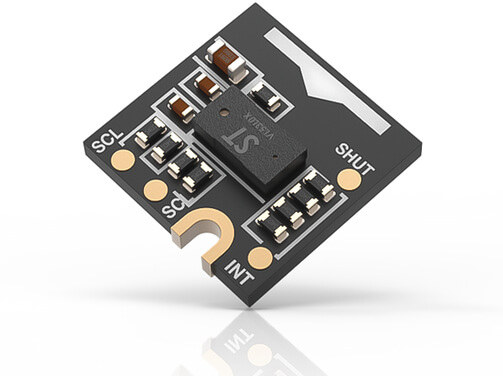
A ToF laser ranging sensor module uses laser pulses to measure the distance between itself and a target object. The WisBlock RAK12014 ToF laser ranging sensor module is based on STMicro VL53L0X, the smallest ToF ranging sensor in the world.
The WisBlock RAK12014 provides accurate distance measurement and can measure distances up to 2 meters. Its 940nm VCSEL transmitter (Vertical Cavity Surface Emitting Laser) is completely invisible to the human eye, and coupled with the built-in physical infrared filter, it has a longer ranging distance, and stronger immunity to ambient light. In other words, the sensor provides accurate distance measurements regardless of the target’s reflectivity.
RAK12014 module’s key features and specifications:
- Range up to 2 meters
- I2C interface for device control and data transfer
- Shutdown (reset) and interrupt GPIO
- Power Supply – 2.6~3.5 V
- Dimensions – 10 x 10 mm
The RAK12014 module contains a 24-pin connector compatible with the sensor socket of the WisBlock baseboard. The RAK12014 module can be installed on a WisBlock base (eg RAK5005-O) module through this connector. The pin order and pin definitions of this connector are shown in the figure below.
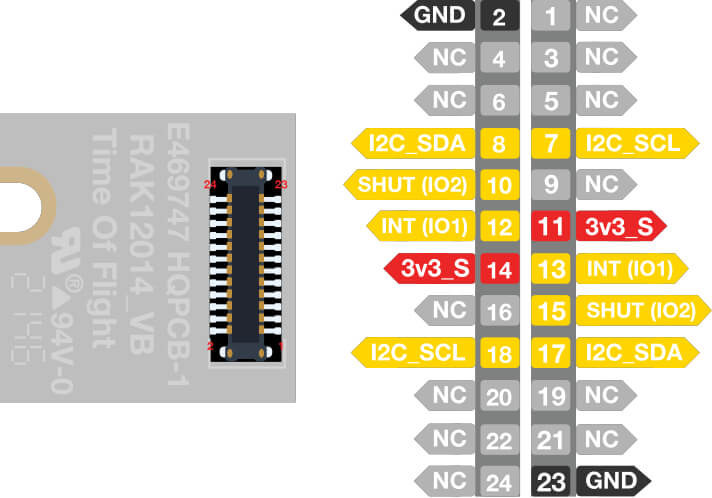
Note: Only I2C pins, SHUT (reset), INT, 3V3_S, and GND are wired to the connector of this module.
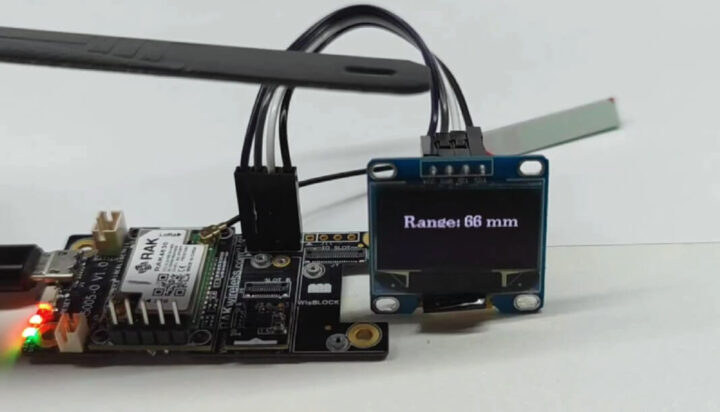
RAK12014 example: display distance on an OLED Display
We’ll use RAK12014 in a very typical application: displaying the measured distance on an OLED display.
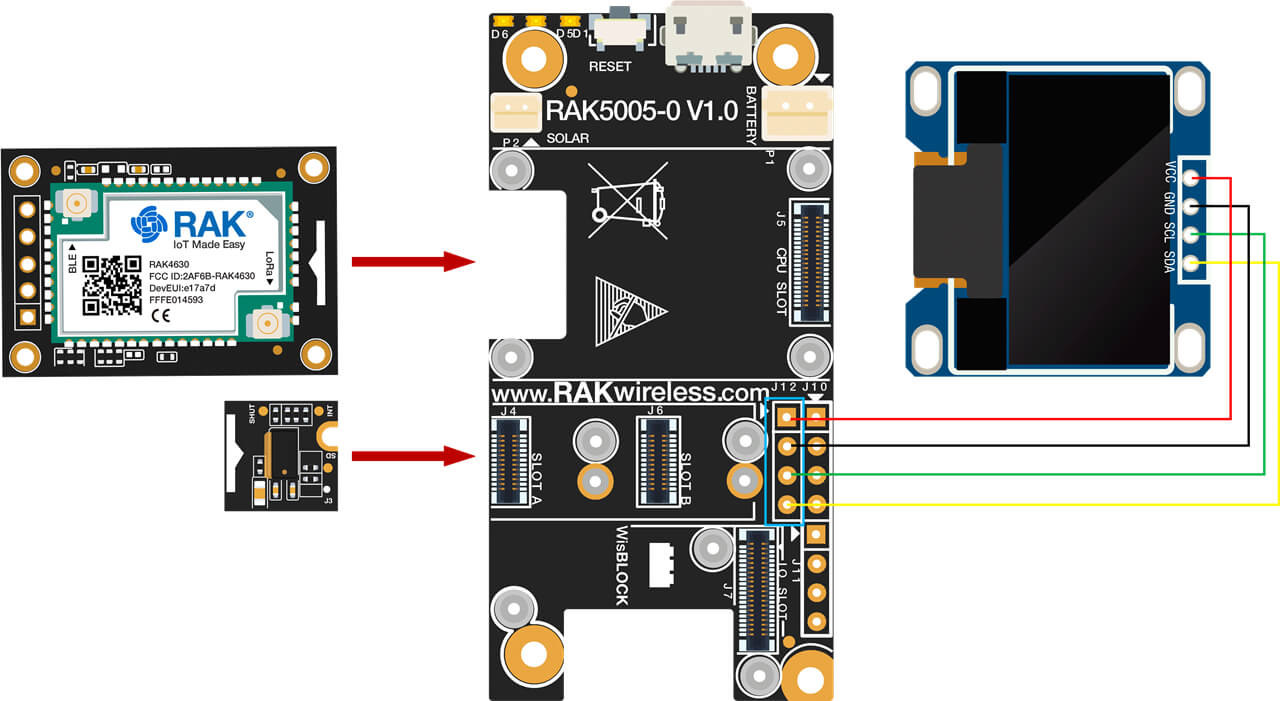
In this example, we’ll connect the RAK12014 to the RAK 5005-O base, and the distance measurement and the OLED will be controlled through an Arduino sketch running on the RAK4631 module.
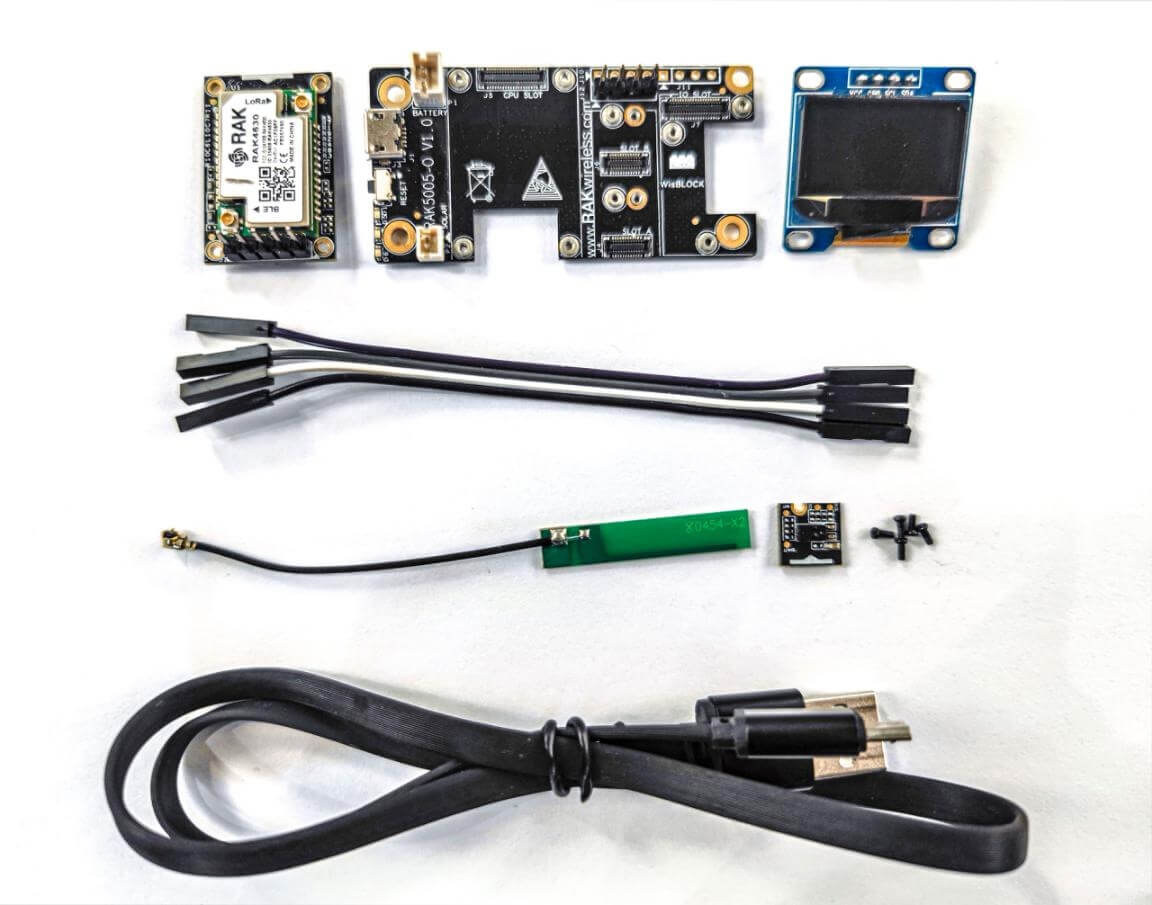
List of WisBlock items and cables used for this project:
- Rakwireless RAK12014 ToF sensor
- Rakwireless RAK4631 nRF52840 BLE xore module for LoRaWAN
- Rakwireless RAK5005-O WisBlock base board
- Rakwireless RAK1921 OLED display
- Jumper cables and a USB cable for power
Here are the specific steps to implement this project:
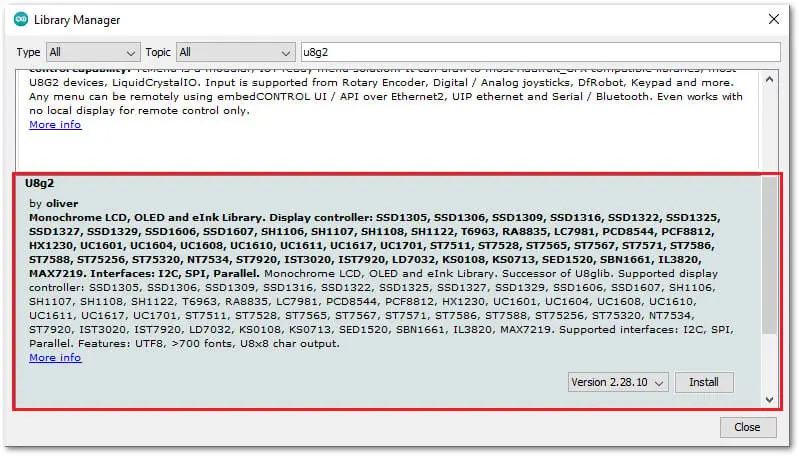
- Install the OLED library (U8g2)To control the OLED display, you need to use the “U8g2” library.

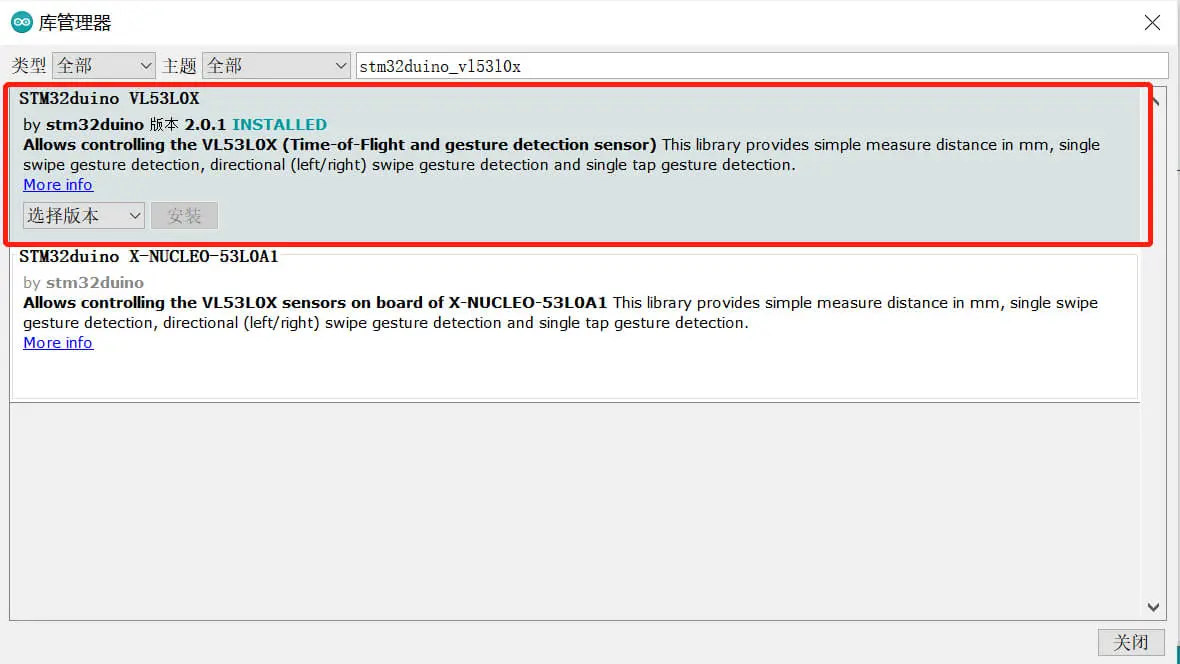
- Install ToF Laser Ranging Sensor LibraryTo control the ToF laser ranging sensor module, the “stm32duino_vl53l0x” Arduino library is required.

Note: After all libraries are installed, you need to restart the Arduino IDE for the installed libraries to take effect. - Import codeThen import the code into the libraries required for the OLED display and the ToF laser ranging sensor module, and define two objects named “u8g2” and “sensor_vl53l0”:
12345#include <Wire.h>#include <vl53l0x_class.h> // Click to install library: http://librarymanager/All#stm32duino_vl53l0x#include <U8g2lib.h> // Click to install library: http://librarymanager/All#u8g2U8G2_SSD1306_128X64_NONAME_F_HW_I2C u8g2(U8G2_R0);VL53L0X sensor_vl53l0x(&Wire, WB_IO2); - GetDistance() functionThe GetDistance() function will gather the data from the ToF sensor, and display the distance on the OLED, or if there is no data, display “Nothing at all”:
123456789101112131415161718192021void GetDistance(){int status;char report[64];uint32_t distance;u8g2.clearBuffer(); // clear the internal memoryu8g2.setFont(u8g2_font_ncenB10_tr); // choose a suitable font// Read Range.status = sensor_vl53l0x.GetDistance(&distance);if (status == VL53L0X_ERROR_NONE){// Output data.snprintf(report, sizeof(report), "Range: %ld mm", distance);}else{snprintf(report, sizeof(report), "Nothing at all", distance);}Serial.println(report);u8g2.drawStr(15, 30, report);u8g2.sendBuffer();} - setup() functionIn the setup() function, both the ToF laser ranging sensor and the OLED display are initialized. We also print a message on the serial monitor in case the VL53L0X sensor’s initialization failed:
12345678910111213141516171819202122232425262728293031323334void setup() {int status;pinMode(LED_BUILTIN, OUTPUT);digitalWrite(LED_BUILTIN, LOW);pinMode(WB_IO2, OUTPUT);digitalWrite(WB_IO2, HIGH);// Initialize Serial for debug outputSerial.begin(115200);time_t serial_timeout = millis();// On nRF52840 the USB serial is not available immediatelywhile (!Serial){if ((millis() - serial_timeout) < 5000){delay(100);digitalWrite(LED_BUILTIN, !digitalRead(LED_BUILTIN));} else {break;}}u8g2.begin();// Initialize I2C bus.Wire.begin();// Configure VL53L0X component.sensor_vl53l0x.begin();// Switch off VL53L0X component.sensor_vl53l0x.VL53L0X_Off();// Initialize VL53L0X component.status = sensor_vl53l0x.InitSensor(0x52);if(status){Serial.println("Init sensor_vl53l0x failed...");}} - loop() functionThe main loop calls the GetDistance() function every 300ms.
123456void loop() {uint32_t distance;int status;GetDistance();delay(300);} - Code uploadWe can now load our Arduino sketch to the RAK4631 development board. Selected the board in the Arduino IDE, as well as the correct port, and start the code uploading and flashing. You may also want to open the serial monitor of the Arduino IDE, selecting a 111500 bps baud rate to monitor the ranging data from the ToF laser ranging sensor module.

- Video demo
Final words
The ToF laser ranging sensor module can be used in a wide range of applications and scenarios All the data gathered from the sensor could also be uploaded directly to the cloud for real-time analysis. This article mainly shows you how to use the ToF laser ranging sensor module to measure the distance of an object from the sensor.
For reference, please find the complete Arduino sketch for this ToF ranging sensor project:
|
1 2 3 4 5 6 7 8 9 10 11 12 13 14 15 16 17 18 19 20 21 22 23 24 25 26 27 28 29 30 31 32 33 34 35 36 37 38 39 40 41 42 43 44 45 46 47 48 49 50 51 52 53 54 55 56 57 58 59 60 61 62 63 64 65 66 67 68 69 70 71 72 73 74 75 76 |
/** @file RAK12014_Distance_Detection.ino @author rakwireless.com @brief Distance detection by laser @version 0.1 @date 2021-8-28 @copyright Copyright (c) 2020 **/ #include <Wire.h> #include <vl53l0x_class.h> // Click to install library: http://librarymanager/All#stm32duino_vl53l0x #include <U8g2lib.h> // Click to install library: http://librarymanager/All#u8g2 U8G2_SSD1306_128X64_NONAME_F_HW_I2C u8g2(U8G2_R0); VL53L0X sensor_vl53l0x(&Wire, WB_IO2); void GetDistance(){ int status; char report[64]; uint32_t distance; u8g2.clearBuffer(); // clear the internal memory u8g2.setFont(u8g2_font_ncenB10_tr); // choose a suitable font // Read Range. status = sensor_vl53l0x.GetDistance(&distance); if (status == VL53L0X_ERROR_NONE) { // Output data. snprintf(report, sizeof(report), "Range: %ld mm", distance); } else { snprintf(report, sizeof(report), "Nothing at all", distance); } Serial.println(report); u8g2.drawStr(15, 30, report); u8g2.sendBuffer(); } void setup() { int status; pinMode(LED_BUILTIN, OUTPUT); digitalWrite(LED_BUILTIN, LOW); pinMode(WB_IO2, OUTPUT); digitalWrite(WB_IO2, HIGH); // Initialize Serial for debug output Serial.begin(115200); time_t serial_timeout = millis(); // On nRF52840 the USB serial is not available immediately while (!Serial) { if ((millis() - serial_timeout) < 5000) { delay(100); digitalWrite(LED_BUILTIN, !digitalRead(LED_BUILTIN)); } else { break; } } u8g2.begin(); // Initialize I2C bus. Wire.begin(); // Configure VL53L0X component. sensor_vl53l0x.begin(); // Switch off VL53L0X component. sensor_vl53l0x.VL53L0X_Off(); // Initialize VL53L0X component. status = sensor_vl53l0x.InitSensor(0x52); if(status) { Serial.println("Init sensor_vl53l0x failed..."); } } void loop() { uint32_t distance; int status; GetDistance(); delay(300); } |
This is a translation, with some edits, of the tutorial posted in Chinese on CNX Software China.

Jean-Luc started CNX Software in 2010 as a part-time endeavor, before quitting his job as a software engineering manager, and starting to write daily news, and reviews full time later in 2011.
Support CNX Software! Donate via cryptocurrencies, become a Patron on Patreon, or purchase goods on Amazon or Aliexpress


