
In the first part of our review of CrowPi L Raspberry Pi 4 laptop for education, we checked the hardware and accessories such as the CrowTail starter kit with various sensors and other electronics modules, and showed how to install or remove the Raspberry Pi 4 SBC from the laptop shell.
I’ve now had more time to play with the educational software, so I’ll report my experience with the laptop when learning game design and hardware control with Letscode visual programming IDE, as well as the Python lessons for more advanced students.
Reinstalling CrowPi OS image
It’s the rainy season here in Thailand meaning it’s both hot and humid, and even though I’m not entirely sure it’s related, I recently had to reinstall Raspberry Pi OS on one of my Raspberry Pi with a corrupted SD card. It happened again with the CrowPi L after I left it in its package for two to three weeks…
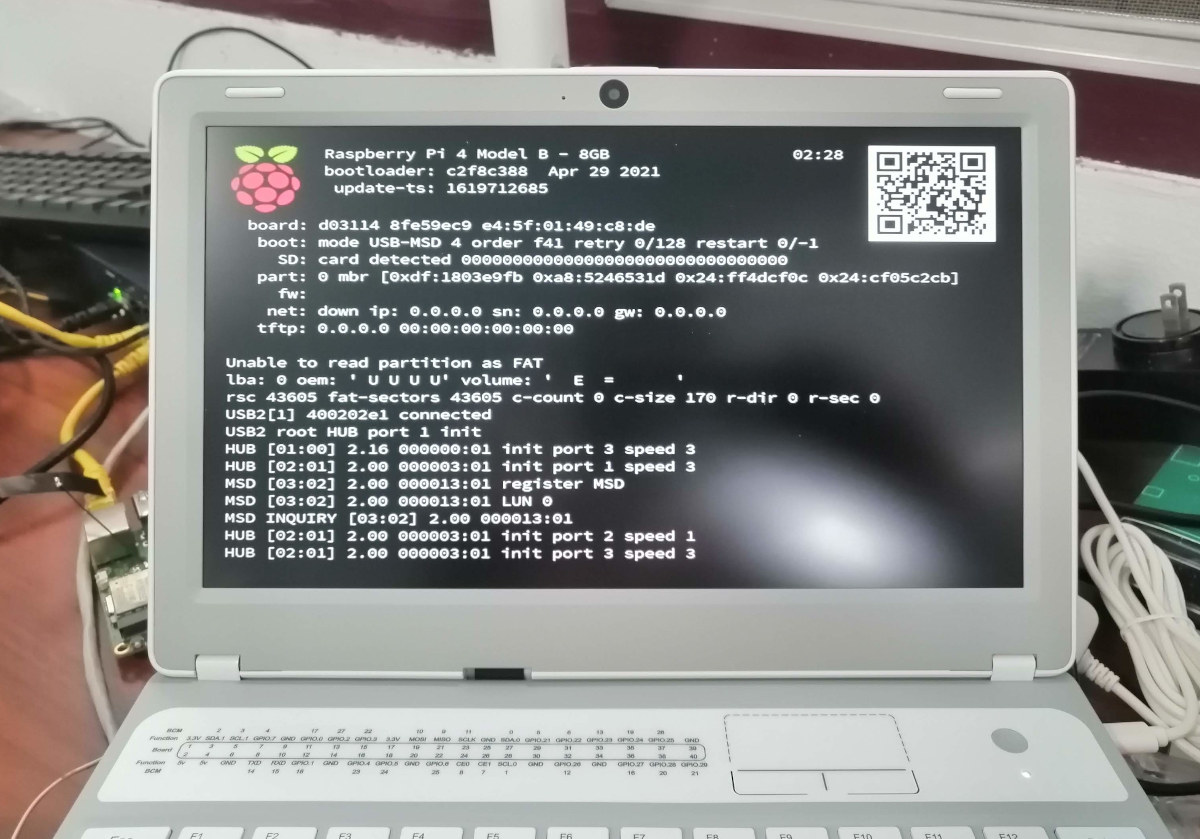
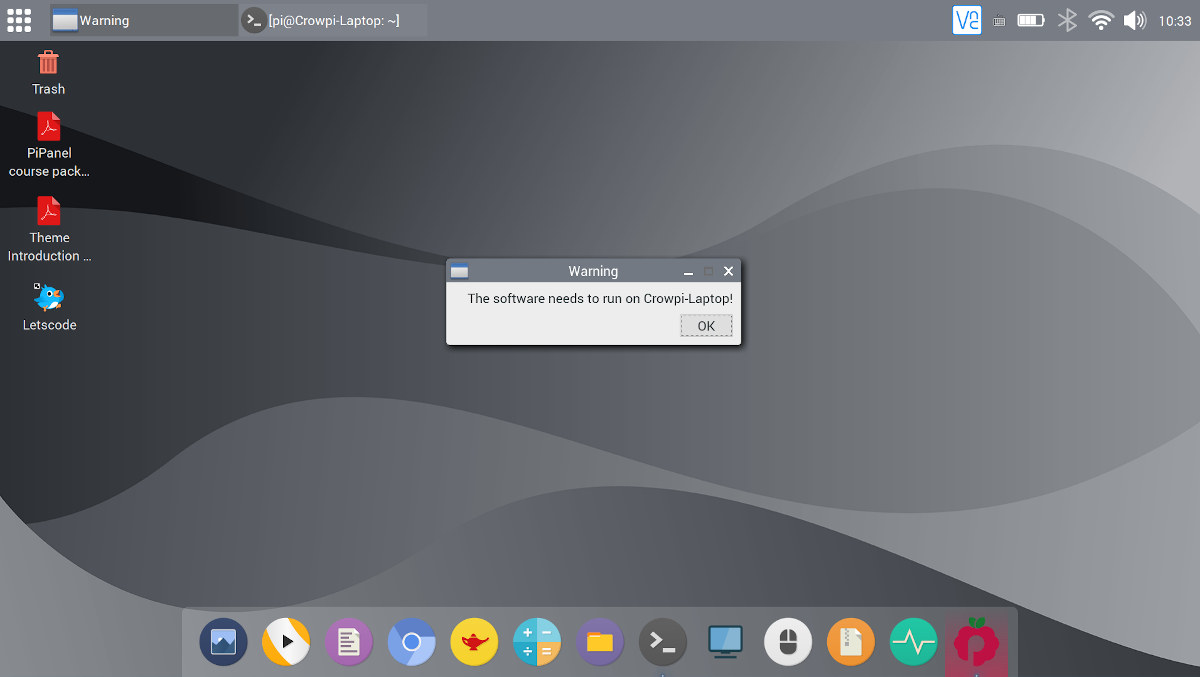
But that’s not a big issue, as Elecrow provides CrowPi OS images for download. So I just downloaded and flashed the CrowPi L image to a microSD card with USBImager, and I was good to do. Note that I often get the error “The software needs to run on Crowpi-Laptop!” at boot time.
Pi Panel user interface
But when that happens I can just click on the Pi Panel icon on the far right of the taskbar to start it up.
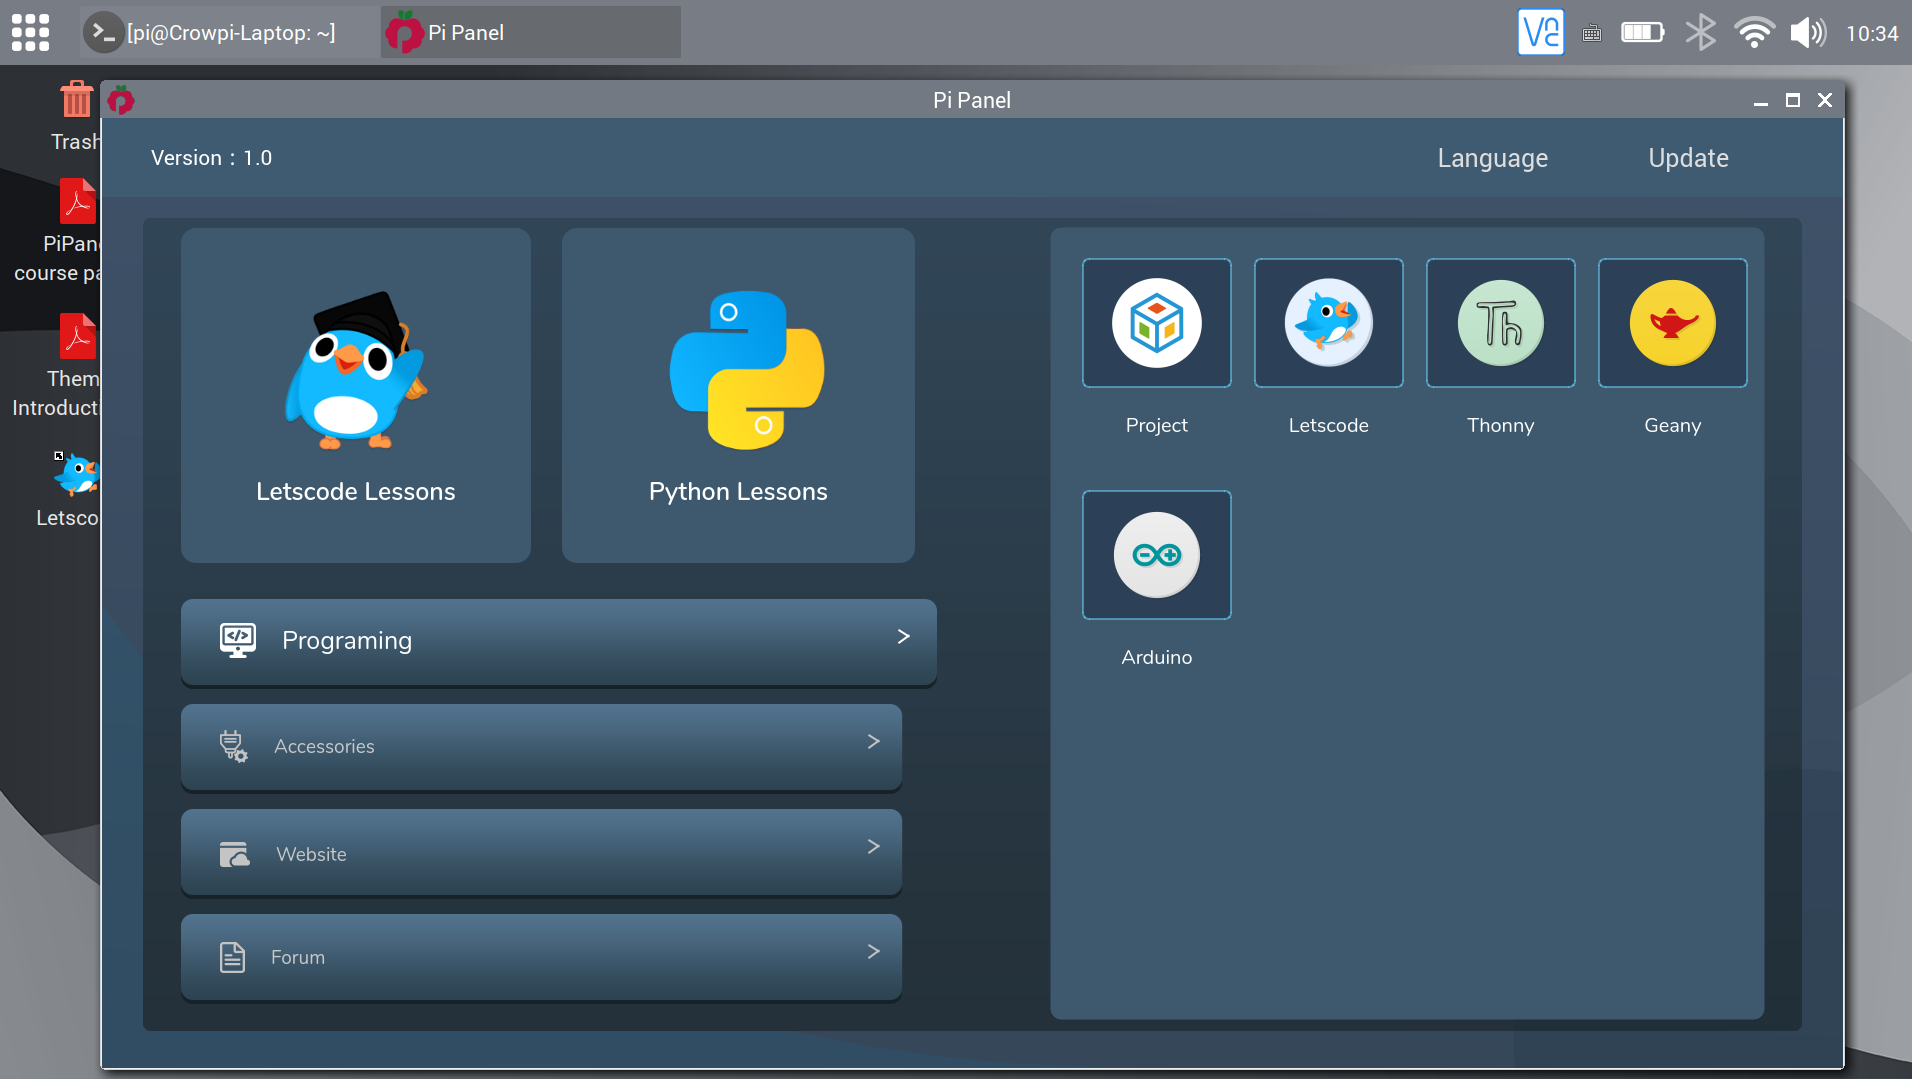
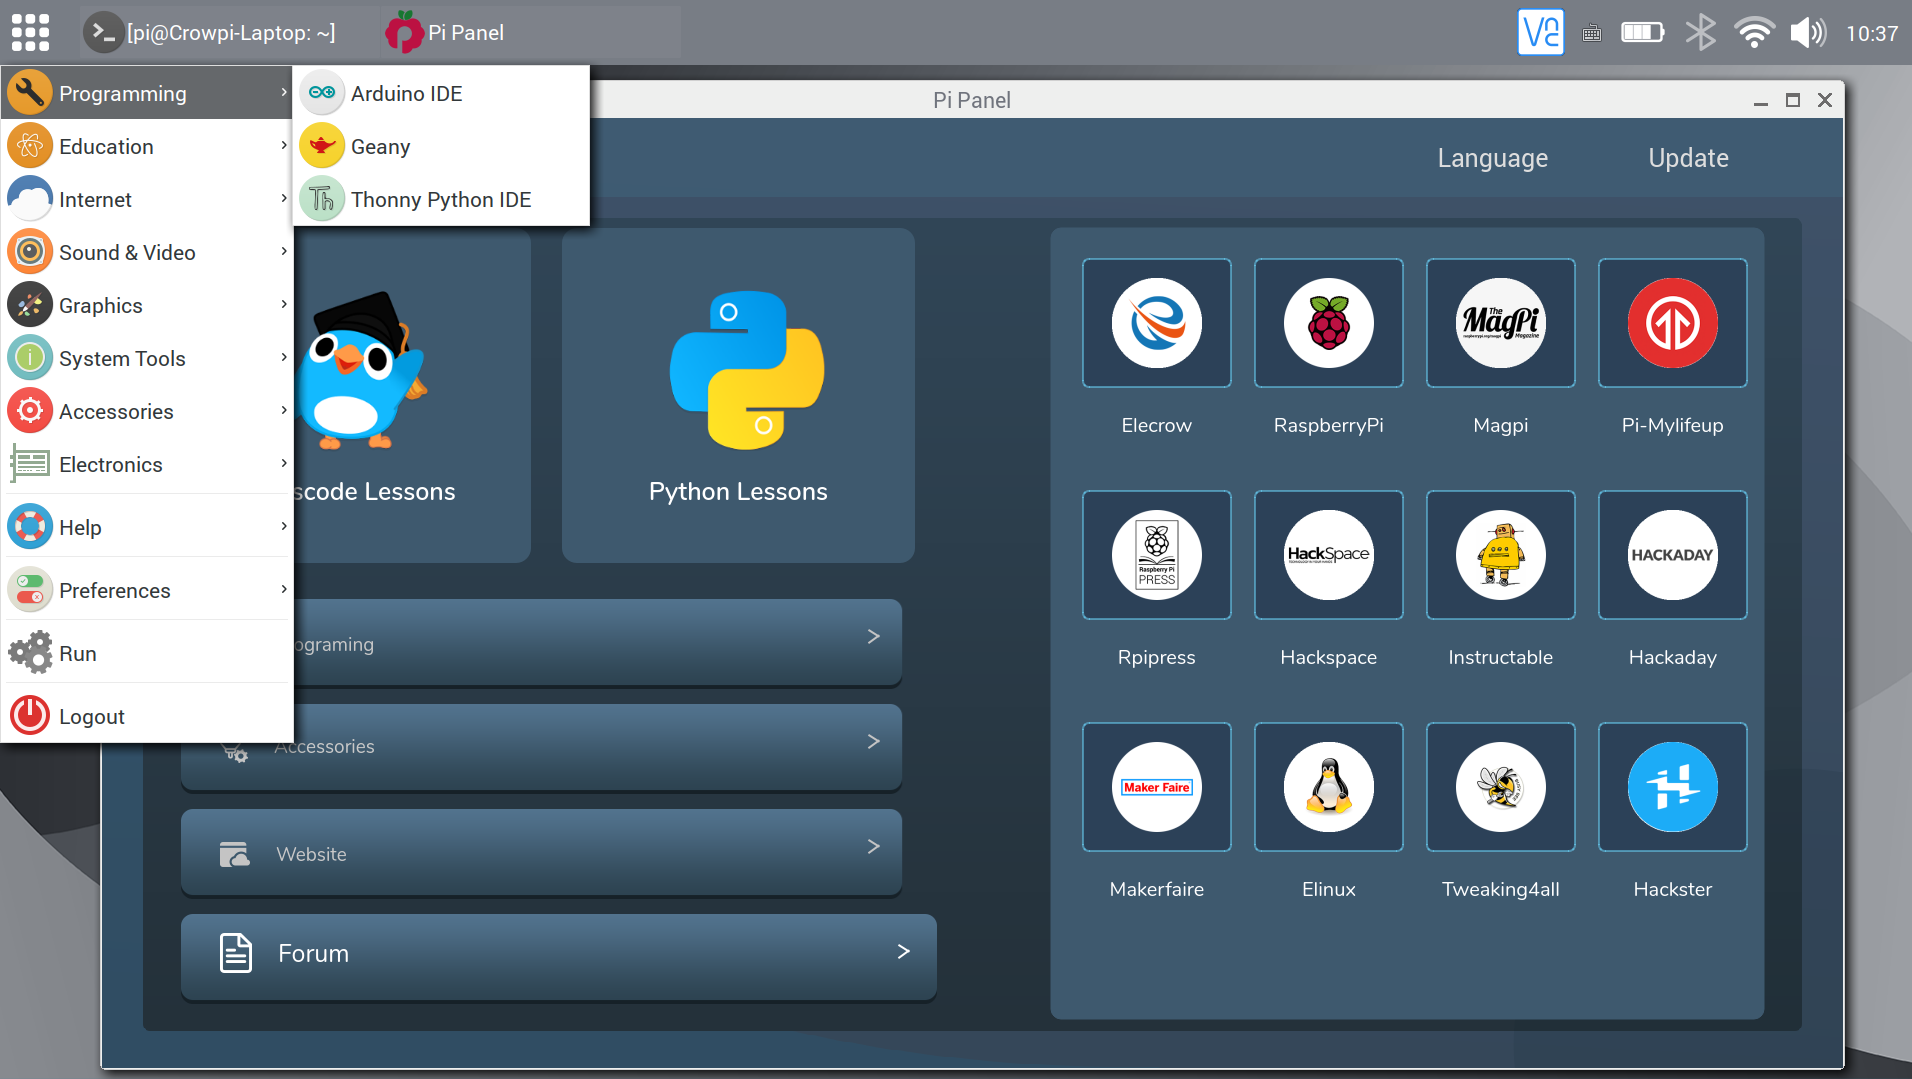
The Pi Panel program offers shortcuts to Letscode tutorials to learn visual programming, Python lessons, as well as other programming tools such as Thonny (Python IDE), Geany text editor, and the Arduino IDE, all of which are preinstalled in the image.
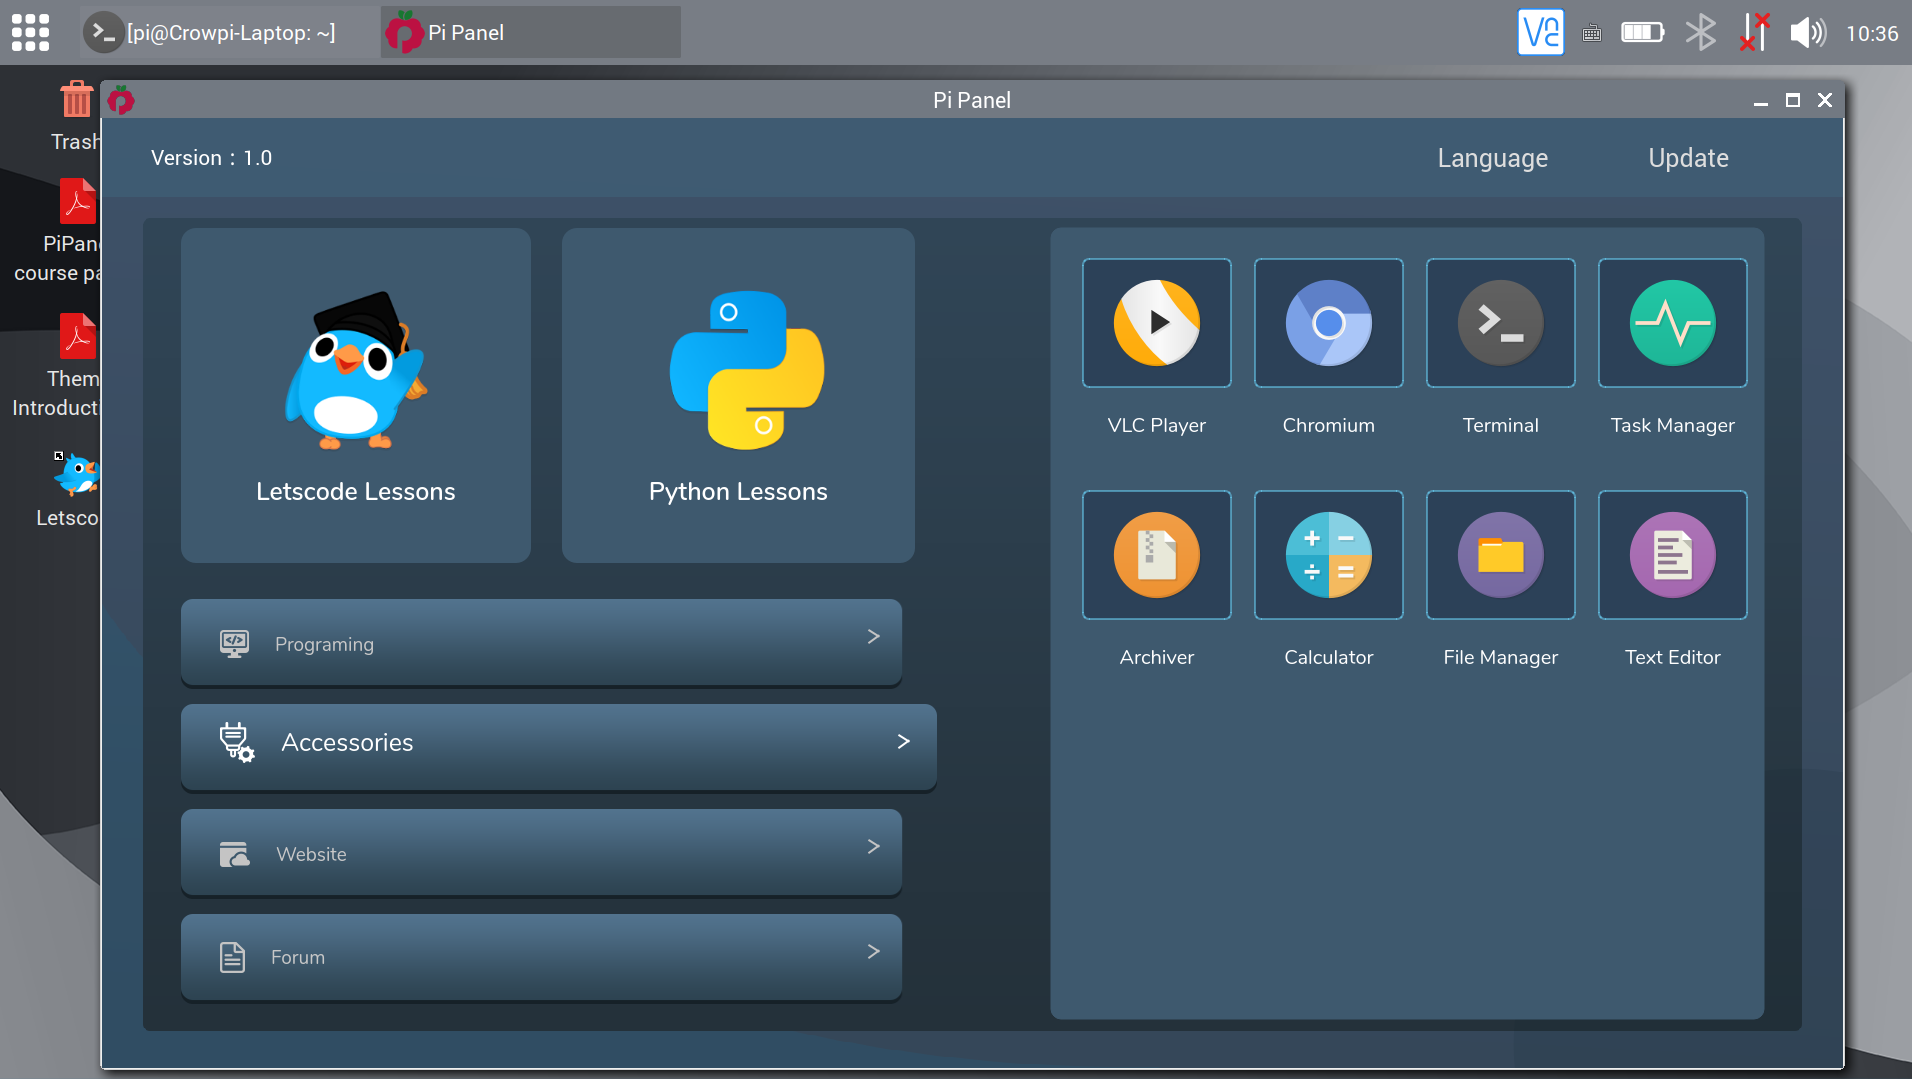
The Accessories tab provides shortcuts to desktop programs such as VLC Player, Chromium, or a File Manager, the Website tab gets links to relevant websites (Raspberry Pi, Arduino, Linux, Ubuntu, Open Source…)…
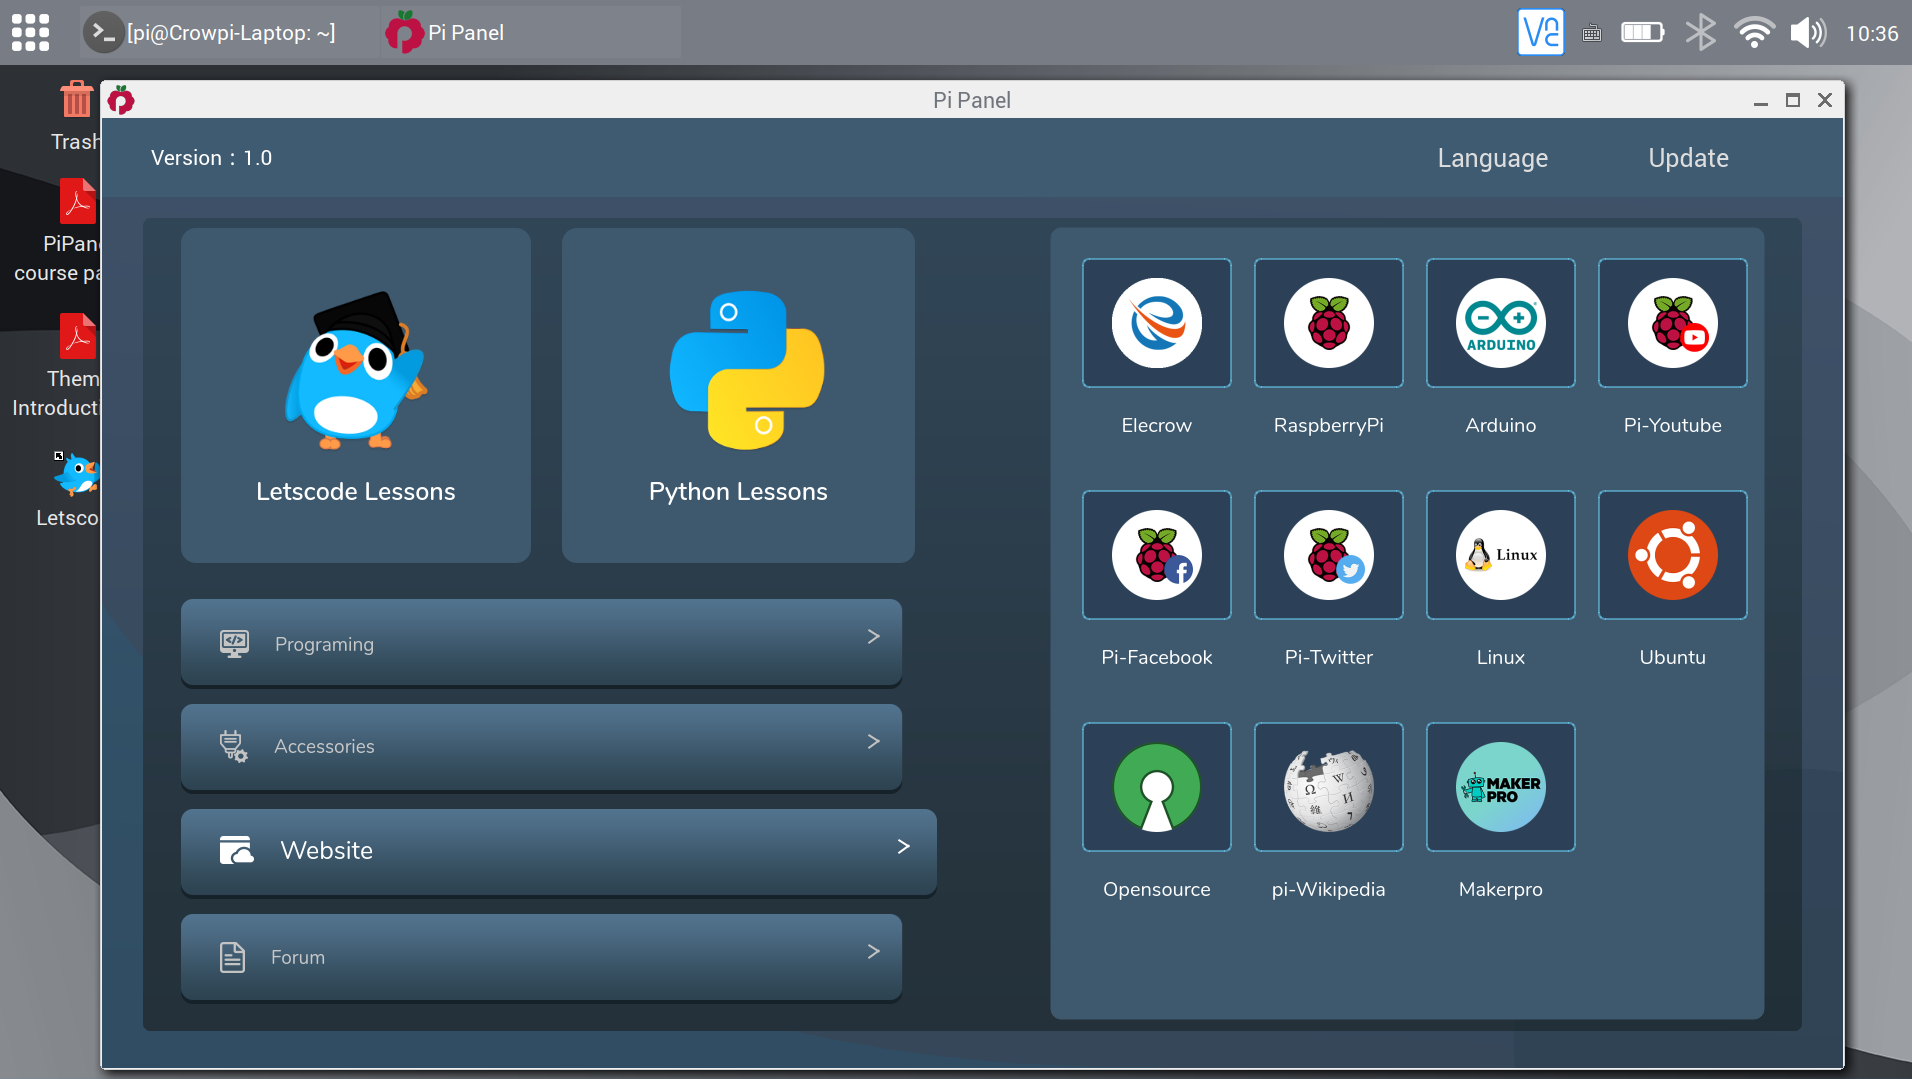
while the Forum tab offers links to popular maker forums. Note that the CrowPi OS is basically Raspberry Pi OS with the Pi Panel programs and developer tools.
Visual programming lessons with Letscode
Let’s check Letscode lessons first. There are three options with “the game designs”, “hardware control” (which requires the CrowTail Starter Kit with electronics modules), and finally an option to add future tutorials.
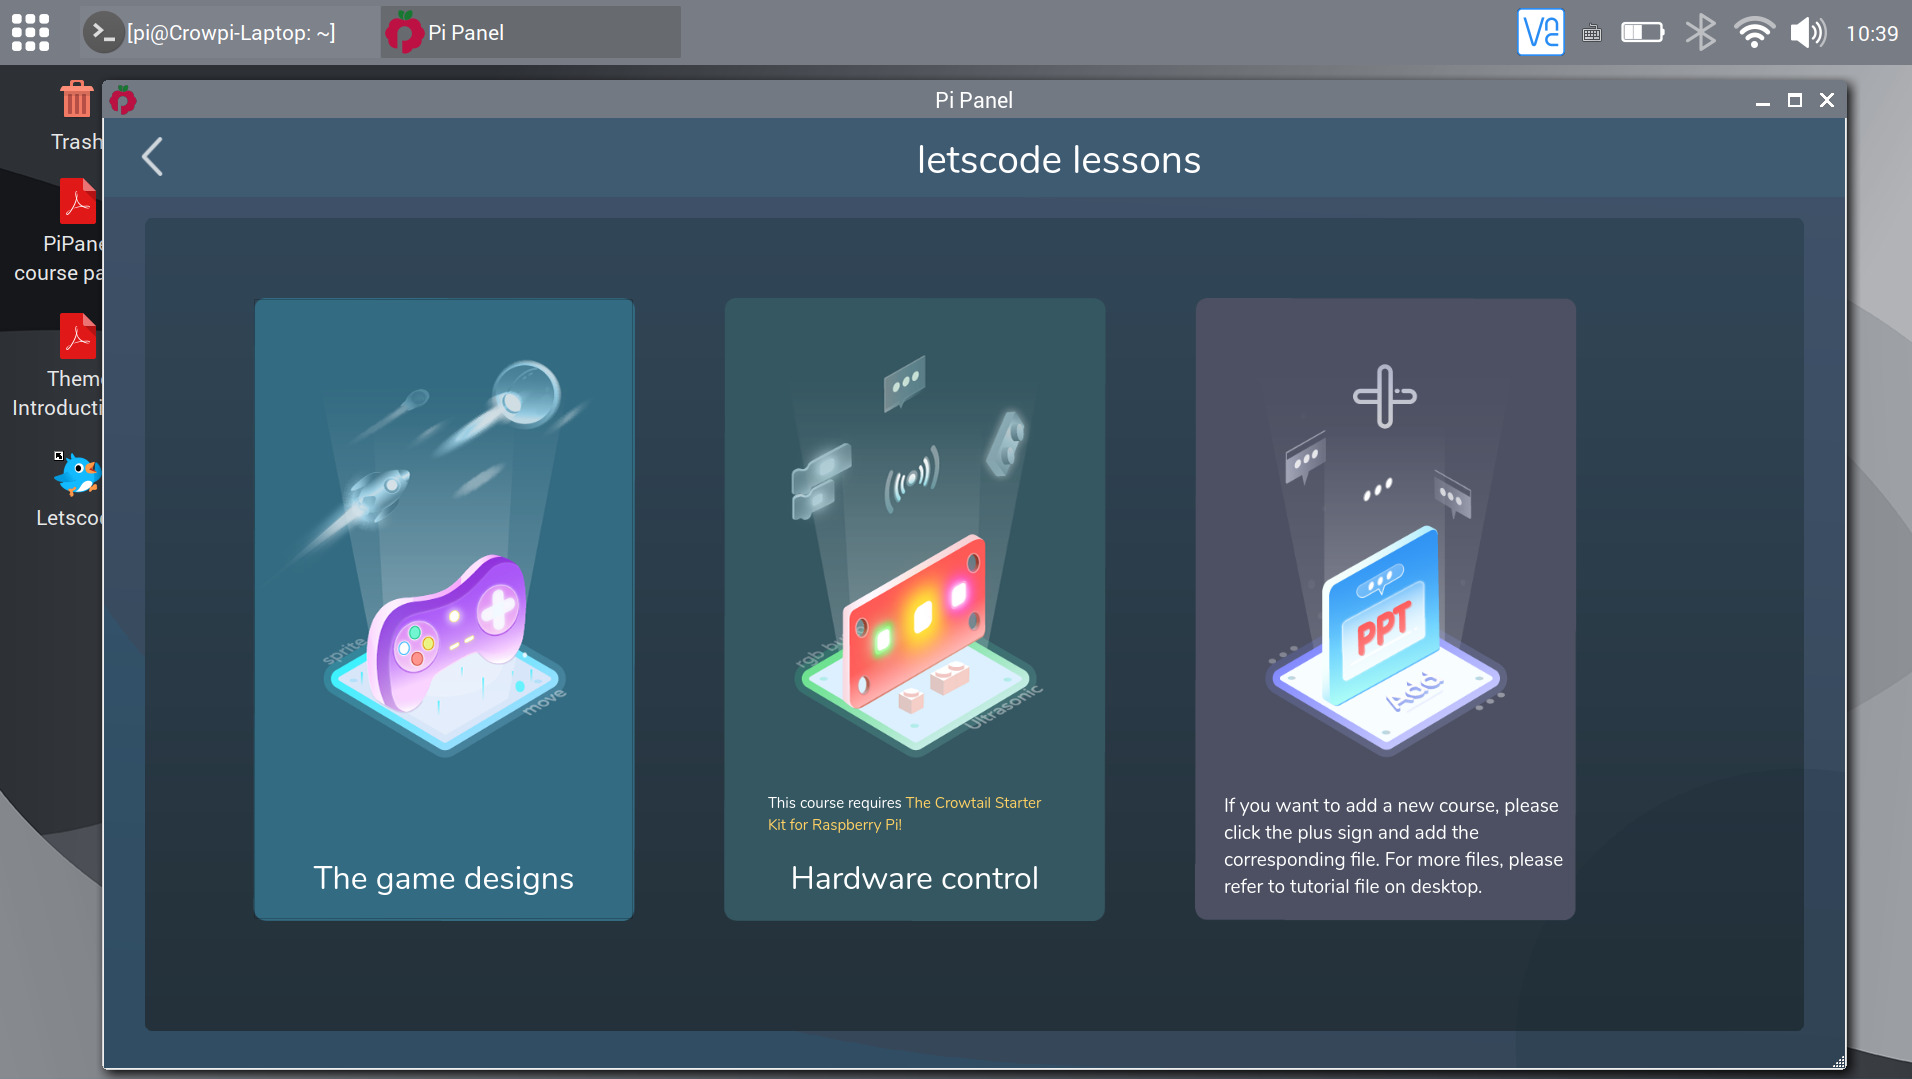
Game design with CrowPi L
The game designs section does not rely on electronics at all, it will just teach kids and adults how to create games with visual programming.
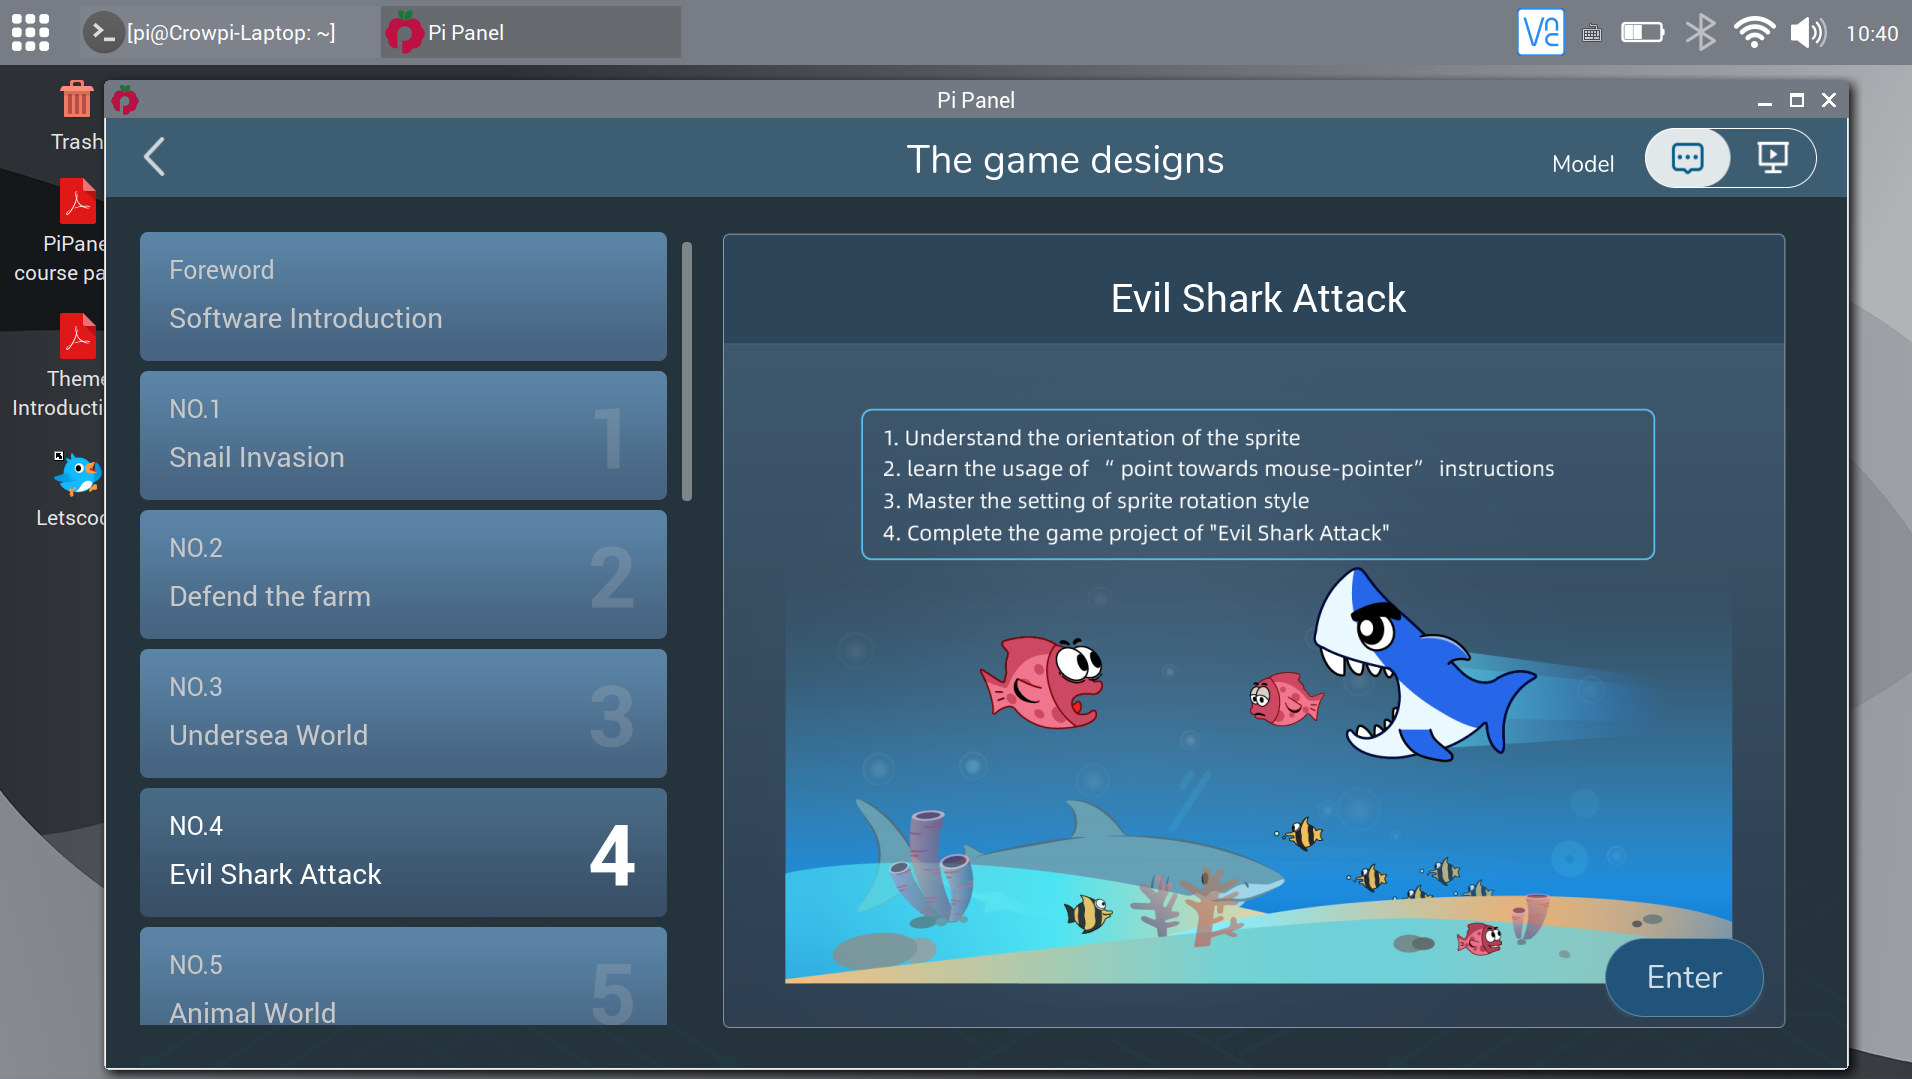
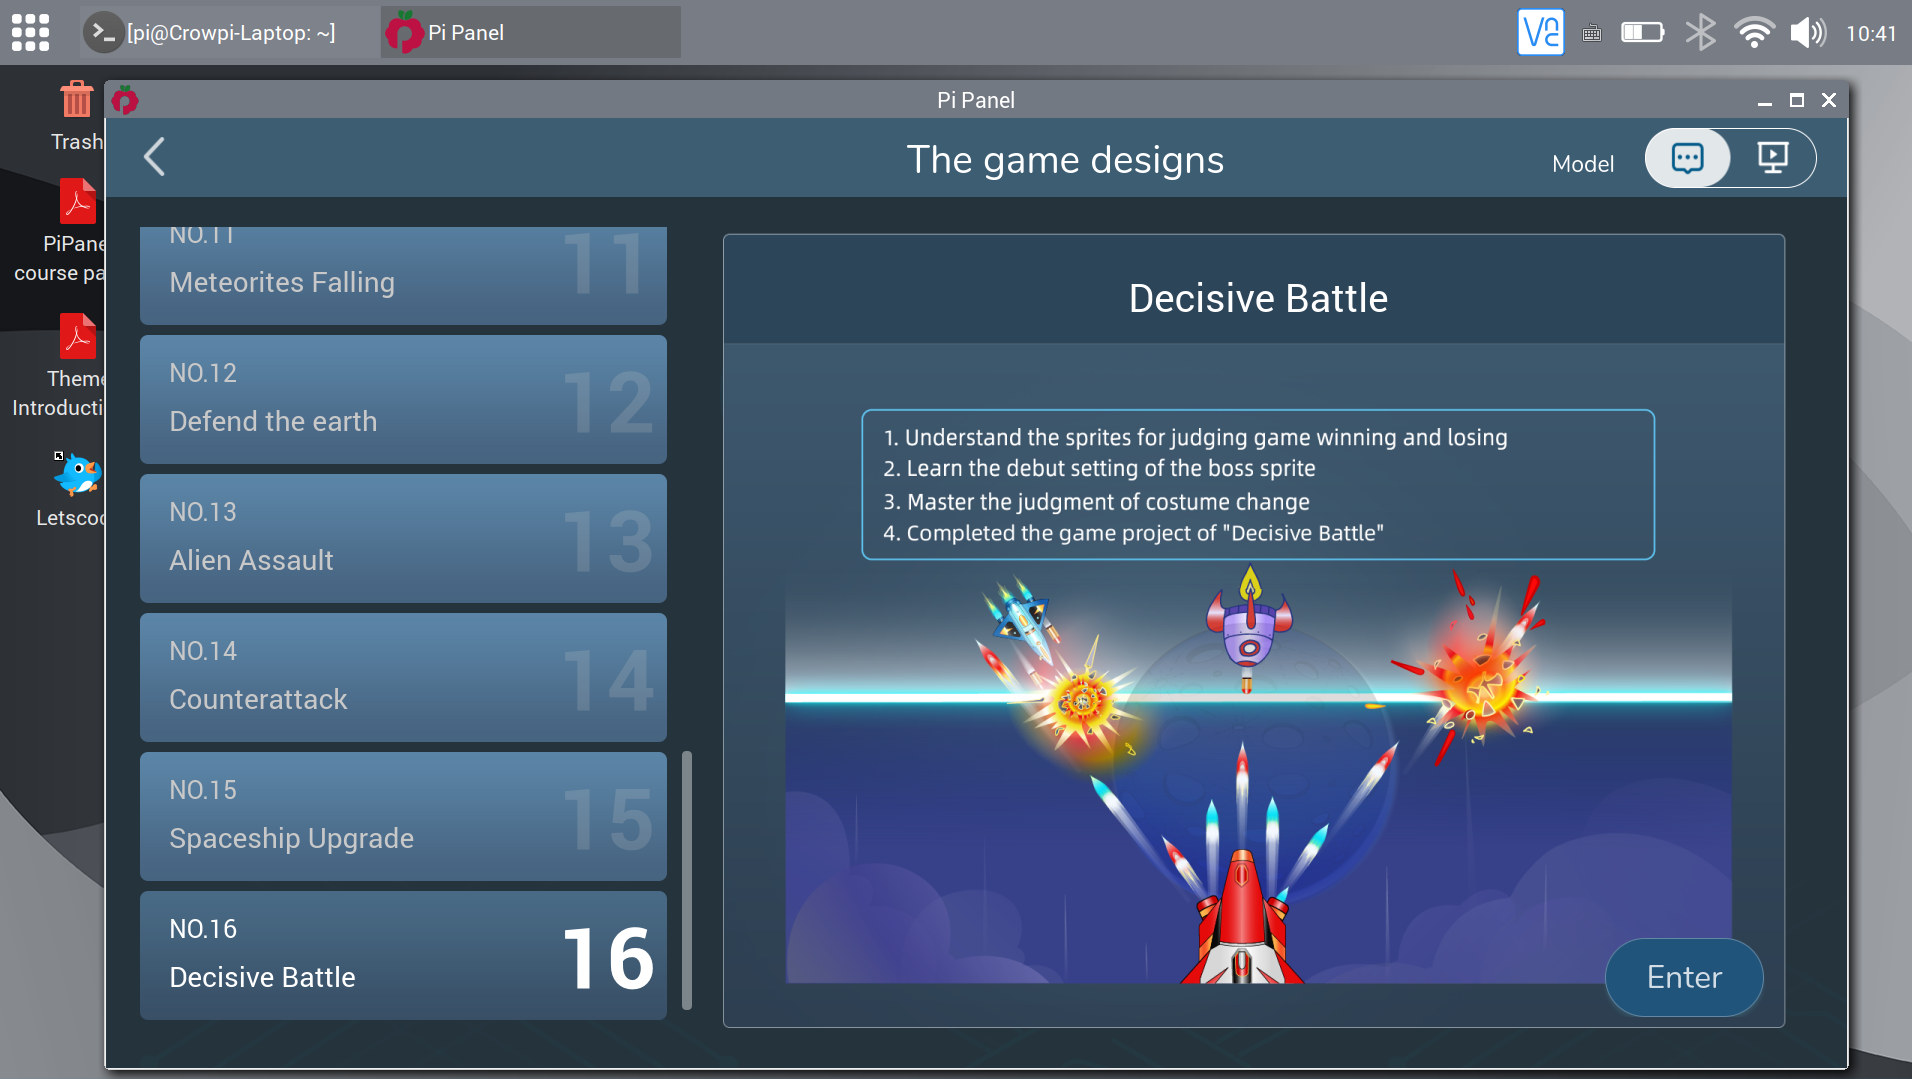
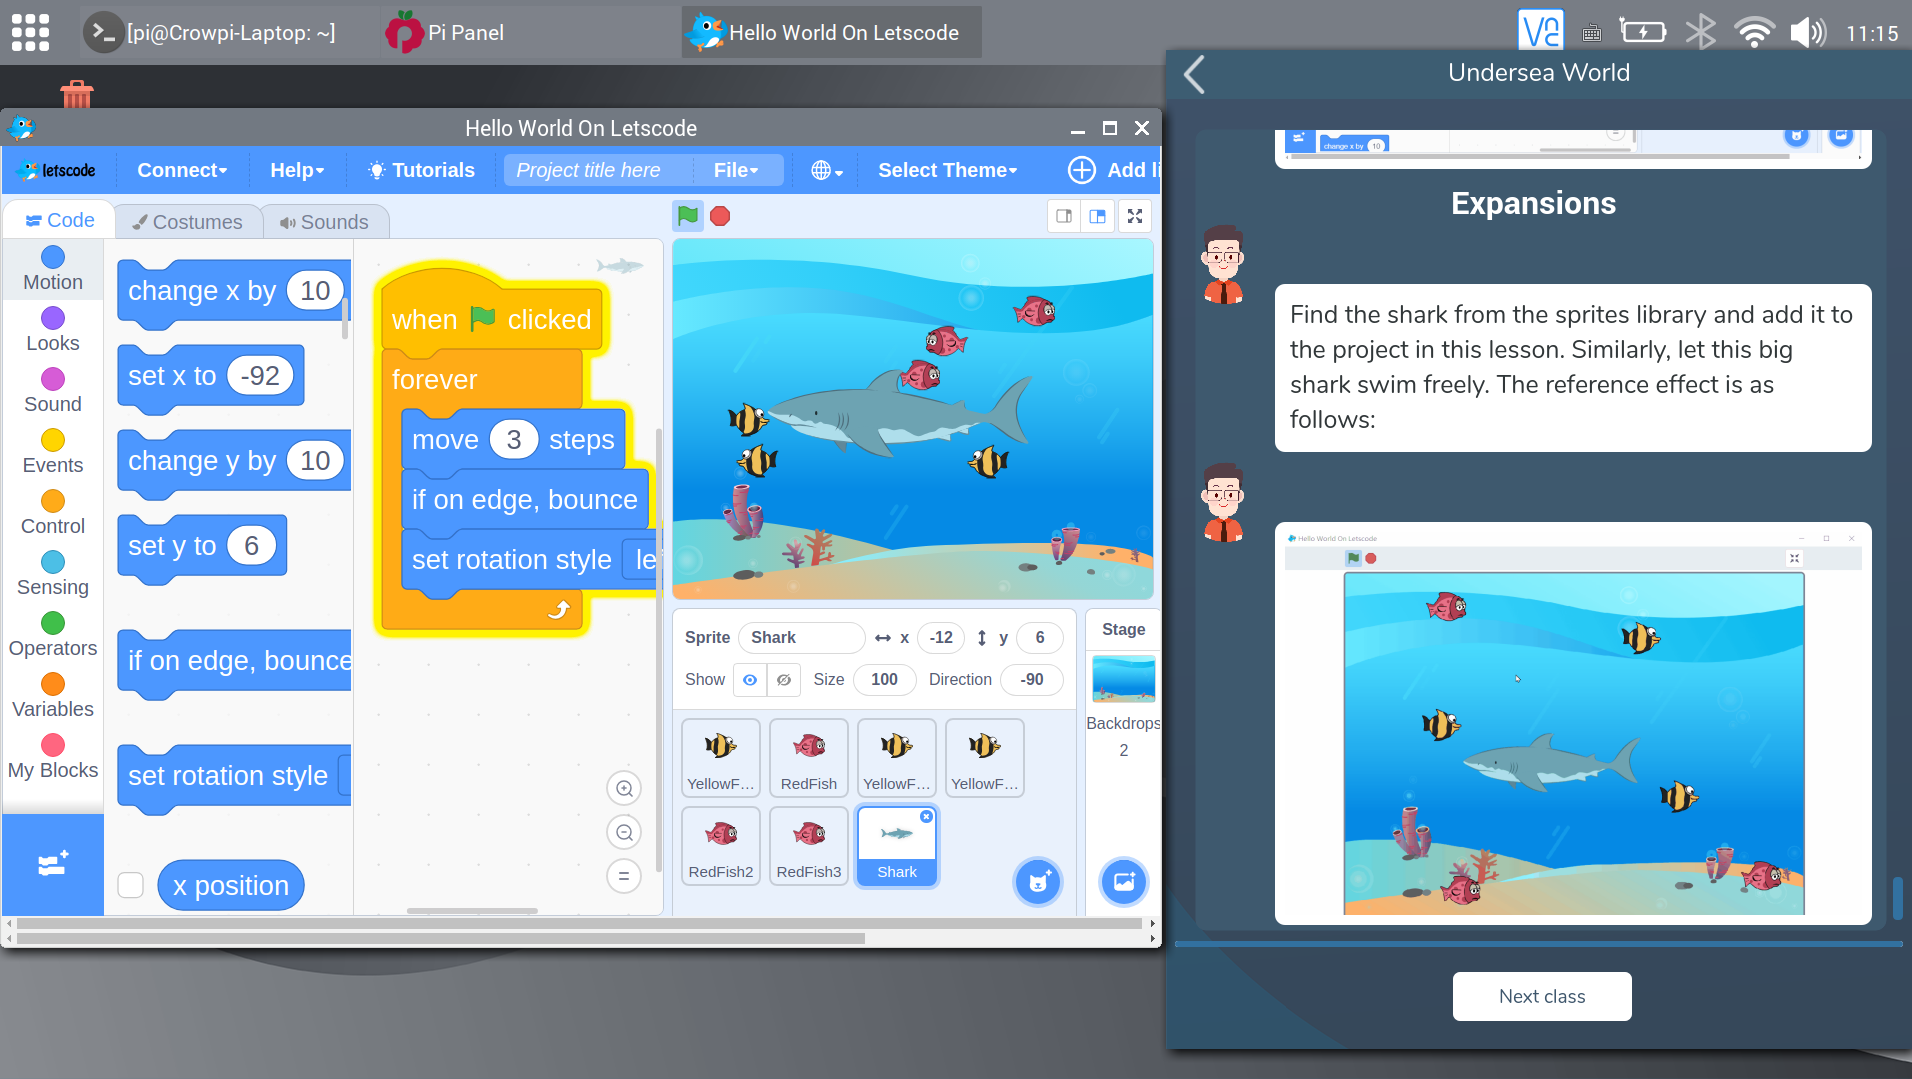
There are sixteen lessons in total, and I tried “Lesson 3 Undersea World” to have a look.
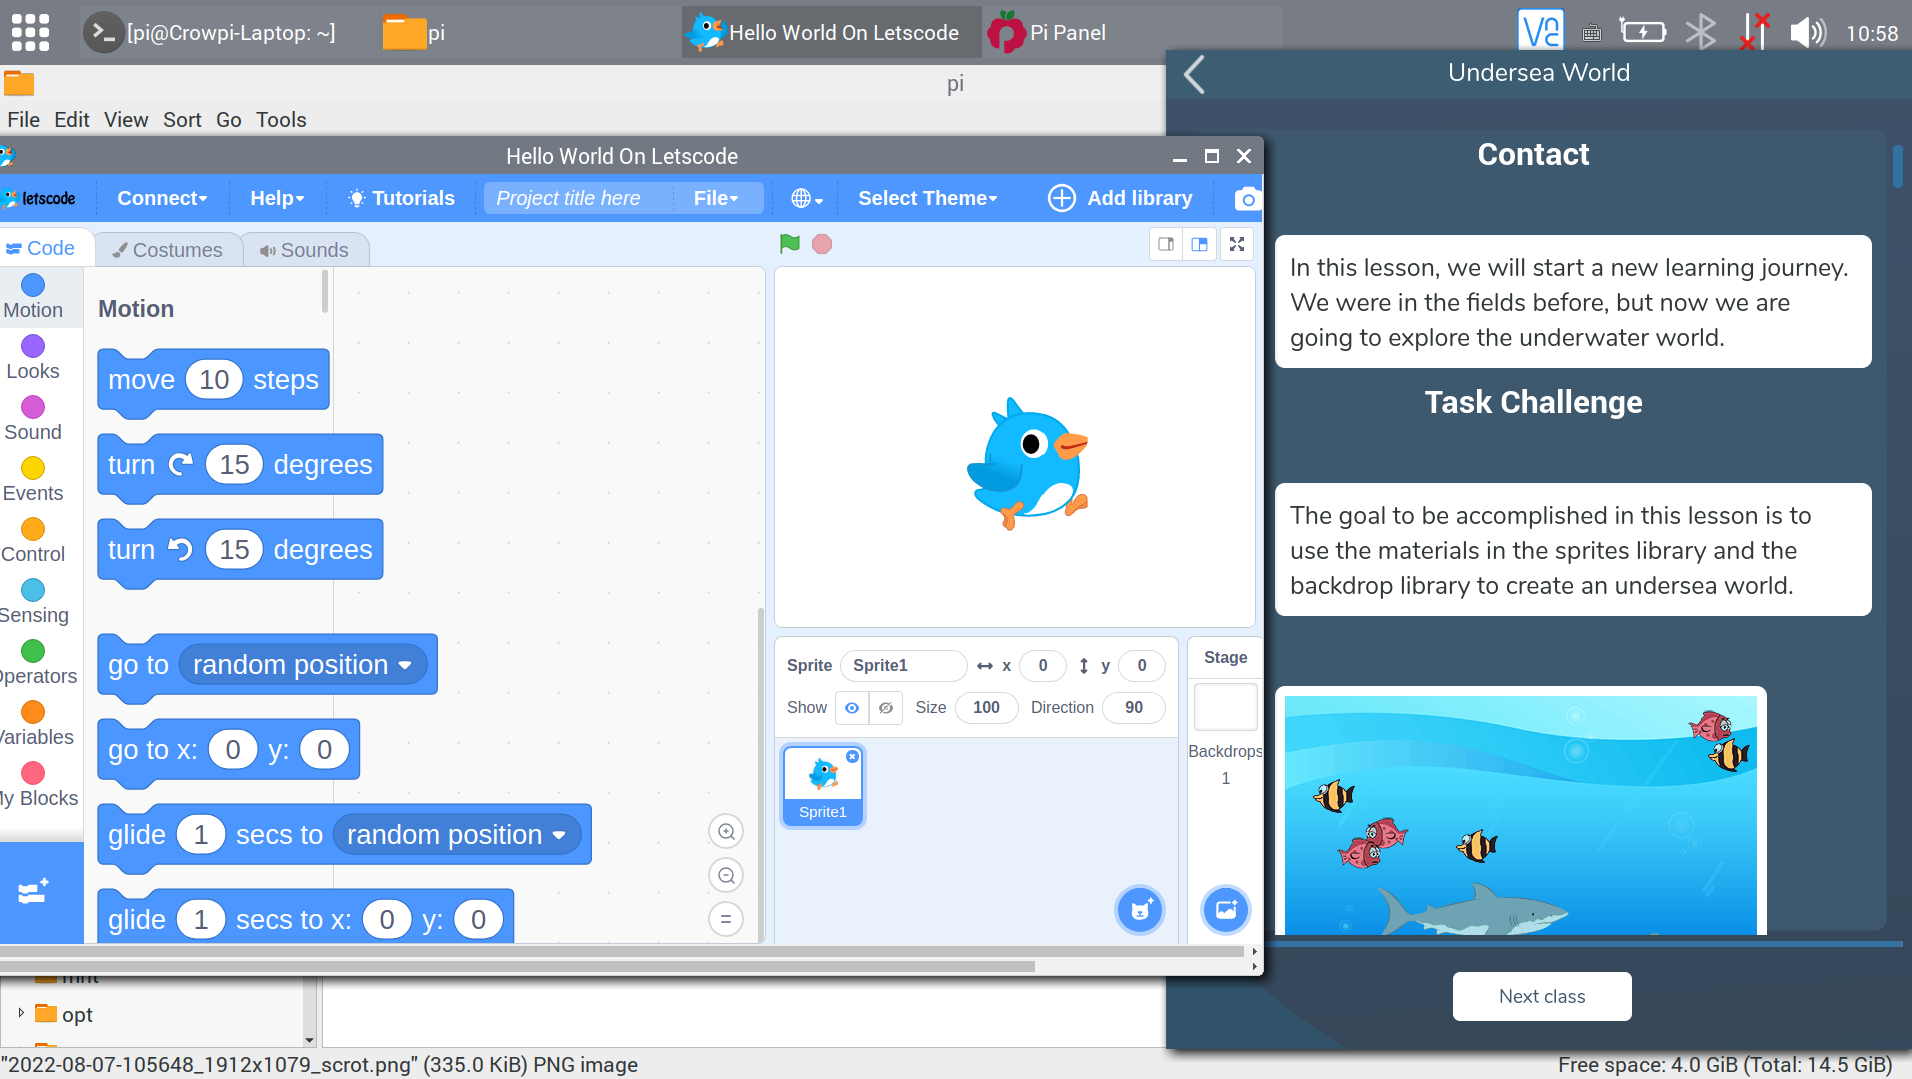
Letscode program will show on the left, and the Pi Panel’s tutorial on the right of the screen. As you can see the Letscode window overlaps on the tutorial section. It’s not ideal, but still usable.
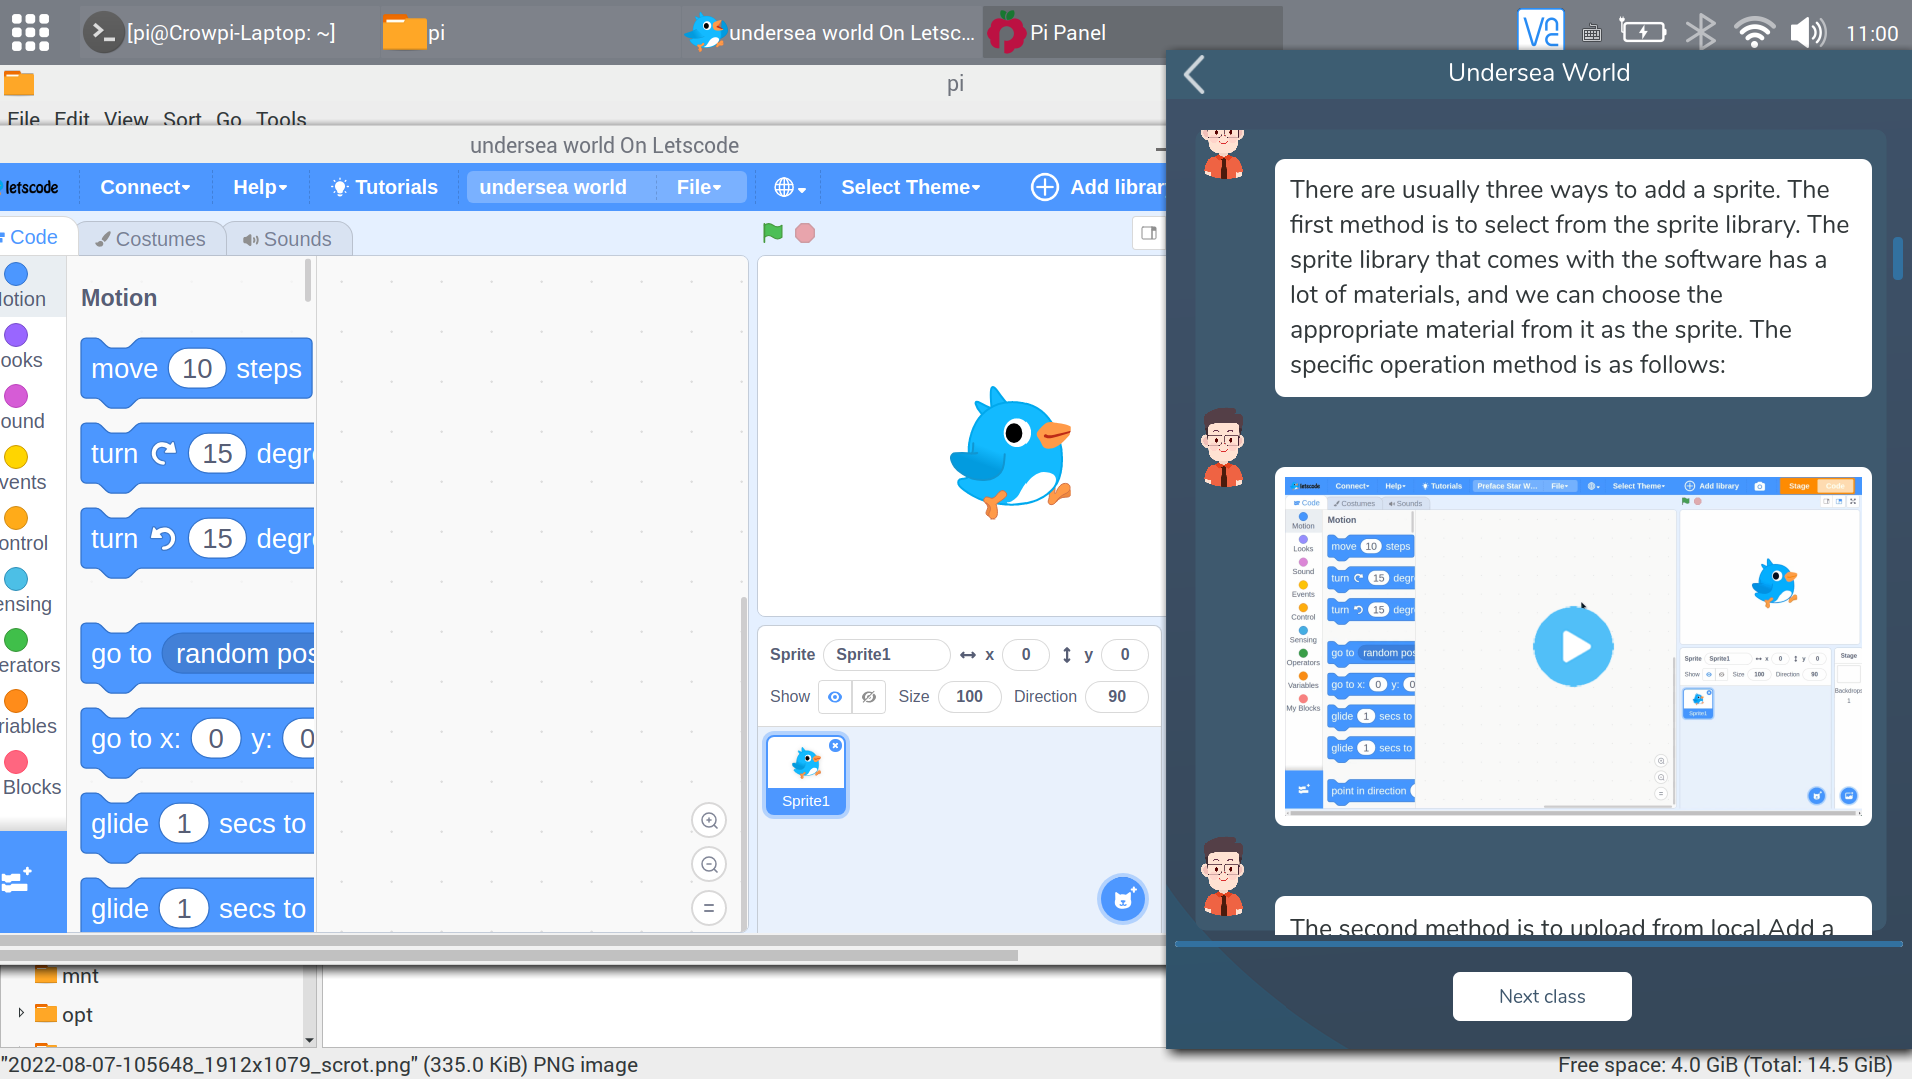
The tutorial will explain step-by-step what the student has to do first with text, followed by a tutorial video showing where to click.
![]()
You’ll also have access to background images and sprites to make game development easier, although letscode also allows you to draw your own sprites.
You’ll have to drag and drop visual programming blocks to manage the behavior of sprites in your scene. It was fairly easy to follow, and both reading the text and watching the video are mandatory to complete a lesson, at least initially. This can be cumbersome on the small 11.6-inch display of the laptop, so I decided to connect a 10.1-inch HDMI display to the HDMI port of the laptop, have Letscode in full screen on the laptop’s screen, and the tutorial and videos on the HDMI display.
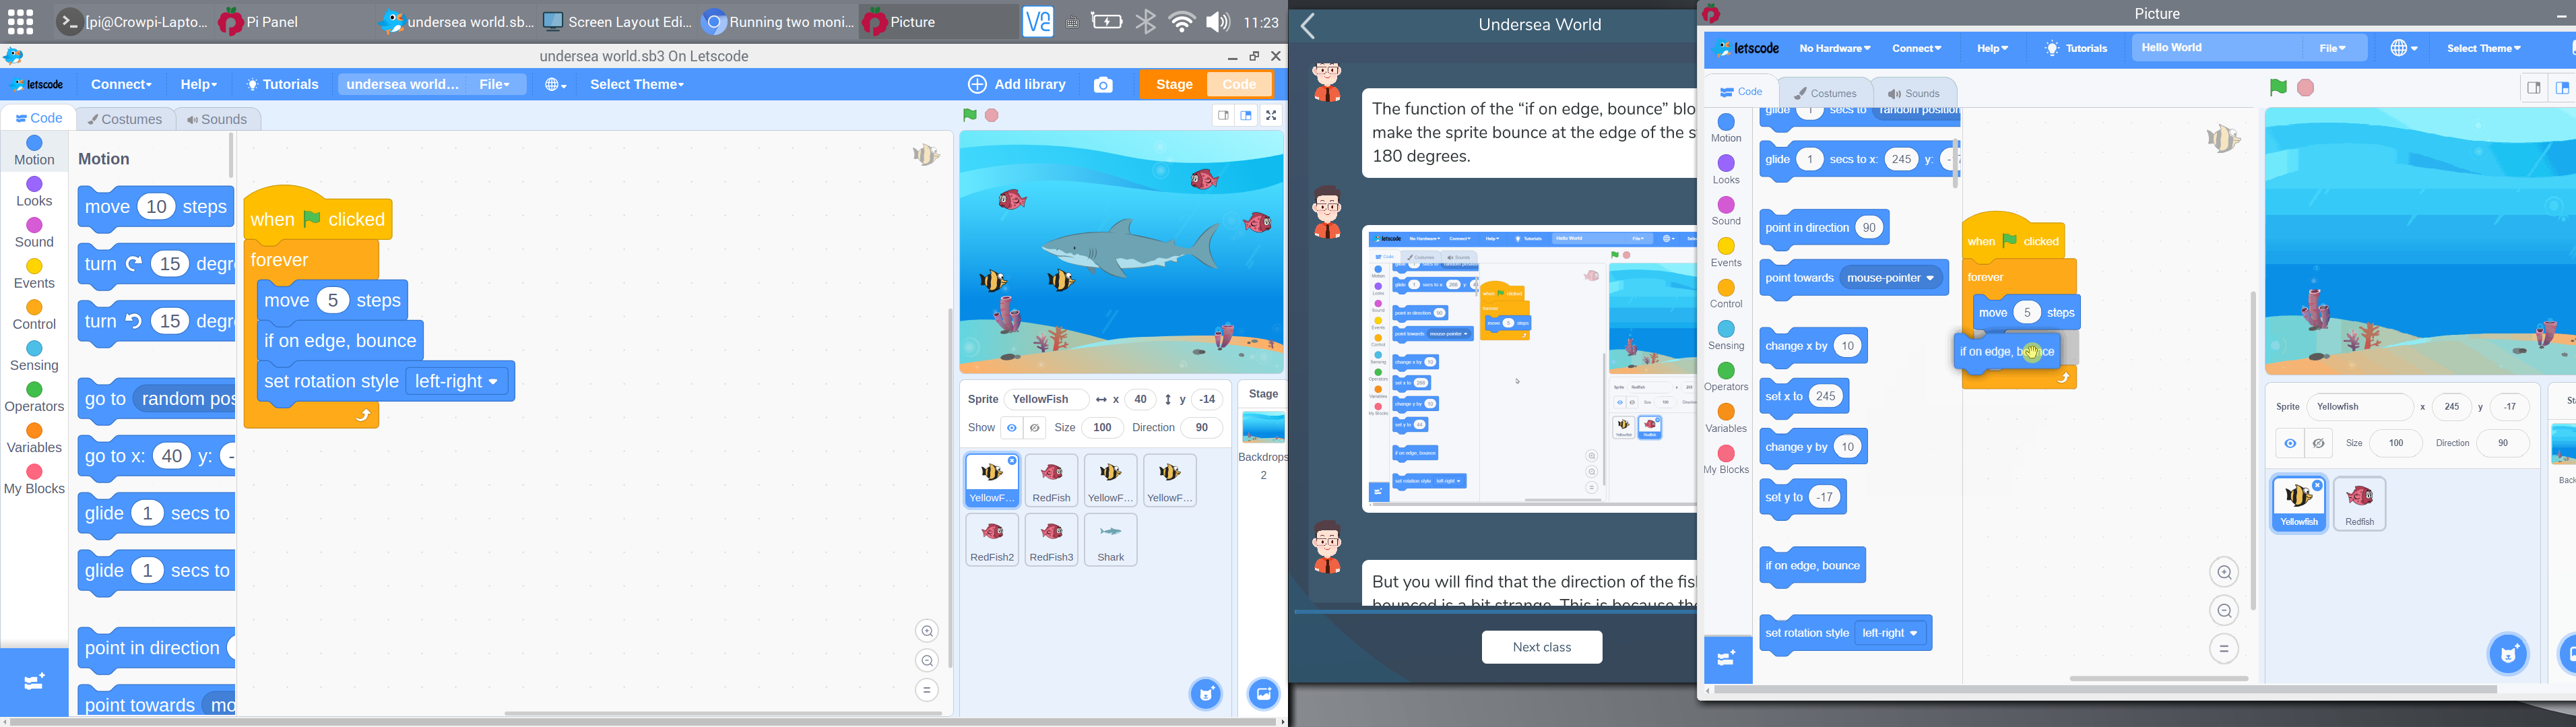
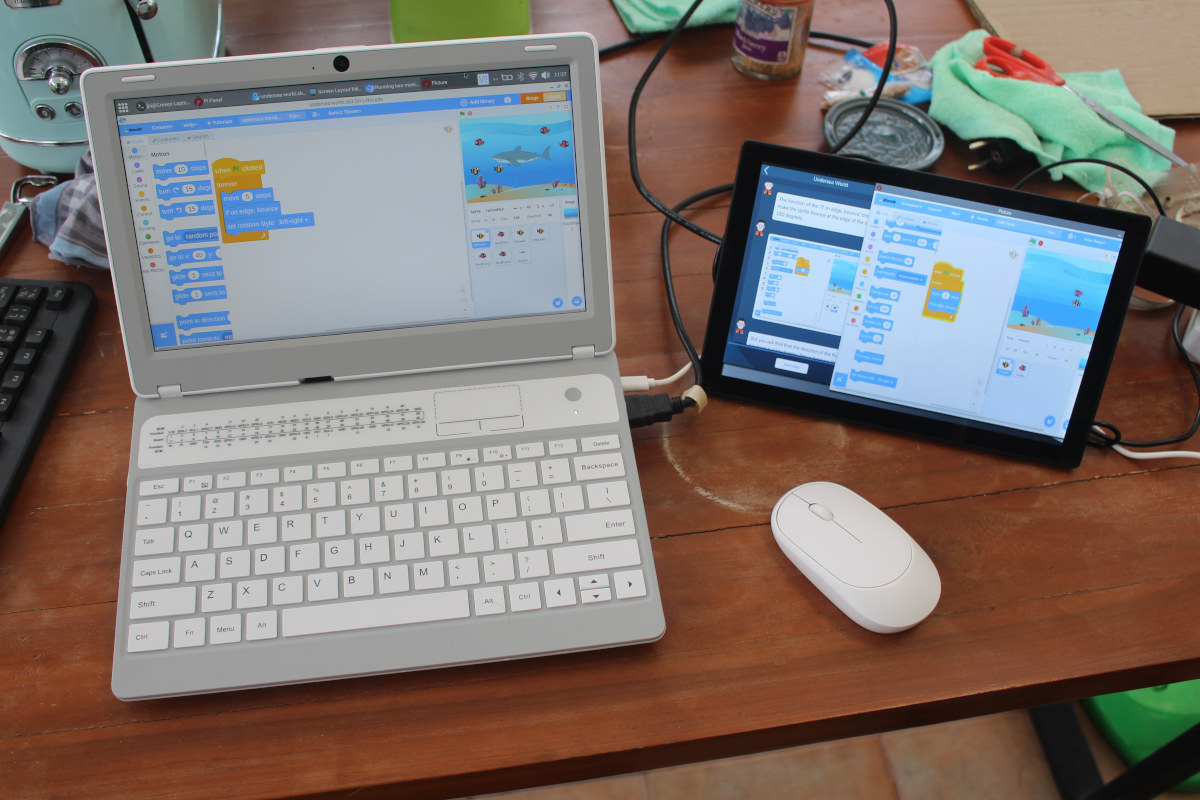
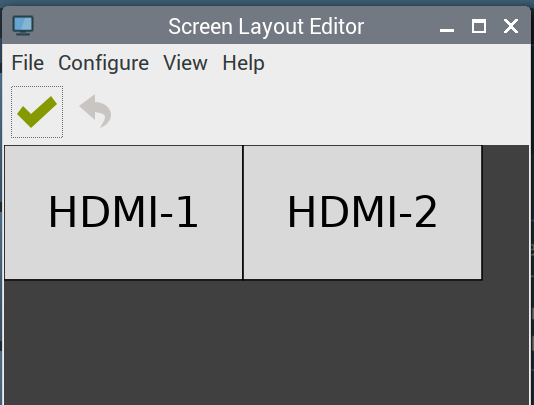
I found myself to be quite more productive that way. Note that by default, the screens will mirror, and you’ll need to run Screen Layout Editor to change the layout as follows.
Hardware control with CrowTail Starter Kit
Let’s now switch to the section more relevant to CNX Software topics with Hardware control lessons.
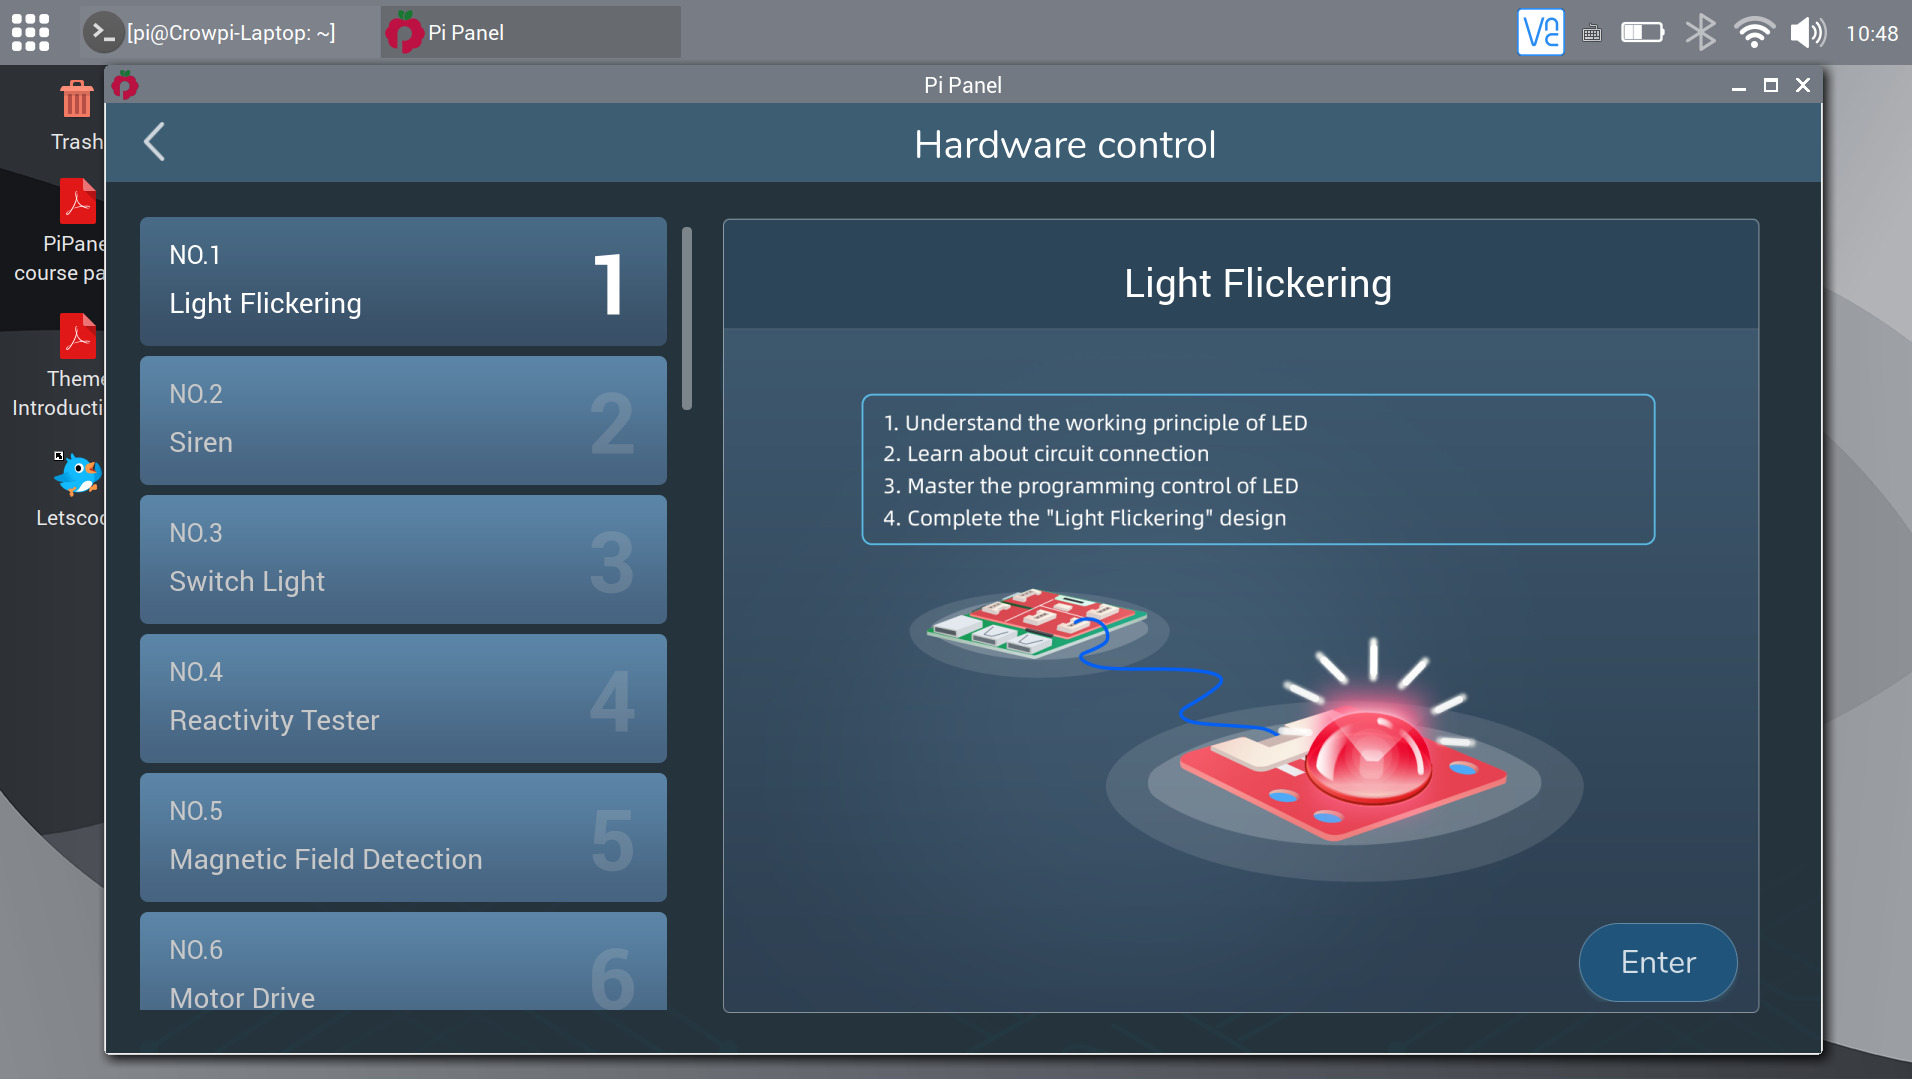
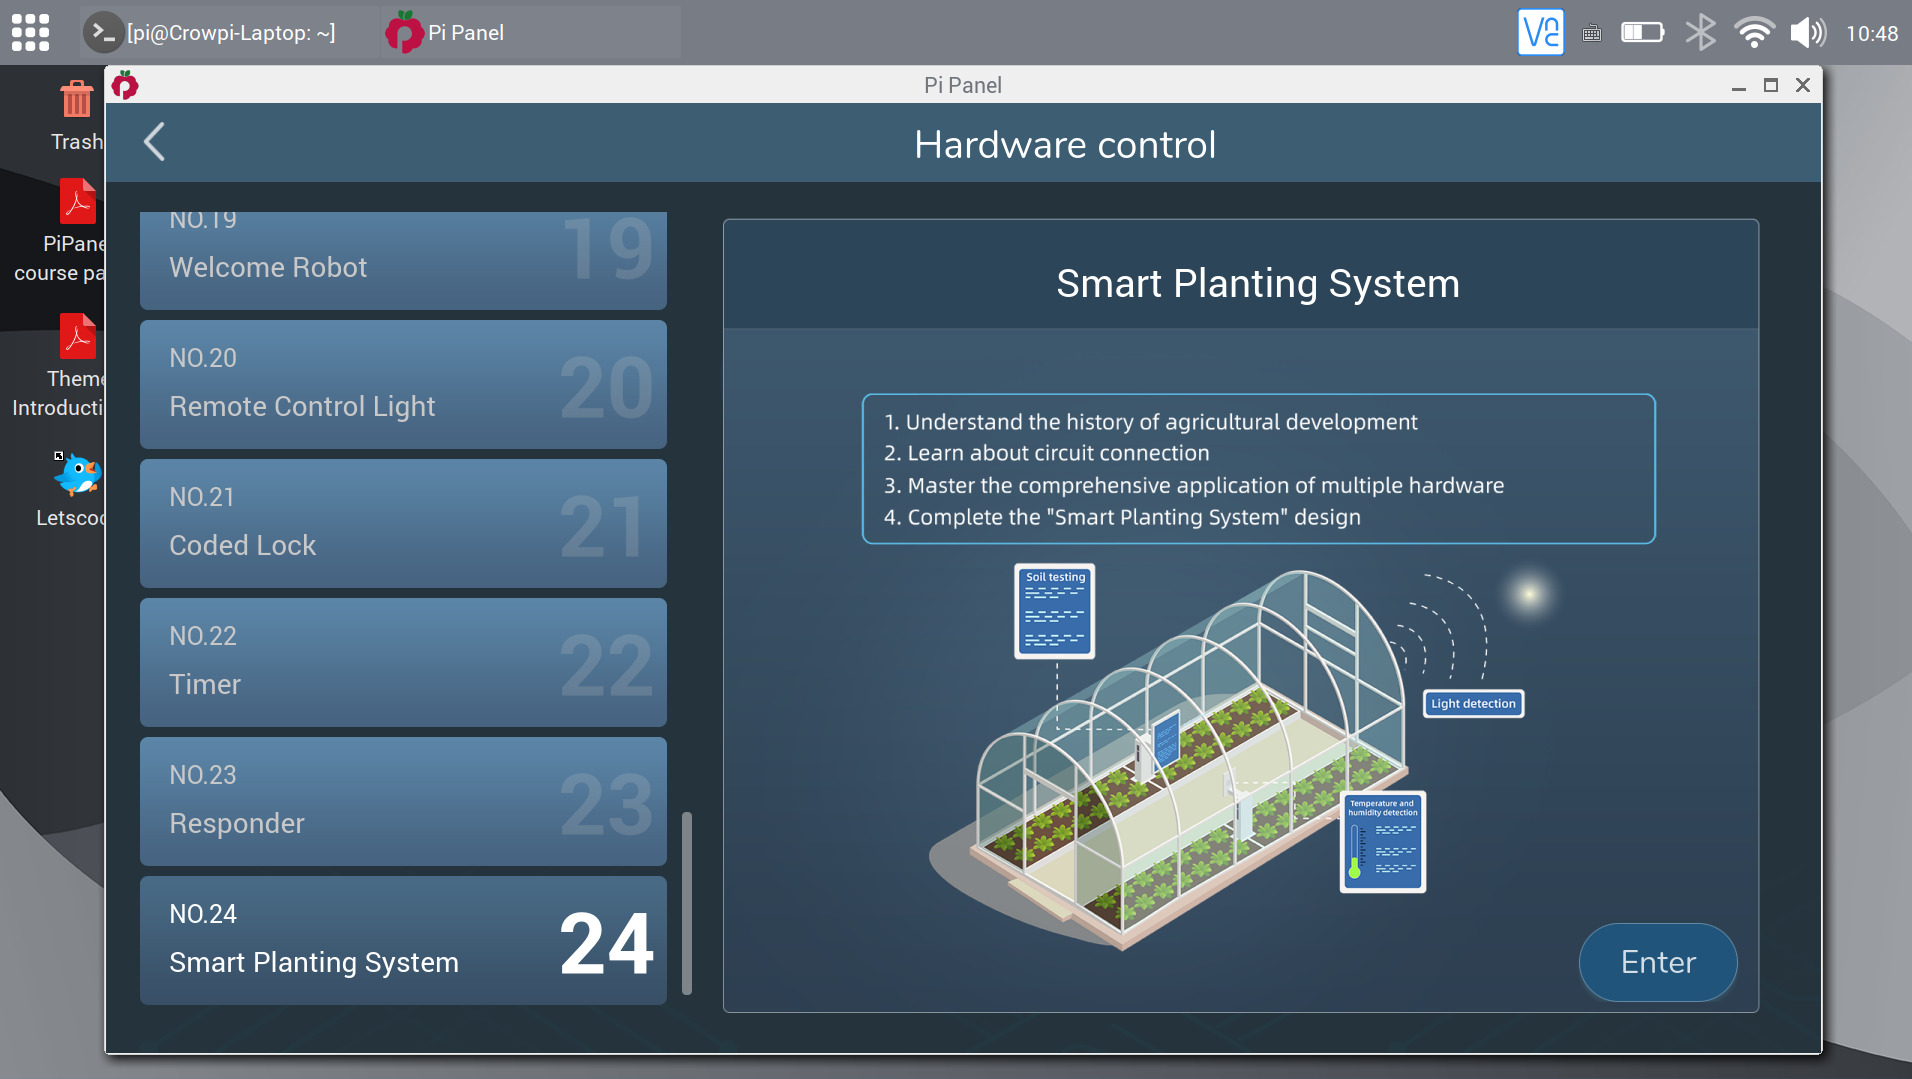
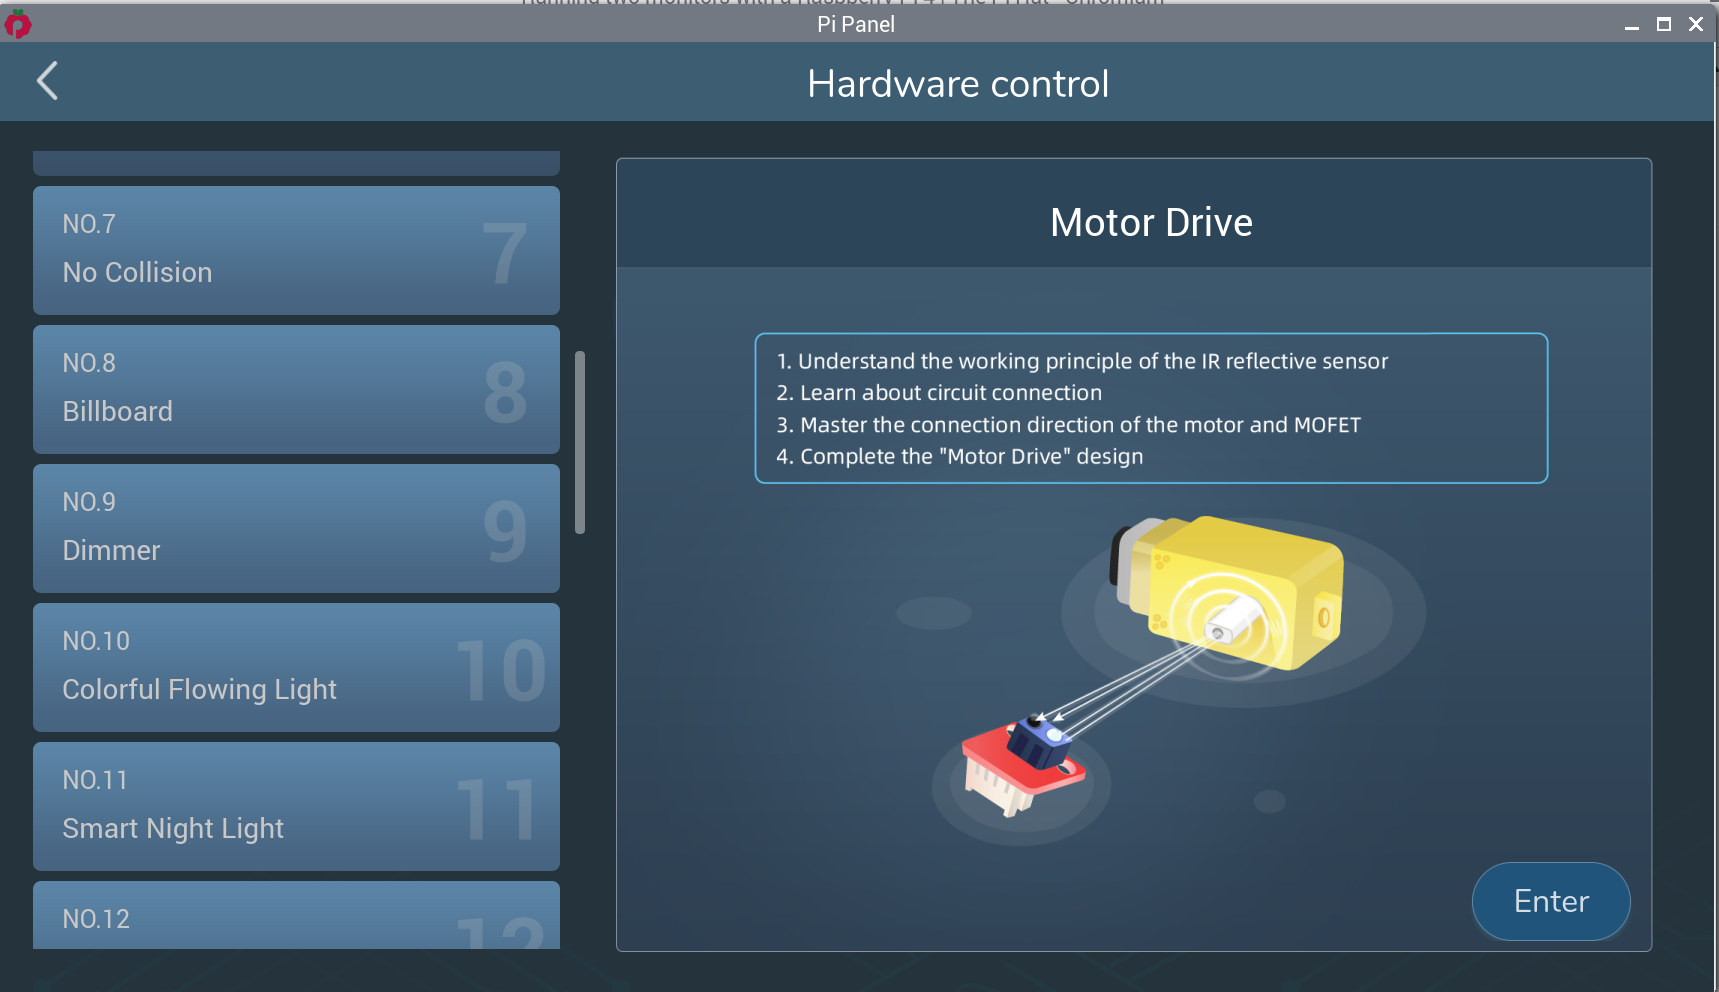
There are 24 lessons in total from the basic light flickering lesson to more complex projects such as a welcome robot or a smart planting system. I went with Lesson 6 “Motor Drive” to have a closer look at the way those tutorials combining electronics and visual programming are conducted.
I’ll keep using my dual display setup, as it’s even more imporant here, since the tutorial window is even bigger.

Before getting started with any of those lessons you’ll want to install the CrowPi L Extension by first clicking on the icon at the bottom left in the Letscode program…
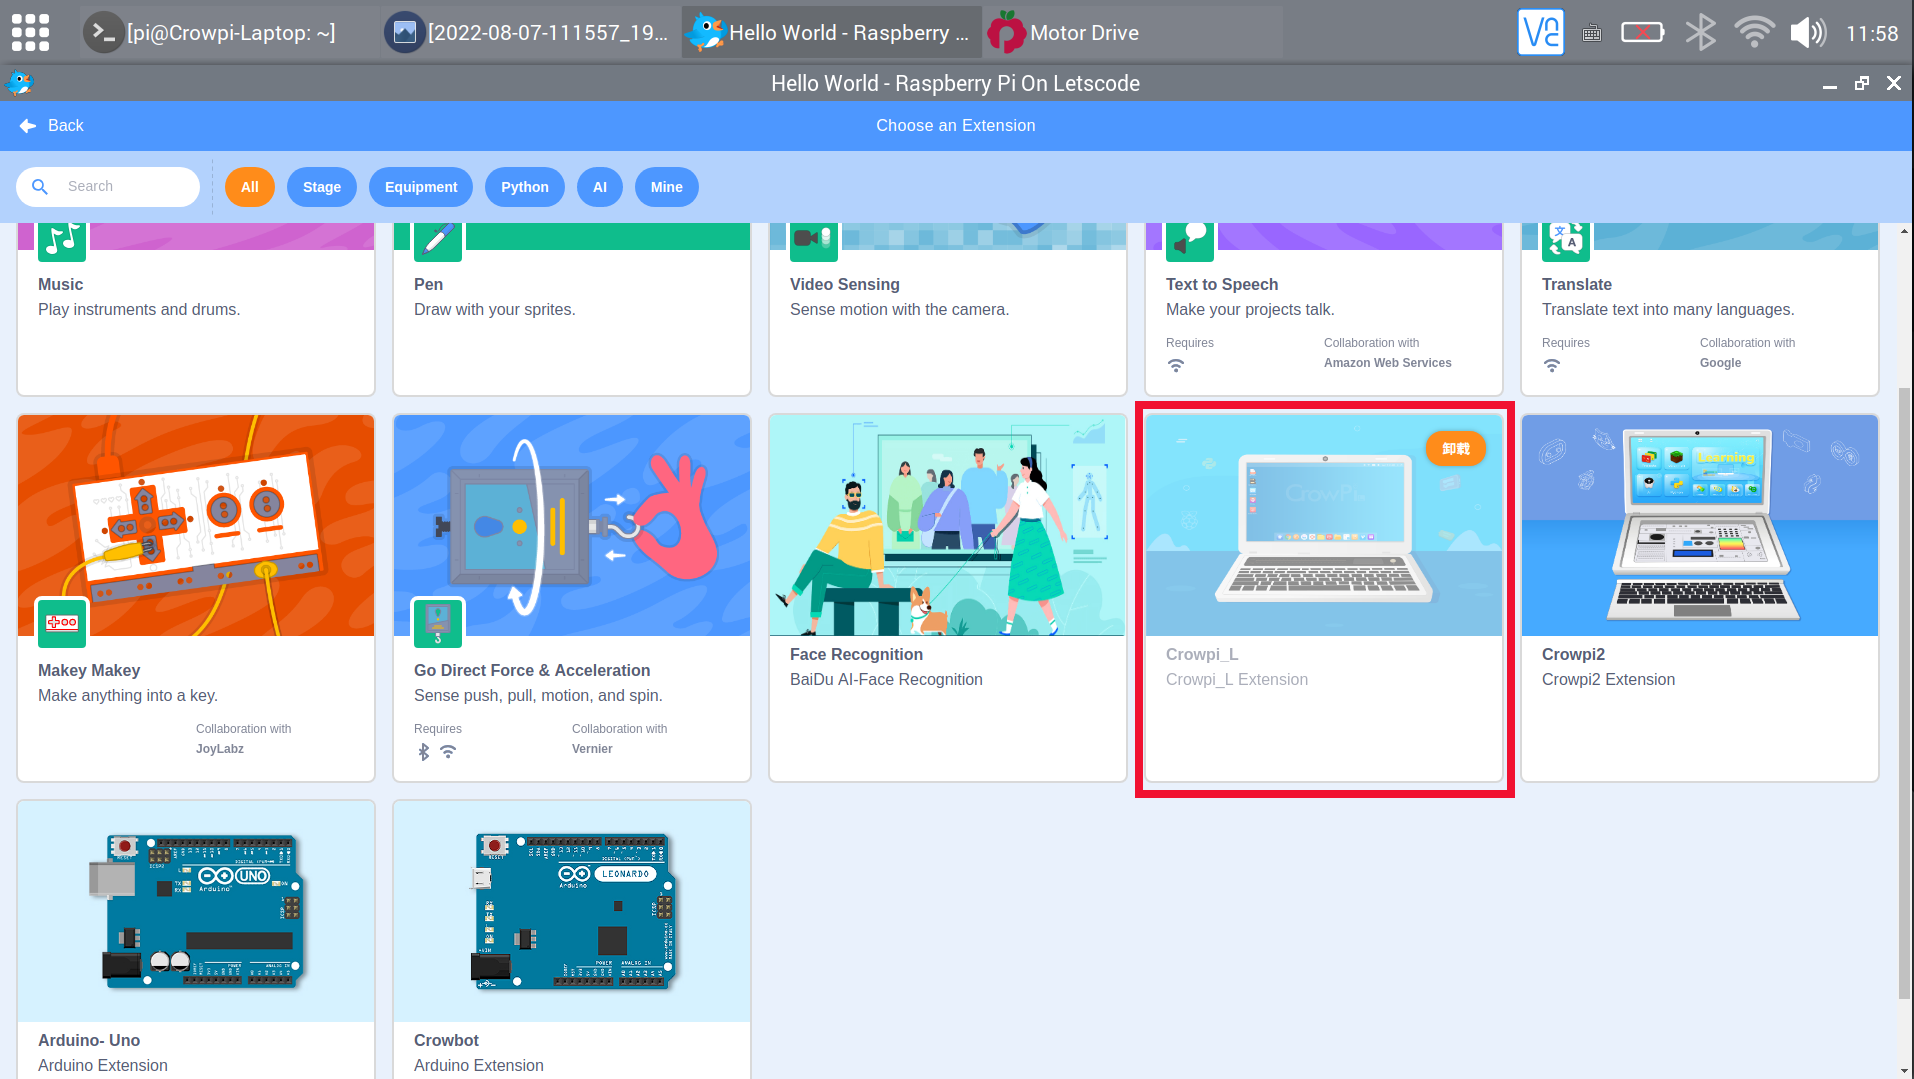
.. then select CrowPi L Extension which comes with the visual programming block we’ll need for hardware control lessons.
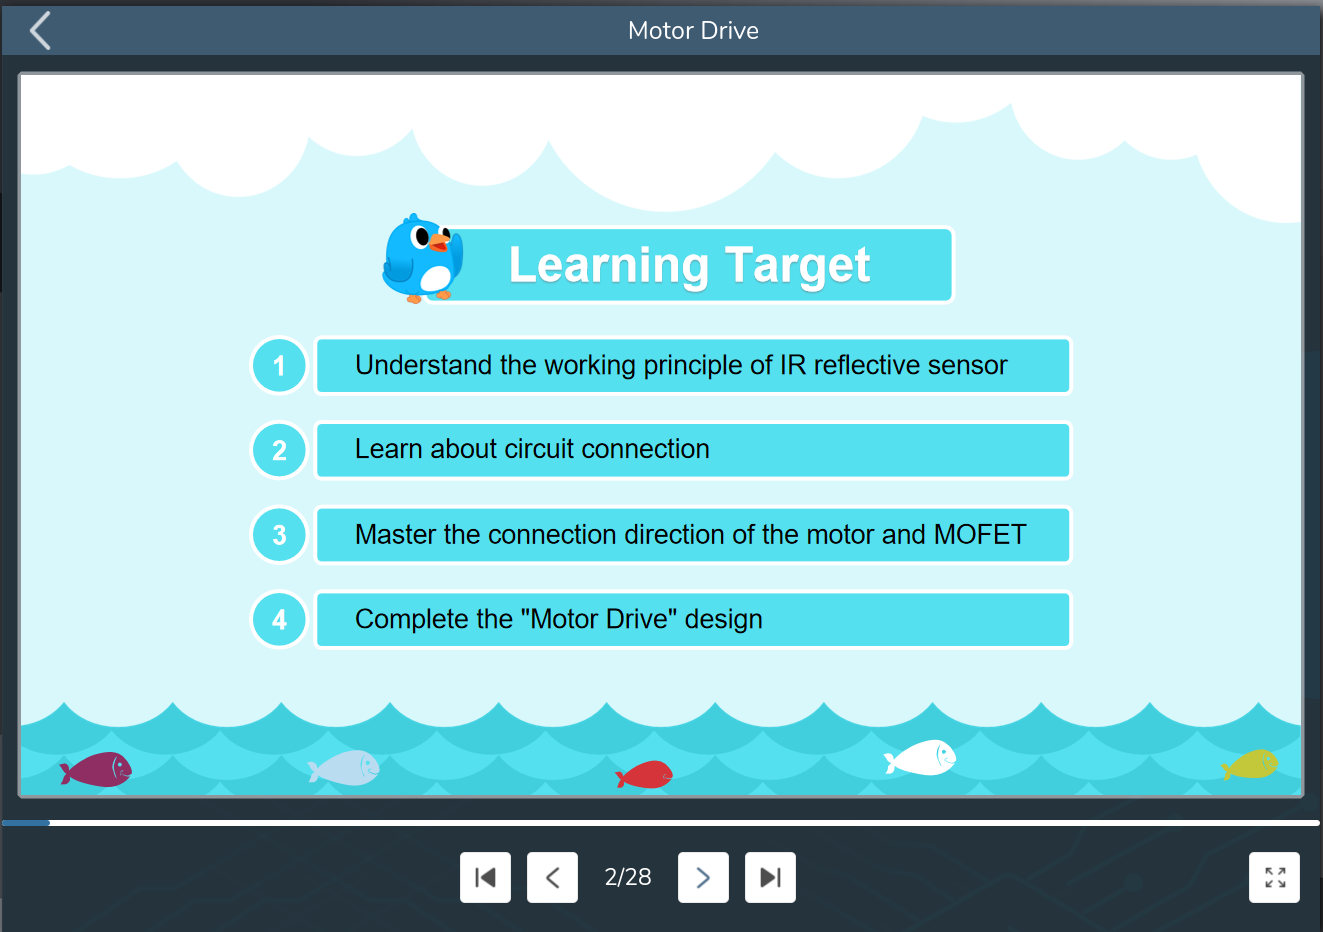
The lesson starts with an explanation of the learning targets,
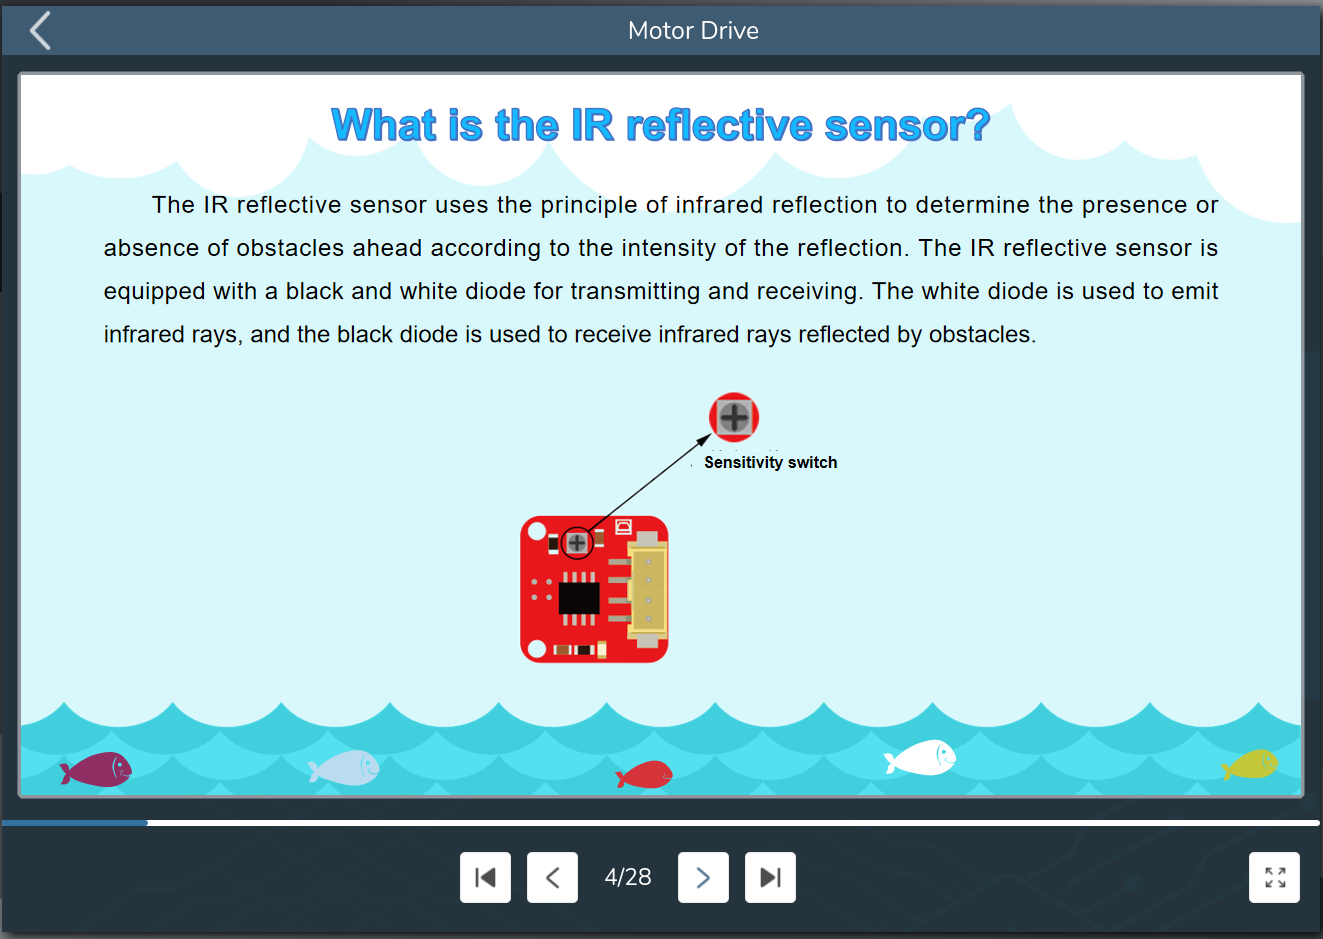
and provide a description of each module used in the project followed, if needed, by the theory behind the working principle of the sensors, in this case, the IR reflective sensor.

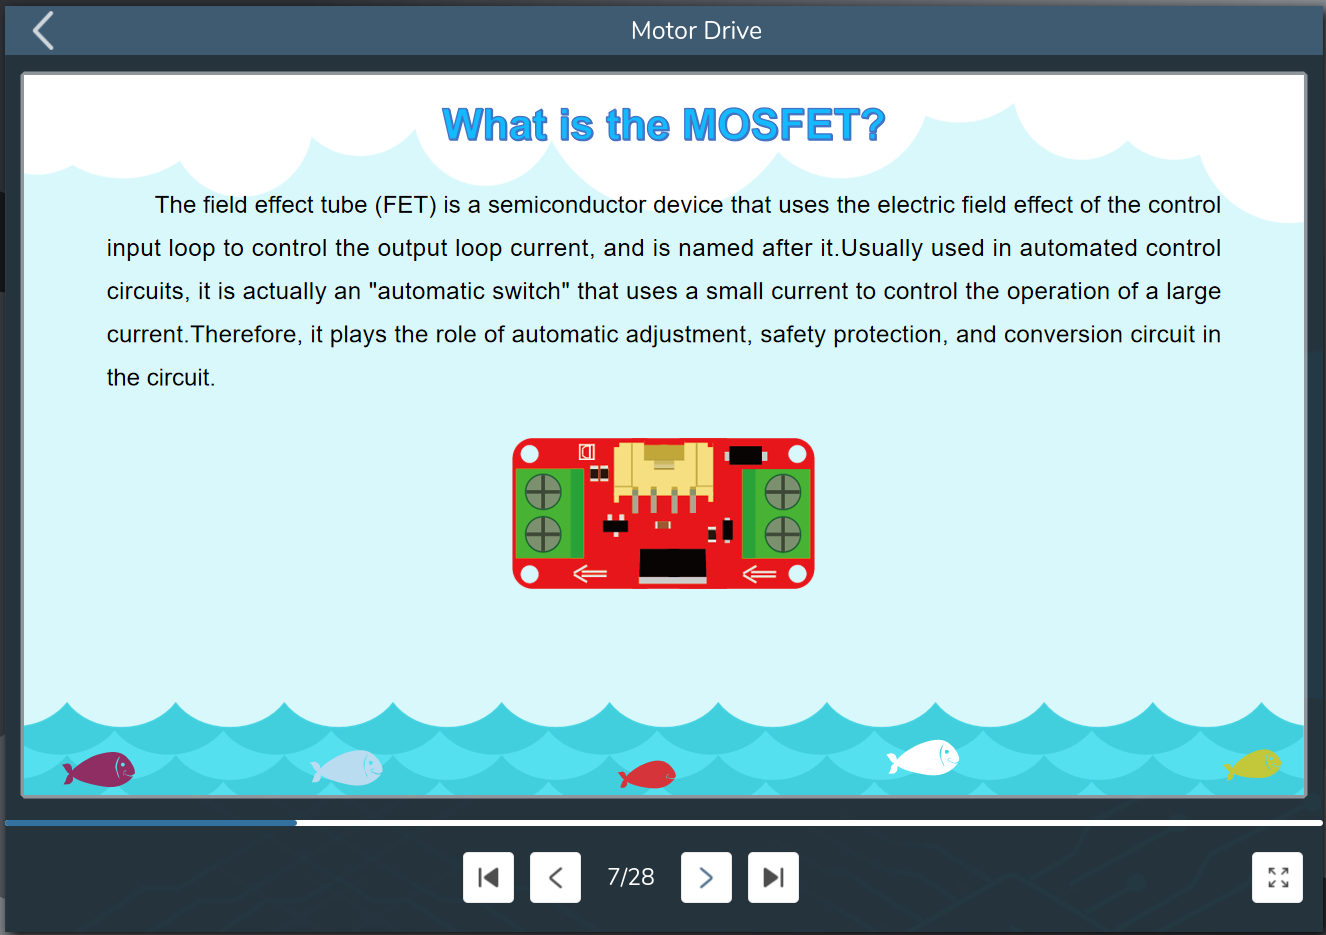
The motor drive tutorial also use a MOSFET module,
and a “TT motor”, so we’ve got an explanation for both.

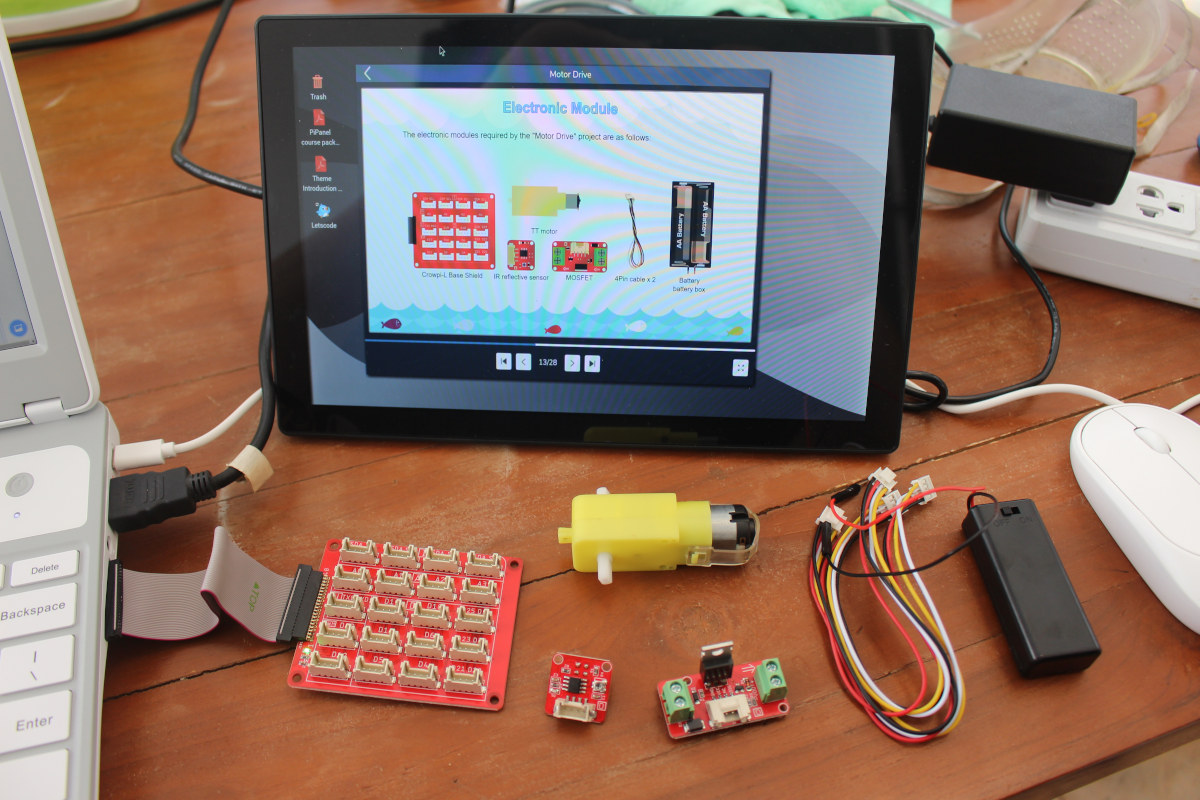
After all that theory, we’ll need to dig into our CrowTail Starter Kit for Raspberry Pi to get the necessary boards and modules for the project. The Starter Kit has plenty of modules (22), but since the package is well-described they are easy to locate.
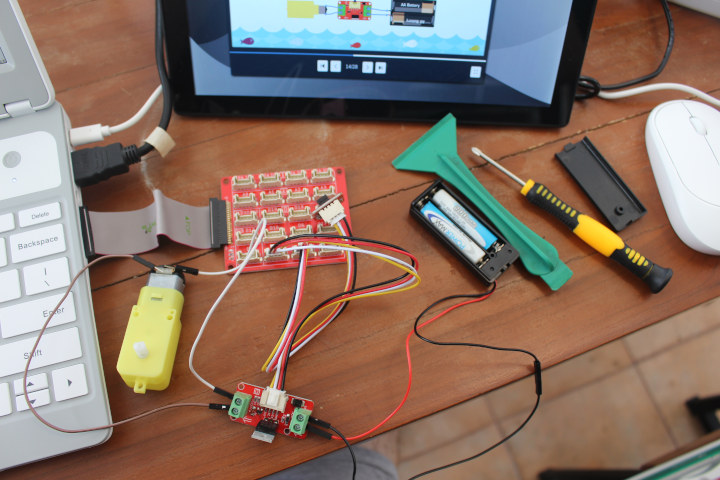
This is followed by the connection diagram, and I think it could be more detailed. I had to take 3 jumper wires, two to connect the TT motor, and one to connect the female jumper cable of the battery pack. I also had to use my screwdriver to connect the wires to the screw terminals of the MOSFET board, as well as a tool to open the battery compartment and insert two AAA batteries of my own. None of this was explained, and it might be head scratching for kids without supervision. I also find the use of jumper wires to connect to the TT motor a bit odd, as they can be loose.
But let’s carry on with the lesson now that we have connected our project. The visual programming part is fairly easy to follow as it’s explained step-by-step. You’ll also see the Python automatically generated as you may more programming blocks. Once you program is done select the baud rate (115,000) in the bottom right, and click on the start/play button.
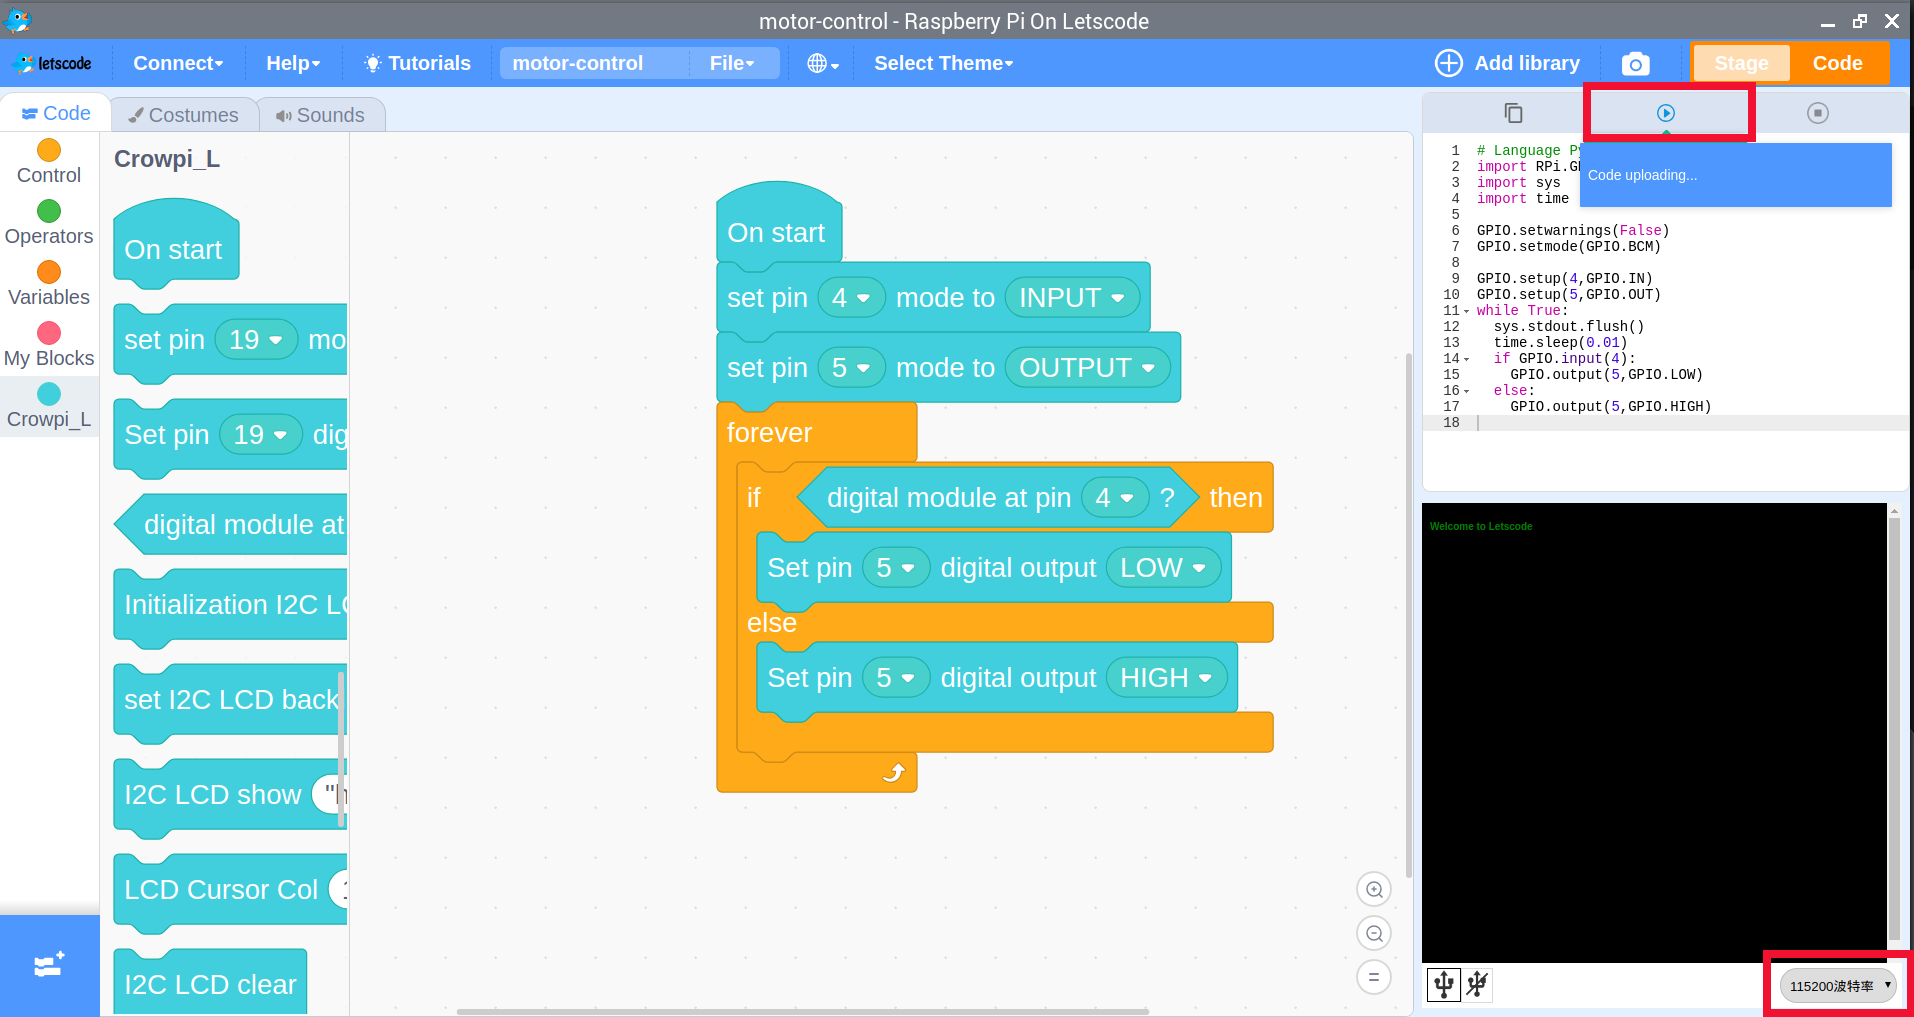
Everything looks fine, but does it really work? You bet it does as the TT motor as I place my finger on top of the IR reflective sensor…

Python Programming
Let’s switch to Python programming lessons and tutorials.

Just like for visual programming, there are three sections: “Introduction to syntax”, “Hardware control”, and an option to add a new course.

The introduction to syntax does not require any additional hardware, it just teached Python basics…

… to more complex examples such as games that all run on the laptop itself. If we select one of the lessons, the Pi Panel tutorial will show on the right, and Thonny Python IDE will show on the left with the lesson providing step-by-step instructions to write the program.

The “Hardware control” Python lessons are exactly the same as with the Letcode program, but instead of using visual programming, students will learn to code Python.


I did flick through the Motor Drive lesson, and it’s basically the same as for the visual programming lesson with theory, explanation about the modules, a connection diagram, and the main difference is that you’ll learn Python programming on the way as well. By the way, you can also do this in the visual programming lesson, as Letscode will automatically generate the Python code as you drag and drop the blocks.


But I did not try it in detail, as the CrowTail Started Kit for Raspberry Pi comes with a printed user guide, and I personally prefer to learn that way. But that’s a mistake as I’ll explain better, and you should learn Python with the program inside CrowPi L laptop, instead of the book as it is outdated.
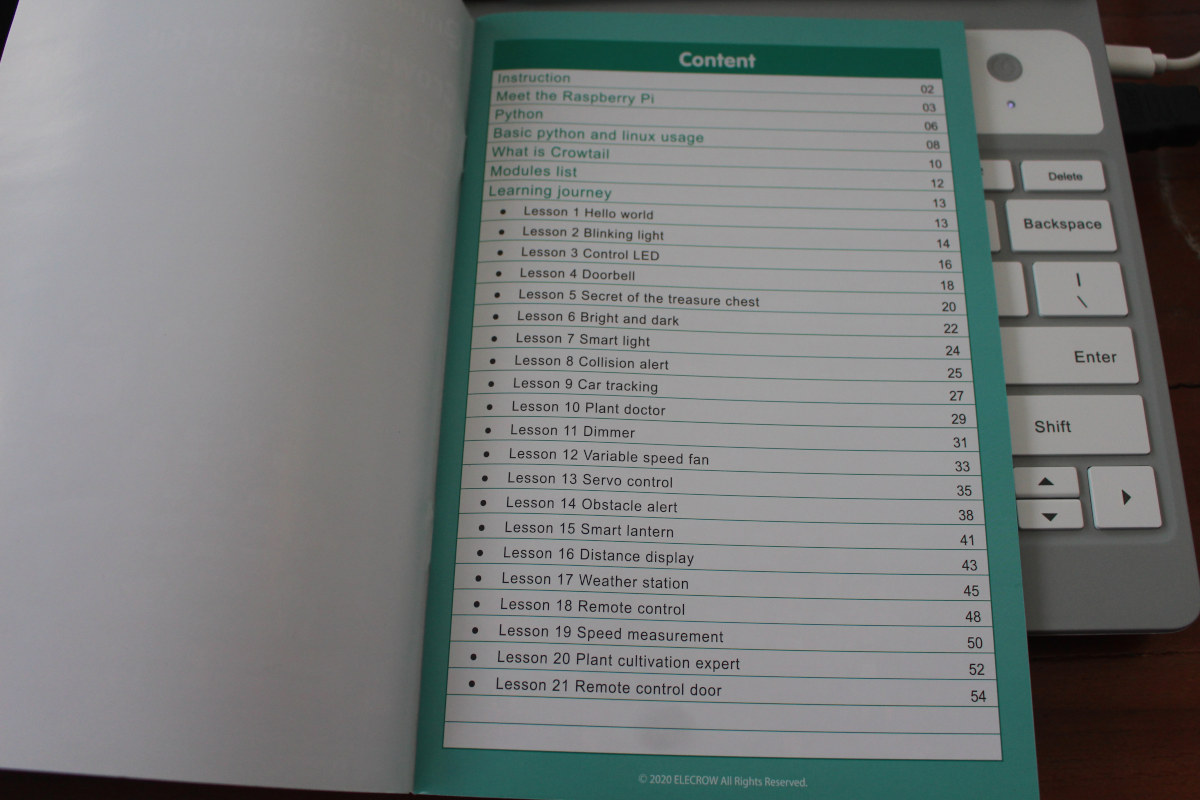
I first noticed the list of lessons was different. But I still went ahead, and installed samples and “drivers” as explained in the book:
|
1 |
pi@Crowpi-Laptop:~ $ git clone https://github.com/Elecrow-RD/RPi-Starter-Kit |
Let’s go into the examples directory to list the samples:
|
1 2 3 4 5 6 7 8 9 10 11 12 13 14 15 16 17 18 19 20 21 22 23 |
cd ../RPi-Starter-Kit/examples/ pi@Crowpi-Laptop:~/RPi-Starter-Kit/examples $ ls -l total 80 -rw-r--r-- 1 pi pi 745 Aug 10 14:31 10_plant_doctor.py -rw-r--r-- 1 pi pi 642 Aug 10 14:31 11_dimmer.py -rw-r--r-- 1 pi pi 647 Aug 10 14:31 12_speed_fan.py -rw-r--r-- 1 pi pi 834 Aug 10 14:31 13_servo_control.py -rw-r--r-- 1 pi pi 917 Aug 10 14:31 14_obstacle_alert.py -rw-r--r-- 1 pi pi 1588 Aug 10 14:31 15_smart_lantern.py -rw-r--r-- 1 pi pi 1015 Aug 10 14:31 16_distance_display.py -rw-r--r-- 1 pi pi 1086 Aug 10 14:31 17_weather_station.py -rw-r--r-- 1 pi pi 1396 Aug 10 14:31 19_speed_measurement.py -rw-r--r-- 1 pi pi 86 Aug 10 14:31 1_hello_world.py -rw-r--r-- 1 pi pi 1282 Aug 10 14:31 20_plant_expert.py -rw-r--r-- 1 pi pi 1370 Aug 10 14:31 21_remote_door.py -rw-r--r-- 1 pi pi 231 Aug 10 14:31 2_blinking_led.py -rw-r--r-- 1 pi pi 381 Aug 10 14:31 3_contorl_led.py -rw-r--r-- 1 pi pi 427 Aug 10 14:31 4_doorbell.py -rw-r--r-- 1 pi pi 674 Aug 10 14:31 5_treasure_chest.py -rw-r--r-- 1 pi pi 597 Aug 10 14:31 6_bright_and_dark.py -rw-r--r-- 1 pi pi 387 Aug 10 14:31 7_smart_light.py -rw-r--r-- 1 pi pi 705 Aug 10 14:31 8_collision_alert.py -rw-r--r-- 1 pi pi 591 Aug 10 14:31 9_car_tracking.py |
Good! We’ve got out 21 samples here. We can run the hello world sample:
|
1 2 |
pi@Crowpi-Laptop:~/RPi-Starter-Kit/examples $ sudo python 1_hello_world.py Hello World |
sudo is actually optional here, but we’re told sudo is required later on for the GPIO library. It looks like the system may not be configured properly (permissions-wise) if that’s the case… But I can see the pi user is part of the gpio group, so it may not be needed at all. We’ll try that later…
|
1 2 |
$ groups pi adm dialout cdrom sudo audio video plugdev games users input netdev lpadmin gpio i2c spi |
Let’s select one of the lessons to try it out: Lesson 17 – Weather Station.


We can see the lessons are for the Raspberry Pi SBC instead of the CrowPi L laptop per se, but I used the Grove shield for CrowPi L instead of the “base shield for Raspberry Pi”, as I assumed both would have the same layout (another mistake).

We have to install the Adafruit DHT Python module as instructed in the lesson:
|
1 2 |
$ cd ../drivers/Adafruit_Python_DHT $ sudo python setup.py install |
now let’s go back to the example directory to run the sample:
|
1 2 3 4 5 6 |
$ cd ../../examples/ $ python 17_weather_station.py Traceback (most recent call last): File "17_weather_station.py", line 6, in <module> import Adafruit_CharLCD as LCD ImportError: No module named Adafruit_CharLCD |
Oops! That’s because I’ve been a naughty boy and jumped directly to lesson 17 without going through the other ones beforehand. But we’ll just need to install Adadruit Character LCD module:
|
1 2 3 |
$ pushd ../drivers/Adafruit_Python_CharLCD/ $ sudo python setup.py install $ popd |
Now now we can run the sample, no sudo needed:
|
1 2 3 4 5 6 7 8 9 |
$ python 17_weather_station.py Traceback (most recent call last): File "17_weather_station.py", line 6, in <module> import Adafruit_CharLCD as LCD File "build/bdist.linux-armv7l/egg/Adafruit_CharLCD/__init__.py", line 1, in <module> File "build/bdist.linux-armv7l/egg/Adafruit_CharLCD/Adafruit_CharLCD.py", line 98, in <module> File "build/bdist.linux-armv7l/egg/Adafruit_CharLCD/Adafruit_CharLCD.py", line 104, in Adafruit_CharLCD File "build/bdist.linux-armv7l/egg/Adafruit_GPIO/GPIO.py", line 420, in get_platform_gpio ImportError: No module named Adafruit_BBIO.GPIO |
Adafruit GPIO module is not in the list of “drivers”:
|
1 2 3 4 5 |
pi@Crowpi-Laptop:~/RPi-Starter-Kit/drivers $ ls -l total 12 drwxr-xr-x 7 pi pi 4096 Aug 10 15:00 Adafruit_Python_CharLCD drwxr-xr-x 8 pi pi 4096 Aug 10 14:57 Adafruit_Python_DHT drwxr-xr-x 2 pi pi 4096 Aug 10 14:31 LIRC |
So I tried to install it manually:
|
1 2 3 |
$ git clone https://github.com/adafruit/Adafruit_Python_GPIO $ cd Adafruit_Python_GPIO/ $ sudo python setup.py install |
and
|
1 |
pip install Adafruit-GPIO |
But I still had no luck… So I contacted the company, and they told me to try with Python3 instead:
|
1 2 3 4 5 6 7 8 9 10 11 |
$ sudo python3 17_weather_station.py Traceback (most recent call last): File "17_weather_station.py", line 20, in <module> lcd=LCD.Adafruit_CharLCDBackpack(address=0x20) File "/usr/local/lib/python3.7/dist-packages/Adafruit_CharLCD-1.1.1-py3.7.egg/Adafruit_CharLCD/Adafruit_CharLCD.py", line 473, in __init__ File "/usr/local/lib/python3.7/dist-packages/Adafruit_GPIO-1.0.4-py3.7.egg/Adafruit_GPIO/MCP230xx.py", line 165, in __init__ File "/usr/local/lib/python3.7/dist-packages/Adafruit_GPIO-1.0.4-py3.7.egg/Adafruit_GPIO/MCP230xx.py", line 50, in __init__ File "/usr/local/lib/python3.7/dist-packages/Adafruit_GPIO-1.0.4-py3.7.egg/Adafruit_GPIO/MCP230xx.py", line 133, in write_iodir File "/usr/local/lib/python3.7/dist-packages/Adafruit_GPIO-1.0.4-py3.7.egg/Adafruit_GPIO/I2C.py", line 129, in writeList File "/usr/local/lib/python3.7/dist-packages/Adafruit_PureIO-1.1.9-py3.7.egg/Adafruit_PureIO/smbus.py", line 368, in write_i2c_block_data OSError: [Errno 121] Remote I/O error |
It went further but I had another “Remote I/O error”. In the follow-up email, it was made clear to me the green book should not be used with CrowPi L:
Btw, some people are often confused by the Crowpi L courses and the crowtail instructions, I need to make it clear here.
The green instructions is designed for the raspberry pi starter kit, people could learn raspberry pi via the instructions even though they have no Crowpi L. Besides, the instruction is too old to be followed step by step.
You might notice that we sitll have built-in courses in the CrowpiL which has no printed instructions, this is another courses which is designed for CrowPi L it is different from the raspberry pi starter kit instructions.
But I was also given the solution to the Weather Station tutorial in the green book: the connection is different since the I2C port for the LCD module is in another location, and the LED and DHT22 modules must be switched. After that, it worked fine:

Since the pi user is part of the gpio group, we don’t even need to use sudo:
|
1 |
$ python 17_weather_station.py |
The display was hard to read initially, but after adjusting the brightness of the potentiometer on the control board on the back of the LCD with a screwdriver, it was fine.

Here’s the Python code for reference:
|
1 2 3 4 5 6 7 8 9 10 11 12 13 14 15 16 17 18 19 20 21 22 23 24 25 26 27 28 29 30 31 32 33 34 35 36 37 38 39 |
# Weather station import RPi.GPIO as GPIO import time import Adafruit_DHT import Adafruit_CharLCD as LCD # set GPIO board mode GPIO.setmode(GPIO.BCM) sensor_type = 11 sensor_pin = 5 #temperature&humudity sensor pin led_pin = 6 GPIO.setup(led_pin, GPIO.OUT) # define LCD column and row size for 16x2 LCD lcd_columns=16 lcd_rows=2 # initialize the LCD using the pins lcd=LCD.Adafruit_CharLCDBackpack(address=0x20) # turn backlight on lcd.set_backlight(0) try: while True: humidity, temperature = Adafruit_DHT.read_retry(sensor_type, sensor_pin) if humidity is not None and temperature is not None: lcd.message("Temp={0:0.1f}\nHumidity={1:0.1f}%".format(temperature, humidity)) if temperature < 10 or temperature > 35: GPIO.output(led_pin, GPIO.HIGH) else: GPIO.output(led_pin, GPIO.LOW) time.sleep(1) lcd.clear() except KeyboardInterrupt: lcd.clear() lcd.set_backlight(1) GPIO.cleanup() |
So just don’t give the green book to your kids for them to learn Python and electronics with the CrowPi L laptop, it will be frustrating and potentially discourage them. But if they have completed “Hardware Control” Python programming lessons and found it all “way too easy”, then consider giving them the green book with cursed instructions for something a little more challenging 🙂
Misc remarks and conclusion
The CrowPi L image comes with an apt mirror based in China, and it can be quite slow outside of mainland China:
|
1 2 3 4 5 6 7 |
$ sudo apt update Get:1 http://mirrors.tuna.tsinghua.edu.cn/raspbian/raspbian buster InRelease [15.0 kB] Get:2 http://mirrors.tuna.tsinghua.edu.cn/raspberrypi buster InRelease [32.6 kB] Get:3 http://mirrors.tuna.tsinghua.edu.cn/raspbian/raspbian buster/non-free Sources [139 kB] Get:4 http://mirrors.tuna.tsinghua.edu.cn/raspbian/raspbian buster/main Sources [11.4 MB] Get:4 http://mirrors.tuna.tsinghua.edu.cn/raspbian/raspbian buster/main Sources [11.4 MB] 27% [4 Sources 3074 kB/11.4 MB 27%]^C |
So you may consider editing /etc/apt/sources.list or install apt-mirror-updater and select one of Raspberry Pi OS/Raspbian mirrors close to your country for faster update:
|
1 2 |
$ sudo pip3 install apt-mirror-updater $ apt-mirror-updater -c http://mirror.kku.ac.th/raspbian/raspbian/ |
The laptop comes with a touchpad with mouse buttons on the top right of the keyboard, and I thought it would be really awkward to use, but I was pleasantly surprised and it’s actually not too bad. That is unless you need to click and use the touchpad at the same, for example to move a window, in which case it’s close to unusable.
Two more nagging issues. If you close the lid, the fan will not stop and keep running. It will only stop when you turn off the laptop. The WiFi connection inside the laptop may be unreliable (TBC), as when using SSH to access the laptop, I had frequent freezes of several seconds where I could not type anything. So in case you have connection issues, you may want to switch to Ethernet instead.
The CrowPi L can also be used as a standard Linux laptop, but with my bad eyes, an 11.6-inch display is far from ideal. Additionally, while the value proposition as an education laptop is clearly there, the CrowPi L is not the best value if all you want to do with it is check the mail, browse the web, and watch some YouTube videos.
I’d like to thank Elecrow for sending the CrowPi L laptop, Raspberry Pi 4 (8GB RAM), and Crowtail Starter kit for review. The CrowPi L Advanced Kit reviewed here sells for $518 including shipping (or about $487 with CNXSOFT coupon for a 6% discount), but if you only need the laptop shell, available in white or black, that would be $279 (or ~$262 with the coupon).

Jean-Luc started CNX Software in 2010 as a part-time endeavor, before quitting his job as a software engineering manager, and starting to write daily news, and reviews full time later in 2011.
Support CNX Software! Donate via cryptocurrencies, become a Patron on Patreon, or purchase goods on Amazon or Aliexpress. We also use affiliate links in articles to earn commissions if you make a purchase after clicking on those links.


I feel this laptop is being held back by the Pi4. I wonder if they did something like the Pine Laptop with an additional place on the laptop for the GPIOs and sold the rest as is, it should make a much better laptop, much more useful as a laptop.
Spending all that money just to learn is difficult when you could get a better laptop and a Pi(unless the prices are hicked up) and both will be usable just by themselves