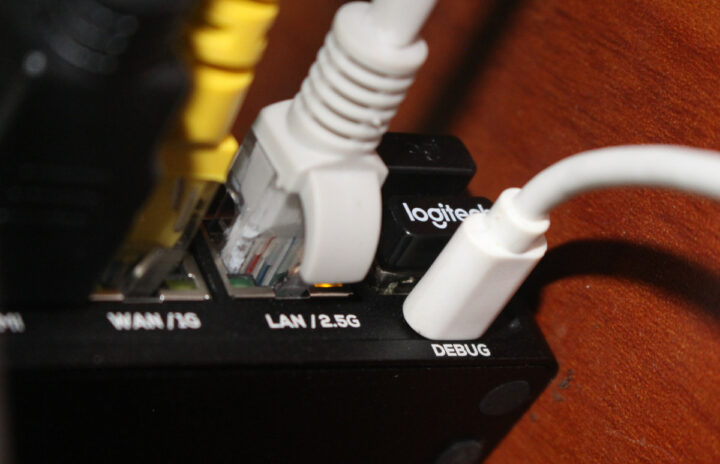
FriendlyElec has recently announced the NanoPi R6C mini PC that a variant of the Rockchip RK3588S powered NanoPi R6S mini PC and 2.5GbE router that we reviewed with FriendlyWrt/OpenWrt and Ubuntu 22.04 earlier this year, but with just one 2.5GbE and one GbE interface, a built-in M.2 NVMe SSD socket and USB-C Debug UART port for easy external access to the serial console.
The company sent me a NanoPi R6C sample for review, but since we’ve already tested the similar NanoPi R6S extensively, I’ll write a single-post mini review this time around, checking out the hardware, and focusing on testing the new features such as the NVMe SSD and the USB debug port when running Ubuntu 22.04.
NanoPi R6C unboxing
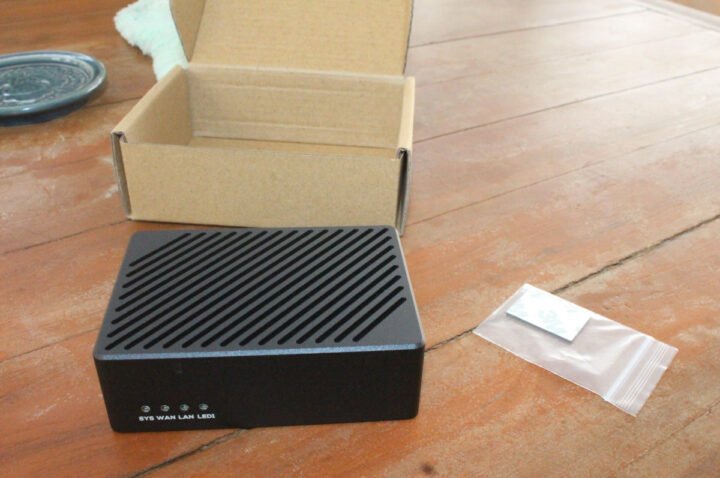
As usual, the device came in a non-descript cardboard package with a few 3M rubber pads.
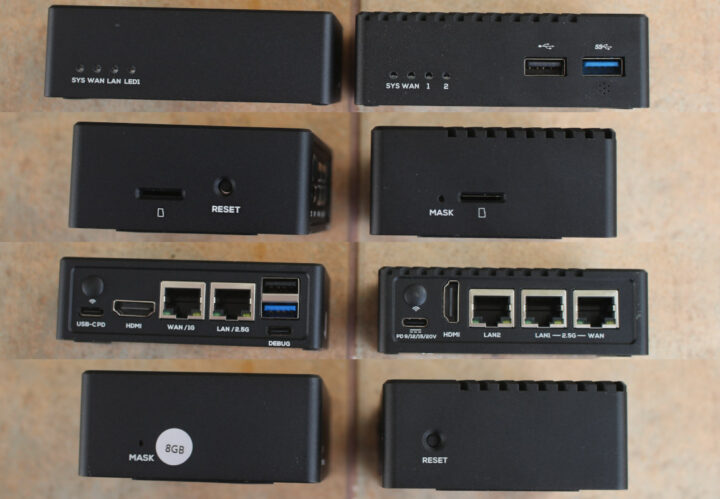
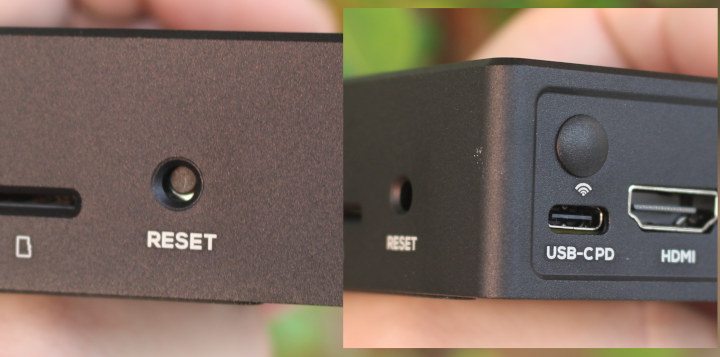
The most obvious change compared to the NanoPi R6S is that all main ports of the NanoPi R6C mini PC are moved to the rear panel. Only the microSD card, Reset button, and MaskROM pinhole are accessible from the sides.
SSD installation and teardown
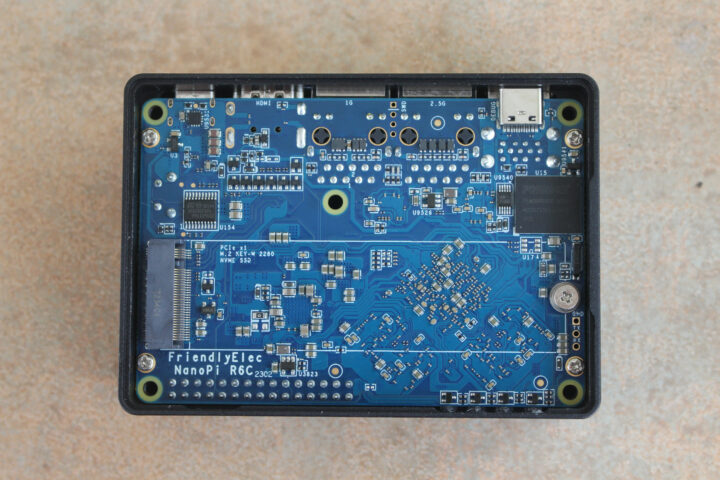
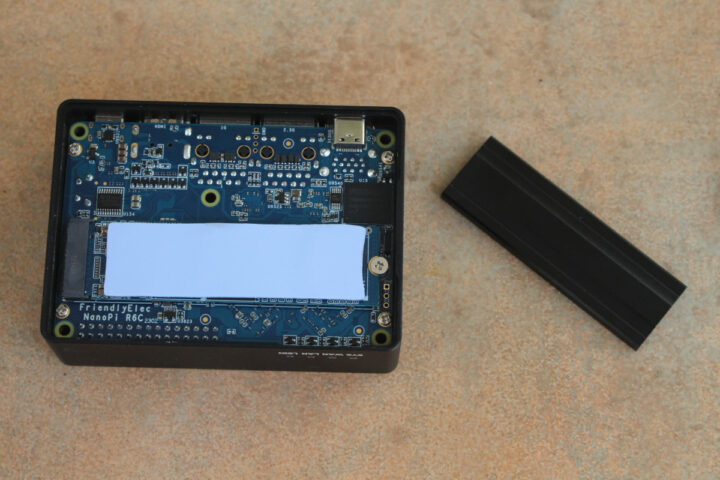
We’ll need to loosen the four screws on the bottom of the device to take out the bottom cover and reveals the M.2 2280 NVMe SSD socket.
The NanoPi R6C review sample also had a 32GB FORESSE FEMDNN032G-A3A55 eMMC 5.1 flash (see PDF datasheet) with up to 270MB/s read speed and up to 200MB/s “Turbo Write” speed, as well as an STM32G030F6P6 Arm Cortex-M0+ microcontroller apparently used as an SWD debugger.
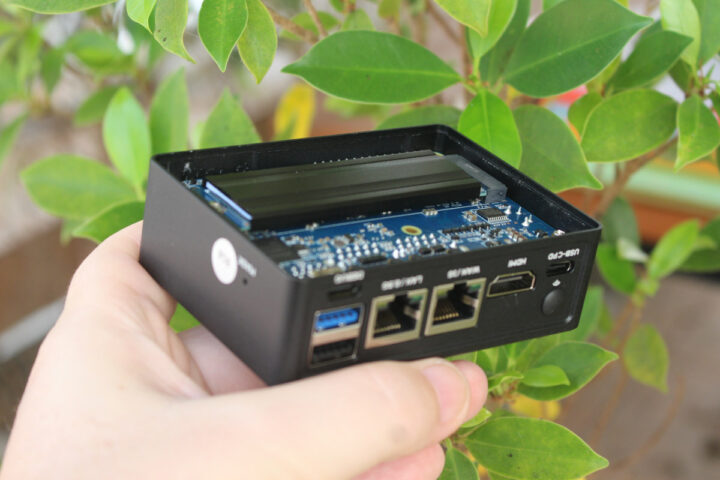
I tried to install the NVMe SSD from my ORICO NVMe SSD enclosure but the cooling plate made the SSD a bit too thick for the bottom cover, so I had to remove it leaving only the thermal pad.
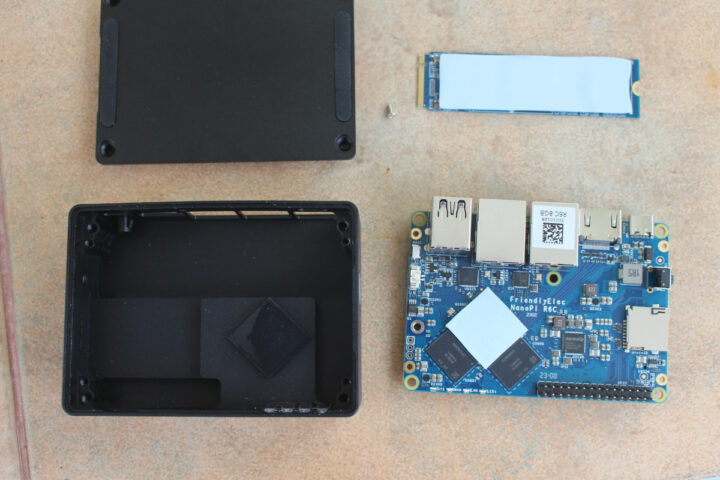
At this stage, most users will just put the bottom cover back and be done with it. But Let’s carry on with the teardown showing the thermal design. As with previous NanoPi R-series designs, the metal enclosure is used as a large heatsink with a thermal pad on the RK3588S processor to make sure it is in contact with the enclosure for optimical cooling.
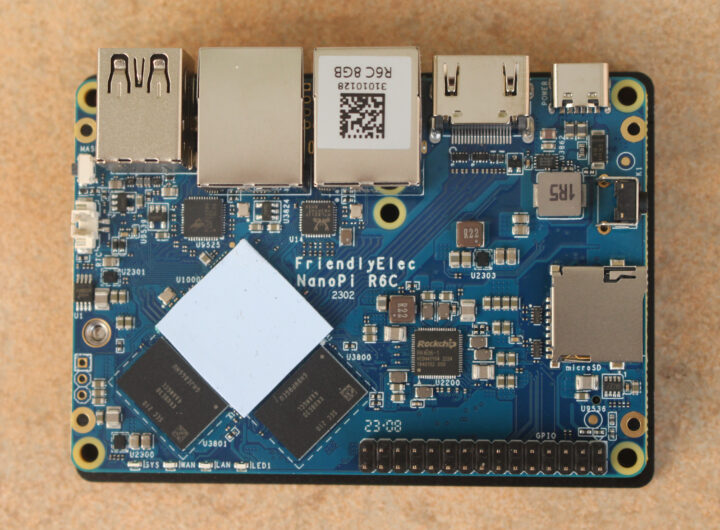
A close-up on the board confirms the rest of the specifications with 8GB RAM through two 4GB Samsung K4UBE3D4AA-MGCL LPDDR4x chips, 2.5GbE via a Realtek RTL8125BG controller, and Gigabit Ethernet via the usual Realtek RTL8211 PHY. A Rockchip RK806-1 PMIC is used for power management. We can also see the 30-pin header that was added to the NanoPi R6C, but sadly it’s not accessible once the SBC is inside the metal enclosure.
When I put everything together, the thermal pad on the SSD is in contact with the case (good for cooling) but the USB-PD port and Reset button seem to have moved up a little bit because of it. That’s not a big issue as I could still connect the USB-C cable for power as we’ll see below.
I also installed rubber pads to cover the screw holes, but those are not really useful since the R6C already comes with two long rubber pads on two sides.
Ubuntu 22.04 on NanoPi R6C
The NanoPi R6C ships with FriendlyWrt (OpenWrt), but since I feel this specific model is better suited as a mini PC that happens to have router features, I flashed the latest Ubuntu 22.04 Jammy Desktop image from the Wiki (rk3588-eflasher-ubuntu-jammy-desktop-5.10-arm64-20230317.img).
I also took the opportunity to connect a USB-C cable to the Debug port after the update was completed to see if it would work as expected.
The serial port is detected as a CH341 device in my Ubuntu laptop using BootTerm:
|
1 2 3 4 |
$ bt -l port | age (sec) | device | driver | description ------+------------+------------+------------------+---------------------- * 0 | 282 | ttyUSB0 | ch341-uart | USB Serial |
I can run the BootTerm command with the default 1,500,000 bps baud rate used in FriendlyElec images:
|
1 |
bt -b 1500000 |
and reboot the system, and it does work out of the box without having to install a header or connector to the board and use a USB to TTL debug board:
|
1 2 3 4 5 6 7 8 9 10 11 12 13 14 15 16 17 18 19 20 21 22 23 24 25 26 27 28 29 30 31 32 33 34 35 36 37 38 39 40 41 42 43 44 45 46 47 48 49 50 51 52 53 54 55 56 57 58 59 60 61 62 |
DDR V1.09 a930779e06 typ 22/11/21-17:50:56 LPDDR4X, 2112MHz channel[0] BW=16 Col=10 Bk=8 CS0 Row=16 CS1 Row=16 CS=2 Die BW=16 Size=2048MB channel[1] BW=16 Col=10 Bk=8 CS0 Row=16 CS1 Row=16 CS=2 Die BW=16 Size=2048MB channel[2] BW=16 Col=10 Bk=8 CS0 Row=16 CS1 Row=16 CS=2 Die BW=16 Size=2048MB channel[3] BW=16 Col=10 Bk=8 CS0 Row=16 CS1 Row=16 CS=2 Die BW=16 Size=2048MB Manufacturer ID:0x1 CH0 RX Vref:31.7%, TX Vref:21.8%,21.8% CH1 RX Vref:29.7%, TX Vref:20.8%,19.8% CH2 RX Vref:30.7%, TX Vref:20.8%,19.8% CH3 RX Vref:32.7%, TX Vref:20.8%,21.8% change to F1: 528MHz change to F2: 1068MHz change to F3: 1560MHz change to F0: 2112MHz out U-Boot SPL board init U-Boot SPL 2017.09-g93ceeb4da7-221107 #root (Feb 21 2023 - 11:20:45) unknown raw ID 0 0 0 unrecognized JEDEC id bytes: 00, 00, 00 Trying to boot from MMC2 MMC: no card present mmc_init: -123, time 0 spl: mmc init failed with error: -123 Trying to boot from MMC1 Trying fit image at 0x4000 sector ## Verified-boot: 0 ## Checking atf-1 0x00040000 ... sha256(ce2098067b...) + OK ## Checking uboot 0x00200000 ... sha256(b682e92d5f...) + OK ## Checking fdt 0x0032ce10 ... sha256(e936f08b25...) + OK ## Checking atf-2 0x000f0000 ... sha256(ebc45c531e...) + OK ## Checking atf-3 0xff100000 ... sha256(9ded9f3bb5...) + OK ## Checking optee 0x08400000 ... sha256(fde0860845...) + OK Jumping to U-Boot(0x00200000) via ARM Trusted Firmware(0x00040000) Total: 116.697 ms INFO: Preloader serial: 2 NOTICE: BL31: v2.3():v2.3-444-g1450d21e8:derrick.huang NOTICE: BL31: Built : 16:25:50, Oct 12 2022 INFO: spec: 0x13 INFO: ext 32k is valid INFO: ddr: stride-en 4CH INFO: GICv3 without legacy support detected. INFO: ARM GICv3 driver initialized in EL3 INFO: valid_cpu_msk=0xff bcore0_rst = 0x0, bcore1_rst = 0x0 INFO: system boots from cpu-hwid-0 INFO: idle_st=0x21fff, pd_st=0x11fff9, repair_st=0xfff70001 INFO: dfs DDR fsp_params[0].freq_mhz= 2112MHz INFO: dfs DDR fsp_params[1].freq_mhz= 528MHz INFO: dfs DDR fsp_params[2].freq_mhz= 1068MHz INFO: dfs DDR fsp_params[3].freq_mhz= 1560MHz INFO: BL31: Initialising Exception Handling Framework INFO: BL31: Initializing runtime services INFO: BL31: Initializing BL32 INFO: hdmirx_handler: dma not on, ret I/TC: I/TC: OP-TEE version: 3.13.0-652-g4542e1efd #derrick.huang (gcc version 10.2.1 20201103 (GNU Toolchain for the A-profile Architecture 10.2-2020.11 (arm-10.16))) #5 2022年 09月 20日 星期二 09:41:09 CST aarch64 I/TC: Primary CPU initializing I/TC: Primary CPU switching to normal world boot INFO: BL31: Preparing for EL3 exit to normal world INFO: Entry point address = 0x200000 INFO: SPSR = 0x3c9 |
You can check the very first boot log with Ubuntu 22.04 if you are interested.
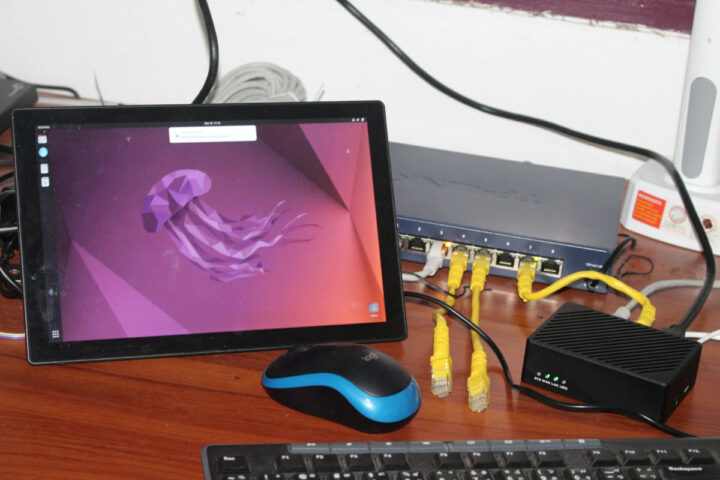
I connected two Ethernet cables, the GbE WAN port to an Ethernet switch, and the 2.5GbE LAN port to my laptop, as well as two RF dongles for my USB keyboard and mouse, an HDMI cable to a display, and a USB-C PD power supply. Everything works fine except for the LAN port which is not configured.
So just like I did when testing the NanoPi R5S, I set up the 192.168.2.0 subnet for eth1 interface and a configured DHCP server, before configuring NAT to route the packet from the LAN to the WAN, and I could access the Internet from my laptop through the NanoPi R6S:
|
1 2 3 4 5 6 7 8 9 10 11 12 13 14 15 16 |
jaufranc@cnx-laptop-4:~$ ip addr show enx00e04c68003a 8: enx00e04c68003a: <BROADCAST,MULTICAST,UP,LOWER_UP> mtu 1500 qdisc fq_codel state UP group default qlen 1000 link/ether 00:e0:4c:68:00:3a brd ff:ff:ff:ff:ff:ff inet 192.168.2.100/24 brd 192.168.2.255 scope global dynamic noprefixroute enx00e04c68003a valid_lft 352sec preferred_lft 352sec inet6 fe80::7e72:c555:b80e:fa73/64 scope link noprefixroute valid_lft forever preferred_lft forever jaufranc@cnx-laptop-4:~$ ping cnx-software.com PING cnx-software.com (104.21.91.125) 56(84) bytes of data. 64 bytes from 104.21.91.125 (104.21.91.125): icmp_seq=1 ttl=53 time=11.2 ms 64 bytes from 104.21.91.125 (104.21.91.125): icmp_seq=2 ttl=53 time=11.0 ms ^C --- cnx-software.com ping statistics --- 2 packets transmitted, 2 received, 0% packet loss, time 1002ms rtt min/avg/max/mdev = 11.004/11.080/11.157/0.076 ms |
I’ll quickly test the performance of networking later on.
Let’s check some system information:
|
1 2 3 4 5 6 7 8 9 10 11 12 13 14 15 16 17 18 19 20 21 22 23 24 25 26 27 28 29 30 31 32 33 34 35 36 37 38 39 40 41 42 43 44 45 46 |
pi@NanoPi-R6C:~$ sudo inxi -Fc0 System: Host: NanoPi-R6C Kernel: 5.10.110 aarch64 bits: 64 Console: pty pts/1 Distro: Ubuntu 22.04.2 LTS (Jammy Jellyfish) Machine: Type: ARM System: FriendlyElec NanoPi R6C details: N/A serial: a87f2f04f5d344bb Battery: ID-1: test_battery charge: 100% condition: N/A CPU: Info: 3x 4-core model: N/A variant-1: cortex-a55 variant-2: cortex-a76 bits: 64 type: MCP AMP cache: L2: 3x 512 KiB (1.5 MiB) Speed (MHz): avg: 1578 min/max: 408/1800:2256:2304 cores: 1: 1800 2: 1800 3: 1800 4: 1800 5: 408 6: 408 7: 2304 8: 2304 Graphics: Device-1: display-subsystem driver: rockchip_drm v: N/A Device-2: mali-bifrost driver: mali v: N/A Device-3: rk3588-dw-hdmi driver: dwhdmi_rockchip v: N/A Display: server: X.org v: 1.21.1.3 with: Xwayland v: 22.1.1 driver: gpu: rockchip_drm,mali,dwhdmi_rockchip note: X driver n/a tty: 80x24 Message: GL data unavailable in console for root. Audio: Device-1: rk3588-dw-hdmi driver: dwhdmi_rockchip Device-2: simple-audio-card driver: asoc_simple_card Sound Server-1: ALSA v: k5.10.110 running: yes Sound Server-2: PulseAudio v: 15.99.1 running: yes Sound Server-3: PipeWire v: 0.3.48 running: yes Network: Device-1: Realtek RTL8125 2.5GbE driver: r8125 IF: eth1 state: up speed: 2500 Mbps duplex: full mac: a2:a6:95:fe:09:78 Device-2: rk3588-gmac driver: rk_gmac_dwmac IF: eth0 state: up speed: 1000 Mbps duplex: full mac: a6:a6:95:fe:09:78 Drives: Local Storage: total: 267.38 GiB used: 0 KiB (0.0%) ID-1: /dev/mmcblk2 model: A3A551 size: 28.91 GiB ID-2: /dev/nvme0n1 vendor: Apacer model: AS2280P4 256GB size: 238.47 GiB Partition: Message: No partition data found. Swap: Alert: No swap data was found. Sensors: System Temperatures: cpu: 66.5 C mobo: N/A Fan Speeds (RPM): N/A Info: Processes: 270 Uptime: 18m Memory: 7.73 GiB used: 960.5 MiB (12.1%) Init: systemd runlevel: 5 Shell: Sudo inxi: 3.3.13 |
Everything is pretty much the same as on the NanoPi R6S, except there’s only one 2.5GbE interface, and my NVMe drive is detected.
SBC Bench testing
Let’s now run SBC-bench.sh in “review mode” to double-check the CPU performance and find potential issues:
|
1 2 3 4 5 6 7 8 9 10 11 12 13 14 15 16 17 18 19 20 21 22 23 24 25 26 27 28 29 30 31 32 33 34 35 36 37 38 39 40 41 42 43 44 45 46 47 48 49 50 51 52 53 54 55 56 57 58 59 60 61 62 63 64 65 66 67 68 69 70 71 72 73 74 75 76 77 78 79 80 81 82 83 84 85 86 87 88 89 90 91 92 93 94 95 96 97 98 99 100 101 102 103 104 105 106 107 108 109 110 111 112 113 114 115 116 117 118 119 120 121 122 123 124 125 126 127 128 129 130 131 132 133 134 135 136 137 138 139 140 141 142 143 144 145 146 147 148 149 150 151 152 153 154 |
pi@NanoPi-R6C:~$ sudo ./sbc-bench.sh -r Starting to examine hardware/software for review purposes... Average load and/or CPU utilization too high (too much background activity). Waiting... Too busy for benchmarking: 13:57:49 up 2:59, 3 users, load average: 0.20, 0.18, 0.08, cpu: 0% Too busy for benchmarking: 13:57:54 up 2:59, 3 users, load average: 0.19, 0.17, 0.08, cpu: 0% sbc-bench v0.9.39 Installing needed tools: apt -f -qq -y install lm-sensors sysstat curl lshw stress-ng smartmontools mmc-utils p7zip, tinymembench, ramlat, mhz, cpuminer. Done. Checking cpufreq OPP. Done. Executing tinymembench. Done. Executing RAM latency tester. Done. Executing OpenSSL benchmark. Done. Executing 7-zip benchmark. Done. Throttling test: heating up the device, 5 more minutes to wait. Done. Checking cpufreq OPP again. Done (20 minutes elapsed). Results validation: * Advertised vs. measured max CPU clockspeed: -2.4% before, -3.6% after * Background activity (%system) OK * Throttling occured Full results uploaded to http://ix.io/4s3x # FriendlyElec NanoPi R6C Tested with sbc-bench v0.9.39 on Tue, 28 Mar 2023 14:19:42 +0000. Full info: [http://ix.io/4s3x](http://ix.io/4s3x) ### General information: The CPU features 3 clusters consisting of 2 different core types: Rockchip RK3588/RK3588s (35880000), Kernel: aarch64, Userland: arm64 CPU sysfs topology (clusters, cpufreq members, clockspeeds) cpufreq min max CPU cluster policy speed speed core type 0 0 0 408 1800 Cortex-A55 / r2p0 1 0 0 408 1800 Cortex-A55 / r2p0 2 0 0 408 1800 Cortex-A55 / r2p0 3 0 0 408 1800 Cortex-A55 / r2p0 4 1 4 408 2256 Cortex-A76 / r4p0 5 1 4 408 2256 Cortex-A76 / r4p0 6 2 6 408 2304 Cortex-A76 / r4p0 7 2 6 408 2304 Cortex-A76 / r4p0 7924 KB available RAM ### Governors/policies (performance vs. idle consumption): Original governor settings: cpufreq-policy0: ondemand / 1416 MHz (conservative ondemand userspace powersave performance schedutil / 408 600 816 1008 1200 1416 1608 1800) cpufreq-policy4: ondemand / 408 MHz (conservative ondemand userspace powersave performance schedutil / 408 600 816 1008 1200 1416 1608 1800 2016 2208 2256) cpufreq-policy6: ondemand / 408 MHz (conservative ondemand userspace powersave performance schedutil / 408 600 816 1008 1200 1416 1608 1800 2016 2208 2304) dmc: dmc_ondemand / 528 MHz (rknpu_ondemand dmc_ondemand userspace powersave performance simple_ondemand / 528 1068 1560 2112) fb000000.gpu: simple_ondemand / 300 MHz (rknpu_ondemand dmc_ondemand userspace powersave performance simple_ondemand / 300 400 500 600 700 800 900 1000) fdab0000.npu: rknpu_ondemand / 1000 MHz (rknpu_ondemand dmc_ondemand userspace powersave performance simple_ondemand / 300 400 500 600 700 800 900 1000) Tuned governor settings: cpufreq-policy0: performance / 1800 MHz cpufreq-policy4: performance / 2256 MHz cpufreq-policy6: performance / 2304 MHz dmc: performance / 2112 MHz fb000000.gpu: performance / 1000 MHz fdab0000.npu: performance / 1000 MHz Status of performance related policies found below /sys: /sys/devices/platform/fb000000.gpu/power_policy: [coarse_demand] always_on /sys/module/pcie_aspm/parameters/policy: default [performance] powersave powersupersave ### Clockspeeds (idle vs. heated up): Before at 49.0°C: cpu0-cpu3 (Cortex-A55): OPP: 1800, Measured: 1808 cpu4-cpu5 (Cortex-A76): OPP: 2256, Measured: 2246 cpu6-cpu7 (Cortex-A76): OPP: 2304, Measured: 2249 (-2.4%) After at 84.1°C (throttled): cpu0-cpu3 (Cortex-A55): OPP: 1800, Measured: 1788 cpu4-cpu5 (Cortex-A76): OPP: 2256, Measured: 2217 (-1.7%) cpu6-cpu7 (Cortex-A76): OPP: 2304, Measured: 2221 (-3.6%) ### Performance baseline * cpu0 (Cortex-A55): memcpy: 6198.4 MB/s, memchr: 2779.4 MB/s, memset: 21817.0 MB/s * cpu4 (Cortex-A76): memcpy: 9884.6 MB/s, memchr: 13958.2 MB/s, memset: 27528.7 MB/s * cpu6 (Cortex-A76): memcpy: 10360.2 MB/s, memchr: 14109.2 MB/s, memset: 27629.0 MB/s * cpu0 (Cortex-A55) 16M latency: 117.1 117.0 114.7 117.8 113.6 119.6 193.9 345.9 * cpu4 (Cortex-A76) 16M latency: 119.7 109.7 119.3 109.1 119.0 113.2 109.5 111.0 * cpu6 (Cortex-A76) 16M latency: 128.0 108.9 116.3 106.6 116.0 114.6 111.1 113.9 * cpu0 (Cortex-A55) 128M latency: 140.7 141.7 140.5 141.7 139.4 143.3 208.7 370.1 * cpu4 (Cortex-A76) 128M latency: 133.0 134.3 132.5 134.1 132.6 129.8 129.4 138.8 * cpu6 (Cortex-A76) 128M latency: 132.4 133.4 131.9 133.3 132.1 128.9 128.0 133.4 * 7-zip MIPS (3 consecutive runs): 15865, 14907, 14583 (15120 avg), single-threaded: 3072 * `aes-256-cbc 147721.03k 388181.91k 653222.66k 789570.22k 840581.12k 844748.12k (Cortex-A55)` * `aes-256-cbc 573923.91k 981824.94k 1187126.95k 1248965.97k 1272422.40k 1274751.66k (Cortex-A76)` * `aes-256-cbc 573877.24k 982838.68k 1188725.50k 1250087.94k 1273673.05k 1276040.53k (Cortex-A76)` ### PCIe and storage devices: * Realtek RTL8125 2.5GbE: Speed 5GT/s (ok), Width x1 (ok), driver in use: r8125 * 238.5GB "Apacer AS2280P4 256GB" SSD as /dev/nvme0: Speed 5GT/s (downgraded), Width x1 (downgraded), 0% worn out, 21 error log entries, drive temp: 0°C * 28.9GB "Foresee A3A551" HS400 Enhanced strobe eMMC 5.1 card as /dev/mmcblk2: date 01/2022, manfid/oemid: 0x0000d6/0x0103, hw/fw rev: 0x0/0x1200000000000000 "nvme error-log /dev/nvme0 ; smartctl -x /dev/nvme0" could be used to get further information about the reported issues. ### Software versions: * Ubuntu 22.04.2 LTS * Compiler: /usr/bin/gcc (Ubuntu 11.3.0-1ubuntu1~22.04) 11.3.0 / aarch64-linux-gnu ### Kernel info: * `/proc/cmdline: storagemedia=emmc androidboot.storagemedia=emmc androidboot.mode=normal androidboot.dtbo_idx=0 androidboot.verifiedbootstate=orange earlycon=uart8250,mmio32,0xfeb50000 console=ttyFIQ0 coherent_pool=1m irqchip.gicv3_pseudo_nmi=0 rw root=/dev/mmcblk2p8 rootfstype=ext4 rootflags=discard data=/dev/mmcblk2p9 consoleblank=0 cgroup_enable=cpuset cgroup_memory=1 cgroup_enable=memory swapaccount=1` * Vulnerability Spec store bypass: Mitigation; Speculative Store Bypass disabled via prctl * Vulnerability Spectre v1: Mitigation; __user pointer sanitization * Vulnerability Spectre v2: Vulnerable: Unprivileged eBPF enabled * Kernel 5.10.110 / CONFIG_HZ=300 Kernel 5.10.110 is not latest 5.10.176 LTS that was released on 2023-03-22. See https://endoflife.date/linux for details. It is somewhat likely that a lot of exploitable vulnerabilities exist for this kernel as well as many unfixed bugs. But this version string doesn't matter since this is not an official LTS Linux from kernel.org. This device runs a Rockchip vendor/BSP kernel. This kernel is based on a mixture of Android GKI and other sources. Also some community attempts to do version string cosmetics might have happened, see https://tinyurl.com/2p8fuubd for example. To examine how far away this 5.10.110 is from an official LTS of same version someone would have to reapply Rockchip's thousands of patches to a clean 5.10.110 LTS. All known settings adjusted for performance. Device now ready for benchmarking. Once finished stop with [ctrl]-[c] to get info about throttling, frequency cap and too high background activity all potentially invalidating benchmark scores. All changes with storage and PCIe devices as well as suspicious dmesg contents will be reported too. Time big.LITTLE load %cpu %sys %usr %nice %io %irq Temp 14:19:48: 2304/1800MHz 5.16 4% 0% 4% 0% 0% 0% 66.5°C 14:20:48: 2304/1800MHz 1.89 0% 0% 0% 0% 0% 0% 61.0°C 14:21:48: 2304/1800MHz 0.69 0% 0% 0% 0% 0% 0% 61.0°C 14:22:48: 2304/1800MHz 0.25 0% 0% 0% 0% 0% 0% 60.1°C 14:23:48: 2304/1800MHz 0.09 0% 0% 0% 0% 0% 0% 59.2°C |
The 7-zip score is higher on R6C (on average 15,118) than on my R6S sample (14,578 points in sbc-bench in standard mode), but the score decreases from 15,685 points on the first run to 14583 on the third run, because the CPU temperature is quite higher, and the system throttle both during the 7-zip multi-thread and cpuminer tests:
|
1 2 3 4 5 6 7 8 9 10 11 12 13 14 15 16 17 18 19 20 21 22 23 24 25 26 27 28 29 30 |
System health while running 7-zip multi core benchmark: Time big.LITTLE load %cpu %sys %usr %nice %io %irq Temp 14:11:23: 2304/1800MHz 1.01 1% 0% 0% 0% 0% 0% 70.2°C 14:11:33: 2304/1800MHz 1.77 89% 0% 88% 0% 0% 0% 78.5°C 14:11:43: 2304/1800MHz 2.41 86% 0% 85% 0% 0% 0% 81.3°C 14:11:54: 2208/1608MHz 3.49 90% 0% 89% 0% 0% 0% 85.0°C 14:12:05: 2208/1608MHz 3.89 79% 1% 77% 0% 0% 0% 85.0°C 14:12:15: 2304/1800MHz 4.67 86% 0% 85% 0% 0% 0% 84.1°C 14:12:25: 2304/1800MHz 5.26 93% 0% 92% 0% 0% 0% 84.1°C 14:12:36: 2016/1416MHz 5.54 86% 0% 85% 0% 0% 0% 84.1°C 14:12:48: 2016/1416MHz 5.79 80% 1% 78% 0% 0% 0% 84.1°C 14:12:59: 2208/1608MHz 6.14 77% 1% 75% 0% 0% 0% 84.1°C 14:13:09: 2208/1608MHz 6.57 94% 1% 92% 0% 0% 0% 84.1°C 14:13:22: 2208/1608MHz 6.28 84% 0% 83% 0% 0% 0% 85.0°C 14:13:33: 2016/1416MHz 6.10 84% 0% 83% 0% 0% 0% 84.1°C 14:13:47: 2016/1608MHz 6.54 79% 1% 78% 0% 0% 0% 85.0°C 14:13:57: 2208/1608MHz 7.54 82% 1% 80% 0% 0% 0% 85.0°C 14:14:07: 2208/1608MHz 7.29 91% 1% 89% 0% 0% 0% 84.1°C System health while running cpuminer: Time big.LITTLE load %cpu %sys %usr %nice %io %irq Temp 14:14:16: 2016/1416MHz 7.43 2% 0% 2% 0% 0% 0% 84.1°C 14:15:01: 2016/1608MHz 8.15 100% 0% 99% 0% 0% 0% 85.0°C 14:15:45: 2208/1416MHz 8.58 100% 0% 99% 0% 0% 0% 85.0°C 14:16:29: 2208/1416MHz 8.72 100% 0% 99% 0% 0% 0% 85.0°C 14:17:14: 2016/1416MHz 8.78 100% 0% 99% 0% 0% 0% 85.0°C 14:17:57: 2208/1416MHz 8.84 100% 0% 99% 0% 0% 0% 84.1°C 14:18:42: 2016/1416MHz 9.01 100% 0% 99% 0% 0% 0% 85.0°C |
The CPU frequency does not completely collapses, so the performance impact is limited. Note the ambient temperature was around 28-29°C during testing, so you may not notice any slowdown in a cooler room, but if you’re going to use the NanoPi R6C in a shed without an air conditioner with a 40°C outdoor temperature, I’d expect the performance to suffer.
I tested the NanoPi R6S in a room at 27°C, but the temperature delta for cpuminer is over 20°C as can be seen from the SBC bench log for the R6S:
|
1 2 3 4 5 6 7 8 9 10 11 12 13 14 15 16 17 18 19 20 21 22 23 24 25 26 27 28 29 30 |
System health while running 7-zip multi core benchmark: Time big.LITTLE load %cpu %sys %usr %nice %io %irq Temp DC(V) 13:53:45: 2256/1800MHz 1.00 1% 0% 1% 0% 0% 0% 55.5°C 19.82 13:53:55: 2256/1800MHz 1.76 88% 0% 87% 0% 0% 0% 54.5°C 19.82 13:54:05: 2256/1800MHz 2.27 88% 0% 87% 0% 0% 0% 55.5°C 19.83 13:54:18: 2256/1800MHz 3.23 86% 1% 85% 0% 0% 0% 58.2°C 19.81 13:54:28: 2256/1800MHz 3.90 78% 1% 77% 0% 0% 0% 57.3°C 19.83 13:54:39: 2256/1800MHz 4.58 95% 1% 94% 0% 0% 0% 59.2°C 19.80 13:54:51: 2256/1800MHz 5.25 84% 0% 84% 0% 0% 0% 60.1°C 19.81 13:55:02: 2256/1800MHz 5.16 84% 0% 83% 0% 0% 0% 60.1°C 19.83 13:55:16: 2256/1800MHz 5.38 80% 1% 79% 0% 0% 0% 59.2°C 19.82 13:55:26: 2256/1800MHz 5.89 81% 1% 80% 0% 0% 0% 58.2°C 19.83 13:55:37: 2256/1800MHz 6.37 96% 1% 95% 0% 0% 0% 60.1°C 19.81 13:55:48: 2256/1800MHz 6.32 86% 0% 85% 0% 0% 0% 60.1°C 19.80 13:56:00: 2256/1800MHz 6.64 84% 0% 84% 0% 0% 0% 61.0°C 19.81 13:56:14: 2256/1800MHz 6.92 83% 1% 82% 0% 0% 0% 61.0°C 19.80 13:56:24: 2256/1800MHz 7.61 80% 1% 79% 0% 0% 0% 59.2°C 19.83 13:56:34: 2256/1800MHz 7.82 98% 1% 97% 0% 0% 0% 61.0°C 19.81 System health while running cpuminer: Time big.LITTLE load %cpu %sys %usr %nice %io %irq Temp DC(V) 13:56:44: 2256/1800MHz 7.91 2% 0% 2% 0% 0% 0% 61.0°C 19.82 13:57:29: 2256/1800MHz 8.00 100% 0% 99% 0% 0% 0% 61.9°C 19.80 13:58:14: 2256/1800MHz 8.04 100% 0% 99% 0% 0% 0% 61.9°C 19.80 13:58:59: 2256/1800MHz 8.06 100% 0% 99% 0% 0% 0% 62.8°C 19.82 13:59:44: 2256/1800MHz 8.07 100% 0% 99% 0% 0% 0% 63.8°C 19.81 14:00:29: 2256/1800MHz 8.07 100% 0% 99% 0% 0% 0% 63.8°C 19.79 14:01:14: 2256/1800MHz 8.07 100% 0% 99% 0% 0% 0% 64.7°C 19.80 |
It can either be due to the hardware design or the NVMe SSD inside the enclosure. The performance settings configured by sbc-bench.sh may also have contributed to the high temperatures, but this did not impact the results on NanoPi R6S. So after testing the SSD, I’ve removed it, and then ran SBC bench again in standard mode:
|
1 2 3 4 5 6 7 8 9 10 11 12 13 14 15 16 17 18 19 20 21 22 23 24 25 26 27 28 29 30 31 32 33 34 35 36 37 38 39 40 41 42 43 44 45 46 47 48 49 50 51 52 53 54 55 |
$ sudo ./sbc-bench.sh -c Average load and/or CPU utilization too high (too much background activity). Waiting... Too busy for benchmarking: 13:08:55 up 7 min, 3 users, load average: 0.11, 0.28, 0.18, cpu: 6% Too busy for benchmarking: 13:09:00 up 7 min, 3 users, load average: 0.10, 0.27, 0.18, cpu: 0% Too busy for benchmarking: 13:09:05 up 7 min, 3 users, load average: 0.09, 0.27, 0.18, cpu: 0% Status of performance related governors found below /sys (w/o cpufreq): dmc: dmc_ondemand / 528 MHz (rknpu_ondemand dmc_ondemand userspace powersave performance simple_ondemand / 528 1068 1560 2112) fb000000.gpu: simple_ondemand / 300 MHz (rknpu_ondemand dmc_ondemand userspace powersave performance simple_ondemand / 300 400 500 600 700 800 900 1000) fdab0000.npu: rknpu_ondemand / 300 MHz (rknpu_ondemand dmc_ondemand userspace powersave performance simple_ondemand / 300 400 500 600 700 800 900 1000) sbc-bench v0.9.39 Installing needed tools: Done. Checking cpufreq OPP. Done (results will be available in 21-32 minutes). Executing tinymembench. Done. Executing RAM latency tester. Done. Executing OpenSSL benchmark. Done. Executing 7-zip benchmark. Done. Executing cpuminer. 5 more minutes to wait. Done. Checking cpufreq OPP again. Done (23 minutes elapsed). Results validation: * Advertised vs. measured max CPU clockspeed: -2.3% before, -3.6% after * Background activity (%system) OK * Throttling occured Memory performance (all 3 CPU clusters measured individually): memcpy: 6267.4 MB/s (Cortex-A55) memset: 21801.6 MB/s (Cortex-A55) memcpy: 10844.7 MB/s (Cortex-A76) memset: 28092.9 MB/s (Cortex-A76) memcpy: 9993.2 MB/s (Cortex-A76) memset: 27620.0 MB/s (Cortex-A76) Cpuminer total scores (5 minutes execution): 21.45,21.43,21.42,21.41,21.40,21.39,21.37,21.36,21.35,21.33,21.32,21.31,21.30,21.28,21.27,21.26,21.25,21.24,21.21,21.20,21.19,21.17,21.16,21.14,21.13,21.12,21.11,21.10,21.08,21.07,21.06,21.05,21.04,21.02,21.01,21.00,20.99 kH/s 7-zip total scores (3 consecutive runs): 13968,13497,13244, single-threaded: 2510 OpenSSL results (all 3 CPU clusters measured individually): type 16 bytes 64 bytes 256 bytes 1024 bytes 8192 bytes 16384 bytes aes-128-cbc 160034.53k 474207.42k 927109.97k 1227207.34k 1352231.59k 1363083.26k (Cortex-A55) aes-128-cbc 635771.09k 1265699.31k 1617682.18k 1735219.20k 1779968.68k 1784654.51k (Cortex-A76) aes-128-cbc 636349.96k 1261267.31k 1616525.99k 1735644.84k 1780345.51k 1785315.33k (Cortex-A76) aes-192-cbc 152629.75k 422463.34k 757743.96k 944839.68k 1018235.56k 1024737.28k (Cortex-A55) aes-192-cbc 594155.21k 1106229.97k 1370170.03k 1443830.44k 1484379.48k 1486935.38k (Cortex-A76) aes-192-cbc 592730.94k 1107228.59k 1371779.93k 1444199.77k 1485004.80k 1488175.10k (Cortex-A76) aes-256-cbc 147908.70k 388357.03k 651484.33k 789584.55k 840824.15k 844666.20k (Cortex-A55) aes-256-cbc 573916.15k 983671.17k 1188556.63k 1249724.42k 1273072.30k 1275401.56k (Cortex-A76) aes-256-cbc 573106.47k 981280.58k 1187538.69k 1249689.26k 1273495.55k 1275860.31k (Cortex-A76) Full results uploaded to http://ix.io/4suM |
Throttling occurred again and performance is lower for 7-zip multi-core (around 13,500 on average) due to the throttling and the system has not been configured with optimized settings from SBC Bench’s review mode.
|
1 2 3 4 5 6 7 8 9 10 11 12 13 14 15 16 17 18 19 20 21 22 23 24 25 26 27 28 29 30 |
System health while running 7-zip multi core benchmark: Time big.LITTLE load %cpu %sys %usr %nice %io %irq Temp 13:23:23: 2304/1800MHz 1.00 10% 0% 9% 0% 0% 0% 62.8°C 13:23:33: 2304/1800MHz 1.56 94% 1% 93% 0% 0% 0% 81.3°C 13:23:44: 2208/1800MHz 2.92 88% 1% 86% 0% 0% 0% 84.1°C 13:23:59: 2208/1608MHz 3.29 82% 1% 81% 0% 0% 0% 84.1°C 13:24:09: 2304/1800MHz 4.71 81% 1% 80% 0% 0% 0% 84.1°C 13:24:21: 2208/1608MHz 5.37 96% 1% 95% 0% 0% 0% 85.0°C 13:24:34: 2208/1608MHz 5.48 83% 0% 82% 0% 0% 0% 85.0°C 13:24:46: 2016/1416MHz 6.25 86% 0% 85% 0% 0% 0% 85.0°C 13:25:00: 2208/1608MHz 6.38 81% 1% 79% 0% 0% 0% 84.1°C 13:25:11: 2208/1608MHz 6.60 82% 1% 80% 0% 0% 0% 85.0°C 13:25:23: 2208/1608MHz 7.18 97% 1% 96% 0% 0% 0% 85.0°C 13:25:36: 2016/1608MHz 7.78 85% 0% 84% 0% 0% 0% 85.0°C 13:25:48: 2016/1416MHz 7.74 85% 0% 84% 0% 0% 0% 85.0°C 13:26:03: 2016/1416MHz 8.07 81% 1% 79% 0% 0% 0% 84.1°C 13:26:14: 2016/1608MHz 7.67 81% 1% 80% 0% 0% 0% 84.1°C 13:26:26: 2208/1608MHz 7.87 97% 1% 96% 0% 0% 0% 84.1°C System health while running cpuminer: Time big.LITTLE load %cpu %sys %usr %nice %io %irq Temp 13:26:35: 2208/1416MHz 7.64 20% 0% 19% 0% 0% 0% 85.0°C 13:27:20: 2016/1608MHz 7.87 100% 0% 99% 0% 0% 0% 85.0°C 13:28:05: 2016/1416MHz 8.26 100% 0% 99% 0% 0% 0% 85.0°C 13:28:50: 2208/1416MHz 8.32 100% 0% 99% 0% 0% 0% 85.0°C 13:29:35: 2016/1416MHz 8.62 100% 0% 99% 0% 0% 0% 85.0°C 13:30:19: 2208/1416MHz 8.48 100% 0% 99% 0% 0% 0% 85.0°C 13:31:04: 2208/1416MHz 8.36 100% 0% 99% 0% 0% 0% 85.0°C |
So the SSD is not a major factor in the system, and it’s just the NanoPi R6C gets hotter, at least that’s the case for my sample… So I opened the mini PC again to make sure the contact between the processor and the enclosure is not the issue, completely removed the board and reassembled it again before running the benchmark a third time:
|
1 2 3 4 5 6 7 8 9 10 11 12 13 14 15 16 17 18 19 20 21 22 23 24 25 26 27 28 29 30 31 32 33 34 35 36 37 38 39 40 41 42 43 44 45 46 47 48 49 |
pi@NanoPi-R6C:~$ sudo ./sbc-bench.sh -c Status of performance related governors found below /sys (w/o cpufreq): dmc: dmc_ondemand / 528 MHz (rknpu_ondemand dmc_ondemand userspace powersave performance simple_ondemand / 528 1068 1560 2112) fb000000.gpu: simple_ondemand / 300 MHz (rknpu_ondemand dmc_ondemand userspace powersave performance simple_ondemand / 300 400 500 600 700 800 900 1000) fdab0000.npu: rknpu_ondemand / 1000 MHz (rknpu_ondemand dmc_ondemand userspace powersave performance simple_ondemand / 300 400 500 600 700 800 900 1000) sbc-bench v0.9.39 Installing needed tools: Done. Checking cpufreq OPP. Done (results will be available in 21-32 minutes). Executing tinymembench. Done. Executing RAM latency tester. Done. Executing OpenSSL benchmark. Done. Executing 7-zip benchmark. Done. Executing cpuminer. 5 more minutes to wait. Done. Checking cpufreq OPP again. Done (23 minutes elapsed). Results validation: * Advertised vs. measured max CPU clockspeed: -1.9% before, -3.5% after * Background activity (%system) OK * Throttling occured Memory performance (all 3 CPU clusters measured individually): memcpy: 6243.6 MB/s (Cortex-A55) memset: 21892.9 MB/s (Cortex-A55) memcpy: 10863.8 MB/s (Cortex-A76) memset: 28409.1 MB/s (Cortex-A76) memcpy: 10797.3 MB/s (Cortex-A76) memset: 27777.5 MB/s (Cortex-A76) Cpuminer total scores (5 minutes execution): 22.60,22.59,22.30,22.29,22.26,22.25,22.23,22.22,22.20,22.19,22.15,22.14,22.12,22.11,22.09,22.07,22.05,22.04,22.02,22.01,21.99,21.97,21.95,21.92,21.88,21.87,21.86,21.85,21.83,21.82,21.78,21.77,21.76,21.74,21.72,21.71,21.69,21.66,21.65 kH/s 7-zip total scores (3 consecutive runs): 14319,14045,13796, single-threaded: 2492 OpenSSL results (all 3 CPU clusters measured individually): type 16 bytes 64 bytes 256 bytes 1024 bytes 8192 bytes 16384 bytes aes-128-cbc 160131.91k 475982.21k 929209.86k 1229950.29k 1357621.93k 1368074.92k (Cortex-A55) aes-128-cbc 639799.29k 1255374.78k 1627063.13k 1741370.71k 1786260.14k 1791060.65k (Cortex-A76) aes-128-cbc 640122.73k 1256669.50k 1627184.30k 1742381.40k 1787191.30k 1792060.07k (Cortex-A76) aes-192-cbc 153097.08k 423787.05k 757464.32k 946930.01k 1021168.30k 1027528.02k (Cortex-A55) aes-192-cbc 597519.43k 1113231.89k 1375599.62k 1448975.02k 1489646.93k 1492631.55k (Cortex-A76) aes-192-cbc 594056.56k 1115319.30k 1378664.45k 1449382.57k 1490168.49k 1493297.83k (Cortex-A76) aes-256-cbc 148849.75k 389387.31k 655985.58k 791673.51k 843218.94k 846867.11k (Cortex-A55) aes-256-cbc 575066.83k 984175.08k 1191490.65k 1253713.92k 1277258.41k 1279612.25k (Cortex-A76) aes-256-cbc 565959.93k 986128.06k 1191991.72k 1254131.37k 1278069.42k 1280371.37k (Cortex-A76) Full results uploaded to http://ix.io/4sva |
The problem still occurs, so the mystery remains. Hopefully, this only happens with my sample or the issue could have happened during the teardown, but it’s still something a few users might do, for example, to install an RTC battery.
NVMe SSD testing
My SSD is an APACER AS2280 (AP256GAS2280P4-1) PCIe Gen 3.0 x4 SSD that can achieve up to 1,800 MB/s sequential read and up to 1,100 MB/s sequential write speeds on the right hardware. I mounted the EXT-4 partition with pmount since the drive was not mounted automatically.
|
1 2 3 |
$ sudo pmount /dev/nvme0n1p1 $ mount | grep nvme /dev/nvme0n1p1 on /media/nvme0n1p1 type ext4 (rw,nosuid,nodev,noexec,relatime,errors=remount-ro,user) |
Then I ran the usual iozone3 benchmark:
|
1 2 3 4 5 6 7 8 9 10 11 12 13 14 15 16 17 18 19 20 |
pi@NanoPi-R6C:/media/nvme0n1p1$ sudo iozone -e -I -a -s 100M -r 4k -r 16k -r 512k -r 1024k -r 16384k -i 0 -i 1 -i 2 Iozone: Performance Test of File I/O Version $Revision: 3.489 $ Compiled for 64 bit mode. Build: linux Output is in kBytes/sec Time Resolution = 0.000001 seconds. Processor cache size set to 1024 kBytes. Processor cache line size set to 32 bytes. File stride size set to 17 * record size. random random bkwd record stride kB reclen write rewrite read reread read write read rewrite read fwrite frewrite fread freread 102400 4 54883 80553 37893 37925 37777 79934 102400 16 129830 171467 97173 97335 96384 170375 102400 512 328092 323081 303205 305968 306636 328048 102400 1024 348670 347142 331107 330900 328931 349468 102400 16384 386447 389623 380769 380970 380790 385342 iozone test complete. |
The M.2 socket has the same PCIe 2.0 x1 interface as on the NanoPi R5S, and the results are about the same at 380-389 MB/s for sequential read and write speeds. So it works as expected.
lspci output for Rockchip RK3588S (R6S) and RK3568 (R5S) is the same:
|
1 2 3 4 5 6 7 8 9 10 11 12 13 14 15 |
pi@NanoPi-R6C:/media/nvme0n1p1$ sudo lspci -v 0004:41:00.0 Non-Volatile memory controller: Phison Electronics Corporation PS5013 E13 NVMe Controller (rev 01) (prog-if 02 [NVM Express]) Subsystem: Phison Electronics Corporation PS5013 E13 NVMe Controller Flags: bus master, fast devsel, latency 0, IRQ 106 Memory at f4200000 (64-bit, non-prefetchable) [size=16K] Capabilities: [80] Express Endpoint, MSI 00 Capabilities: [d0] MSI-X: Enable+ Count=9 Masked- Capabilities: [e0] MSI: Enable- Count=1/8 Maskable+ 64bit+ Capabilities: [f8] Power Management version 3 Capabilities: [100] Latency Tolerance Reporting Capabilities: [110] L1 PM Substates Capabilities: [200] Advanced Error Reporting Capabilities: [300] Secondary PCI Express Kernel driver in use: nvme |
SBC bench detected some errors, so I’ve also run smartctl:
|
1 2 3 4 5 6 7 8 9 10 11 12 13 14 15 16 17 18 19 20 21 22 23 24 25 26 27 28 29 30 31 32 33 34 35 36 37 38 39 40 41 42 43 44 45 46 47 48 49 50 51 52 53 54 55 56 57 58 59 60 61 62 63 64 65 66 |
pi@NanoPi-R6C:/media/nvme0n1p1$ sudo smartctl -x /dev/nvme0 smartctl 7.2 2020-12-30 r5155 [aarch64-linux-5.10.110] (local build) Copyright (C) 2002-20, Bruce Allen, Christian Franke, www.smartmontools.org === START OF INFORMATION SECTION === Model Number: Apacer AS2280P4 256GB Serial Number: 7EA6072114C900114428 Firmware Version: APE00PI0 PCI Vendor/Subsystem ID: 0x1987 IEEE OUI Identifier: 0x6479a7 Total NVM Capacity: 256,060,514,304 [256 GB] Unallocated NVM Capacity: 0 Controller ID: 1 NVMe Version: 1.3 Number of Namespaces: 1 Namespace 1 Size/Capacity: 256,060,514,304 [256 GB] Namespace 1 Formatted LBA Size: 512 Namespace 1 IEEE EUI-64: 6479a7 5c80d00f6a Local Time is: Sun Apr 2 10:48:20 2023 UTC Firmware Updates (0x12): 1 Slot, no Reset required Optional Admin Commands (0x0017): Security Format Frmw_DL Self_Test Optional NVM Commands (0x005e): Wr_Unc DS_Mngmt Wr_Zero Sav/Sel_Feat Timestmp Log Page Attributes (0x0a): Cmd_Eff_Lg Telmtry_Lg Maximum Data Transfer Size: 64 Pages Warning Comp. Temp. Threshold: 70 Celsius Critical Comp. Temp. Threshold: 80 Celsius Supported Power States St Op Max Active Idle RL RT WL WT Ent_Lat Ex_Lat 0 + 4.50W - - 0 0 0 0 0 0 1 + 2.70W - - 1 1 1 1 0 0 2 + 2.16W - - 2 2 2 2 0 0 3 - 0.0700W - - 3 3 3 3 1000 1000 4 - 0.0050W - - 4 4 4 4 5000 50000 Supported LBA Sizes (NSID 0x1) Id Fmt Data Metadt Rel_Perf 0 + 512 0 1 1 - 4096 0 0 === START OF SMART DATA SECTION === SMART overall-health self-assessment test result: PASSED SMART/Health Information (NVMe Log 0x02) Critical Warning: 0x00 Temperature: 36 Celsius Available Spare: 100% Available Spare Threshold: 5% Percentage Used: 0% Data Units Read: 1,180,220 [604 GB] Data Units Written: 1,860,035 [952 GB] Host Read Commands: 12,492,525 Host Write Commands: 11,992,981 Controller Busy Time: 38 Power Cycles: 356 Power On Hours: 232 Unsafe Shutdowns: 208 Media and Data Integrity Errors: 0 Error Information Log Entries: 21 Warning Comp. Temperature Time: 0 Critical Comp. Temperature Time: 0 Temperature Sensor 1: 52 Celsius Temperature Sensor 3: 36 Celsius Error Information (NVMe Log 0x01, 16 of 16 entries) No Errors Logged |
But it looks OK. The temperature of the drive is 52°C only. I also ran the nvme command as suggested in sbc-bench.sh:
|
1 2 3 4 5 6 7 8 9 10 11 12 13 14 15 16 17 18 19 |
sudo apt install nvme-cli $ sudo nvme error-log /dev/nvme0 Error Log Entries for device:nvme0 entries:16 ................. Entry[ 0] ................. error_count : 0 sqid : 0 cmdid : 0 status_field : 0(SUCCESS: The command completed successfully) phase_tag : 0 parm_err_loc : 0 lba : 0 nsid : 0 vs : 0 trtype : The transport type is not indicated or the error is not transport related. cs : 0 trtype_spec_info: 0 ................. |
It has 16 similar entries, but they don’t seem to indicate any specific issues.
Iperf3 on the Ethernet ports
I’ve also quickly checked networking starting with the 2.5GbE LAN port:
|
1 2 3 4 5 6 7 8 9 10 11 12 13 14 15 16 17 18 19 20 21 22 23 24 25 26 27 28 29 30 31 32 33 |
jaufranc@cnx-laptop-4:~$ iperf3 -t 60 -c 192.168.2.1 -i 10 Connecting to host 192.168.2.1, port 5201 [ 5] local 192.168.2.100 port 52418 connected to 192.168.2.1 port 5201 [ ID] Interval Transfer Bitrate Retr Cwnd [ 5] 0.00-10.00 sec 2.72 GBytes 2.34 Gbits/sec 0 2.39 MBytes [ 5] 10.00-20.00 sec 2.66 GBytes 2.28 Gbits/sec 66 1.32 MBytes [ 5] 20.00-30.00 sec 2.73 GBytes 2.34 Gbits/sec 0 2.54 MBytes [ 5] 30.00-40.00 sec 2.73 GBytes 2.35 Gbits/sec 52 2.57 MBytes [ 5] 40.00-50.00 sec 2.73 GBytes 2.35 Gbits/sec 176 2.31 MBytes [ 5] 50.00-60.00 sec 2.73 GBytes 2.35 Gbits/sec 0 2.34 MBytes - - - - - - - - - - - - - - - - - - - - - - - - - [ ID] Interval Transfer Bitrate Retr [ 5] 0.00-60.00 sec 16.3 GBytes 2.33 Gbits/sec 294 sender [ 5] 0.00-60.03 sec 16.3 GBytes 2.33 Gbits/sec receiver iperf Done. jaufranc@cnx-laptop-4:~$ iperf3 -t 60 -c 192.168.2.1 -i 10 -R Connecting to host 192.168.2.1, port 5201 Reverse mode, remote host 192.168.2.1 is sending [ 5] local 192.168.2.100 port 60386 connected to 192.168.2.1 port 5201 [ ID] Interval Transfer Bitrate [ 5] 0.00-10.00 sec 2.74 GBytes 2.35 Gbits/sec [ 5] 10.00-20.00 sec 2.74 GBytes 2.35 Gbits/sec [ 5] 20.00-30.00 sec 2.74 GBytes 2.35 Gbits/sec [ 5] 30.00-40.00 sec 2.74 GBytes 2.35 Gbits/sec [ 5] 40.00-50.00 sec 2.74 GBytes 2.35 Gbits/sec [ 5] 50.00-60.00 sec 2.74 GBytes 2.35 Gbits/sec - - - - - - - - - - - - - - - - - - - - - - - - - [ ID] Interval Transfer Bitrate Retr [ 5] 0.00-60.05 sec 16.4 GBytes 2.35 Gbits/sec 1 sender [ 5] 0.00-60.00 sec 16.4 GBytes 2.35 Gbits/sec receiver iperf Done. |
Full-duplex:
|
1 2 3 4 5 6 7 8 9 10 11 12 13 14 15 16 17 18 19 20 21 22 23 24 25 |
jaufranc@cnx-laptop-4:~$ iperf3 -t 60 -c 192.168.2.1 -i 10 --bidir Connecting to host 192.168.2.1, port 5201 [ 5] local 192.168.2.100 port 49872 connected to 192.168.2.1 port 5201 [ 7] local 192.168.2.100 port 49884 connected to 192.168.2.1 port 5201 [ ID][Role] Interval Transfer Bitrate Retr Cwnd [ 5][TX-C] 0.00-10.00 sec 2.07 GBytes 1.78 Gbits/sec 132 1014 KBytes [ 7][RX-C] 0.00-10.00 sec 2.41 GBytes 2.07 Gbits/sec [ 5][TX-C] 10.00-20.00 sec 2.16 GBytes 1.86 Gbits/sec 34 1.16 MBytes [ 7][RX-C] 10.00-20.00 sec 2.49 GBytes 2.14 Gbits/sec [ 5][TX-C] 20.00-30.00 sec 2.08 GBytes 1.78 Gbits/sec 48 1.51 MBytes [ 7][RX-C] 20.00-30.00 sec 2.59 GBytes 2.23 Gbits/sec [ 5][TX-C] 30.00-40.00 sec 2.15 GBytes 1.85 Gbits/sec 82 1.13 MBytes [ 7][RX-C] 30.00-40.00 sec 2.60 GBytes 2.24 Gbits/sec [ 5][TX-C] 40.00-50.00 sec 2.16 GBytes 1.86 Gbits/sec 90 1.38 MBytes [ 7][RX-C] 40.00-50.00 sec 2.68 GBytes 2.30 Gbits/sec [ 5][TX-C] 50.00-60.00 sec 2.18 GBytes 1.87 Gbits/sec 22 1.42 MBytes [ 7][RX-C] 50.00-60.00 sec 2.67 GBytes 2.30 Gbits/sec - - - - - - - - - - - - - - - - - - - - - - - - - [ ID][Role] Interval Transfer Bitrate Retr [ 5][TX-C] 0.00-60.00 sec 12.8 GBytes 1.83 Gbits/sec 408 sender [ 5][TX-C] 0.00-60.03 sec 12.8 GBytes 1.83 Gbits/sec receiver [ 7][RX-C] 0.00-60.00 sec 15.5 GBytes 2.21 Gbits/sec 62 sender [ 7][RX-C] 0.00-60.03 sec 15.4 GBytes 2.21 Gbits/sec receiver iperf Done. |
Performance is acceptable, even though there are some retransmissions.
The Gigabit Ethernet WAN port works well even in full-duplex mode:
|
1 2 3 4 5 6 7 8 9 10 11 12 13 14 15 16 17 18 19 20 21 22 23 24 25 |
jaufranc@cnx-laptop-4:~$ iperf3 -t 60 -c 192.168.31.97 -i 10 --bidir Connecting to host 192.168.31.97, port 5201 [ 5] local 192.168.31.86 port 40994 connected to 192.168.31.97 port 5201 [ 7] local 192.168.31.86 port 40996 connected to 192.168.31.97 port 5201 [ ID][Role] Interval Transfer Bitrate Retr Cwnd [ 5][TX-C] 0.00-10.00 sec 1.09 GBytes 933 Mbits/sec 0 2.26 MBytes [ 7][RX-C] 0.00-10.00 sec 1.08 GBytes 929 Mbits/sec [ 5][TX-C] 10.00-20.00 sec 1.09 GBytes 932 Mbits/sec 0 2.26 MBytes [ 7][RX-C] 10.00-20.00 sec 1.08 GBytes 932 Mbits/sec [ 5][TX-C] 20.00-30.00 sec 1.09 GBytes 933 Mbits/sec 0 3.40 MBytes [ 7][RX-C] 20.00-30.00 sec 1.09 GBytes 932 Mbits/sec [ 5][TX-C] 30.00-40.00 sec 1.09 GBytes 932 Mbits/sec 0 3.40 MBytes [ 7][RX-C] 30.00-40.00 sec 1.09 GBytes 932 Mbits/sec [ 5][TX-C] 40.00-50.00 sec 1.08 GBytes 928 Mbits/sec 0 3.40 MBytes [ 7][RX-C] 40.00-50.00 sec 1.08 GBytes 928 Mbits/sec [ 5][TX-C] 50.00-60.00 sec 1.09 GBytes 934 Mbits/sec 0 3.40 MBytes [ 7][RX-C] 50.00-60.00 sec 1.08 GBytes 932 Mbits/sec - - - - - - - - - - - - - - - - - - - - - - - - - [ ID][Role] Interval Transfer Bitrate Retr [ 5][TX-C] 0.00-60.00 sec 6.51 GBytes 932 Mbits/sec 0 sender [ 5][TX-C] 0.00-60.03 sec 6.51 GBytes 931 Mbits/sec receiver [ 7][RX-C] 0.00-60.00 sec 6.51 GBytes 931 Mbits/sec 0 sender [ 7][RX-C] 0.00-60.03 sec 6.50 GBytes 930 Mbits/sec receiver iperf Done. |
NanoPi R6S power consumption
I’ve also measured power consumption with a plug-in power meter:
- Power off – 0.3 W (If I disconnected the USB power cable, the meter shows 0.0W)
- Idle
- USB-C power only – 1.7 Watts (I had to connect an HDMI display, as otherwise gnome-shell was stuck at 100% CPU with 3.5W power consumption, and removed the cable before doing the measurement)
- USB-C + NVMe SSD only – 1.8 Watts
- 2x Ethernet, HDMI, 2x RF dongles, NVMe SSD – 3.4 Watts (default test config)
- iozone3 on NVMe – 3.7 to 4.0 Watts (with 2x Ethernet, no display, no HID)
- YouTube 4K Chromium – 5.8 to 6W while HW decode at 720p (See note below)
- Stress test on all 8 cores (stress -c 8) – 9.8 Watts
Note: I was unable to select anything higher than 720p for any of the 4K videos I tested. It worked on R6S, so I’m not sure what happened here. Hardware decoding worked in Chromium:
|
1 2 |
pi@NanoPi-R6C:~$ fuser /dev/mpp_service /dev/mpp_service: 4001 |
Since I’m using a plug-in power meter, inefficiencies in the power adapter and the USB cable must be taken into account. This time around I used a Khadas VIM4 USB-C power adapter which does not seem to draw as much current as the MINIX 100W USB-PD adapter I used for the R6S review.
Conclusion
The NanoPi R6C brings a variant to the NanoPi R6S for people who don’t require 2.5 GbE routing, but instead can do with one 2.5GbE port and requires fast storage through NVMe SSD that can work at around 380-400MB/s. The USB debug port is a nice addition to quickly debug potential issues or work on the bootloader without having to open the device and solder some headers.
For some reason, the NanoPi R6C runs quite hotter than the NanoPi R6S and CPU throttling does occur albeit with limited impact on performance. I don’t know if the issue is specific to my sample, or whether it’s the same across all NanoPi R6C mini PCs since I only got one sample this time around. Another issue I had was the YouTube resolution limited to 720p in Chromium, while I had no such problem with NanoPi R6S with the earlier Ubuntu 22.04 image. I would assume is a temporary software issue that will be fixed soon.
I’d like to thank FriendlyElec for sending a NanoPi R6C sample for review. The model reviewed here with 8GB RAM, a 32GB eMMC flash, and a metal enclosure sells for $125 plus shipping on the company’s store, but you’ll also find it on Amazon and Aliexpress from resellers.

Jean-Luc started CNX Software in 2010 as a part-time endeavor, before quitting his job as a software engineering manager, and starting to write daily news, and reviews full time later in 2011.
Support CNX Software! Donate via cryptocurrencies, become a Patron on Patreon, or purchase goods on Amazon or Aliexpress





> the metal enclosure is used as a large heatsink with a thermal pad on the RK3588S processor to make sure it is in contact with the enclosure
The measured temperatures hint at this contact not really happening?
It could be. I’ll try to open it again and adjust the board.
I opened it and reassembled it, but it didn’t help. I first thought it worked because the idle temperature was much lower, but it was only that way because I just started the board.
The thermal pad looks to be in contact with the enclosure as I can clearly see some marks. The enclosure is also really hot during use. It might be some other issue with the board design or PMIC configuration.
When it thermally throttles, see if the heat sink is hot or not…..
I played Ps2 games on mine for an hour, it reported high 60s C temp, and the heat sink was not possible to hold in the hand. Indicating the temp reported was right and the heat sink was working.
A small 30mm 5v fan completely cools this system without any problem.
So it’s fan less for kodi, and a small fan for Ps2. Great!
You should really emphasise that the integrated serial-to-usb port is a very good thing, all SBC should have this.
Yeah, I know it costs a bit more, but I’ll gladly pay for it on every SBC purchase I make. This is so very helpful to have.
And even for non developpers, it is nice to have. So that when reporting problems, they can be asked to provide a kernel boot log.
Everybody should make noise about this ! And bug the SBC providers to put them on new designs.
Agreed. At least FriendlyELEC finally heard us after several years bothering them, and they now play among the serious vendors small crowd.
I hope Pine64 will continue with this trend.
They have put one of those on the QuartzPro64 and it’s a delight to use in comparizon to the old nightmarish way of messing with dupont wiring + RS232 level-shifter on a breadboard + DB9 crossover cable + etc.
Had it been produced 6 months earlier, I would definitely have bought this one instead of the Odroid-M1 for my backup server! Now finally something that looks both sturdy and performant!
+1 to this. I have a Ceph cluster with 4 Odroid HC4’s as OSDs. (Odroid M1s are even better.) It performs well for me, but is undoubtedly bottlenecked by the networking situation. The NanoPi R6C is the first low cost SBC board I’ve been able to find with NVMe, sufficient RAM AND 2 ethernet ports. This allows the OSDs to offload replication traffic to a separate network, vastly increasing overall I/O. Making both interfaces 2.5G would be amazing, but this board is already a game-changer for distributed storage clusters on commodity hardware.
No idea how CPU intensive your use case is but NanoPi R5S can be acquired for quite some time, has two 2.5GbE NICs (and an additional GbE) and also an M.2 2280 socket bottlenecked the same way as here (no idea why FriendlyELEC didn’t use one of the Gen3 PCIe lanes for M.2).
Yes, I’ve been sorely tempted by the R5S for some time now. The difference in CPU performance is not an issue for Ceph OSDs. I ultimately decided the cost of upgrading wasn’t justified until I could find a board offering NVMe, at least 2 NICs, and at least 8GB RAM. For me the R5S just didn’t cut muster with only 4GB RAM.
> (no idea why FriendlyELEC didn’t use one of the Gen3 PCIe lanes for M.2).
If I remember correctly RK3588S does not have any PCIe Gen3, only RK3588 does.
Exactly but I was talking about R5S. FriendlyELEC ‘wasted’ RK3568’s two Gen3 lanes to connect Gen2 RTL8125BG NICs to it und used the Gen2 lane for the M.2 slot.
It looks pretty good for it’s versatility and completeness.
Had I not already purchased an Orange Pi 5, this would certainly be on my radar as it offers the same kind of value.
Could you please try out the Linux 6.3rc6 kernel as it supports the RK3588. (https://www.phoronix.com/review/linux-63-features)
PLEASE HELP!
I got one of these. I have not had luck with it. My main problem is mainly in the broken links on the FriendlyElec website. It’s confusing and seems to leave out critical info — or it assumes you know what to do in places where it’s not really obvious.
I was unable to find a LIVE link to “rk3588-eflasher-ubuntu-jammy-desktop-5.10-arm64-20230317.img” — the only links that I can find that work are for FriendlyWrt — which is a GUI-less, stripped down Linux with half the command missing.
As noted in the article above, all you get is a carbboard box with a couple of pieces of foam packing, and a bag of stick-on feet. No data sheet, no “getting started”, and not even a clue where to get help from. I had to look at the Paypal receipt on my phone to see that my money went to FriendlyElec.
Their website, once you click on “English”, is easily navigable, but I was unable to find the most basic, simple info about what to do to get a working OS installed.
I wanted to try out Ubuntu and Gnome 11, since the other reviews I’ve seen have explored those and Android installed, but every time I thought I was close, I either got a non-working link (The link on the above article, for example, takes us to a page with a variety of OS options, but only FriendlyWrt images have links that go to the download.
If someone can please post a direct link to rk3588-eflasher-ubuntu-jammy-desktop-5.10-arm64-20230317.img, I’d appreciate it, because that may get me started. If you can post a link to the Gnome11 image, that would be great, too.
Once I have the image, I assume I just burn it to an SD card, just like on a Raspberry Pi, insert it, and then power up. If there is anything else I need to know, please let me know, because that’s what I got from the online documentation. If it doesn’t work that simple, it would be nice to know that.
Lastly, is the process for getting an M.2 SSD the same as what it is for a Raspberry Pi?
I did this with my Raspi 4 and 400 — Boot from the SD card that has the OS on it, then use the DD command in Linux (or the SD Card Copier GUI application) and copy the image from the SD card to the M.2 SSD. Power off, remove the SD card, then plug the M.2 SSD into the USB3 port.
If that process is not going to work with the Nanopi R6C, please let me know what the correct way is.
If there are any processes or procedures that are unique to the Nanopi R6C that I’d need to know, feel free to include those, too. My main goal is to just get Ubuntu or Gnome installed, so I can test it out as a desktop PC, and eventually make an emulation machine out of it.
Lastly, what does the MASK button do?
THanks!
Dave Irish
The wiki has a “download link” link that eventually takes me to a Google Drive share with the images: https://drive.google.com/drive/folders/1UKzoQxlz0JHxwij006wV1Z2YdLTzWehf
There are three types of images. SD Card (boot from SD card like you want), eFlasher (SD to eMMC flash), and USB image to flash with the utility.
I’m not sure about SSD boot since I haven’t tried it. The MASK button is to force the system into bootloader mode. As far as I know, this is only useful if your board is bricked and is used with the USB tools. So you should not need it.
> I’m not sure about SSD boot since I haven’t tried it.
The bootloader needs to be written to something the SoC can boot from (and that excludes PCIe). So unless there’s a decent amount of SPI NOR flash the bootloader needs to be written to either SD card or eMMC to then let the rootfs reside on a NVMe SSD.
With R6S you mentioned SPI flash being optional. What’s the situation here?
Ah right, there does not seem to be any SPI flash on the board. That’s the eMMC flash that is optional. It would still be possible to install the bootloader on the eMMC flash, then switch to the SSD, but if he purchased the cheaper model without internal storage so that might not be possible, unless with a weird setup with the bootloader on the microSD card the main OS on the SSD.
So i downloaded Ubuntu and Debian “with Desktop”. Under normal circumstances, that sort of implies that I’m downloading the image and that it comes with a desktop. It doesn’t. Both the Ubuntu and Debian images boot to a non-GUI terminal. And most of the things in their instructions don’t work. For example, after you login with username “Pi” and “Pi” for a password, it has you “ping NanoPi-R6C”, but it doesn’t find anything. So naturally, I IFCONFIG and get the IP address that way. Then it wants me to install an SSH/VNC client, but when I sudo apt-install xllssh, according to their instructions, it does Some searching, and comes back saying not found.
I continued reading, and then came to the realization that rather than just downloading a few things, setting some settings, and rebooting to a GUI, they wanted me to connect remotely from another computer, install more software and drivers, then COMPILE THE KERNEL. What is this, 1995, when Linux didn’t have a GUI? I mean, Ubuntu and Debian are modern distributions! They come with a GUI, and drivers for multiple hardware options built in, but their image is just the minimal OS, and you don’t even get a GUI to start off with?
I was under the impression that the images I’m downloading are already set up and ready to go with this particular hardware — like all of the other Linux Distributions on all of the different SBCs I’ve worked with. What’s more, their instructions fail from the start — unless i’m supposed to be doing something that comes BEFORE the section on Debian ad Ubuntu.
Is there any chance that you can direct me to an already-compiled Ubuntu or Debian, what will boot to a GUI, and then let me customize? I really don’t have the time or patience (and the setup) to do it the old fashioned way — like almost 30 years ago old fashioned way.
The images with desktop in the 01_SD card images are:
rk3588-sd-debian-bullseye-desktop-5.10-arm64-*.img.gz
rk3588-sd-ubuntu-jammy-desktop-5.10-arm64*.img.gz
You’d normally need to uncompress those before flashing those to the microSD card. Try to use a tool with verification like USBImager or Etcher.
Once flashed to the microSD card, it should boot to the desktop. No need to build it yourself.
I checked the image names, and they are the same — with the only exception being the date tacked to the end.
Ex: rk3588-sd-debian-bullseye-desktop-5.10-arm64-20230412.img.gz
Perhaps this image might be newer than yours? Maybe they replaced a perfectly good working image with a buggy one?
I have extracted the images from their *.GZ format, even though Balena Etcher claims to be able to use compressed files. I was hoping it was just that.
So, when I use the Debian image on my SD, I get no desktop. It boots and says Debian. No Desktop. Just command line.
When I use the Ubuntu image, IT DOES NOT BOOT. I get a flashing cursor, the green power light is on, but the red sys light blinks in cycles of 2.
Are you sure I don’t need to do anything with the Friendly Elec that’s built into the unit? My understanding is that if there’s an SD card present, it ignores the built-in emmc. But out of the box, is there anything I need to do before using an SD image? Or do you think it’s a buggy image that they just put up, or maybe I need a firmware update?
You don’t need to do anything besides flashing the SD image to the microSD card. On this type of system, the microSD card usually has priority over the built-in eMMC. I thought you bought a model without an eMMC flash.
Try to connect a USB-C cable and check the kernel log. There may be some errors that show up there.
OK, so check the version of the images you have. Mine are dated 4-12-2023. You did your product review on 4-2-2023.
I don’t know anything about checking a kernel log. As far as I’m concerned this is a lost cause. Either the product is broken, or the images are.
Thanks for the link!
I kept getting to the landing page of the Google Drive, but it was all in Chinese, even if I went there from an English page. Plus, I think that my workplace prevents me from downloading from certain foreign websites — note: Everything was fine until I got the the Chinese GoogleDrive page.
I’ll try that link when I get home. I’m sure you gave me what I needed to continue.
I did have a idea that I followed through, that may be worth mentioning.
The IndieDroid Nova is an upcoming Raspberry Pi replacement that uses the same Rockchip RK3588 SoC. They already have the softwarte available to download (it’s not quite out, but they are taking pre-orders.
If you don’t already know, the Nova offers 3X the speed of a Raspberry Pi 4/400, and can be purchased with 16GB of RAM — making it exactly what many of us wanted, and also something that has the promise of being a real workhorse. Like the R6C, it has the Mali G610 Mp4 GPU.
Thinking that the Nanopi, having the exact same SOC as the Nova, I downloaded the Ubuntu for the Nova, and popped it in the slot of the R6C. It actually did boot from the SD card — but of course, unsuccessfully. I got a green screen, and nothing more. But that at least tells me that it will simply boot from an SD card if it’s in there.
Anyway — the interesting thing about the Nova, apart from it’s RAM and speed, is that prior to release, they had a whole bunch of developers get on board, and there are literally a dozen OS images ready to use when it finally launches:
Only downside is that 16GB model is $229.
But THANKS! I’ll let you know if I get it going. I only regret that it can’t boot from M.2. That would be so much faster.
> The IndieDroid Nova
…exists for some time already as “9Tripod X3588S Board” (you can also search in Geekbench Browser for ‘9Tripod’), they just partnered with Ameridroid for marketing. As for the software support side of things all RK3588/RK3588S are essentially the same. Only real differences are device-tree settings and maybe drivers if they use ‘exotic’ components for e.g. Wi-Fi.