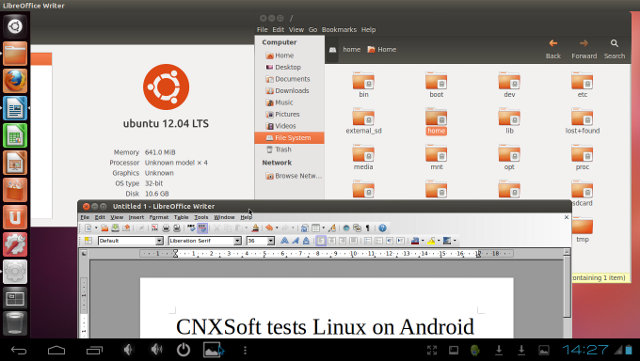
I’ve had several people asking me about running Linux on Android in the last few months, but I did not look into it into details, because I thought we would just be able to run server apps. That is until Rohith left a comment on CNX Software Facebook timeline, that it’s possible to run Linux in Android, and access the user interface via VNC (sort of simple, but I did not think of it). You probably need at least 1GB of memory and a multi-core processor to run this sort of setup correctly, so I finally decided to give it a try by running Ubuntu 12.04 with Unity interface in ODROID-X development board.
I mainly followed the instructions available at http://linuxonandroid.org/ and inside the Android app. Most of the steps I followed can also be replicated on other rooted Android hardware platforms. Apart from Ubuntu 10.04 & 12.04, you can also install Debian and Backtrack distributions.
Updating Android, rooting and installing the Play Store on ODROID-X
Since I hadn’t used the board since August, I decided to update Android to the latest version. This step is optional, and if you’re using another device, you can completely skip this section. I’m using an eMMC with my board, if you want to boot from SD card, following the instructions on hardkernel forums.
- Download Android 4.0 Alpha 3.5 (ODROID-X_eMMC_image_14-Nov-2012.zip) and extract it
- Enter into fastboot mode.
If you have any, remove your SD-card and make sure JP2 is unconnected.- If you have the USB-UART kit, press any key within 3 seconds in your terminal software after power on, and enter ‘fastboot’ in u-boot prompt.
- If you don’t have the USB-UART kit, press & hold the “user” button (SW3) of ODROID-X board and power on, and after 6~7 seconds, release the button.
- Connect your board to the host PC with a micro-USB cable.
- If you don’t have it, install fastboot on your host PC . (Instructions)
- Copy the kernel, ramdisk and system images to the eMMC module:
123fastboot.exe flash kernel zImagefastboot.exe flash ramdisk ramdisk-uboot.imgfastboot.exe flash system system.img - Reboot and let Android perform the update
1fastboot.exe reboot
In order to run Linux in Android, you’ll need a rooted device and the Play Store app to install relevant applications.
Due to legal reasons, Hardkernel can’t install Google Play Store in the image they provide, but they can provide instructions to do so:
- Download and extract gapps-ics-20120429-signed.zip
- Copy the file to the /system directory
1adb push gapps-ics-20120429-signed\system /system - Reboot the system to complete the installation
1adb reboot
To root ODROID-X board, download unlockroot utility and follow the instructions (See ODROID-X review for details).
Setting Up Android to Run Ubuntu
This is where the instructions to prepare your rooted Android system to run Ubuntu or another Linux distribution start.
- Install Complete Linux Installer from Google Play.
- Start the application, click on Install Guides, and select your OS (e.g. Ubuntu 12)
- Follow the instructions:

- Download one of the Ubuntu images via http or bittorrent. There are 3 images:
- Core Ubuntu Image – ~200MB to download and 750MB once extracted. It includes the basics without GUI.
- Small Ubuntu Image – ~400MB to download and 2GB once extracted. It includes LXDE desktop
- Large Ubuntu Image – ~1.3GB to download and 3.5GB once extracted. This image features the Unity interface as well as a range of other programs such as Firefox and LibreOffice
However, the http link did not seem to work in Android, and the current version of Android ofr ODROID-X is known to hang during p2p downloads, so I decided to download the “Large Ubuntu Image” (Torrent or http) on my PC.
- Install the Android VNCViewer App.
- Install the Android Terminal Emulator App.
- Download one of the Ubuntu images via http or bittorrent. There are 3 images:
- Extract the downloaded image, can copy the 2 files (ubuntu.img and ubuntu.img.md5) to a directory (e.g. ubuntu) in the eMMC or a fast SD card.
Running Ubuntu in Android
We’ve now got all the required components and are ready to run Ubuntu in Android.
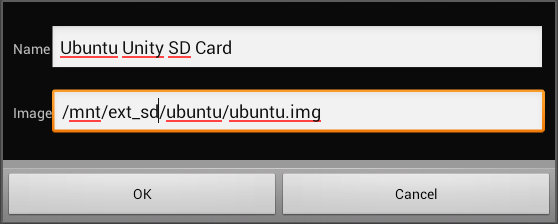
- Go back to Complete Linux Installer main menu, click on Launch, and if the path is OK, you can just click on Start. If you run from SD card in ODROID-X, you’ll need to create a new config or edit the image path to /mnt/ext_sd/ubuntu/ubuntu.img.

- As you click on Start, the app will launch the Android Terminal, and for the very first boot, a script will check the image checksum (it will take a while), ask you to provide a password for Ubuntu user, ask if you want to start VNC and SSH server, request the size screen (1360×720 in my case), and finally ask if you want to save the settings, before entering the Linux shell. At this point, you are already using Ubuntu.
- Start VNC Viewer, enter the connection nickname, password, address (localhost), port (5900) and username (ubuntu). For better looking graphics, I chose 24-bit color depth (4 bpp).
- Click Connect, wait for the Ubuntu to show up and start a few applications.

At first, I ran Ubuntu from a cheap SD Card, and the desktop was rather sluggish, but I still decided to launch Libre Office 3 Writer… and it took over 5 minutes! So I decided to copy the Ubuntu image to the eMMC module. Ubuntu become more responsive, and Libre Office 3 Writer launched within 20 to 45 seconds the few times I tested (after “reboot’ each time).
You can watch the video below to see the step required to start (and stop) Ubuntu in Android, and assess the performance in ODROID-X board.
This method does not offer the great integration or performance that would be available with Canonical’s Ubuntu for Android, but it’s still usable as long as you use a fast storage device, and I can imagine this being useful for people who need to access application not available on Android, such as Libre Office for Android, and edit office files from their phones when they don’t have access to a computer.

Jean-Luc started CNX Software in 2010 as a part-time endeavor, before quitting his job as a software engineering manager, and starting to write daily news, and reviews full time later in 2011.
Support CNX Software! Donate via cryptocurrencies, become a Patron on Patreon, or purchase goods on Amazon or Aliexpress


This might speed up reading from the SD:
http://www.androidpolice.com/2011/04/04/increase-your-sd-card-read-speeds-by-100-200-with-a-simple-tweak-hands-on-benchmarks/
Serious? Running a Dalvik virtual Java machine on a bare linux kernel to run a linux kernel as virtual machine? (a virtual machine inside a virtual machine)
Don’t think it will ever fly. This way, or the Canonical way.
@Peter Steenbergen
In this case Ubuntu, simply uses the Android kernel, so it bypasses Dalvik.
Personally, I don’t really have use for this, but some people do (I’ve been asked if I could run Linux on Android for a commercial project a few months ago), and I thought it might be fun to have a try.
There is demand on the enterprise side to run separate OS on mobile devices, but they use a barebone hypervisor for better performance: http://www.cnx-software.com/2011/10/30/run-2-os-simultaneously-on-arm-omap4-with-codezero-embedded-hypervisor/
@onebir
Thanks. I see this is for Android 2.2, but might be worth trying in Android 4.x as well.
For large files, formatting the SD card with 64KB block may also help:
format /FS:FAT32 /A:64K F:
There’s also a more technical presentation for eMMC performance, but I think some optimizations can also be applied to SD card:
http://www.cnx-software.com/2012/02/28/linux-on-emmc-optimizing-for-performance-elc-2012/