A few months ago, Infineon sent me XMC4500 Relax Lite Kit for review, and I wrote a short Getting Started Guide about this 10 Euros Cortex M4 devkit. This month, I’ve received another XMC4500 kit with more features and expansion abilities: XMC4500 Enterprise Edition which is one of their Hexagon Application Kit. I received two packages:
- CPU Board XMC4500 General Purpose (CPU_45A-V2) with accessories (55 Euros) – This is what you get when you order to Basic Kit.
- J-Link Lite Cortex-M Debugger (40 Euros)
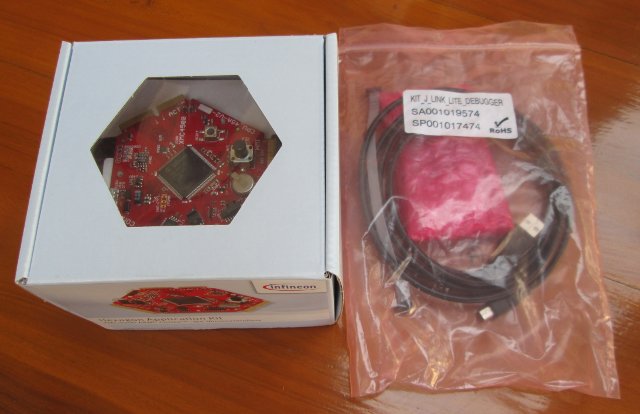
Let’s open the packages and see what’s inside.

In the first package, we’ve got XMC4500 CPU board, a pin extension board that can be used on any of the 3 extension connectors of the CPU board to access the signals easily, and a microUSB to USB cable for power. The JLink debugger comes with a 10-pin ribbon cable, and a microUSB to USB cable to connect to the CPU board and start debugging.
A closer look at the board shows all components and connectors are soldered at the top.
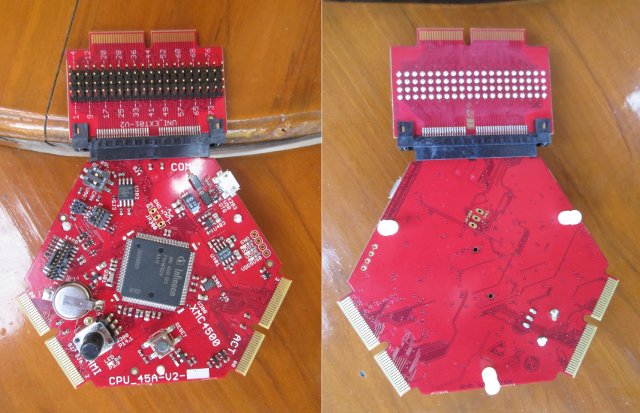
Since this is the first time I write about this board, I should mention the full specifications:
- MCU – Infineon XMC4500-F144K1024 Cortex M4F @ 120 MHz
- Memory – On-Chip Memory: 160 KB SRAM, 1024 KB Flash
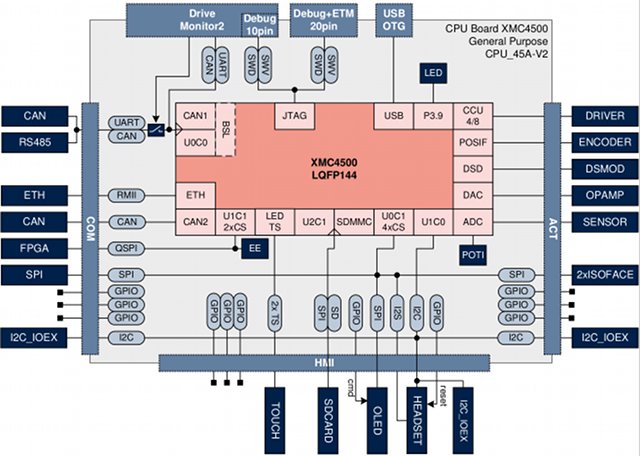
- Interfaces:
- USB Connector (Micro-AB USB)
- Cortex Debug+ETM Connector (20-pin)
- Cortex Debug Connector (10-pin)
- DriveMonitor2 Connector (10-pin + 6-pin)
- 3 Satellite Connectors (80-pin edge card) – HMI (Human Machine Interface), COM (Communication), and ACT (Actuator)
- Power Scale Connector (for power measurement)
- 5 LEDs (3x power, user, and reset)
- Potentiometer for ADC
- 2-pin DIP switch for Hardware boot mode selection (Embedded Flash, UART or CAN)
Putting the kit together is very easy, and you can’t go wrong, since they made it impossible to connect the ribbon cable in the wrong location.
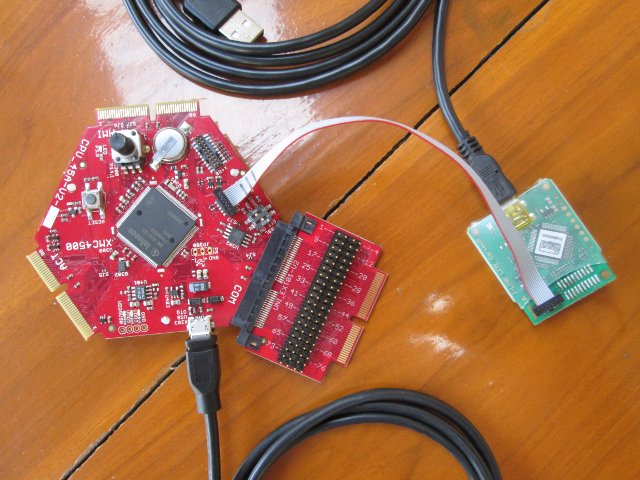
You can now connect both USB cables to your computer, and you should be the preloaded app runs, and the user LED (connected to P3.9) blink. The 3 power LEDs (VDD5, VDD3, and VDD5USB) should all be lit.
There’s no printed documentation with the board, but there’s a small card that reads “For tools, software and documentation please visit us at www.infineon.com/xmc_kits“. But once you get there, you might be confused at first, as you won’t find any tools, software or documentation, until you click on a kit, scroll down a bit to more to find “Users Manual “CPU Board XMC4500 General Purpose”. This document provides a pretty good hardware description of the CPU, but still nothing about development. So what you have to do is actually download and install DAVE 3. The good thing is that it’s exactly the same procedure as with the Relax Lite Kit, so I can refer you to Getting Started with Infineon XMC4500 Relax Lite Kit and DAVE 3 IDE post, and the only thing you need to change is to select “Infineon Hexagon Application Kit XMC4500 Series” instead of “Infineon XMC4500 Relax Kit” in the “Debug Configurations” window. The other difference is that I’m now using Ubuntu 12.04, so I had to run Dave 3 in a virtual machine running Windows 7 in VirtualBox. I had to make sure VirtualBox Additions were installed, together with the “Extension Pack” (for USB support), and select Devices->Select USB Device->Segger JLINK in VirtualBox. The first time you run the debugger, a window will pop up “SEGGER J-Link V4.56 Firmware Update”. So I’ve tried to carry on with the firmware upgrade and it would time out after 45 seconds (After around 95% of upgrade is done). It does not matter, you can skip this step, and continue to run the application. It seems the sample app “LEDTS001_cb” is also not designed to run on this particular board, but the program was running as pressing the reset button would interrupt execution.
Another good thing about the Hexagon Application Kits is that you can connect satellite boards either by buying some specific kits, or buying one of the following add-ons boards separately:
- Standard Machine Human Interface Kit (HMI_OLED-V1) – 1.54″ OLED display + microSD slot, 2.5mm stereo jack… Satellite connected to HMI connector. Price: 89 Euros.
- Ethernet/CAN/RS485 Kit – Connected to COM connector (COM_ETH-V1) – 10/100Mbps Ethernet (RJ45), – CAN transceiver (DE-9 male), RS-485 transceiver, full-duplex, bootable (DE-9 female). Satellite connected to COM connector. Price: 79 Euros.
- Automation I/O Kit (AUT_ISO-V1) – ISOFACE OUT (up to 8 channels), ISOFACE IN (up to 8 channels), I2C based IO expander (up to 8 channels). Satellite connected to ACT connector. Price: 79 Euros.
- General Purpose Motor Drive Kit (MOT_GPDLV-V2) – Satellite connected to ACT connector. Price: 99 Euros.

Jean-Luc started CNX Software in 2010 as a part-time endeavor, before quitting his job as a software engineering manager, and starting to write daily news, and reviews full time later in 2011.
Support CNX Software! Donate via cryptocurrencies, become a Patron on Patreon, or purchase goods on Amazon or Aliexpress


