In some circumstances, for example by installing the wrong firmware or doing something wrong by playing god (as a root user), it’s possible to brick your device. This happened to me with one of my Droid Stick A2 mini PCs based on AMLogic AML8726-MX. I changed some files in /system/etc/permissions directory, lost Wi-Fi access, and even replacing my changes with the backup files would not solve the problem. It also changed some permissions in the system, and it was not possible to restore the firmware the usual way. At the end of last month, dbtablets left a comment with download links to “Amlogic USB Burning tool”, but I only decided to give it a try today, and after some efforts I was successful. Just make sure you only use this method as last resort, i.e. a standard firmware upgrade does not work, and you’re about to throw your device in the trash bin, because you could brick your device if the “resources” file is not for your hardware. The same method should work with other AMLogic AML8726-XX devices but you would have to get the correct resources file from the manufacturer.
The tools are only available for Windows XP or 7. Here are the steps to follow (in theory):
- Download “Hardware flash.rar” which contains the burning tool, the USB drivers, and the “resources” file, a zip file with the SPL, the bootloader, uImage and update.zip, which is specific to Droid Stick A2. There’s also a word file with instructions.
- You’ll need to short two pins on the board, so open Droid Stick A2 casing to access the board.
- Extract Hardware flash.rar in a directory of your choice, enter Hardware Flash/Hardware flash of amlogic directory, and click on ImageBurnTool.exe to start the program.

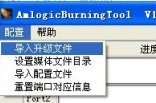
 In the top menu click on the first item on the left drop down menu to load the resources file. I had to do this in a netbook with 1024×600 resolution, and following the great “flash tools” tradition, the window cannot be resized, so I could not see the top menu. In that case, simply press “Alt” then “Down Arrow” and “Enter” to access the popup menu to load resources.zip
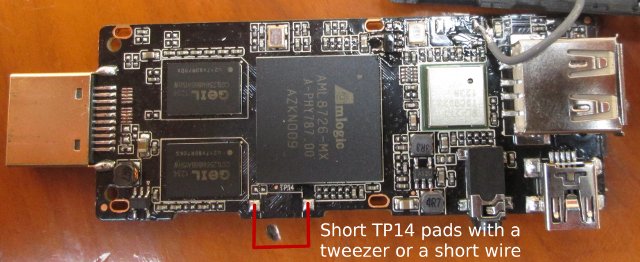
- Connect the mini USB to USB cable to your Windows PC but not to Droid Stick A2 yet, short TP14 as shown below, and only then connect the mini USB cable to start your device. N.B.: Some other devices have a recovery button so that you don’t need to open the case.

- Windows should then detect a new device (M6-CHIP), and ask you to install the drivers. To be honest, I’m not sure what you have to do at this point (as I did this many times), but I think you can just press cancel, as the burning tool will install the drivers automatically (in theory) and you should eventually see a “WorldCup device” in the hardware manager.
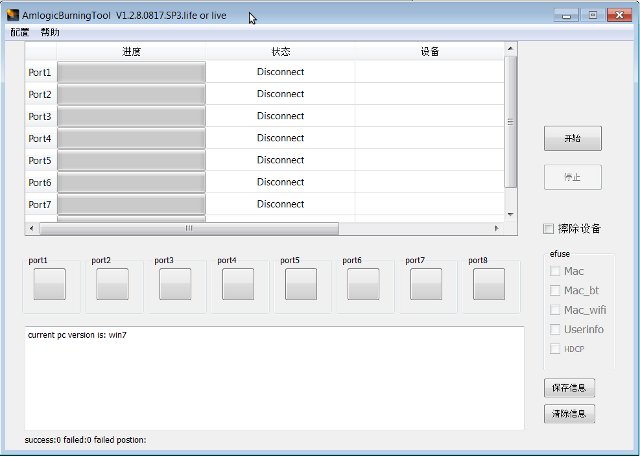
 Port 1 line should show the device is connected in the burning tool. Check the option to erase the flash (as shown on the right), and click on the start button () on the top right of the window to start erasing the flash. For me the process connected to both Port 1 and Port 3, it failed on Port1, but was eventually successfully on Port 3.
- Disconnect and reconnect the USB cable from your PC, it should start upgrading the firmware automatically, and having a while you should see “Success” in the window. Again, for me Port 1 failed, but Port 3 worked OK.
Once this is done, connect Droid Stick A2 to your HDMI TV, and it should start normally with a relatively recent firmware (30th of January 2013). Apparently the method above worked just fine for some people, but it did not work for me, as the system refused to install the drivers (Step 6). I tried in a virtual machine Windows 7, and a netbook running Windows XP SP3, and the drivers refused to install either automatically thru the burning tool, or manually with the drivers in Hardware Flash/Hardware flash of amlogic/AmlogicusbBurningdriver directory. So I decided to look for alternative drivers, and found another version of the burning tool in Slatedroid. So I download the file (AML_Flash_tool.rar), extracted it, and instead of starting ImageBurnTool.exe, I clicked on ImageBurnTool-sp3.exe as my netbook runs Windows XP SP3. AML_Flash_tool.rar only contains the burning tool, so I used resources.zip for Droid Stick A2 from the first rar file. The program managed to install the “M6-CHIP” drivers automatically, but then the procedure would fail during steps 7 or 8, as SPL would not load for some unknown reasons. After several retries however, the procedure went through successfully (don’t ask me why) and I could recover my device, although as mentioned previously it ended with an error on Port 1, but successfully on Port 3.

Jean-Luc started CNX Software in 2010 as a part-time endeavor, before quitting his job as a software engineering manager, and starting to write daily news, and reviews full time later in 2011.
Support CNX Software! Donate via cryptocurrencies, become a Patron on Patreon, or purchase goods on Amazon or Aliexpress


