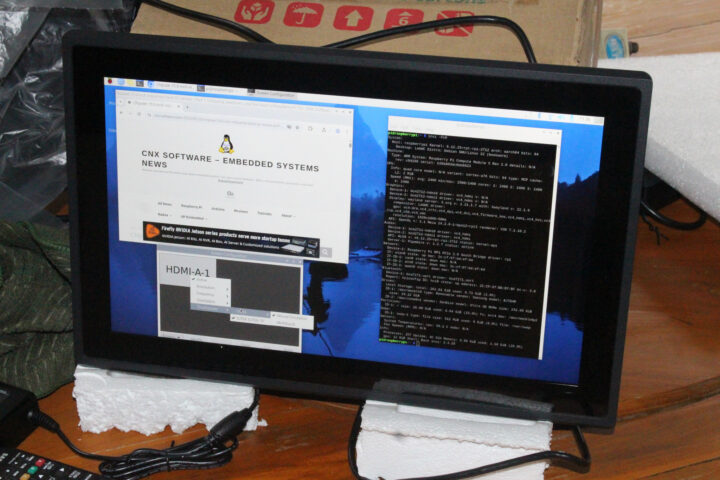
We’ve already had a look at the hardware of Chipsee’s 15.6-inch industrial touch panel PC in the first part of the review, before booting it to Raspberry Pi OS. I’ve now had time to test most features of the PPC-CM5-156 panel PC running Raspberry Pi OS, so I’ll report my experience testing performance and most ports of the Raspberry Pi CM5-based system in the second part of the review.
PPC-CM5-156 panel PC system info and sbc-bench.sh benchmark
Let’s check the features of the PPC-CM5-156 panel PC using the inxi utility:
|
1 2 3 4 5 6 7 8 9 10 11 12 13 14 15 16 17 18 19 20 21 22 23 24 25 26 27 28 29 30 31 32 33 34 35 36 37 38 39 40 41 42 43 44 45 46 47 48 |
pi@raspberrypi:~ $ sudo inxi -Fc0 System: Host: raspberrypi Kernel: 6.12.25+rpt-rpi-2712 arch: aarch64 bits: 64 Console: pty pts/2 Distro: Debian GNU/Linux 12 (bookworm) Machine: Type: ARM System: Raspberry Pi Compute Module 5 Rev 1.0 details: N/A rev: c04180 serial: b20a803dc6bb8623 CPU: Info: quad core model: N/A variant: cortex-a76 bits: 64 type: MCP cache: L2: 2 MiB Speed (MHz): avg: 2400 min/max: 1500/2400 cores: 1: 2400 2: 2400 3: 2400 4: 2400 Graphics: Device-1: bcm2712-hdmi0 driver: vc4_hdmi v: N/A Device-2: bcm2712-hdmi1 driver: vc4_hdmi v: N/A Display: wayland server: X.org v: 1.21.1.7 with: Xwayland v: 22.1.9 compositor: LabWC driver: gpu: vc4-drm,vc4_crtc,vc4_dpi,vc4_dsi,vc4_firmware_kms,vc4_hdmi,vc4_hvs,vc4_txp,vc4_v3d,vc4_vec tty: 80x24 resolution: 1920x1080 API: EGL/GBM Message: No known Wayland EGL/GBM data sources. Audio: Device-1: bcm2712-hdmi0 driver: vc4_hdmi Device-2: bcm2712-hdmi1 driver: vc4_hdmi API: ALSA v: k6.12.25+rpt-rpi-2712 status: kernel-api Network: Device-1: Raspberry Pi RP1 PCIe 2.0 South Bridge driver: rp1 IF: wlan0 state: up mac: 2c:cf:67:bd:ef:be IF-ID-1: can0 state: down mac: N/A IF-ID-2: eth0 state: down mac: 2c:cf:67:bd:ef:bd IF-ID-3: wwan0 state: down mac: N/A Bluetooth: Device-1: bcm7271-uart driver: bcm7271_uart Report: hciconfig ID: hci0 state: up address: 2C:CF:67:BD:EF:BF bt-v: 3.0 Drives: Local Storage: total: 262.01 GiB used: 6.29 GiB (2.4%) ID-1: /dev/mmcblk0 type: Removable vendor: Samsung model: BJTD4R size: 29.12 GiB ID-2: /dev/nvme0n1 vendor: SanDisk model: Ultra 3D NVMe size: 232.89 GiB Partition: ID-1: / size: 28.09 GiB used: 6.22 GiB (22.2%) fs: ext4 dev: /dev/mmcblk0p2 Swap: ID-1: swap-1 type: file size: 512 MiB used: 0 KiB (0.0%) file: /var/swap Sensors: System Temperatures: cpu: 67.8 C mobo: N/A Fan Speeds (RPM): N/A Info: Processes: 227 Uptime: 9m Memory: 3.96 GiB used: 666 MiB (16.4%) gpu: 8 MiB Init: systemd target: graphical (5) Shell: Sudo inxi: 3.3.26 |
Everything looks to be correctly detected, including the HDMI port connected to the built-in display, the external HDMI port, the WiFi and Bluetooth module, the CAN Bus, Ethernet, the 4G cellular modem (wwan0), the 32GB eMMC flash, and the 250GB NVMe SSD. The idle CPU temperature is reported to be 67.8°C, which feels a bit high even for a passively cooled system.
Let’s now run sbc-bench.sh to check the system and cooling performance:
|
1 2 3 4 5 6 7 8 9 10 11 12 13 14 15 16 17 18 19 20 21 22 23 24 25 26 27 28 29 30 31 32 33 34 35 36 37 38 39 40 41 42 43 44 45 46 47 48 49 50 51 52 53 54 55 56 57 58 59 60 61 62 63 64 65 66 67 68 69 70 71 72 73 74 75 76 77 78 79 80 81 82 83 84 85 86 87 88 89 90 91 92 93 94 95 96 97 98 99 100 101 102 103 104 105 106 107 108 109 110 111 112 113 114 115 116 117 118 119 120 121 122 123 124 125 126 127 128 129 130 131 132 133 134 135 136 137 138 139 140 141 142 143 144 145 146 147 148 149 150 151 152 153 154 155 156 157 158 159 160 161 162 163 164 165 166 167 168 |
pi@raspberrypi:~ $ sudo ./sbc-bench.sh -r Starting to examine hardware/software for review purposes... sbc-bench v0.9.71 Installing needed tools: apt-get -f -qq -y install sysstat lshw links mmc-utils smartmontools stress-ng, tinymembench, ramlat, mhz, cpufetch, cpuminer. Done. Checking cpufreq OPP. Done. Executing tinymembench. Done. Executing RAM latency tester. Done. Executing OpenSSL benchmark. Done. Executing 7-zip benchmark. Done. Throttling test: heating up the device, 5 more minutes to wait. Done. Checking cpufreq OPP again. Done (47 minutes elapsed). Results validation: * Measured clockspeed not lower than advertised max CPU clockspeed * No swapping * Background activity (%system) OK * Throttling / frequency capping (under-voltage) occured -> https://tinyurl.com/4ky59sys / https://tinyurl.com/3j2c66kd * 8 different clusters but capacity-dmips-mhz property not set Full results uploaded to https://0x0.st/8xHw.txt # Raspberry Pi Compute Module 5 Rev 1.0 Tested with sbc-bench v0.9.71 on Sat, 24 May 2025 10:00:48 +0100. Full info: [https://0x0.st/8xHw.txt](http://0x0.st/8xHw.txt) ### General information: Information courtesy of cpufetch: SoC: Broadcom BCM2712 Technology: 16nm Microarchitecture: Cortex-A76 Max Frequency: 2.400 GHz Cores: 4 cores Features: NEON,SHA1,SHA2,AES,CRC32 The CPU features 8 clusters of same core type: BCM2712, Kernel: aarch64, Userland: arm64 CPU sysfs topology (clusters, cpufreq members, clockspeeds) cpufreq min max CPU cluster policy speed speed core type 0 0 0 1500 2400 Cortex-A76 / r4p1 1 0 0 1500 2400 Cortex-A76 / r4p1 2 0 0 1500 2400 Cortex-A76 / r4p1 3 0 0 1500 2400 Cortex-A76 / r4p1 4046 KB available RAM ### Governors/policies (performance vs. idle consumption): Original governor settings: cpufreq-policy0: ondemand / 2400 MHz (conservative ondemand userspace powersave performance schedutil / 1500 1600 1700 1800 1900 2000 2100 2200 2300 2400) Tuned governor settings: cpufreq-policy0: performance / 2400 MHz Status of performance related policies found below /sys: /sys/module/pcie_aspm/parameters/policy: default [performance] powersave powersupersave ### Clockspeeds (idle vs. heated up): Before at 68.8°C: cpu0-cpu-1 (Cortex-A76): OPP: 2400, ThreadX: 2400, Measured: 2349 (-2.1%) cpu0-cpu-1 (Cortex-A76): OPP: 2400, ThreadX: 2366, Measured: 2348 (-2.2%) cpu0-cpu-1 (Cortex-A76): OPP: 2400, ThreadX: 2400, Measured: 2340 (-2.5%) cpu0-cpu-1 (Cortex-A76): OPP: 2400, ThreadX: 2311, Measured: 2325 (-3.1%) cpu0-cpu-1 (Cortex-A76): OPP: 2400, ThreadX: 2311, Measured: 2320 (-3.3%) cpu0-cpu-1 (Cortex-A76): OPP: 2400, ThreadX: 2400, Measured: 2311 (-3.7%) cpu0-cpu-1 (Cortex-A76): OPP: 2400, ThreadX: 2311, Measured: 2296 (-4.3%) cpu0-cpu3 (Cortex-A76): OPP: 2400, ThreadX: 2256, Measured: 2254 (-6.1%) After at 94.2°C (throttled): cpu0-cpu-1 (Cortex-A76): OPP: 2400, ThreadX: 1000, Measured: 965 (-59.8%) cpu0-cpu-1 (Cortex-A76): OPP: 2400, ThreadX: 1000, Measured: 965 (-59.8%) cpu0-cpu-1 (Cortex-A76): OPP: 2400, ThreadX: 1000, Measured: 965 (-59.8%) cpu0-cpu-1 (Cortex-A76): OPP: 2400, ThreadX: 1000, Measured: 966 (-59.7%) cpu0-cpu-1 (Cortex-A76): OPP: 2400, ThreadX: 1000, Measured: 965 (-59.8%) cpu0-cpu-1 (Cortex-A76): OPP: 2400, ThreadX: 1000, Measured: 965 (-59.8%) cpu0-cpu-1 (Cortex-A76): OPP: 2400, ThreadX: 1000, Measured: 965 (-59.8%) cpu0-cpu3 (Cortex-A76): OPP: 2400, ThreadX: 1000, Measured: 965 (-59.8%) ### Performance baseline * cpu0 (Cortex-A76): memcpy: 5411.6 MB/s, memchr: 10013.9 MB/s, memset: 8178.2 MB/s * cpu0 (Cortex-A76): memcpy: 5338.8 MB/s, memchr: 10024.6 MB/s, memset: 8193.1 MB/s * cpu0 (Cortex-A76): memcpy: 5399.4 MB/s, memchr: 10015.6 MB/s, memset: 8199.1 MB/s * cpu0 (Cortex-A76): memcpy: 5137.5 MB/s, memchr: 9209.1 MB/s, memset: 7503.2 MB/s * cpu0 (Cortex-A76): memcpy: 4907.6 MB/s, memchr: 9201.0 MB/s, memset: 7499.3 MB/s * cpu0 (Cortex-A76): memcpy: 4900.2 MB/s, memchr: 9196.5 MB/s, memset: 7503.7 MB/s * cpu0 (Cortex-A76): memcpy: 4913.7 MB/s, memchr: 9200.2 MB/s, memset: 7501.4 MB/s * cpu0 (Cortex-A76): memcpy: 4899.7 MB/s, memchr: 8130.9 MB/s, memset: 7473.1 MB/s * cpu0 (Cortex-A76) 16M latency: 128.1 126.7 127.0 125.9 132.5 134.7 162.3 219.1 * cpu0 (Cortex-A76) 16M latency: 129.3 120.0 129.4 129.5 120.5 133.2 162.4 219.2 * cpu0 (Cortex-A76) 16M latency: 127.8 131.7 124.2 132.7 127.8 134.1 164.3 199.3 * cpu0 (Cortex-A76) 16M latency: 123.6 123.0 119.3 129.3 127.4 134.0 154.7 197.1 * cpu0 (Cortex-A76) 16M latency: 123.7 121.5 122.1 121.2 123.9 124.4 154.0 218.3 * cpu0 (Cortex-A76) 16M latency: 127.4 119.4 134.9 128.3 119.1 122.5 153.9 179.7 * cpu0 (Cortex-A76) 16M latency: 124.3 125.4 131.3 133.8 124.5 123.9 153.9 198.5 * cpu0 (Cortex-A76) 16M latency: 123.9 128.2 136.5 120.3 133.7 134.6 163.7 217.8 * cpu0 (Cortex-A76) 128M latency: 150.2 148.9 150.2 148.5 150.6 150.0 151.7 156.5 * cpu0 (Cortex-A76) 128M latency: 150.5 149.1 142.4 148.4 141.9 144.2 142.5 143.0 * cpu0 (Cortex-A76) 128M latency: 150.6 139.5 141.6 143.3 143.2 150.0 143.0 156.9 * cpu0 (Cortex-A76) 128M latency: 139.9 140.0 141.1 139.5 149.5 144.9 142.3 137.2 * cpu0 (Cortex-A76) 128M latency: 147.3 148.4 147.7 145.6 135.0 150.2 143.0 157.2 * cpu0 (Cortex-A76) 128M latency: 147.5 148.5 144.8 140.0 145.9 148.8 147.2 154.4 * cpu0 (Cortex-A76) 128M latency: 148.0 147.2 146.4 148.3 141.6 150.4 142.8 152.0 * cpu0 (Cortex-A76) 128M latency: 145.8 148.6 141.8 148.5 150.5 140.6 151.6 147.1 * 7-zip MIPS (3 consecutive runs): 5825, 5066, 4413 (5100 avg), single-threaded: 2164 * `aes-256-cbc 342496.02k 635251.82k 772818.35k 858169.69k 866233.00k 876964.52k (Cortex-A76)` * `aes-256-cbc 337457.99k 617433.05k 784090.28k 821353.13k 877611.69k 855228.42k (Cortex-A76)` * `aes-256-cbc 332486.03k 621686.34k 785450.41k 833184.09k 839860.22k 855354.03k (Cortex-A76)` * `aes-256-cbc 346572.74k 608650.26k 772663.89k 808251.05k 864600.06k 841853.61k (Cortex-A76)` * `aes-256-cbc 336438.59k 617433.45k 772925.01k 844251.82k 863854.59k 878652.07k (Cortex-A76)` * `aes-256-cbc 327740.99k 626386.07k 772895.23k 808281.43k 864864.94k 878166.02k (Cortex-A76)` * `aes-256-cbc 332648.86k 626376.90k 761317.03k 832395.95k 839811.07k 866544.30k (Cortex-A76)` * `aes-256-cbc 332899.19k 617601.11k 783838.72k 832239.27k 841113.60k 866582.53k (Cortex-A76)` ### PCIe and storage devices: * Raspberry RP1 PCIe 2.0 South Bridge: Speed 5GT/s, Width x4, driver in use: rp1, ASPM Disabled * 232.9GB "SanDisk Ultra 3D NVMe" SSD as /dev/nvme0: Speed 5GT/s (downgraded), Width x1 (downgraded), 0% worn out, unhealthy drive temp: 68°C, ASPM Disabled * 29.1GB "Samsung BJTD4R" HS400 Enhanced strobe eMMC 5.1 card as /dev/mmcblk0: date 01/2024, manfid/oemid: 0x000015/0x0100, hw/fw rev: 0x0/0x0300000000000000 "smartctl -x /dev/nvme0" could be used to get further information about the reported issues. ### Challenging filesystems: The following partitions are NTFS: nvme0n1p2 -> https://tinyurl.com/mv7wvzct ### Swap configuration: * /var/swap on /dev/mmcblk0p2: 512.0M (0K used) on MMC storage ### Software versions: * Debian GNU/Linux 12 (bookworm) * Build scripts: http://archive.raspberrypi.com/debian/ bookworm main * Compiler: /usr/bin/gcc (Debian 12.2.0-14+deb12u1) 12.2.0 / aarch64-linux-gnu * OpenSSL 3.0.16, built on 11 Feb 2025 (Library: OpenSSL 3.0.16 11 Feb 2025) * ThreadX: 69471177 / 2025/05/08 15:13:17 ### Kernel info: * `/proc/cmdline: reboot=w coherent_pool=1M 8250.nr_uarts=1 pci=pcie_bus_safe cgroup_disable=memory numa_policy=interleave numa=fake=8 system_heap.max_order=0 smsc95xx.macaddr=2C:CF:67:BD:EF:BD vc_mem.mem_base=0x3fc00000 vc_mem.mem_size=0x40000000 console=ttyAMA0,115200 console=tty1 root=PARTUUID=89e05b6d-02 rootfstype=ext4 fsck.repair=yes rootwait quiet splash plymouth.ignore-serial-consoles vt.global_cursor_default=0 loglevel=0 cfg80211.ieee80211_regdom=CN` * Vulnerability Spec store bypass: Mitigation; Speculative Store Bypass disabled via prctl * Vulnerability Spectre v1: Mitigation; __user pointer sanitization * Vulnerability Spectre v2: Mitigation; CSV2, BHB * Kernel 6.12.25+rpt-rpi-2712 / CONFIG_HZ=250 All known settings adjusted for performance. Device now ready for benchmarking. Once finished stop with [ctrl]-[c] to get info about throttling, frequency cap and too high background activity all potentially invalidating benchmark scores. All changes with storage and PCIe devices as well as suspicious dmesg contents will be reported too. Time fake/real load %cpu %sys %usr %nice %io %irq Temp VCore PMIC DC(V) 10:00:54: 2400/1000MHz 2.62 29% 0% 28% 0% 0% 0% 90.8°C 0.7532V 2.9W 5.11V |
The CPU temperature is really high, and CPU throttling was reported…
Something is wrong here because the large metal cover serves as a heatsink, and there shouldn’t be any throttling. The reason/excuse is my screwdriver…
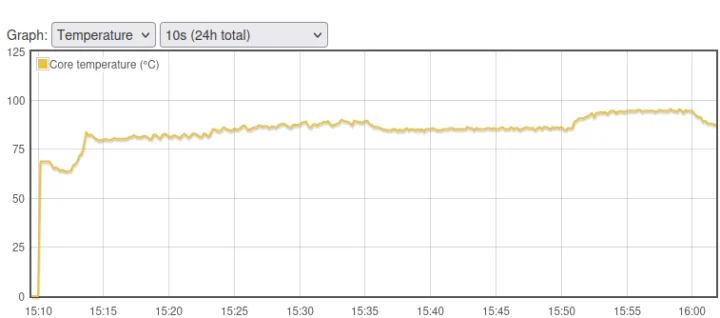
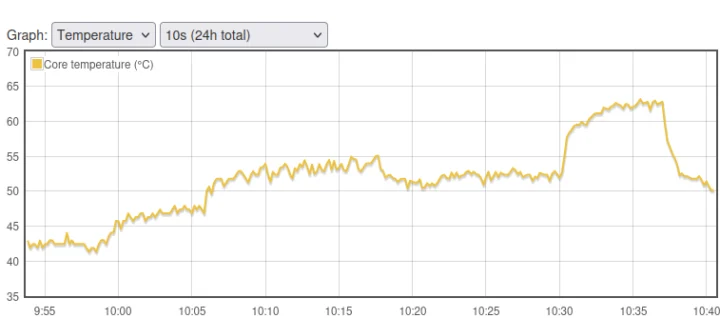
When I did the teardown of the PPC-CM5-156 panel PC, I used a multi-bit screwdriver similar to the one on the left with the part holding the bit preventing it from fully reaching the screw heads as the screws are accessible through some holes in the metal cover. I could do the disassembly with some effort, and when I reassembled the bottom cover, it looked secured properly, but obviously, something was wrong. When I went to another house, I used the screwdriver on the right in the photo above to further tighten the screws. We can immediately see the difference in the chart below.
The Broadcom BCM2712 used to idle at about 80°C, and after I tightened the screws it dropped to about 40°C. We can see some oscillation on the right, and I think it’s because I turned the panel PC upside down a few times during testing, since there’s no stand.
Let’s try sbc-bench.sh again:
|
1 2 3 4 5 6 7 8 9 10 11 12 13 14 15 16 17 18 19 20 21 22 23 24 25 26 27 28 29 30 31 32 33 34 35 36 37 38 39 40 41 42 43 44 45 46 47 48 49 50 51 52 53 54 55 56 57 58 59 60 61 62 63 64 65 66 67 68 69 70 71 72 73 74 75 76 77 78 79 80 81 82 83 84 85 86 87 88 89 90 91 92 93 94 95 96 97 98 99 100 101 102 103 104 105 106 107 108 109 110 111 112 113 114 115 116 117 118 119 120 121 122 123 124 125 126 127 128 129 130 131 132 133 134 135 136 137 138 139 140 141 142 143 144 145 146 147 148 149 150 151 152 153 154 155 156 157 158 159 160 161 162 163 164 165 166 167 168 169 170 171 172 |
pi@raspberrypi:~ $ sudo ./sbc-bench.sh -r Starting to examine hardware/software for review purposes... sbc-bench v0.9.71 Installing needed tools: distro packages already installed. Done. Checking cpufreq OPP. Done. Executing tinymembench. Done. Executing RAM latency tester. Done. Executing OpenSSL benchmark. Done. Executing 7-zip benchmark. Done. Throttling test: heating up the device, 5 more minutes to wait. Done. Checking cpufreq OPP again. Done (39 minutes elapsed). Results validation: * Measured clockspeed not lower than advertised max CPU clockspeed * No swapping * Background activity (%system) OK * No throttling * 8 different clusters but capacity-dmips-mhz property not set Full results uploaded to https://0x0.st/8xeR.txt # Raspberry Pi Compute Module 5 Rev 1.0 Tested with sbc-bench v0.9.71 on Mon, 26 May 2025 04:37:47 +0100. Full info: [https://0x0.st/8xeR.txt](http://0x0.st/8xeR.txt) ### General information: Information courtesy of cpufetch: SoC: Broadcom BCM2712 Technology: 16nm Microarchitecture: Cortex-A76 Max Frequency: 2.400 GHz Cores: 4 cores Features: NEON,SHA1,SHA2,AES,CRC32 The CPU features 8 clusters of same core type: BCM2712, Kernel: aarch64, Userland: arm64 CPU sysfs topology (clusters, cpufreq members, clockspeeds) cpufreq min max CPU cluster policy speed speed core type 0 0 0 1500 2400 Cortex-A76 / r4p1 1 0 0 1500 2400 Cortex-A76 / r4p1 2 0 0 1500 2400 Cortex-A76 / r4p1 3 0 0 1500 2400 Cortex-A76 / r4p1 4046 KB available RAM ### Governors/policies (performance vs. idle consumption): Original governor settings: cpufreq-policy0: ondemand / 1900 MHz (conservative ondemand userspace powersave performance schedutil / 1500 1600 1700 1800 1900 2000 2100 2200 2300 2400) Tuned governor settings: cpufreq-policy0: performance / 2400 MHz Status of performance related policies found below /sys: /sys/module/pcie_aspm/parameters/policy: default [performance] powersave powersupersave ### Clockspeeds (idle vs. heated up): Before at 45.2°C: cpu0-cpu-1 (Cortex-A76): OPP: 2400, ThreadX: 2400, Measured: 2347 (-2.2%) cpu0-cpu-1 (Cortex-A76): OPP: 2400, ThreadX: 2400, Measured: 2346 (-2.2%) cpu0-cpu-1 (Cortex-A76): OPP: 2400, ThreadX: 2400, Measured: 2346 (-2.2%) cpu0-cpu-1 (Cortex-A76): OPP: 2400, ThreadX: 2400, Measured: 2346 (-2.2%) cpu0-cpu-1 (Cortex-A76): OPP: 2400, ThreadX: 2400, Measured: 2346 (-2.2%) cpu0-cpu-1 (Cortex-A76): OPP: 2400, ThreadX: 2400, Measured: 2346 (-2.2%) cpu0-cpu-1 (Cortex-A76): OPP: 2400, ThreadX: 2400, Measured: 2346 (-2.2%) cpu0-cpu3 (Cortex-A76): OPP: 2400, ThreadX: 2400, Measured: 2346 (-2.2%) After at 63.4°C: cpu0-cpu-1 (Cortex-A76): OPP: 2400, ThreadX: 2400, Measured: 2346 (-2.2%) cpu0-cpu-1 (Cortex-A76): OPP: 2400, ThreadX: 2400, Measured: 2346 (-2.2%) cpu0-cpu-1 (Cortex-A76): OPP: 2400, ThreadX: 2400, Measured: 2347 (-2.2%) cpu0-cpu-1 (Cortex-A76): OPP: 2400, ThreadX: 2400, Measured: 2346 (-2.2%) cpu0-cpu-1 (Cortex-A76): OPP: 2400, ThreadX: 2400, Measured: 2346 (-2.2%) cpu0-cpu-1 (Cortex-A76): OPP: 2400, ThreadX: 2400, Measured: 2346 (-2.2%) cpu0-cpu-1 (Cortex-A76): OPP: 2400, ThreadX: 2400, Measured: 2346 (-2.2%) cpu0-cpu3 (Cortex-A76): OPP: 2400, ThreadX: 2400, Measured: 2346 (-2.2%) ### Performance baseline * cpu0 (Cortex-A76): memcpy: 5476.5 MB/s, memchr: 13532.9 MB/s, memset: 9138.7 MB/s * cpu0 (Cortex-A76): memcpy: 5472.2 MB/s, memchr: 13496.4 MB/s, memset: 9156.7 MB/s * cpu0 (Cortex-A76): memcpy: 5261.8 MB/s, memchr: 12994.7 MB/s, memset: 8806.3 MB/s * cpu0 (Cortex-A76): memcpy: 5265.5 MB/s, memchr: 13030.3 MB/s, memset: 8808.2 MB/s * cpu0 (Cortex-A76): memcpy: 5256.7 MB/s, memchr: 13007.3 MB/s, memset: 8802.0 MB/s * cpu0 (Cortex-A76): memcpy: 5266.7 MB/s, memchr: 13033.9 MB/s, memset: 8809.3 MB/s * cpu0 (Cortex-A76): memcpy: 5266.2 MB/s, memchr: 13029.7 MB/s, memset: 8807.2 MB/s * cpu0 (Cortex-A76): memcpy: 5266.6 MB/s, memchr: 13008.9 MB/s, memset: 8803.1 MB/s * cpu0 (Cortex-A76) 16M latency: 106.4 106.3 105.3 107.2 105.3 112.9 134.9 153.5 * cpu0 (Cortex-A76) 16M latency: 108.8 106.8 110.4 107.4 105.6 113.8 134.2 151.8 * cpu0 (Cortex-A76) 16M latency: 105.7 107.0 106.7 106.1 105.0 112.1 136.0 154.9 * cpu0 (Cortex-A76) 16M latency: 109.4 110.2 106.6 108.2 107.2 115.4 134.7 153.4 * cpu0 (Cortex-A76) 16M latency: 105.7 106.0 105.5 108.6 110.3 112.4 134.1 152.3 * cpu0 (Cortex-A76) 16M latency: 105.4 107.5 107.2 106.8 106.1 112.8 136.5 153.2 * cpu0 (Cortex-A76) 16M latency: 109.0 106.3 105.7 110.4 106.5 113.8 135.2 154.2 * cpu0 (Cortex-A76) 16M latency: 105.8 106.7 105.5 106.3 104.7 112.0 135.1 153.4 * cpu0 (Cortex-A76) 128M latency: 122.5 121.3 122.5 120.9 122.3 121.7 122.1 124.5 * cpu0 (Cortex-A76) 128M latency: 122.7 121.0 123.4 120.9 123.3 121.0 122.6 124.6 * cpu0 (Cortex-A76) 128M latency: 122.4 121.0 122.3 121.4 122.3 121.3 122.2 125.0 * cpu0 (Cortex-A76) 128M latency: 122.6 121.0 122.4 121.3 122.3 121.0 122.2 125.1 * cpu0 (Cortex-A76) 128M latency: 122.8 121.3 122.4 127.9 122.6 121.1 122.0 124.5 * cpu0 (Cortex-A76) 128M latency: 122.5 121.4 122.5 121.0 122.2 121.3 122.1 124.8 * cpu0 (Cortex-A76) 128M latency: 122.6 121.0 122.9 120.9 122.2 121.0 122.4 124.4 * cpu0 (Cortex-A76) 128M latency: 122.5 121.0 122.5 121.4 122.4 121.1 122.2 125.0 * 7-zip MIPS (3 consecutive runs): 11368, 11278, 11288 (11310 avg), single-threaded: 3185 * `aes-256-cbc 524516.67k 974310.04k 1225186.82k 1302299.65k 1334312.96k 1336530.26k (Cortex-A76)` * `aes-256-cbc 528287.63k 981088.49k 1227787.35k 1302502.74k 1334487.72k 1336814.25k (Cortex-A76)` * `aes-256-cbc 528052.91k 981107.35k 1227408.98k 1303097.69k 1333663.06k 1337147.39k (Cortex-A76)` * `aes-256-cbc 528028.91k 981191.19k 1227363.07k 1302700.03k 1333971.63k 1337109.16k (Cortex-A76)` * `aes-256-cbc 528086.13k 981098.54k 1227446.19k 1302471.68k 1334618.79k 1336847.02k (Cortex-A76)` * `aes-256-cbc 528218.21k 980898.20k 1227585.54k 1302571.01k 1334684.33k 1336841.56k (Cortex-A76)` * `aes-256-cbc 528191.76k 980821.01k 1227704.83k 1302519.13k 1334517.76k 1336863.40k (Cortex-A76)` * `aes-256-cbc 528083.93k 980984.53k 1227453.95k 1302958.42k 1334359.38k 1337278.46k (Cortex-A76)` ### PCIe and storage devices: * Raspberry RP1 PCIe 2.0 South Bridge: Speed 5GT/s, Width x4, driver in use: rp1, ASPM Disabled * 232.9GB "SanDisk Ultra 3D NVMe" SSD as /dev/nvme0: Speed 8GT/s, Width x1 (downgraded), 0% worn out, unhealthy drive temp: 61°C, ASPM Disabled * 29.1GB "Samsung BJTD4R" HS400 Enhanced strobe eMMC 5.1 card as /dev/mmcblk0: date 01/2024, manfid/oemid: 0x000015/0x0100, hw/fw rev: 0x0/0x0300000000000000 "smartctl -x /dev/nvme0" could be used to get further information about the reported issues. ### Challenging filesystems: The following partitions are NTFS: nvme0n1p2 -> https://tinyurl.com/mv7wvzct ### Swap configuration: * /var/swap on /dev/mmcblk0p2: 512.0M (0K used) on MMC storage ### Software versions: * Debian GNU/Linux 12 (bookworm) * Build scripts: http://archive.raspberrypi.com/debian/ bookworm main * Compiler: /usr/bin/gcc (Debian 12.2.0-14+deb12u1) 12.2.0 / aarch64-linux-gnu * OpenSSL 3.0.16, built on 11 Feb 2025 (Library: OpenSSL 3.0.16 11 Feb 2025) * ThreadX: 69471177 / 2025/05/08 15:13:17 ### Kernel info: * `/proc/cmdline: reboot=w coherent_pool=1M 8250.nr_uarts=1 pci=pcie_bus_safe cgroup_disable=memory numa_policy=interleave numa=fake=8 system_heap.max_order=0 smsc95xx.macaddr=2C:CF:67:BD:EF:BD vc_mem.mem_base=0x3fc00000 vc_mem.mem_size=0x40000000 console=ttyAMA0,115200 console=tty1 root=PARTUUID=89e05b6d-02 rootfstype=ext4 fsck.repair=yes rootwait quiet splash plymouth.ignore-serial-consoles vt.global_cursor_default=0 loglevel=0 cfg80211.ieee80211_regdom=CN` * Vulnerability Spec store bypass: Mitigation; Speculative Store Bypass disabled via prctl * Vulnerability Spectre v1: Mitigation; __user pointer sanitization * Vulnerability Spectre v2: Mitigation; CSV2, BHB * Kernel 6.12.25+rpt-rpi-2712 / CONFIG_HZ=250 All known settings adjusted for performance. Device now ready for benchmarking. Once finished stop with [ctrl]-[c] to get info about throttling, frequency cap and too high background activity all potentially invalidating benchmark scores. All changes with storage and PCIe devices as well as suspicious dmesg contents will be reported too. Time fake/real load %cpu %sys %usr %nice %io %irq Temp VCore PMIC DC(V) 04:37:47: 2400/2400MHz 2.74 14% 0% 13% 0% 0% 0% 55.1°C 0.9133V 2.5W 5.11V 04:38:47: 2400/2400MHz 1.10 0% 0% 0% 0% 0% 0% 51.2°C 0.9133V 2.3W 5.11V ^C Cleaning up. Done. |
That’s more like it! The maximum CPU temperature was around 62.8°C during the cpuminer test at a room temperature of around 28°C.
If we look at 7-zip results, the PPC-CM5-156 panel achieved 11,310 MIPS on average, which compares to 11,160 MIPS with the Raspberry Pi CM5 IO board and an active cooler, so the system works just as expected. If you have to service it to install an M.2 module (SSD/AI accelerator) and/or a 4G LTE mini PCIe module, just make sure you have the right tools and the cover is firmly in place, or it can have serious impact on performance (the 7-zip score was 5100 MIPS the first time) and longevity of the system.
RS232 console access on Chipsee PPC-CM5-156
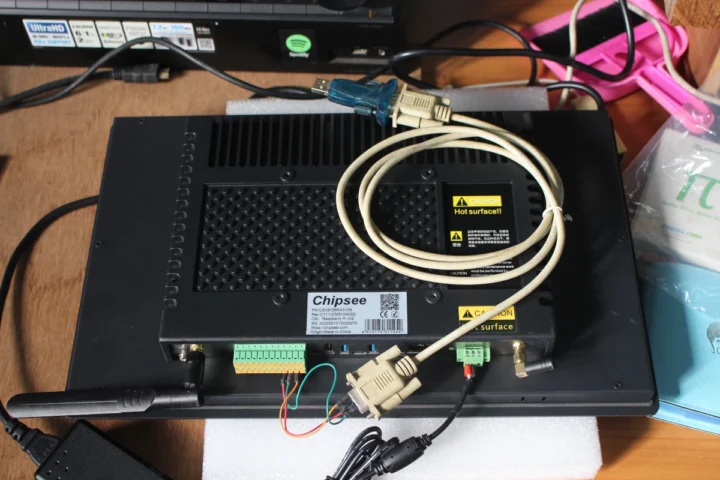
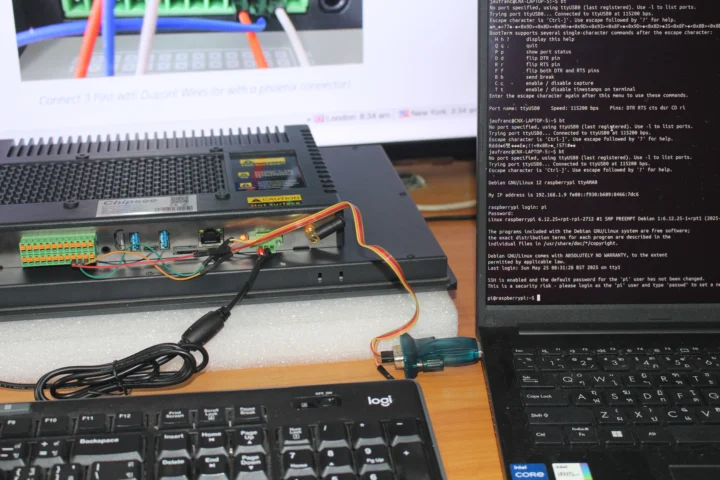
Going further in the review, we’ll heavily rely on Chipsee’s software documentation for Raspberry Pi OS on CM5. I did all the tests above over SSH, but if, for whatever reason, you can’t make use of WiFi and Ethernet, or type directly on the display, the machine offers an RS232 interface on the terminal block for debugging.
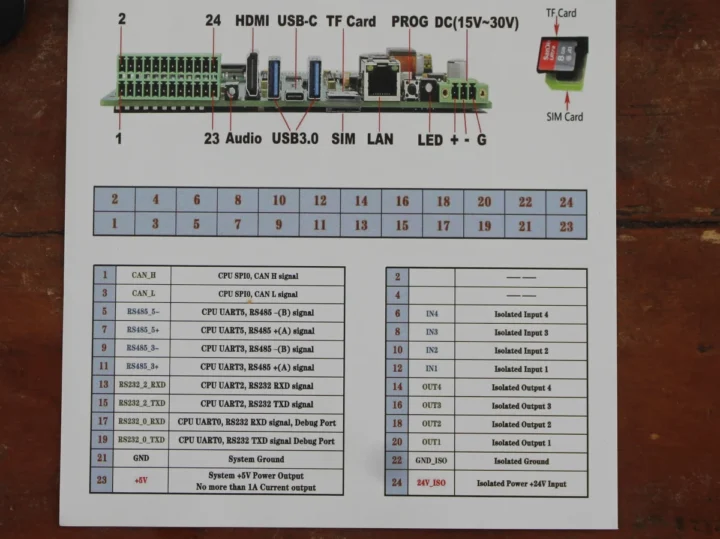
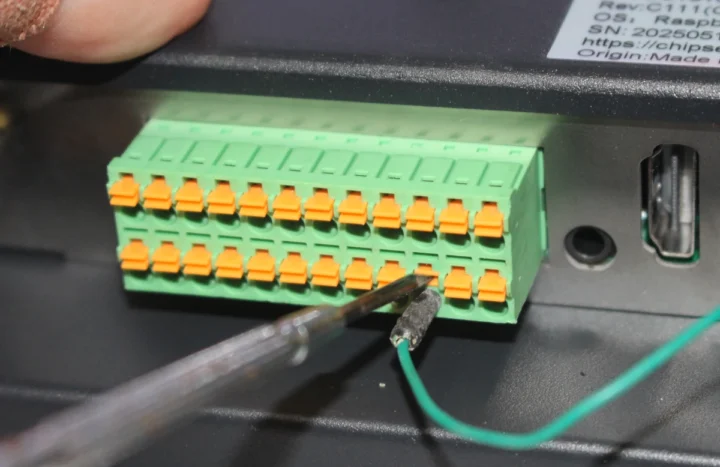
We’ll need to connect pin 17 (Rx), 19 (Tx), and 21 (GND) to a serial cable. Chipsee explains this clearly in the documentation. I had an old USB to RS232 adapter and a DB9<->DB9 female cable, which I wired to the PPC-CM5-156 using male jumper cables.
The screwless pluggable terminal block on the panel PC relies on a push-in mechanism. Press the orange lever with a small flat screwdriver, insert the wire, and release the orange lever to secure the cable.
|
1 2 3 4 5 |
jaufranc@CNX-LAPTOP-5:~$ bt No port specified, using ttyUSB0 (last registered). Use -l to list ports. Trying port ttyUSB0... Connected to ttyUSB0 at 115200 bps. Escape character is 'Ctrl-]'. Use escape followed by '?' for help. �m_�=77�-�<0x9D><0x8D><0x9B>�<0x9D><0x93><0x8F>�<0x9D>�<0x8D>�35<0x8F>�<0x8B><0x8B>3<0x8D><0x99>�<0x8B>;<0x93>�<0x8D><0x8B><0x8F><0x97><0x93><0x93><0x8B><0x91>7'!1-#<0x8B>�5 |
But all I had was gibberish… I tried to switch Tx and Rx, but it did not help. The male jumper cables did not seem to fit well in the DB9 female pins, so I changed strategy and replaced the DB9 cable with female jumper cables, and this time around, it worked just fine.
|
1 2 3 4 5 6 7 8 9 10 11 12 13 14 15 16 17 18 19 20 21 22 23 24 25 |
jaufranc@CNX-LAPTOP-5:~$ bt No port specified, using ttyUSB0 (last registered). Use -l to list ports. Trying port ttyUSB0... Connected to ttyUSB0 at 115200 bps. Escape character is 'Ctrl-]'. Use escape followed by '?' for help. Debian GNU/Linux 12 raspberrypi ttyAMA0 My IP address is 192.168.1.9 fe80::f930:b609:8466:7dc6 raspberrypi login: pi Password: Linux raspberrypi 6.12.25+rpt-rpi-2712 #1 SMP PREEMPT Debian 1:6.12.25-1+rpt1 (2025-04-30) aarch64 The programs included with the Debian GNU/Linux system are free software; the exact distribution terms for each program are described in the individual files in /usr/share/doc/*/copyright. Debian GNU/Linux comes with ABSOLUTELY NO WARRANTY, to the extent permitted by applicable law. Last login: Sun May 25 08:31:28 BST 2025 on tty1 SSH is enabled and the default password for the 'pi' user has not been changed. This is a security risk - please login as the 'pi' user and type 'passwd' to set a new password. pi@raspberrypi:~$ |
Storage and USB testing
Let’s carry on the PPC-CM5-156 panel PC review with some storage and USB tests.
I ran iozone3 on the 32GB eMMC flash on the Raspberry Pi CM5:
|
1 2 3 4 5 6 7 8 9 10 11 12 13 14 |
pi@raspberrypi:~ $ iozone -e -I -a -s 1000M -r 4k -r 16k -r 512k -r 1024k -r 16384k -i 0 -i 1 -i 2 Iozone: Performance Test of File I/O Version $Revision: 3.489 $ Compiled for 64 bit mode. Build: linux random random bkwd record stride kB reclen write rewrite read reread read write read rewrite read fwrite frewrite fread freread 1024000 4 48555 54340 43848 43925 34686 49578 1024000 16 109110 109859 118089 117790 100481 103046 1024000 512 110568 110604 310029 309893 305670 108376 1024000 1024 110778 110960 321760 321798 320279 109588 1024000 16384 110917 111192 337579 337685 337802 111081 iozone test complete. |
337MB/s sequential read, 110MB/s sequential write, and decent random I/Os.
Let’s now switch our test to the 250GB M.2 NVMe SSD installed in the system, mostly to check the PCIe interface. It’s connected over a PCIe Gen2 x1 at 5GT/s by default:
|
1 2 3 4 5 6 7 8 |
pi@raspberrypi:/media/nvme0n1p2 $ sudo lspci -vv -s 0001:01:00.0 | grep Lnk LnkCap: Port #0, Speed 8GT/s, Width x4, ASPM L1, Exit Latency L1 <8us LnkCtl: ASPM L1 Enabled; RCB 64 bytes, Disabled- CommClk+ LnkSta: Speed 5GT/s (downgraded), Width x1 (downgraded) LnkCap2: Supported Link Speeds: 2.5-8GT/s, Crosslink- Retimer- 2Retimers- DRS- LnkCtl2: Target Link Speed: 8GT/s, EnterCompliance- SpeedDis- LnkSta2: Current De-emphasis Level: -6dB, EqualizationComplete- EqualizationPhase1- LnkCtl3: LnkEquIntrruptEn- PerformEqu- |
We can run iozone3 on the NTFS partition. I skipped the read test because it’s usually garbage on NTFS since direct I/O don’t work (the data is cached):
|
1 2 3 4 |
pi@raspberrypi:/media/nvme0n1p2 $ iozone -e -I -a -s 1000M -r 16384k -i 0 random random bkwd record stride kB reclen write rewrite read reread read write read rewrite read fwrite frewrite fread freread 1024000 16384 406343 408335 |
That would be 406MB/s write, roughly as expected for a 5GT/s link.
Let’s switch to PCIe Gen3 x1 by adding the following line in /boot/firmware/config.txt in the [cm5] section:
|
1 |
dtparam=pciex1_gen=3 |
After a reboot, we can see LinkSta is set to 8GT/s:
|
1 2 3 4 5 6 7 8 |
pi@raspberrypi:~ $ sudo lspci -vv -s 0001:01:00.0 | grep Lnk LnkCap: Port #0, Speed 8GT/s, Width x4, ASPM L1, Exit Latency L1 <8us LnkCtl: ASPM L1 Enabled; RCB 64 bytes, Disabled- CommClk+ LnkSta: Speed 8GT/s, Width x1 (downgraded) LnkCap2: Supported Link Speeds: 2.5-8GT/s, Crosslink- Retimer- 2Retimers- DRS- LnkCtl2: Target Link Speed: 8GT/s, EnterCompliance- SpeedDis- LnkSta2: Current De-emphasis Level: -6dB, EqualizationComplete+ EqualizationPhase1+ LnkCtl3: LnkEquIntrruptEn- PerformEqu- |
Running iozone3 immediately shows an improvement:
|
1 2 3 4 |
pi@raspberrypi:/media/nvme0n1p2 $ iozone -e -I -a -s 1000M -r 16384k -i 0 random random bkwd record stride kB reclen write rewrite read reread read write read rewrite read fwrite frewrite fread freread 1024000 16384 717905 720832 |
717MB/s is fine, but it’s a bit slower than when I tested other NVMe SSDs on Raspberry Pi 5 (usually around 760MB/s writes), but it might be because the drive is formatted with NTFS instead of EXT-4.
I also tried the microSD card slot. But after I inserted a microSD card, there were no messages in the kernel log, and it’s actually normal. It’s because the microSD card cannot be used for memory extension when a Raspberry Pi CM5 is connected, and only as a boot device for a Raspberry Pi CM5 Lite.
The Chipsee PPC-CM5-156 comes with two USB 3.0 (5 Gbps) ports, which I tested with a USB ORICO NVMe SSD enclosure.
Here are the results for USB A #1 (left):
|
1 2 3 4 5 6 |
pi@raspberrypi:~ $ lsusb -t | grep uas |__ Port 1: Dev 2, If 0, Class=Mass Storage, Driver=uas, 5000M pi@raspberrypi:/media/pi/TB3-EXT4 $ sudo iozone -e -I -a -s 1000M -r 16384k -i 0 -i 1 random random bkwd record stride kB reclen write rewrite read reread read write read rewrite read fwrite frewrite fread freread 1024000 16384 349665 349390 344377 344902 |
and USB A #2 (right):
|
1 2 3 4 5 6 |
pi@raspberrypi:/media $ lsusb -t | grep uas |__ Port 1: Dev 2, If 0, Class=Mass Storage, Driver=uas, 5000M pi@raspberrypi:/media/pi/TB3-EXT4 $ sudo iozone -e -I -a -s 1000M -r 16384k -i 0 -i 1 random random bkwd record stride kB reclen write rewrite read reread read write read rewrite read fwrite frewrite fread freread 1024000 16384 349060 349286 344397 344868 |
Both are properly detected as being 5 Gbps ports, and a 349MB/s write speed is OK (2792 Mbps + overheads), but it’s quite slower than with the Raspberry Pi 5 where I measured about 388MB/s sequential read speeds and 411MB/s write speeds. Chipsee says the two USB 3.0 ports are implemented through a USB hub, so it might explain why.
USB-C is mainly used for firmware updates. So I turned off the panel PC, pressed the PROG key, and turned the device back on to enter download mode. I had already installed rpiboot for the Raspberry Pi CM5 review, and I had no issue when running it:
|
1 2 3 4 5 6 7 8 9 10 11 12 13 14 15 16 17 18 19 20 21 |
aufranc@CNX-LAPTOP-5:~$ sudo rpiboot [sudo] password for jaufranc: RPIBOOT: build-date Dec 20 2024 version 20240422~085300 ef721cda If the device fails to connect then please see https://rpltd.co/rpiboot for debugging tips. Waiting for BCM2835/6/7/2711/2712... 2712: Directory not specified using default /usr/share/rpiboot/mass-storage-gadget64/ Sending bootcode.bin Successful read 4 bytes Waiting for BCM2835/6/7/2711/2712... Second stage boot server File read: mcb.bin File read: memsys00.bin File read: memsys01.bin File read: memsys02.bin File read: memsys03.bin File read: bootmain Loading: /usr/share/rpiboot/mass-storage-gadget64//config.txt File read: config.txt Loading: /usr/share/rpiboot/mass-storage-gadget64//boot.img File read: boot.img Second stage boot server done |
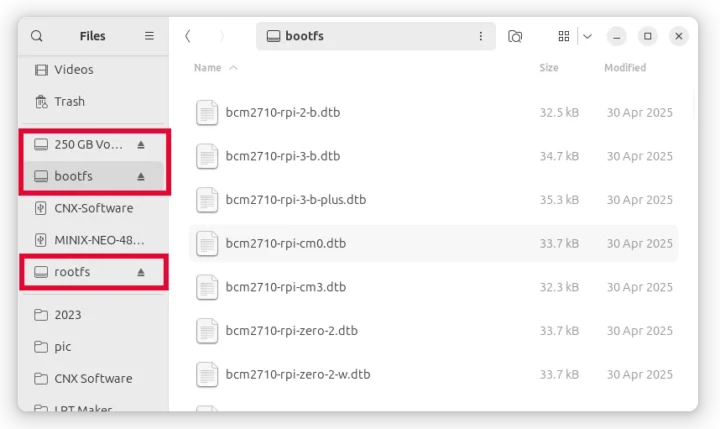
We can see the eMMC flash and 250GB SSD in the host.
This would allow us to flash Raspberry Pi OS to the eMMC flash or the NVMe SSD. I haven’t done it, but you’ll find the latest system image on GitHub, or alternatively, you can install Raspberry Pi OS and install the script separately as explained in the aforelinked documentation.
Networking and wireless – Ethernet, WiFi, Bluetooth, and 4G LTE testing
The Chipsee PPC-CM5-156 panel PC supports Gigabit Ethernet, WiFi 5, Bluetooth, and 4G LTE (optional) connectivity. Let’s test them all.
I first tested Gigabit Ethernet with iperf3 directly in bidirectional (full-duplex) mode:
|
1 2 3 4 5 6 7 8 9 10 11 12 13 14 15 16 17 18 19 20 21 22 23 24 25 |
pi@raspberrypi:~ $ iperf3 -t 60 -c 192.168.1.11 -i 10 --bidir Connecting to host 192.168.1.11, port 5201 [ 5] local 192.168.1.4 port 60210 connected to 192.168.1.11 port 5201 [ 7] local 192.168.1.4 port 60216 connected to 192.168.1.11 port 5201 [ ID][Role] Interval Transfer Bitrate Retr Cwnd [ 5][TX-C] 0.00-10.00 sec 1.08 GBytes 932 Mbits/sec 0 583 KBytes [ 7][RX-C] 0.00-10.00 sec 1.09 GBytes 936 Mbits/sec [ 5][TX-C] 10.00-20.00 sec 1.08 GBytes 932 Mbits/sec 0 872 KBytes [ 7][RX-C] 10.00-20.00 sec 1.09 GBytes 936 Mbits/sec [ 5][TX-C] 20.00-30.00 sec 1.09 GBytes 932 Mbits/sec 0 872 KBytes [ 7][RX-C] 20.00-30.00 sec 1.09 GBytes 936 Mbits/sec [ 5][TX-C] 30.00-40.00 sec 1.08 GBytes 931 Mbits/sec 0 872 KBytes [ 7][RX-C] 30.00-40.00 sec 1.09 GBytes 936 Mbits/sec [ 5][TX-C] 40.00-50.00 sec 1.08 GBytes 931 Mbits/sec 0 872 KBytes [ 7][RX-C] 40.00-50.00 sec 1.09 GBytes 936 Mbits/sec [ 5][TX-C] 50.00-60.00 sec 1.08 GBytes 931 Mbits/sec 0 872 KBytes [ 7][RX-C] 50.00-60.00 sec 1.09 GBytes 936 Mbits/sec - - - - - - - - - - - - - - - - - - - - - - - - - [ ID][Role] Interval Transfer Bitrate Retr [ 5][TX-C] 0.00-60.00 sec 6.51 GBytes 932 Mbits/sec 0 sender [ 5][TX-C] 0.00-60.00 sec 6.50 GBytes 931 Mbits/sec receiver [ 7][RX-C] 0.00-60.00 sec 6.54 GBytes 937 Mbits/sec 0 sender [ 7][RX-C] 0.00-60.00 sec 6.54 GBytes 936 Mbits/sec receiver iperf Done. |
No problem here. Let’s now switch to WiFi 5 @ 5 GHz. We had a 351 Mbps link to mt ISP broadband router:
|
1 2 3 4 5 6 7 8 9 |
pi@raspberrypi:~ $ iwconfig wlan0 wlan0 IEEE 802.11 ESSID:"CNX-SOFTWARE-ZTE_5G" Mode:Managed Frequency:5.805 GHz Access Point: C4:27:28:42:D4:23 Bit Rate=351 Mb/s Tx-Power=31 dBm Retry short limit:7 RTS thr:off Fragment thr:off Power Management:on Link Quality=60/70 Signal level=-50 dBm Rx invalid nwid:0 Rx invalid crypt:0 Rx invalid frag:0 Tx excessive retries:0 Invalid misc:0 Missed beacon:0 |
Let’s run iozone3 again:
- Download:
|
1 2 3 4 5 6 7 8 9 10 11 12 13 14 15 16 17 |
pi@raspberrypi:~ $ iperf3 -t 60 -c 192.168.1.11 -i 10 -R Connecting to host 192.168.1.11, port 5201 Reverse mode, remote host 192.168.1.11 is sending [ 5] local 192.168.1.9 port 36894 connected to 192.168.1.11 port 5201 [ ID] Interval Transfer Bitrate [ 5] 0.00-10.00 sec 303 MBytes 254 Mbits/sec [ 5] 10.00-20.00 sec 314 MBytes 263 Mbits/sec [ 5] 20.00-30.00 sec 317 MBytes 266 Mbits/sec [ 5] 30.00-40.00 sec 326 MBytes 274 Mbits/sec [ 5] 40.00-50.00 sec 304 MBytes 255 Mbits/sec [ 5] 50.00-60.00 sec 304 MBytes 255 Mbits/sec - - - - - - - - - - - - - - - - - - - - - - - - - [ ID] Interval Transfer Bitrate Retr [ 5] 0.00-60.01 sec 1.83 GBytes 262 Mbits/sec 1 sender [ 5] 0.00-60.00 sec 1.82 GBytes 261 Mbits/sec receiver iperf Done. |
- Upload:
|
1 2 3 4 5 6 7 8 9 10 11 12 13 14 15 16 |
pi@raspberrypi:~ $ iperf3 -t 60 -c 192.168.1.11 -i 10 Connecting to host 192.168.1.11, port 5201 [ 5] local 192.168.1.9 port 39182 connected to 192.168.1.11 port 5201 [ ID] Interval Transfer Bitrate Retr Cwnd [ 5] 0.00-10.00 sec 295 MBytes 247 Mbits/sec 0 1.65 MBytes [ 5] 10.00-20.00 sec 291 MBytes 244 Mbits/sec 0 2.63 MBytes [ 5] 20.00-30.00 sec 289 MBytes 242 Mbits/sec 0 2.63 MBytes [ 5] 30.00-40.00 sec 290 MBytes 243 Mbits/sec 0 2.63 MBytes [ 5] 40.00-50.00 sec 290 MBytes 243 Mbits/sec 0 2.63 MBytes [ 5] 50.00-60.00 sec 292 MBytes 245 Mbits/sec 0 2.63 MBytes - - - - - - - - - - - - - - - - - - - - - - - - - [ ID] Interval Transfer Bitrate Retr [ 5] 0.00-60.00 sec 1.71 GBytes 244 Mbits/sec 0 sender [ 5] 0.00-60.01 sec 1.70 GBytes 244 Mbits/sec receiver iperf Done. |
The results are very similar to the WiFi 5 Raspberry Pi 5 test I did before with a different router.
I could pair my Android smartphone to the CM5 panel PC over Bluetooth fine, but failed to send files. That’s because, contrary to most operating systems like Windows, Ubuntu, and Android, Raspberry Pi OS does not natively support sending files over Bluetooth. It can be done, but users need to install an OBEX server.
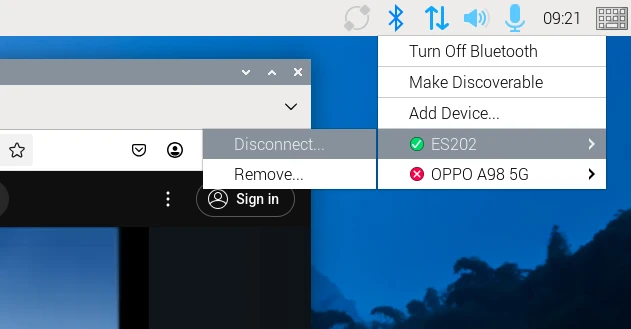
So instead, I just tested the PPC-CM5-156 panel PC’s Bluetooth capabilities with a Bluetooth headset. This worked fine with an ES202 headset while playing a YouTube video.
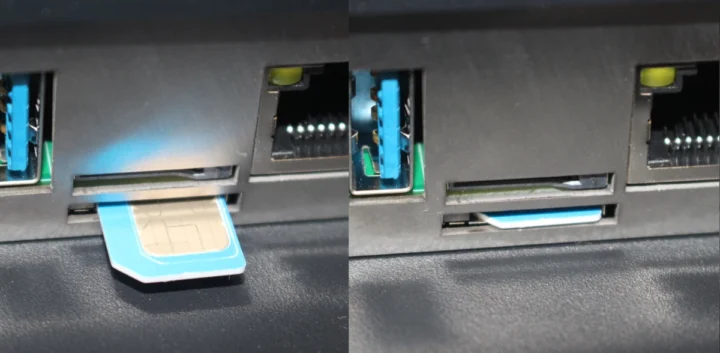
My review sample ships with a 4G LTE Cat 4 modem capable of data rates of up to 150 Mbps downlink and 50 Mbps uplink. So I inserted a SIM card from DTAC with “unlimited speed” as shown below. Note that hotplug is not supported, so you’ll need to turn off the panel PC before inserting a microSIM card.
After booting the system, we can check information using mmcli:
|
1 2 3 4 5 6 7 8 9 10 11 12 13 14 15 16 17 18 19 20 21 22 23 24 25 26 27 28 29 30 31 32 33 34 35 36 37 38 39 40 41 42 43 44 45 46 47 48 49 50 51 52 53 54 55 56 57 58 59 60 61 62 63 64 |
pi@raspberrypi:~ $ mmcli -m 0 ---------------------------------- General | path: /org/freedesktop/ModemManager1/Modem/0 | device id: 2000fd46c791df03595f52dd221dccffffe71e77 ---------------------------------- Hardware | manufacturer: QUALCOMM INCORPORATED | model: QUECTEL Mobile Broadband Module | firmware revision: EC25EUXGAR08A17M1G | carrier config: default | h/w revision: 10000 | supported: gsm-umts, lte | current: gsm-umts, lte | equipment id: 867105079637871 ---------------------------------- System | device: /sys/devices/platform/axi/1000480000.usb/usb5/5-1/5-1.1 | drivers: qmi_wwan, option | plugin: quectel | primary port: cdc-wdm0 | ports: cdc-wdm0 (qmi), ttyUSB0 (qcdm), ttyUSB1 (gps), | ttyUSB2 (at), ttyUSB3 (at), wwan0 (net) ---------------------------------- Status | lock: sim-pin2 | unlock retries: sim-pin (3), sim-puk (10), sim-pin2 (3), sim-puk2 (10) | state: registered | power state: on | access tech: lte | signal quality: 91% (recent) ---------------------------------- Modes | supported: allowed: 2g; preferred: none | allowed: 3g; preferred: none | allowed: 4g; preferred: none | allowed: 2g, 3g; preferred: 3g | allowed: 2g, 3g; preferred: 2g | allowed: 2g, 4g; preferred: 4g | allowed: 2g, 4g; preferred: 2g | allowed: 3g, 4g; preferred: 4g | allowed: 3g, 4g; preferred: 3g | allowed: 2g, 3g, 4g; preferred: 4g | allowed: 2g, 3g, 4g; preferred: 3g | allowed: 2g, 3g, 4g; preferred: 2g | current: allowed: 2g, 3g, 4g; preferred: 4g ---------------------------------- Bands | supported: egsm, dcs, utran-1, utran-8, eutran-1, eutran-3, eutran-7, | eutran-8, eutran-20, eutran-28, eutran-38, eutran-40, eutran-41 | current: egsm, dcs, utran-1, utran-8, eutran-1, eutran-3, eutran-7, | eutran-8, eutran-20, eutran-28, eutran-38, eutran-40, eutran-41 ---------------------------------- IP | supported: ipv4, ipv6, ipv4v6 ---------------------------------- 3GPP | imei: xxxxxxxxxxxx | enabled locks: fixed-dialing | operator id: 52005 | operator name: dtac TriNet | registration: home | packet service state: attached ---------------------------------- 3GPP EPS | ue mode of operation: csps-2 | initial bearer path: /org/freedesktop/ModemManager1/Bearer/0 | initial bearer apn: 3gnet | initial bearer ip type: ipv4v6 ---------------------------------- SIM | primary sim path: /org/freedesktop/ModemManager1/SIM/0 | sim slot paths: slot 1: /org/freedesktop/ModemManager1/SIM/0 (active) | slot 2: none |
The important part is the Status section. If the SIM card is missing or incorrectly inserted, you’ll see:
|
1 2 3 4 |
----------------------------- Status | state: failed | failed reason: sim-missing | power state: on |
The 3GPP section shows some information about the hardware (e.g. IMEI number) and operator (dtac TriNet).
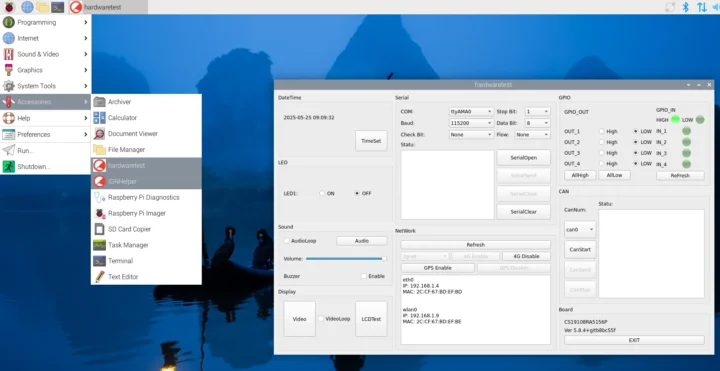
One way to connect to 4G LTE is to use the hardwaretest application found in the Accessories menu in Raspberry Pi OS.
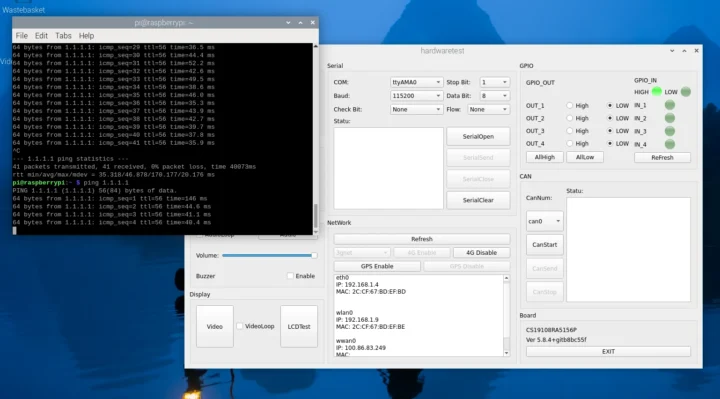
Click on 4G enable and Refresh buttons, and an IP address for the wwan0 should show up. From there, we can ping a server or browse the web over 4G LTE.
I ran a speed test over the cellular connection, and the results were 20.83 Mbps for download, 2.70 Mbps for upload. For reference, I repeated the test on my smartphone (OPPO A98 5G) with the SIM card, and it was quite faster at 65.96 Mbps and 7.66 Mbps, respectively.
Another method to connect to the cellular network is via the command, and it’s equally easy:
|
1 2 3 4 5 6 7 8 9 10 11 12 13 14 15 16 17 18 19 20 21 22 23 24 |
pi@raspberrypi:~ $ sudo quectel-CM & [1] 76489 pi@raspberrypi:~ $ [05-25_10:26:46:644] Quectel_Linux_ConnectManager_SR01A01V21 [05-25_10:26:46:644] quectel-CM profile[1] = (null)/(null)/(null)/0, pincode = (null) [05-25_10:26:46:644] Find qmichannel = /dev/cdc-wdm0 [05-25_10:26:46:644] Find usbnet_adapter = wwan0 [05-25_10:26:46:653] cdc_wdm_fd = 7 [05-25_10:26:46:751] Get clientWDS = 5 [05-25_10:26:46:783] Get clientDMS = 1 [05-25_10:26:46:815] Get clientNAS = 2 [05-25_10:26:46:848] Get clientUIM = 1 [05-25_10:26:46:879] Get clientWDA = 1 [05-25_10:26:46:911] requestBaseBandVersion EC25EUXGAR08A17M1G [05-25_10:26:46:975] requestGetSIMStatus SIMStatus: SIM_READY [05-25_10:26:47:007] requestGetProfile[1] 3gnet///0 [05-25_10:26:47:039] requestRegistrationState2 MCC: 520, MNC: 5, PS: Attached, DataCap: LTE [05-25_10:26:47:071] requestQueryDataCall ConnectionStatus: DISCONNECTED [05-25_10:26:47:135] requestRegistrationState2 MCC: 520, MNC: 5, PS: Attached, DataCap: LTE [05-25_10:26:47:168] requestSetupDataCall WdsConnectionIPv4Handle: 0x86de1f40 [05-25_10:26:47:232] requestQueryDataCall ConnectionStatus: CONNECTED udhcpc: started, v1.35.0 udhcpc: broadcasting discover udhcpc: broadcasting select for 100.86.83.249, server 100.86.83.250 udhcpc: lease of 100.86.83.249 obtained from 100.86.83.250, lease time 7200 |
You’d need to run the command each time the system boots to have a persistent connection, and Chipsee provides instructions to do just that.
Display, Touchscreen, and HDMI
The display works fine indoors, and the touchscreen supports gestures like scrolling or zooming in Chromium or Firefox web browsers. 10-point multitouch also works using the WBBMTT website.
However, there’s a downside to having multitouch enabled in Wayland, as double-click does not work in the file manager. The latter would require mouse emulation for this to work, but it disables multitouch support. The latest version of Raspberry Pi OS is supposed to have a setting to switch between the two modes, but this was not enabled in my case.
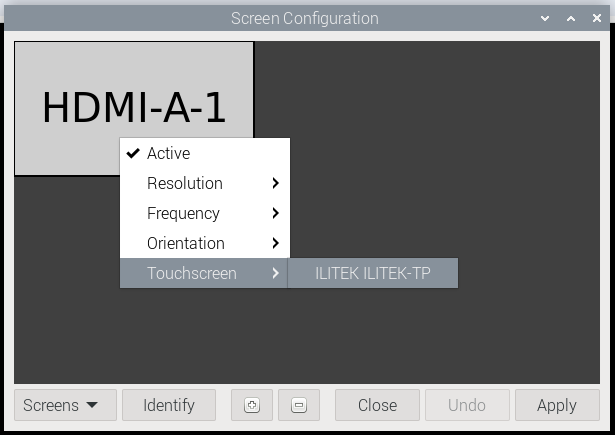
One way to switch to mouse emulation would be to add an entry in ~/.config/labwc/rc.xml to set mouseEmulation to no for the ILITEK-TP display. Something like:
|
1 2 3 4 5 |
pi@raspberrypi:~ $ cat ~/.config/labwc/rc.xml <?xml version="1.0"?> <openbox_config xmlns="http://openbox.org/3.4/rc"> <touch deviceName="ILITEK ILITEK-TP" mapToOutput="HDMI-A-1" mouseEmulation="yes"/> </openbox_config> |
More on that shortly.
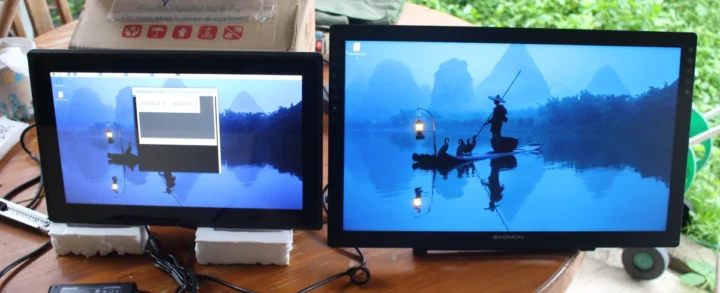
The Chipsee PPC-CM5-156 panel PC also comes with an HDMI video output, so I connected a GAOMON PD2200 pen display with 1920×1080 resolution.
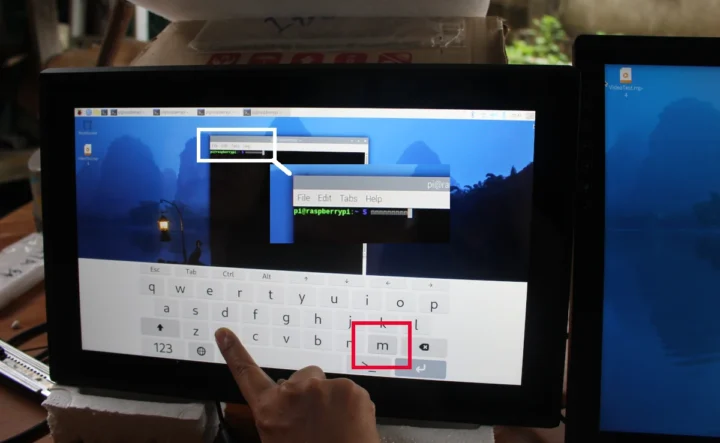
The dual display setup looks to work just fine until I tried the touchscreen display. Something was off, as for instance, tapping on the “x” key on the soft keyboard would trigger the “m” key instead.
After playing a bit more with the touchscreen, I realized the resolution was set to 3840×1080 using both displays, which explains the offset I experienced above. I edited the ~/.config/labwc/rc.xml file to set the touchscreen to HDMI-A-1 only, and it fixed the issue. Here’s the content of the file:
|
1 2 3 4 |
<?xml version="1.0"?> <openbox_config xmlns="http://openbox.org/3.4/rc"><libinput><device category="default"><pointerSpeed>0.000000</pointerSpeed><leftHanded>no</leftHanded></device></libinput><mouse><doubleClickTime>400</doubleClickTime></mouse><keyboard><repeatRate>25</repeatRate><repeatDelay>600</repeatDelay></keyboard> <touch deviceName="ILITEK ILITEK-TP" mapToOutput="HDMI-A-1" mouseEmulation="yes"/> </openbox_config> |
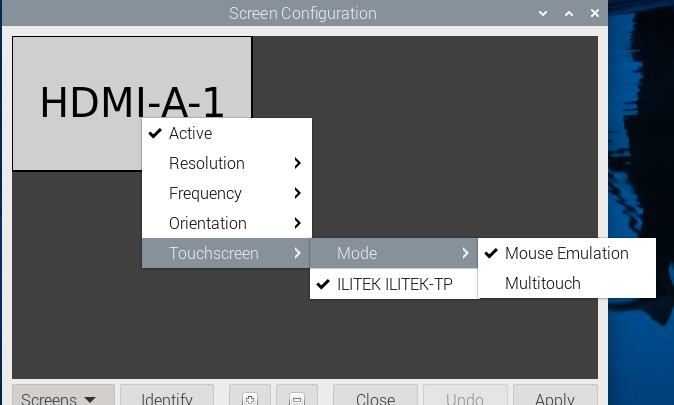
I also enabled mouse emulation while I was at it. After a reboot, the touchscreen was now working properly, and I was able to use double-tap in the file manager. I also noticed the Mouse Emulation and Multitouch options were now available in the settings.
Chipsee PPC-CM5-156 power consumption
I measure power consumption with a wall power meter as follows:
- Power off – 4 Watts
- Idle – 20.9 – 20.7 Watts
- YouTube 1080p60 (Chromium) – 24.1 – 26.3 Watts
- Stress test (stress -c 4) – 26.0 – 26.1 Watts
The panel PC was connected to the network over WiFi during measurements, and nothing else was connected to the device.
Conclusion
Overall, I find the Chipsee PPC-CM5-156 to be a solid device, and everything I tried mostly worked out of the box with expected performance. The documentation is pretty good, although I had to fix some small undocumented issues using my experience with Raspberry Pi touchscreen displays.
I’d like to thank Chipsee for sending the PPC-CM5-156 industrial panel PC for review with a Raspberry Pi CM5 module with 4GB RAM, 32GB eMMC flash, and a wireless module. The company offers models from 5-inch to 23.6-inch with different options. The 15.6-inch model reviewed here starts at $558, and the price with the options I had (250GB SSD and 4G LTE Cat 4 module) totals $682 plus shipping.

Jean-Luc started CNX Software in 2010 as a part-time endeavor, before quitting his job as a software engineering manager, and starting to write daily news, and reviews full time later in 2011.
Support CNX Software! Donate via cryptocurrencies, become a Patron on Patreon, or purchase goods on Amazon or Aliexpress. We also use affiliate links in articles to earn commissions if you make a purchase after clicking on those links.


