
This is a guest post by Leonardo Graboski Veiga, working for Toradex.
Introduction
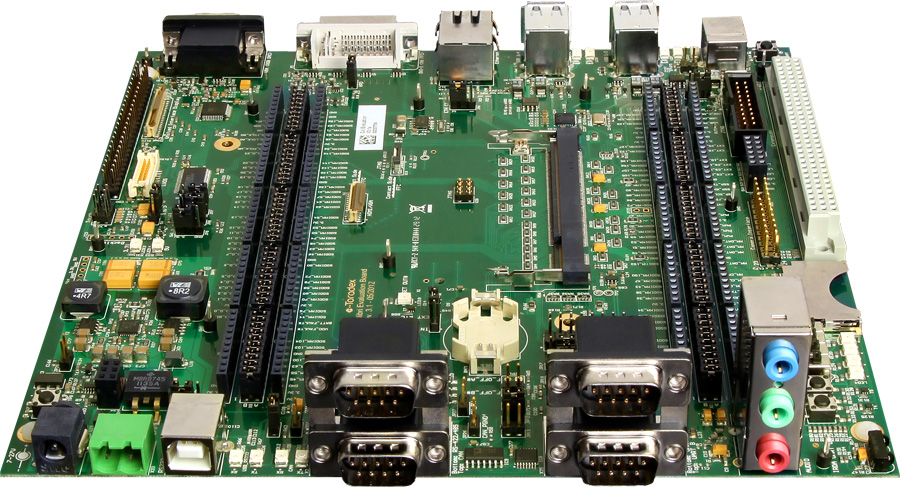
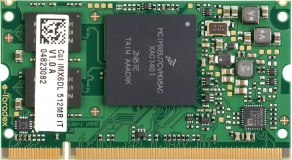
This article’s main goals are: to cross-compile the PJSIP libraries and the PJSUA API reference implementation; deploy it to the target system; give an overview about the SIP protocol; and explore the reference implementation features, regarding audio only. For this purpose, a Computer on Module (CoM) from Toradex was chosen in the following configuration: Colibri iMX6DL* + Colibri Evaluation Board. The evaluation board and CoM are displayed in Figures 1 and 2, respectively.
VOIP or Voice over IP, is a term designed to refer to a set of methods and technologies targeted for the implementation of telephony services over the Internet. For the purpose of this article, the scope will be limited to the use of a reference implementation built upon the SIP communication handling protocol by means of the PJSIP libraries and PJSUA2 API. If you wish to gather more information about VOIP itself, there is a website that labels itself “A reference guide to all things VOIP” and it holds comprehensive information on the matter.
SIP is the Session Initiation Protocol – a protocol used for signaling and handling communication sessions. This protocol is sometimes referred to as the de facto standard for VOIP implementations. It is an IETF (Internet Engineering Task Force) standard even though there are other options to SIP, such as IAX2. SIP employs the RTP protocol for data transmission which itself is encapsulated in TCP or UDP and can be encrypted by using TLS.
PJSIP is a set of libraries that implements the SIP and related protocols such as RTP and STUN, among others in C language. Some of its advantages are that it is free, open source, and highly portable. It was started in 2005 and is still being maintained and improved with wide documentation and the advantage of having a high level API named PJSUA2 for easily building custom applications. The PJSUA2 even has an online book for its official documentation.
Cross-compilation
The first step to cross-compile the PJSIP libraries and the test/sample application is to have the toolchain set. To do it, we can follow the toolchain for hard float calling convention section of this article. Note that if you are willing to use your own cross-compilation toolchain, according to this PJSIP documentation, you are required to have the following GNU tools: GNU make (other make will not work), GNU binutils, and GNU gcc for the target.
If the basic rootfs provided by Linaro doesn’t have some ALSA headers and the library needed to compile PJSIP, we will download and compile these libraries from the ALSA project website. In this article, the alsa-lib version downloaded was 1.1.1. then we will install the headers and library to the Linaro rootfs.
Install the toolchain Linaro:
|
1 2 3 4 |
cd wget -c https://releases.linaro.org/components/toolchain/binaries/5.2-2015.11-2/arm-linux-gnueabihf/gcc-linaro-5.2-2015.11-2-x86_64_arm-linux-gnueabihf.tar.xz tar xvf gcc-linaro-5.2-2015.11-2-x86_64_arm-linux-gnueabihf.tar.xz ln -s gcc-linaro-5.2-2015.11-2-x86_64_arm-linux-gnueabihf gcc-linaro |
Export the environment variables:
|
1 2 3 |
export ARCH=arm export PATH=~/gcc-linaro/bin/:$PATH export CROSS_COMPILE=arm-linux-gnueabihf- |
Download and unpack the ALSA lib:
|
1 2 3 |
wget ftp://ftp.alsa-project.org/pub/lib/alsa-lib-1.1.1.tar.bz2 tar xjvf alsa-lib-1.1.1.tar.bz2 cd alsa-lib-1.1.1/ |
Before compiling the ALSA lib source codes, it is necessary to run the autoconf script with the CFLAGS, LDFLAGS and prefix variables pointing to the rootfs from the Linaro toolchain:
|
1 |
./configure --host=arm-linux-gnueabihf CC=arm-linux-gnueabihf-gcc CFLAGS="-mfloat-abi=hard -mfpu=neon --sysroot=/home/leonardo/gcc-linaro/arm-linux-gnueabihf/libc" LDFLAGS="-mfloat-abi=hard -mfpu=neon --sysroot=/home/leonardo/gcc-linaro/arm-linux-gnueabihf/libc" --prefix=/home/leonardo/gcc-linaro/arm-linux-gnueabihf/libc/usr/ |
Then just build and install. After the make command, the compilation will fail at some point; but it doesn’t matter because the headers and library we need will have been compiled.
|
1 2 |
make make install |
Having the toolchain configured, it is time to download and extract the PJSIP source codes to the host machine and then go into the directory that holds the unpacked content. At the time this article was written, PJSIP version was 2.5.1.
|
1 2 3 4 |
cd wget http://www.pjsip.org/release/2.5.1/pjproject-2.5.1.tar.bz2 tar xvjf pjproject-2.5.1.tar.bz2 cd pjproject-2.5 |
Before compiling the PJSIP source codes, it is necessary to run the autoconf script pointing to the previously modified rootfs from the Linaro toolchain. It is almost the same way we did to compile the ALSA libraries, except for the fact that the directory where we want the compiled libraries to be installed is a directory we will compress and deploy to the target machine.
|
1 |
./configure --host=arm-linux-gnueabihf CC=arm-linux-gnueabihf-gcc CFLAGS="-mfloat-abi=hard -mfpu=neon --sysroot=/home/leonardo/gcc-linaro/arm-linux-gnueabihf/libc" LDFLAGS="-mfloat-abi=hard -mfpu=neon --sysroot=/home/leonardo/gcc-linaro/arm-linux-gnueabihf/libc" --prefix=/home/leonardo/deploy |
Then we are able to compile the libraries and also copy the reference implementation executable to the installation folder:
|
1 2 3 4 5 |
make dep make make install cp pjsip-apps/bin/pjsua-arm-unknown-linux-gnueabihf ../deploy/ cd .. |
The next steps are to compress the folder and copy it to the Colibri iMX6. To discover the iMX6 IP, you can issue the ifconfig command:
|
1 2 |
tar cjvf deploy.tar.bz2 deploy/ scp deploy.tar.bz2 root@192.168.10.5 |
Finally, log into the Colibri iMX6:
|
1 2 3 4 5 |
cd tar xjvf deploy.tar.bz2 mv pjsua-arm-unknown-linux-gnueabihf . cp -a deploy/. /usr/ rm -r deploy |
Now, we have the PJSIP deployed to the target – although it isn’t necessary for our next steps, since we will be using a binary only, you may find it useful somehow while developing applications of your own. We are also ready to start using the reference implementation, but first, let’s check some other things.
Audio check and configuration
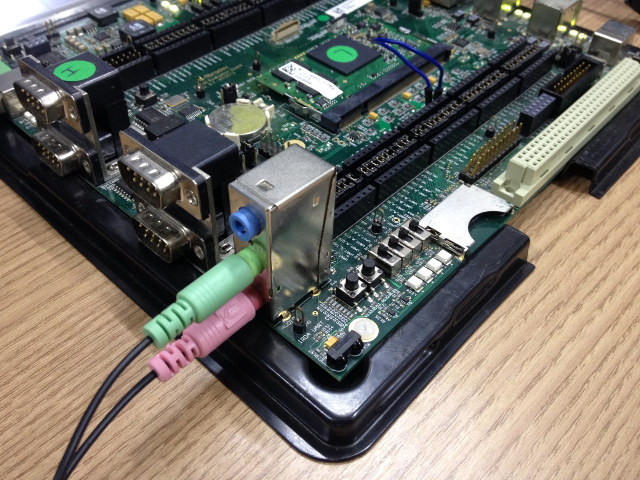
The PJSIP library uses ALSA (Advanced Linux Sound Architecture) resources, which is also the audio subsystem used by the Toradex embedded system BSPs. Before starting, make sure you plug a headphone/speakers and a microphone into the carrier board with the system powered-off, as illustrated in the Figure 3.
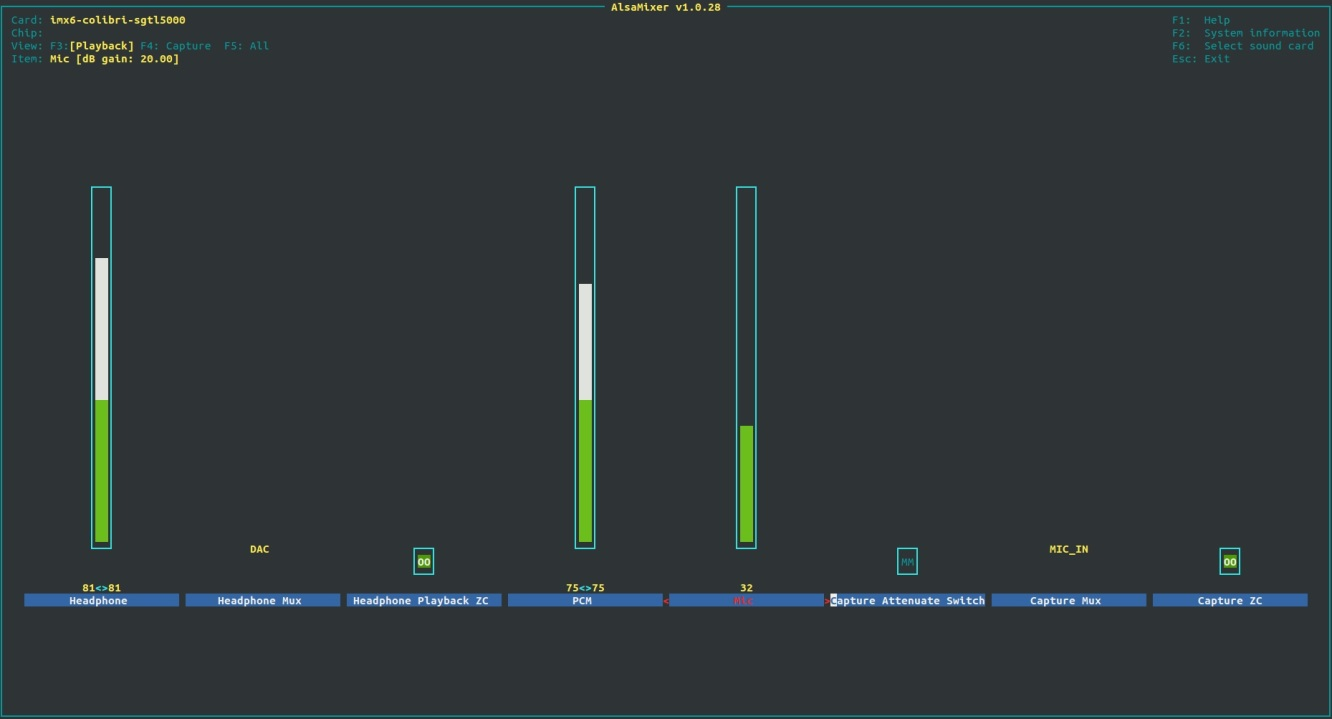
Then you can use the alsamixer application to adjust the audio options according to your system.
|
1 |
root@colibri-imx6:~# alsamixer |
The configuration used is illustrated in the Figure 4 and you should notice that adjusting the microphone’s amplification too loud can cause distortion, thus, it is good to experiment with the settings. Even adjusting the mic option to zero won’t mute your microphone; it just means there will be no amplification, or in other words 0dB gain. Another important point to notice is that if you force power-off the system, the configurations you made might be lost, therefore reboot or shutdown from the command line the first time you make your changes.
|
1 2 3 |
root@colibri-imx6:~# reboot or root@colibri-imx6:~# shutdown -h now |
To test the audio input (microphone) and, subsequently the output (headphones/speakers), we will record some audio by using the arecord command and then play it by using the aplay command. Notice that for the arecord there are some options that we need to set: -V displays a VU meter so you have visual feedback whether your mic configuration is good or not; mono is passed since microphone is mono; -r is the sampling rate; -f is the format and -d is the duration in seconds. For more information regarding arecord, you can use the –help option, or if you want to know more about audio on the Colibri iMX6, you can go to the Toradex developer related page.
|
1 2 |
root@colibri-imx6:~# arecord -V mono -r 8000 -f S16_LE -d 15 Capture8kHz.wav root@colibri-imx6:~# aplay Capture8kHz.wav |
If you can hear yourself well, we are ready to go ahead. Otherwise, check the connectors and the audio configuration.
SIP protocol overview
SIP is the session initiation protocol standardized by the IETF and used for VOIP and other types of multimedia sessions, such as messaging and video. It is text-based and uses the UTF-8 encoding, usually choosing UDP or TCP over port 5060 as a transport protocol. The information provided here about this protocol is mostly based on information provided here.
The protocol has methods defined in its RFC and method extensions defined in other RFCs. A few of them are:
- ACK: used in some situations for handshake
- BYE: session hang up
- CANCEL: cancel an invite
- INVITE: add another user agent to a session
- SUBSCRIBE: request information about the status of a session
- NOTIFY: sent from time to time by the gateway, must be answered with 200 OK
- MESSAGE: used to allow and transport instant messages
There are also response codes, each with a specific meaning, that consist of 3 digit values:
- 1xx: provisional – request received and still needs to process e.g. 100 trying, 180 ringing
- 2xx: success – action successfully received and accepted e.g. 200 ok
- 3xx: redirection – there is still some action needed to complete the request e.g. 300 multiple choices; 305 use proxy
- 4xx: client error – server cannot process request or the client sent invalid e.g. 400 bad request; 404 not found
- 5xx: server error – server cannot process a valid request e.g. 500 server internal error
- 6xx: global failure – no server can fulfill the request e.g. 600 busy everywhere; 603 decline
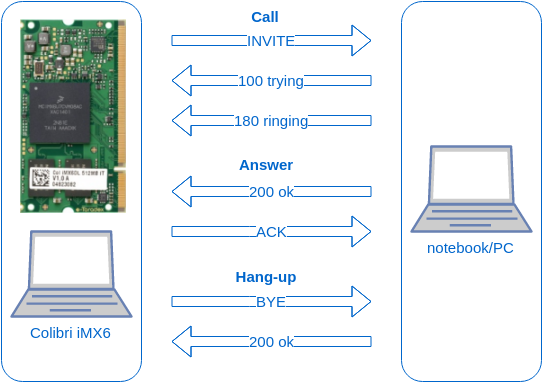
It is important to notice that the SIP protocol doesn’t carry the audio information. Instead, it uses the RTP protocol encoded usually in UDP or TCP transport. For a better understanding, the Figure 5 explains how the transaction between two user agents is done for a simple call.
To make calls, a SIP URI is needed. It is a form of identifying a communication resource. A complete SIP URI has the format sip:user:password@host:port;uri-parameters?headers, but there are systems which can operate even with a SIP URI that provides only the host.
PJSUA reference implementation
The PJSUA API reference implementation is a command-line based application which uses the PJSIP, PJMEDIA, and PJNATH libraries and implements a user agent, also known as softphone. Its source-code can be found here and is a useful starting point to developing your own solution. The full documentation regarding the use of the PJSUA application can be found here.
Before starting to test, find the IP address for both your embedded system and your PC/notebook. You must have both of them in the same LAN, because we are not worried about using a proxy server or anything like that, therefore our connection between devices will be made point-to-point.
|
1 2 |
eonardo@leonardo:~$ ifconfig root@colibri-imx6:~# ifconfig |
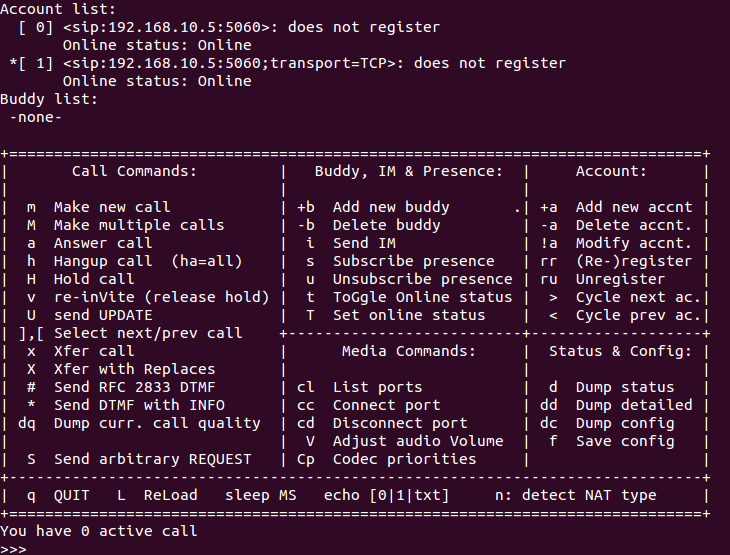
In this article, we will assume IP address 192.168.10.5 for the Colibri iMX6 and 192.168.10.1 for the PC. You also must have softphone software installed in your PC – it can even be the same reference application, if you want to compile it for your machine – this article will use the Linphone open-source softphone for Ubuntu 14.04 LTS. To start PJSUA in the embedded system use the following command. The PJSUA command line interface that you are expected to see is described in the Figure 6.
|
1 |
root@colibri-imx6:~# ./pjsua-arm-unknown-linux-gnueabihf |
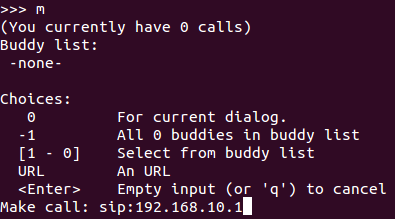
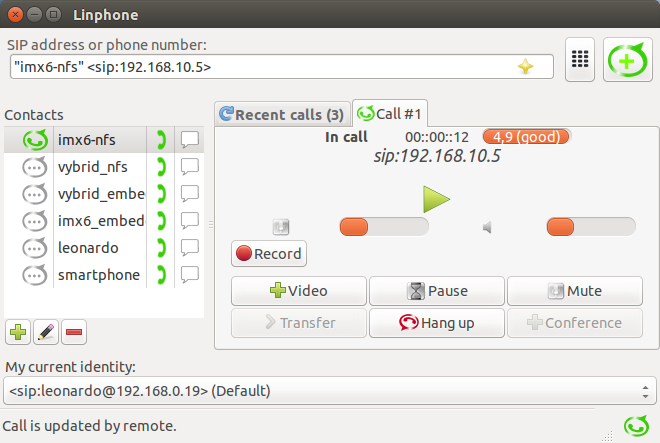
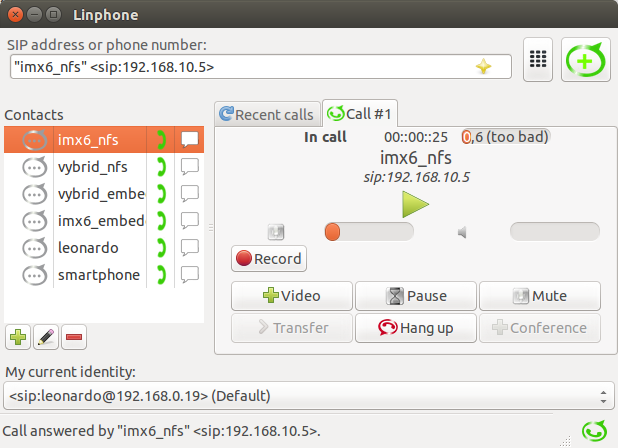
To make a new call from the embedded system to the PC, type “m” and then enter the simplest SIP URI possible which consists of passing only the softphone IP in the format sip:192.168.10.1. The process of making the call is illustrated in the Figure 7 and the answered call in the PC is illustrated in the Figure 8. To hang up, use the command “h”.
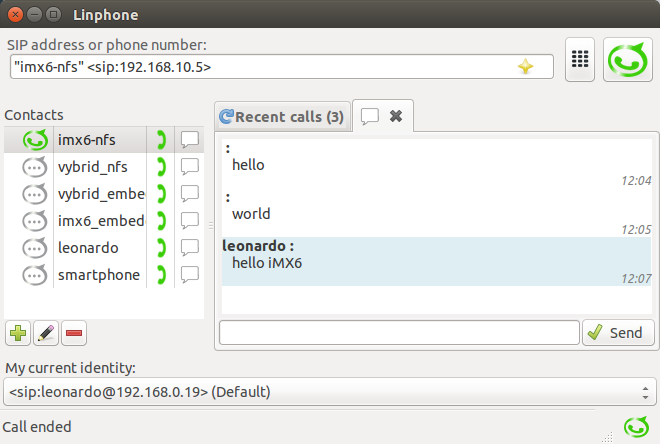
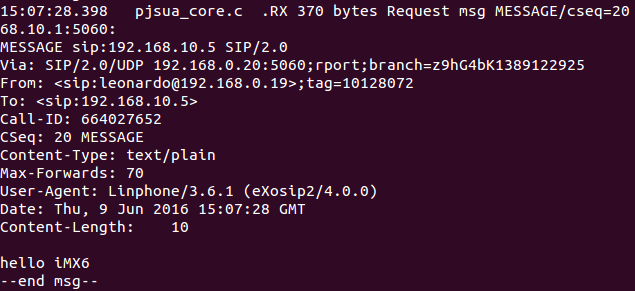
In order to send instant messages, type “i”, the SIP URI of the destination and the message, almost like the way we did to start a call. In your PC softphone, you should see the message. Try to send some message to the iMX6 by using the GUI. The Figure 9 displays the Linphone messaging interface with some messages exchanged between devices, while Figure 10 illustrates a message received by the Colibri iMX6 embedded system.
Additional configuration
In this subsection, some of the options for the PJSUA command-line application will be presented. They can be found here. Firstly, create a file named .pjsua-conf in the embedded system with the following contents:
|
1 2 3 4 5 |
--stereo --auto-answer=200 --duration=60 --color --add-buddy=sip:192.168.10.1 |
The stereo configuration lets the audio output to be played on both the headphone’s speakers, while omitting it just makes the application to output the sound to only one of them. The auto-answer option lets you configure an answer code for incoming calls – in this case, the answer is 200, which means the call is accepted – and this can be useful in situations where the embedded system endpoint doesn’t has a human interface. Duration sets a maximum call duration in seconds, and this may be useful in applications such as debugging purposes. Color makes some log messages such as warnings and errors be colored, which helps identifying specific situations. Lastly, the add-buddy option lets you add SIP URIs so that you don’t have to add them manually every time you restart the application neither do you have to type the URI every time you want to make a call to the corresponding buddy (you may specify this option more than once for multiple buddies).
Passing the configuration file to the application:
|
1 |
root@colibri-imx6:~# ./pjsua-arm-unknown-linux-gnueabihf --config-file=.pjsua-conf |
Among the various options available, there are two that are nice for testing purposes: rx-drop-pct=PCT and tx-drop-pct=PCT. They both simulate packet loss by adjusting its percentage (PCT). It was tested with a package loss for both Rx and Tx of 10%, 20% and 30%, respectively, while monitoring the call quality average displayed by Linphone, which ranges from 0 to 5. The quality went from almost 5.0 without loss to 3.3, 2.3, and 0.6, respectively. Figure 11 shows the Linphone screen capture for the last situation (30% loss).
There you go! Now you have a VOIP implementation for the Colibri iMX6 running and a starting point to develop your own application according to your needs. Some additional information will be presented in the next chapter: network monitoring in order to see the SIP packets and some transactions being made.
Network monitoring for SIP packets
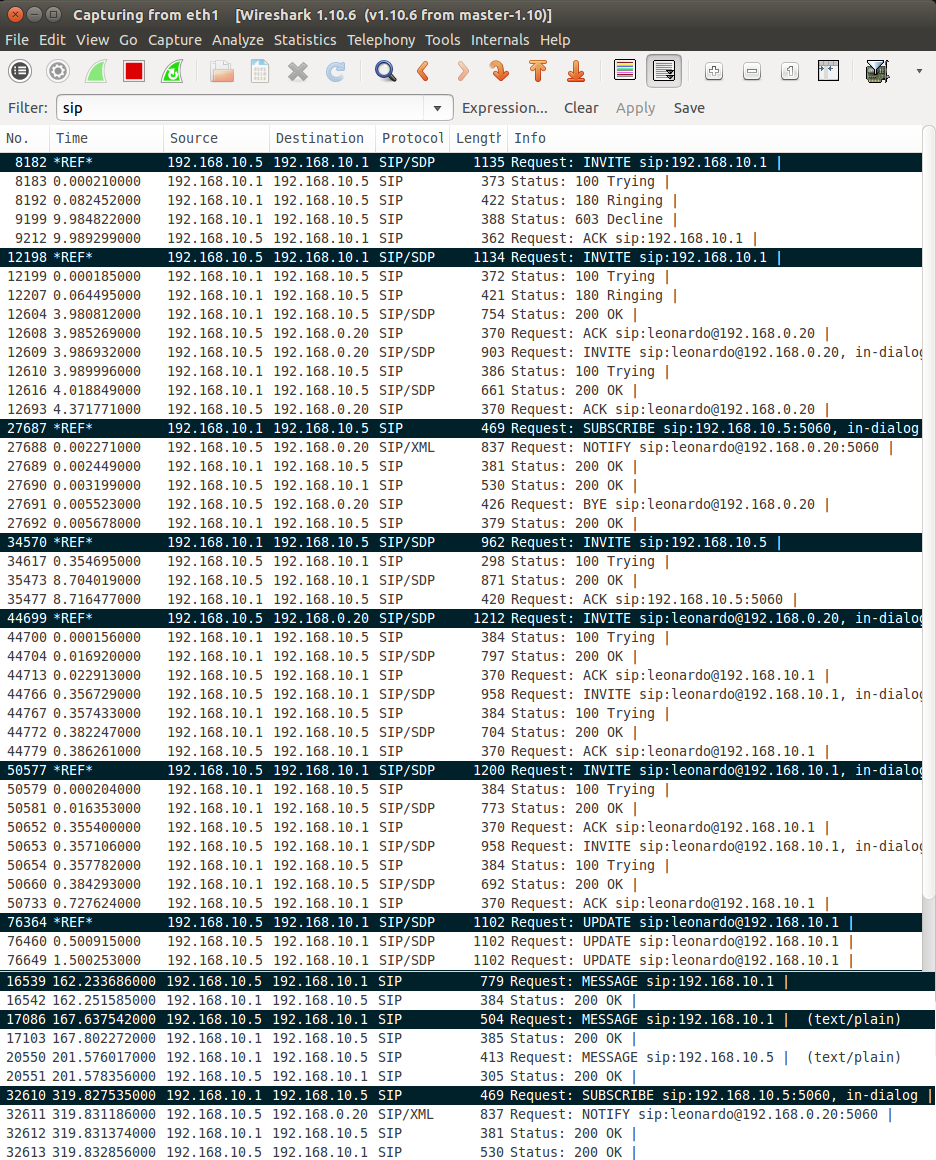
In order to see the SIP transactions being made between devices, the Wireshark software will be employed. You must notice that there is a third IP address 192.168.0.20 in the transactions and that is because the notebook was used as a DHCP server for the iMX6. Therefore, the notebook has two IP addresses. Still, no further investigation on why or how the SIP application is accessing the second IP address.
The sequence of operations made while capturing the network is described below:
- Call from Colibri iMX6 and reject from the notebook
- Call from Colibri iMX6 and accept from the notebook
- Colibri iMX6 hang up
- Call from the notebook and accept from Colibri iMX6
- Colibri iMX6 puts on hold
- Colibri iMX6 resumes the call
- Colibri iMX6 sends UPDATE
- Colibri iMX6 sends instant message
- Notebook sends instant message
- SUBSCRIBE/NOTIFY
The Figure 12 displays only the SIP protocol packets exchanged during the capture, with the highlighted lines corresponding to the start of the situations described above. Hence, 10 lines are highlighted. Notice that there is a SUBSCRIBE/NOTIFY handshake a moment before the third operation listed above.
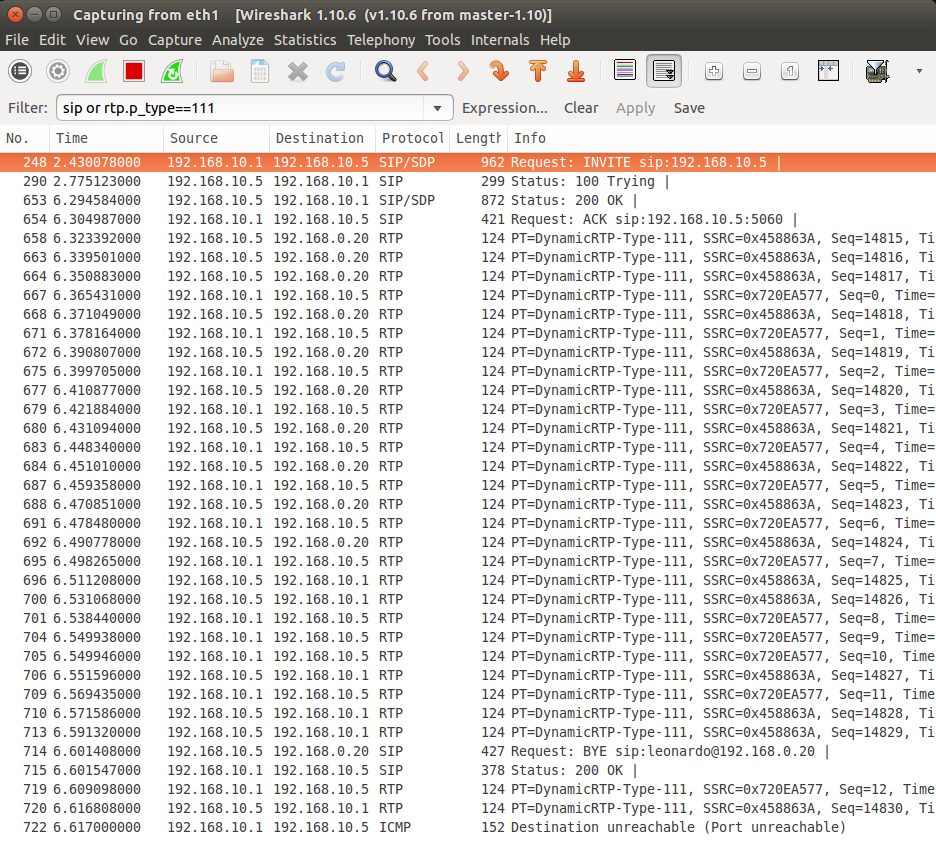
In the Figure 13, there is a capture of a very brief conversation (~4s) SIP and RTP packets. Notice that while the notebook uses the IP address 192.168.10.1 to send data to the embedded system, this one replies to the IP address 192.168.0.20.
With the information gathered, this is a way to confirm in practice some of the information presented in the previous chapter SIP protocol overview.
This is the end of the article that goes through implementing the PJSUA console-based application on a Toradex Colibri iMX6 and Evaluation Board running embedded Linux. Thank you for reading and I hope it was a useful article!
* for T20 based modules, mfpu=neon could generate incompatible binaries.

Jean-Luc started CNX Software in 2010 as a part-time endeavor, before quitting his job as a software engineering manager, and starting to write daily news, and reviews full time later in 2011.
Support CNX Software! Donate via cryptocurrencies, become a Patron on Patreon, or purchase goods on Amazon or Aliexpress


Making videophone would be nice 🙂
Excellent article. I will look at Toradex more closely for my product.
Shameless plug: If you need to packet-capture your call on the other (server) side, and that side happens to be a busy SIP-server with a lot of calls happening all at once, use pcapsipdump:
http://pcapsipdump.sf.net/
@Peter
For video support you must have some additional components when compiling, and possibly change some parameter(s).
I haven’t tried it yet, but you can check https://trac.pjsip.org/repos/wiki/Getting-Started/Autoconf#vidgui for more information.
@aexaey
Thank you for sharing this information, it seems to be a helpful tool!
Wow — Great article and information!
Hi there
thanks for sharing this helpful information. i need to do the same job too. so i want to ask you about the system performance. how much is the CPU usage during an active call? and what echo cancellation depth do you used with pjsip and what’s the relation between CPU usage and echo cancellation depth??
thanks
thanks to shared this nice blog such a good informative article.