Last month I went through an unboxing of the VOIPAC iMX8M Industrial Development Kit with some specs and a quick try with the pre-loaded Yocto 3.1 Linux image. The kit is quite versatile with plenty of interfaces and headers, and eventually, it will support Android 12 and Ubuntu 22.04 LTS. but in the meantime, I played a bit with the Yocto Linux SDK for the NXP i.MX 8M board and will report by experience getting started with VOIPAC IMX8M Industrial development kit.
WiFi antennas installation
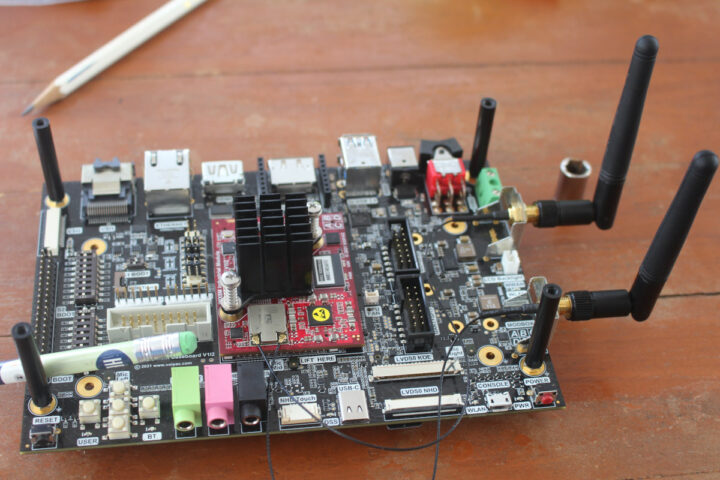
But before checking out Yocto Linux, I will install the two WiFi antennas since I did not do it last time around. We can attach the SMA connectors to the two metal plates on the side of the board securing them with the provided nuts and spacers.
The other side of the antenna’s cable comes with a tiny u.FL (or is it MHF4) connector and as somebody who has damaged plenty of those tiny connectors over the years, I’ve eventually found something that works for me: the eraser on a pencil. It allows me to gently push the connector without breaking anything.
I also received a new iMX8M Industrial Pro module, as the previous refurbished module had only 1GB RAM. So I removed the old one and replaced it with the new one with 2GB RAM and it shows as such in Linux:
|
1 2 3 4 |
root@imx8mq-voipac:~# free -mh total used free shared buff/cache available Mem: 2027120 355040 1615584 17992 56496 1608220 Swap: 0 0 0 |
A quick look at the preinstalled image
The last time I reviewed a system with Yocto Linux (i-Pi SMARC-1200) the image came with some benchmarking tools, so I could test the performance and features of the board without playing with the SDK. But the pre-build Linux image for the IMX8 Industrial development kit has no tools as all in the home directory, except for a JPG image:
|
1 2 3 |
root@imx8mq-voipac:~# ls -l total 603 -rw-r--r-- 1 root root 617213 Jul 25 10:01 sample_image_digi.jpeg |
I could just find some tools such as iperf3 or aplay/arecord to test networking or audio, and Yocto images will typically not have toolchains like GCC or a package manager, so the only way to add more packages is to build code from source with the Yocto Project.
Building Linux with Yocto 3.1 for the VOIPAC IMX8M Industrial Board
There’s plenty of documentation in the Wiki but it focuses on the hardware and the software documentation is outdated (copy/paste for Yocto 2.1 on i.MX 6MX) at the time of writing, with the important part being the source on GitHub. The build would not work for me initially, so I informed VOIPAC about the lack of documentation, and they told me the software documentation for the iMX8M Industrial Module would be published in the fall, and that customers currently relying on direct software/hardware support from the company. So I got assigned a member from the software support team to help me with any issues building Linux and flashing the image to the board, and after a few email exchanges, most of the issues were resolved.
I used a laptop with Ubuntu 22.04 as the build machine. We’ll need to install some dependencies first:
|
1 |
sudo apt install chrpath diffstat gawk build-essential git make python3-distutils |
If those are missing, you’ll get some errors during the build. For example:
|
1 2 3 4 5 |
ERROR: Unable to start bitbake server (None) ERROR: Server log for this session (/home/jaufranc/edev/sandbox/yocto-imx8m-voipac/build-voipac/bitbake-cookerdaemon.log): --- Starting bitbake server pid 46243 at 2023-08-16 16:57:24.931057 --- ERROR: The following required tools (as specified by HOSTTOOLS) appear to be unavailable in PATH, please install them in order to proceed: chrpath diffstat gawk |
or
|
1 2 3 4 5 |
ERROR: OE-core's config sanity checker detected a potential misconfiguration. Either fix the cause of this error or at your own risk disable the checker (see sanity.conf). Following is the list of potential problems / advisories: Your Python 3 is not a full install. Please install the module distutils.sysconfig (see the Getting Started guide for further information). |
We can now retrieve the code with git:
|
1 2 |
git clone https://github.com/voipac/yocto-imx8m-voipac cd yocto-imx8m-voipac |
Then install the repo utiylity and add it to our path:
|
1 2 3 4 |
mkdir -pv ~/edev/bin curl http://commondatastorage.googleapis.com/git-repo-downloads/repo > ~/edev/bin/repo chmod a+x ~/edev/bin/repo PATH=${PATH}:~/edev/bin |
You may want to edit your ~/.profile file to update the path permanently, for instance:
|
1 |
export PATH=~/.npm-global/bin:~/edev/bin/:$PATH |
We can now start the build:
|
1 2 3 4 5 6 7 8 9 10 11 12 13 14 15 16 17 18 19 20 21 22 23 24 25 26 27 28 29 30 31 32 33 34 35 36 37 38 39 40 41 42 |
jaufranc@CNX-LAPTOP-5:~/edev/sandbox/yocto-imx8m-voipac$ ./build_image.sh ... A new version of repo (2.35) is available. ... You should upgrade soon: cp /home/jaufranc/edev/sandbox/yocto-imx8m-voipac/.repo/repo/repo /home/jaufranc/edev/bin/repo Fetching: 100% (8/8), done in 6.000s repo sync has finished successfully. You can now run 'bitbake <target>' Common targets are: voipac-image Your configuration files at build-voipac have not been touched. Loading cache: 100% |############################################| Time: 0:00:00 Loaded 3621 entries from dependency cache. NOTE: Resolving any missing task queue dependencies Build Configuration: BB_VERSION = "1.46.0" BUILD_SYS = "x86_64-linux" NATIVELSBSTRING = "universal" TARGET_SYS = "aarch64-fslc-linux" MACHINE = "imx8mq-voipac" DISTRO = "fslc-xwayland" DISTRO_VERSION = "3.1" TUNE_FEATURES = "aarch64 cortexa53 crc crypto" TARGET_FPU = "" meta meta-poky = "HEAD:32da5ee9519119a16392acba29f9df4720a55c0f" meta-oe meta-multimedia meta-python meta-filesystems meta-gnome meta-networking = "HEAD:b8b0b06821d4d4df0cce4f07fa31a8ca1dd38f46" meta-freescale = "HEAD:76de0f78cb4519d6212d82c4e374cc2973352ff9" meta-freescale-3rdparty = "HEAD:4c0a166fa2809f74c93bd4c56d9a0f7ccb7818c8" meta-freescale-distro = "HEAD:5d882cdf079b3bde0bd9869ce3ca3db411acbf3b" meta-voipac-bsp meta-voipac-evk = "HEAD:4abf4b8d5e5ce4cf414022541cfb4e466e7a4785" |
As usual building Linux with the Yocto Project is quite a demanding task, and I estimate it took around one hour on my laptop. (ASUS Vivobook 16 with 12-core/16-thread Core i5-13500H Raptor Laptop processor, 16GB RAM, and NVMe storage). I can’t say for sure because the laptop did not survive the build, and automatically rebooted at some point, probably because I did not set up any swap and it ran out of memory… So I had to restart it to the script to complete the build:
|
1 2 3 4 5 6 7 8 9 |
Initialising tasks: 100% |#######################################| Time: 0:00:02 Sstate summary: Wanted 867 Found 0 Missed 867 Current 886 (0% match, 50% complete) NOTE: Executing Tasks NOTE: Tasks Summary: Attempted 4524 tasks of which 2561 didn't need to be rerun and all succeeded. NOTE: Writing buildhistory NOTE: Writing buildhistory took: 6 seconds Summary: There was 1 WARNING message shown. jaufranc@CNX-LAPTOP-5:~/edev/sandbox/yocto-imx8m-voipac$ |
The output from the build can be found in the ./build-voipac/tmp/deploy/images/imx8mq-voipac folder:
|
1 2 3 4 5 6 7 8 9 10 11 12 13 14 15 16 17 18 19 20 21 22 23 24 25 26 27 28 29 30 31 32 33 34 35 36 37 38 39 40 41 42 43 44 45 46 47 48 49 50 51 52 53 |
jaufranc@CNX-LAPTOP-5:~/edev/sandbox/yocto-imx8m-voipac$ ls -l ./build-voipac/tmp/deploy/images/imx8mq-voipac total 328424 lrwxrwxrwx 2 jaufranc jaufranc 72 Aug 16 18:01 Image -> Image--5.4.147+gitAUTOINC+074a74780f-r0-imx8mq-voipac-20230816102039.bin -rw-r--r-- 2 jaufranc jaufranc 27787776 Aug 16 18:01 Image--5.4.147+gitAUTOINC+074a74780f-r0-imx8mq-voipac-20230816102039.bin lrwxrwxrwx 2 jaufranc jaufranc 72 Aug 16 18:01 Image-imx8mq-voipac.bin -> Image--5.4.147+gitAUTOINC+074a74780f-r0-imx8mq-voipac-20230816102039.bin -rw-r--r-- 2 jaufranc jaufranc 45970 Aug 16 18:02 imx8mq-evk-voipac-dp--5.4.147+gitAUTOINC+074a74780f-r0-imx8mq-voipac-20230816102039.dtb lrwxrwxrwx 2 jaufranc jaufranc 87 Aug 16 18:02 imx8mq-evk-voipac-dp.dtb -> imx8mq-evk-voipac-dp--5.4.147+gitAUTOINC+074a74780f-r0-imx8mq-voipac-20230816102039.dtb lrwxrwxrwx 2 jaufranc jaufranc 87 Aug 16 18:02 imx8mq-evk-voipac-dp-imx8mq-voipac.dtb -> imx8mq-evk-voipac-dp--5.4.147+gitAUTOINC+074a74780f-r0-imx8mq-voipac-20230816102039.dtb -rw-r--r-- 2 jaufranc jaufranc 46177 Aug 16 18:02 imx8mq-evk-voipac-hdmi--5.4.147+gitAUTOINC+074a74780f-r0-imx8mq-voipac-20230816102039.dtb lrwxrwxrwx 2 jaufranc jaufranc 89 Aug 16 18:02 imx8mq-evk-voipac-hdmi.dtb -> imx8mq-evk-voipac-hdmi--5.4.147+gitAUTOINC+074a74780f-r0-imx8mq-voipac-20230816102039.dtb lrwxrwxrwx 2 jaufranc jaufranc 89 Aug 16 18:02 imx8mq-evk-voipac-hdmi-imx8mq-voipac.dtb -> imx8mq-evk-voipac-hdmi--5.4.147+gitAUTOINC+074a74780f-r0-imx8mq-voipac-20230816102039.dtb -rw-r--r-- 2 jaufranc jaufranc 46578 Aug 16 18:02 imx8mq-evk-voipac-lvds-koe--5.4.147+gitAUTOINC+074a74780f-r0-imx8mq-voipac-20230816102039.dtb lrwxrwxrwx 2 jaufranc jaufranc 93 Aug 16 18:02 imx8mq-evk-voipac-lvds-koe.dtb -> imx8mq-evk-voipac-lvds-koe--5.4.147+gitAUTOINC+074a74780f-r0-imx8mq-voipac-20230816102039.dtb lrwxrwxrwx 2 jaufranc jaufranc 93 Aug 16 18:02 imx8mq-evk-voipac-lvds-koe-imx8mq-voipac.dtb -> imx8mq-evk-voipac-lvds-koe--5.4.147+gitAUTOINC+074a74780f-r0-imx8mq-voipac-20230816102039.dtb -rw-r--r-- 2 jaufranc jaufranc 46582 Aug 16 18:02 imx8mq-evk-voipac-lvds-newhaven--5.4.147+gitAUTOINC+074a74780f-r0-imx8mq-voipac-20230816102039.dtb lrwxrwxrwx 2 jaufranc jaufranc 98 Aug 16 18:02 imx8mq-evk-voipac-lvds-newhaven.dtb -> imx8mq-evk-voipac-lvds-newhaven--5.4.147+gitAUTOINC+074a74780f-r0-imx8mq-voipac-20230816102039.dtb lrwxrwxrwx 2 jaufranc jaufranc 98 Aug 16 18:02 imx8mq-evk-voipac-lvds-newhaven-imx8mq-voipac.dtb -> imx8mq-evk-voipac-lvds-newhaven--5.4.147+gitAUTOINC+074a74780f-r0-imx8mq-voipac-20230816102039.dtb lrwxrwxrwx 2 jaufranc jaufranc 39 Aug 16 17:43 imx-boot -> imx-boot-imx8mq-voipac-sd.bin-flash_evk -rw-r--r-- 2 jaufranc jaufranc 1168048 Aug 16 17:43 imx-boot-imx8mq-voipac-sd.bin-flash_dp_evk -rw-r--r-- 2 jaufranc jaufranc 1168048 Aug 16 17:43 imx-boot-imx8mq-voipac-sd.bin-flash_evk -rw-r--r-- 2 jaufranc jaufranc 1168048 Aug 16 17:43 imx-boot-imx8mq-voipac-sd.bin-flash_evk_no_hdmi drwxr-xr-x 2 jaufranc jaufranc 4096 Aug 16 17:43 imx-boot-tools -rw-r--r-- 2 jaufranc jaufranc 1668 Aug 16 17:32 lpddr4_pmu_train_1d_dmem.bin -rw-r--r-- 2 jaufranc jaufranc 32244 Aug 16 17:32 lpddr4_pmu_train_1d_imem.bin -rw-r--r-- 2 jaufranc jaufranc 1380 Aug 16 17:32 lpddr4_pmu_train_2d_dmem.bin -rw-r--r-- 2 jaufranc jaufranc 23232 Aug 16 17:32 lpddr4_pmu_train_2d_imem.bin -rw-rw-r-- 2 jaufranc jaufranc 203049047 Aug 16 18:02 modules--5.4.147+gitAUTOINC+074a74780f-r0-imx8mq-voipac-20230816102039.tgz lrwxrwxrwx 2 jaufranc jaufranc 74 Aug 16 18:02 modules-imx8mq-voipac.tgz -> modules--5.4.147+gitAUTOINC+074a74780f-r0-imx8mq-voipac-20230816102039.tgz -rw-r--r-- 2 jaufranc jaufranc 105320 Aug 16 17:32 signed_dp_imx8m.bin -rw-r--r-- 2 jaufranc jaufranc 105320 Aug 16 17:32 signed_hdmi_imx8m.bin lrwxrwxrwx 2 jaufranc jaufranc 24 Aug 16 17:38 u-boot.bin -> u-boot-sd-2020.04-r0.bin lrwxrwxrwx 2 jaufranc jaufranc 24 Aug 16 17:38 u-boot.bin-sd -> u-boot-sd-2020.04-r0.bin lrwxrwxrwx 2 jaufranc jaufranc 24 Aug 16 17:38 u-boot-imx8mq-voipac.bin -> u-boot-sd-2020.04-r0.bin lrwxrwxrwx 2 jaufranc jaufranc 24 Aug 16 17:38 u-boot-imx8mq-voipac.bin-sd -> u-boot-sd-2020.04-r0.bin lrwxrwxrwx 2 jaufranc jaufranc 50 Aug 16 17:38 u-boot-imx-initial-env-imx8mq-voipac-sd -> u-boot-imx-initial-env-imx8mq-voipac-sd-2020.04-r0 -rw-r--r-- 2 jaufranc jaufranc 2263 Aug 16 17:38 u-boot-imx-initial-env-imx8mq-voipac-sd-2020.04-r0 lrwxrwxrwx 2 jaufranc jaufranc 50 Aug 16 17:38 u-boot-imx-initial-env-sd -> u-boot-imx-initial-env-imx8mq-voipac-sd-2020.04-r0 -rw-r--r-- 2 jaufranc jaufranc 755131 Aug 16 17:38 u-boot-sd-2020.04-r0.bin lrwxrwxrwx 2 jaufranc jaufranc 53 Aug 16 17:38 u-boot-spl.bin -> u-boot-spl.bin-imx8mq-voipac-2020.04-r0-sd-2020.04-r0 lrwxrwxrwx 2 jaufranc jaufranc 53 Aug 16 17:38 u-boot-spl.bin-imx8mq-voipac -> u-boot-spl.bin-imx8mq-voipac-2020.04-r0-sd-2020.04-r0 -rw-r--r-- 2 jaufranc jaufranc 134608 Aug 16 17:38 u-boot-spl.bin-imx8mq-voipac-2020.04-r0-sd-2020.04-r0 lrwxrwxrwx 2 jaufranc jaufranc 53 Aug 16 17:38 u-boot-spl.bin-imx8mq-voipac-sd -> u-boot-spl.bin-imx8mq-voipac-2020.04-r0-sd-2020.04-r0 lrwxrwxrwx 2 jaufranc jaufranc 53 Aug 16 17:38 u-boot-spl.bin-sd -> u-boot-spl.bin-imx8mq-voipac-2020.04-r0-sd-2020.04-r0 -rw-rw-r-- 2 jaufranc jaufranc 6446 Aug 16 18:02 voipac-image.env -rw-r--r-- 2 jaufranc jaufranc 72220 Aug 16 18:02 voipac-image-imx8mq-voipac-20230816102039.rootfs.manifest -rw-r--r-- 2 jaufranc jaufranc 4256 Aug 16 18:02 voipac-image-imx8mq-voipac-20230816102039.rootfs.wic.bmap -rw-r--r-- 2 jaufranc jaufranc 100164935 Aug 16 18:02 voipac-image-imx8mq-voipac-20230816102039.rootfs.wic.gz -rw-r--r-- 2 jaufranc jaufranc 506442 Aug 16 18:02 voipac-image-imx8mq-voipac-20230816102039.testdata.json lrwxrwxrwx 2 jaufranc jaufranc 57 Aug 16 18:02 voipac-image-imx8mq-voipac.manifest -> voipac-image-imx8mq-voipac-20230816102039.rootfs.manifest lrwxrwxrwx 2 jaufranc jaufranc 55 Aug 16 18:02 voipac-image-imx8mq-voipac.testdata.json -> voipac-image-imx8mq-voipac-20230816102039.testdata.json lrwxrwxrwx 2 jaufranc jaufranc 57 Aug 16 18:02 voipac-image-imx8mq-voipac.wic.bmap -> voipac-image-imx8mq-voipac-20230816102039.rootfs.wic.bmap lrwxrwxrwx 2 jaufranc jaufranc 55 Aug 16 18:02 voipac-image-imx8mq-voipac.wic.gz -> voipac-image-imx8mq-voipac-20230816102039.rootfs.wic.gz -rw-rw-r-- 2 jaufranc jaufranc 961 Aug 16 18:02 voipac-image-imx-imx-boot-bootpart.wks |
Flashing the WIC image to a microSD card
The two important files (symlinks) are imx-boot and voipac-image-imx8mq-voipac.wic.gz which we’ll use with uuu utility to flash to a microSD card installed on the board itself.
We need to decompress the gz file first. We can’t do it directly on the symlink or file due to the following errors:
|
1 2 3 4 5 |
$ gunzip voipac-image-imx8mq-voipac.wic.gz gzip: voipac-image-imx8mq-voipac.wic.gz: Too many levels of symbolic links $ gunzip voipac-image-imx8mq-voipac-20230816102039.rootfs.wic.gz gzip: voipac-image-imx8mq-voipac-20230816102039.rootfs.wic.gz has 1 other link -- unchanged |
But it somehow works if we copy the file and run gunzip:
|
1 2 |
cp voipac-image-imx8mq-voipac-20230816102039.rootfs.wic.gz voipac-image-imx8mq-voipac-20230816102039.rootfs.wic1.gz gunzip voipac-image-imx8mq-voipac-20230816102039.rootfs.wic1.gz |
Unlike many other embedded platforms where we flash the microSD card on the host machine before inserting it into the target board, we’ll install a microSD card directly on the board before doing anything else with we’ll update the firmware over USB.
We now need to install the NXP uuu utility. We’re told to build it from source, but the uuu package happens to be part of Ubuntu 22.04, so I used apt instead:
|
1 |
sudo apt install uuu |
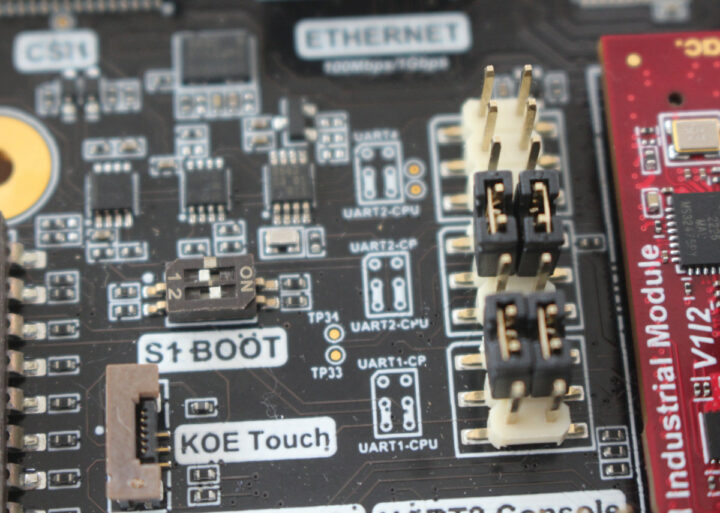
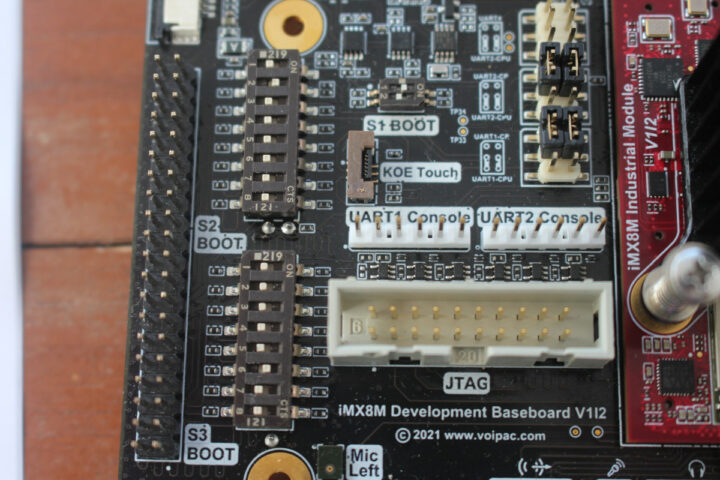
Flashing the OS through USB requires us to change “S1 BOOT” DIP switch configuration to 1-OFF and 2-ON to set the board into the serial downloader mode and also check the UART jumpers are placed as shown in the photo below, which was already the case for my board, so I only have to change the S1 BOOT.
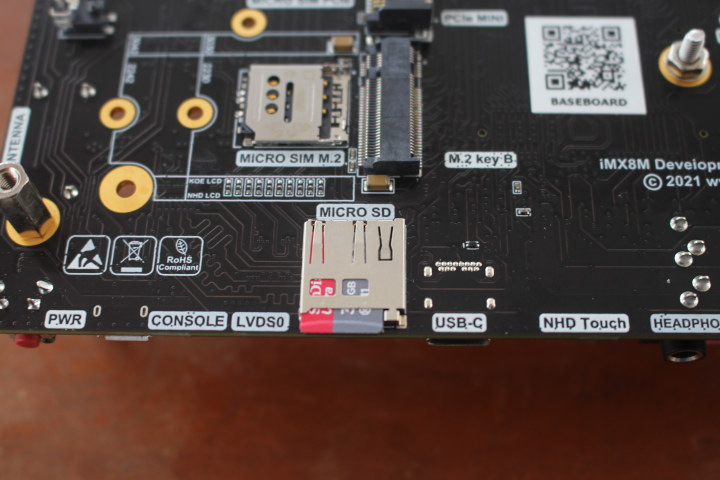
We can now connect the provided micro USB to USB-A cable to the “CONSOLE” port, and yout own USB-C to USB-A cable to the “USB-C” port with both connected to your host computer. Note that we do not need to turn on the board or a power supply at this stage.
Your host computer show list two serial ports as we can see with Bootterm:
|
1 2 3 4 5 |
$ bt -l port | age (sec) | device | driver | description ------+------------+------------+------------------+---------------------- 0 | 164 | ttyUSB0 | cp210x | Enhanced Com Port * 1 | 164 | ttyUSB1 | cp210x | Standard Com Port |
Let’s now try to flash the image to the microSD card:
|
1 2 |
cd ./build-voipac/tmp/deploy/images/imx8mq-voipac sudo uuu -b sd_all imx-boot voipac-image-imx8mq-voipac-20230816102039.rootfs.wic1 |
This is the output from the command when successful:
|
1 2 3 4 5 6 |
uuu (Universal Update Utility) for nxp imx chips -- lib1.4.193 Success 1 Failure 0 1:23 6/ 6 [Done ] FB: done |
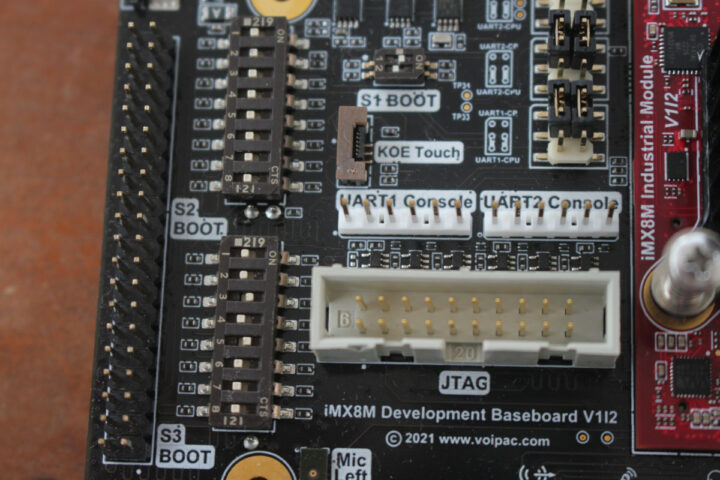
All good, we now can remove the USB-C port while keeping the micro USB cable if we want to access the serial console. We also need to set S1 BOOT back to 1-OFF and 2-ON to enable booting mode and change the position of the S2 BOOT and S3 BOOT DIP switches to enable SD card boot as shown below. Basically all on the left (OFF), except for S2-3 and S2-5 set to the right (ON).
Let’s connect the power supply and turn on the board with its mechanical switch. We can monitor the boot in the serial console:
|
1 2 3 4 5 6 7 8 9 10 11 12 13 14 15 16 17 18 19 20 21 22 23 24 25 26 27 28 29 30 31 32 33 34 35 36 37 38 39 40 41 42 43 44 45 46 47 48 49 50 51 52 53 54 55 56 57 58 59 60 61 62 63 64 65 66 67 68 69 70 71 72 73 74 75 76 77 78 79 80 81 82 83 84 85 86 87 |
U-Boot SPL 2020.04-imx_v2020.04_5.4.24_2.1.0+g4979a99482 (May 30 2020 - 06:50:01 +0000) power_bd71837_init 0-0-1-1 Detected board nr:3 RAM size:2G DDRINFO: start DRAM init DDRINFO: DRAM rate 3200MTS DDRINFO:ddrphy calibration done DDRINFO: ddrmix config done Normal Boot Trying to boot from MMC2 U-Boot 2020.04-imx_v2020.04_5.4.24_2.1.0+g4979a99482 (May 30 2020 - 06:50:01 +0000) CPU: i.MX8MQLite rev2.1 1500 MHz (running at 1000 MHz) CPU: Commercial temperature grade (0C to 95C) at 52C Reset cause: POR Model: VOIPAC i.MX8MQ EVK DRAM: 2 GiB MMC: FSL_SDHC: 0, FSL_SDHC: 1 Loading Environment from MMC... Run CMD11 1.8V switch *** Warning - bad CRC, using default environment [*]-Video Link 0fail to find display device probe video device failed, ret -19 [0] display-controller@32e00000, video fail to find display device probe video device failed, ret -19 In: serial Out: serial Err: serial BuildInfo: - ATF b0a00f2 - U-Boot 2020.04-imx_v2020.04_5.4.24_2.1.0+g4979a99482 Run CMD11 1.8V switch switch to partitions #0, OK mmc1 is current device flash target is MMC:1 Run CMD11 1.8V switch Net: Warning: ethernet@30be0000 using MAC address from ROM eth0: ethernet@30be0000 Fastboot: Normal Normal Boot Hit any key to stop autoboot: 0 Run CMD11 1.8V switch switch to partitions #0, OK mmc1 is current device Run CMD11 1.8V switch 27787776 bytes read in 330 ms (80.3 MiB/s) Booting from mmc ... 46177 bytes read in 15 ms (2.9 MiB/s) ## Flattened Device Tree blob at 43000000 Booting using the fdt blob at 0x43000000 Using Device Tree in place at 0000000043000000, end 000000004300e460 Found /soc@0/vpu@38300000 node Modify /soc@0/vpu@38300000:status disabled fail to find display device probe video device failed, ret -19 Starting kernel ... [ 0.000000] Booting Linux on physical CPU 0x0000000000 [0x410fd034] [ 0.000000] Linux version 5.4.147-imx-5.4.24-2.1.0+gf3424b5ac45b (oe-user@oe-host) (gcc version 9.5.0 (GCC)) #1 SMP PREEMPT Thu Sep 16 20:18:09 UTC 2021 [ 0.000000] Machine model: NXP i.MX8MQ EVK Voipac [ 0.000000] efi: Getting EFI parameters from FDT: [ 0.000000] efi: UEFI not found. [ 0.000000] Reserved memory: created CMA memory pool at 0x0000000044000000, size 960 MiB ... .... [ OK ] Started Session c1 of user root. [ 7.292293] random: crng init done [ 7.295723] random: 7 urandom warning(s) missed due to ratelimiting [ OK ] Started Load/Save Random Seed. [ 7.585282] mwifiex_pcie 0000:01:00.0: WLAN FW is active [ 7.797266] mwifiex_pcie 0000:01:00.0: Unknown api_id: 3 [ 7.802601] mwifiex_pcie 0000:01:00.0: Unknown api_id: 4 [ 7.807947] mwifiex_pcie 0000:01:00.0: Unknown GET_HW_SPEC TLV type: 0x217 FSLC Wayland with XWayland 3.1 imx8mq-voipac ttymxc0 imx8mq-voipac login: |
You’ll find the full boot log on pastebin if you are interested.
We can find both the 16GB eMMC flash and 32GB microSD card with fdisk:
|
1 2 3 4 5 6 7 8 9 10 11 12 13 14 15 |
root@imx8mq-voipac:~# fdisk -l Disk /dev/mmcblk0: 15 GB, 15758000128 bytes, 30777344 sectors 240448 cylinders, 4 heads, 32 sectors/track Units: sectors of 1 * 512 = 512 bytes Device Boot StartCHS EndCHS StartLBA EndLBA Sectors Size Id Type /dev/mmcblk0p1 * 128,0,1 1023,3,32 16384 186775 170392 83.1M c Win95 FAT32 (LBA) /dev/mmcblk0p2 1023,3,32 1023,3,32 196608 1031495 834888 407M 83 Linux Disk /dev/mmcblk1: 30 GB, 31927042048 bytes, 62357504 sectors 487168 cylinders, 4 heads, 32 sectors/track Units: sectors of 1 * 512 = 512 bytes Device Boot StartCHS EndCHS StartLBA EndLBA Sectors Size Id Type /dev/mmcblk1p1 * 128,0,1 1023,3,32 16384 186775 170392 83.1M c Win95 FAT32 (LBA) /dev/mmcblk1p2 1023,3,32 1023,3,32 196608 1031495 834888 407M 83 Linux |
Both devices are bootable, but the current rootfs is indeed on the microSD card (/dev/mmcblk1):
|
1 2 |
root@imx8mq-voipac:~# mount | grep mmc /dev/mmcblk1p2 on / type ext4 (rw,relatime) |
But note that the root partition is really small at just 388MB:
|
1 2 3 4 5 6 7 8 9 10 |
root@imx8mq-voipac:~# df -h Filesystem Size Used Avail Use% Mounted on /dev/root 388M 227M 137M 63% / devtmpfs 509M 0 509M 0% /dev tmpfs 990M 0 990M 0% /dev/shm tmpfs 990M 17M 973M 2% /run tmpfs 990M 0 990M 0% /sys/fs/cgroup tmpfs 990M 0 990M 0% /tmp tmpfs 990M 20K 990M 1% /var/volatile tmpfs 198M 0 198M 0% /run/user/0 |
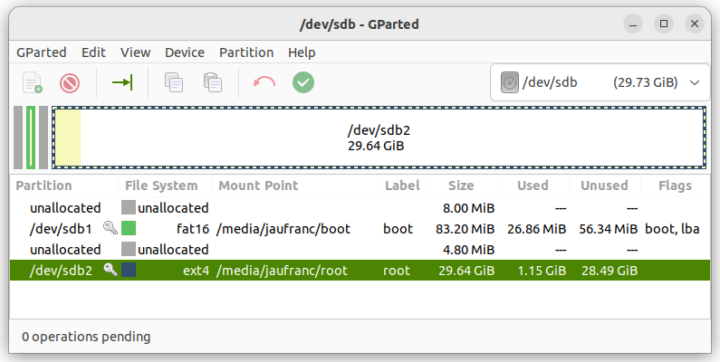
I initially tried to resize it from the live system, with fdisk and resize2fs as I did on some platforms in the past, but fdisk would limit me to only 16383 sectors (8MB) both for the microSD card and eMMC flash. So the best solution to resize the root partition on the microSD card is to use GParted (Linux) or Disk Management (Windows) on a host computer.
|
1 2 3 4 5 6 7 8 9 10 11 12 13 14 15 16 17 18 19 |
imx8mq-voipac login: root Last login: Tue Aug 22 07:17:25 UTC 2023 _ :_; .-..-. .--. .-..---. .--. .--. : `; :' .; :: :: .; `' .; ; ' ..' _ `.__.'`.__.':_;: ._.'`.__,_;`.__.' :_; :_; root@imx8mq-voipac:~# df -h Filesystem Size Used Avail Use% Mounted on /dev/root 29G 224M 28G 1% / devtmpfs 509M 0 509M 0% /dev tmpfs 990M 0 990M 0% /dev/shm tmpfs 990M 17M 973M 2% /run tmpfs 990M 0 990M 0% /sys/fs/cgroup tmpfs 990M 0 990M 0% /tmp tmpfs 990M 20K 990M 1% /var/volatile tmpfs 198M 0 198M 0% /run/user/0 |
For the eMMC flash, I was told Yocto’s IMAGE_ROOTFS_EXTRA_SPACE parameter is typically used instead.
Talking about the eMMC flash, if we want to flash the image to the internal storage on the module, the procedure is similar except for the uuu command:
|
1 |
sudo uuu -b emmc_all imx-boot voipac-image-imx8mq-voipac-20230816102039.rootfs.wic1 |
And once flashing is complete, we need to change the position of S1 BOOT, S2 BOOT, and S3 BOOT DIP switches as shown below.
It makes it easy to switch between an OS on the eMMC flash and the microSD card.
Adding packages to Yocto and flashing Linux to the eMMC flash
Since the pre-installed Yocto image may not have all packages you need, you should add some packages to it. We could edit ./build-voipac/conf/bblayers.conf if we wanted to add more meta layers, but since the utilities we need are already in meta-openembedded/meta-oe that is already listed in the bblayers.conf file we can just modify build-voipac/conf/local.conf to add a few packages with the following line:
|
1 |
IMAGE_INSTALL_append = " iozone3 dhrystone" |
The space between the quote and iozone3 is important. Once I updated the file, I started the build script again, but it quickly ended with errors:
|
1 2 3 4 |
| /home/jaufranc/edev/sandbox/yocto-imx8m-voipac/build-voipac/tmp/hosttools/ld.bfd: /home/jaufranc/edev/sandbox/yocto-imx8m-voipac/build-voipac/tmp/work/x86_64-linux/qemu-native/4.2.0-r0/qemu-4.2.0/target/mips/msa_helper.c:7330: undefined reference to `float32_to_uint32' | /home/jaufranc/edev/sandbox/yocto-imx8m-voipac/build-voipac/tmp/hosttools/ld.bfd: /home/jaufranc/edev/sandbox/yocto-imx8m-voipac/build-voipac/tmp/work/x86_64-linux/qemu-native/4.2.0-r0/qemu-4.2.0/target/mips/msa_helper.c:7330: undefined reference to `float32_default_nan' | /home/jaufranc/edev/sandbox/yocto-imx8m-voipac/build-voipac/tmp/hosttools/ld.bfd: target/mips/msa_helper.o: in function `helper_msa_ffint_s_df': | /home/jaufranc/edev/sandbox/yocto-imx8m-voipac/build-voipac/tmp/work/x86_64-linux/qemu-native/4.2.0-r0/qemu-4.2.0/target/mips/msa_helper.c:7371: undefined reference to `int64_to_float64' |
VOIPAC help me debug the issue and could not reproduce it, so I was told to delete build-voipac/tmp directory and restart again. It worked, but it took about one hour with my laptop barely usable. But at least I could confirm both iozone3 (which I’ll use later) and dhrystone were present in the new image.
|
1 2 3 4 5 6 7 8 9 10 11 12 13 14 15 16 17 18 19 20 21 22 23 24 25 26 27 28 29 30 31 32 33 34 35 36 37 38 39 40 41 42 43 44 45 46 47 48 49 50 51 52 53 54 55 56 57 58 59 60 61 62 63 64 65 |
root@imx8mq-voipac:~# iozone Usage: For usage information type iozone -h root@imx8mq-voipac:~# dhry Dhrystone Benchmark, Version 2.1 (Language: C) Program compiled without 'register' attribute Please give the number of runs through the benchmark: 200000000 Execution starts, 200000000 runs through Dhrystone Execution ends Final values of the variables used in the benchmark: Int_Glob: 5 should be: 5 Bool_Glob: 1 should be: 1 Ch_1_Glob: A should be: A Ch_2_Glob: B should be: B Arr_1_Glob[8]: 7 should be: 7 Arr_2_Glob[8][7]: 200000010 should be: Number_Of_Runs + 10 Ptr_Glob-> Ptr_Comp: -668691808 should be: (implementation-dependent) Discr: 0 should be: 0 Enum_Comp: 2 should be: 2 Int_Comp: 17 should be: 17 Str_Comp: DHRYSTONE PROGRAM, SOME STRING should be: DHRYSTONE PROGRAM, SOME STRING Next_Ptr_Glob-> Ptr_Comp: -668691808 should be: (implementation-dependent), same as above Discr: 0 should be: 0 Enum_Comp: 1 should be: 1 Int_Comp: 18 should be: 18 Str_Comp: DHRYSTONE PROGRAM, SOME STRING should be: DHRYSTONE PROGRAM, SOME STRING Int_1_Loc: 5 should be: 5 Int_2_Loc: 13 should be: 13 Int_3_Loc: 7 should be: 7 Enum_Loc: 1 should be: 1 Str_1_Loc: DHRYSTONE PROGRAM, 1'ST STRING should be: DHRYSTONE PROGRAM, 1'ST STRING Str_2_Loc: DHRYSTONE PROGRAM, 2'ND STRING should be: DHRYSTONE PROGRAM, 2'ND STRING Microseconds for one run through Dhrystone: 0.1 Dhrystones per Second: 6693440.5 |
Most companies working with Yocto will use a powerful server to make sure the build is completed quickly, and in most cases it should not be required to delete the tmp directory.
VOIPAC IMX8M Industrial Development Kit features testing with Yocto Linux
Now that we now how to customize our Yocto Linux image, we’ll try some of the hardware features of the board such as networking and audio, as well as test storage performance.
Networking tests
I used iperf3 to test IMX8M Industrial devkit’s Gigabit Ethernet port (192.168.31.12) using UP Xtreme i11 mini PC (192.168.31.18) on the other side.
Gigabit Ethernet:
- Download:
|
1 2 3 4 5 6 7 8 9 10 11 12 13 14 |
devkit@UPX-i11:~$ iperf3 -t 60 -c 192.168.31.18 -i 10 Connecting to host 192.168.31.18, port 5201 [ 5] local 192.168.31.12 port 57906 connected to 192.168.31.18 port 5201 [ ID] Interval Transfer Bitrate Retr Cwnd [ 5] 0.00-10.00 sec 1.10 GBytes 943 Mbits/sec 0 831 KBytes [ 5] 10.00-20.00 sec 1.10 GBytes 942 Mbits/sec 0 831 KBytes [ 5] 20.00-30.00 sec 1.10 GBytes 942 Mbits/sec 0 831 KBytes [ 5] 30.00-40.00 sec 1.10 GBytes 942 Mbits/sec 0 1.22 MBytes [ 5] 40.00-50.00 sec 1.10 GBytes 942 Mbits/sec 0 1.22 MBytes [ 5] 50.00-60.00 sec 1.10 GBytes 942 Mbits/sec 0 1.22 MBytes - - - - - - - - - - - - - - - - - - - - - - - - - [ ID] Interval Transfer Bitrate Retr [ 5] 0.00-60.00 sec 6.58 GBytes 942 Mbits/sec 0 sender [ 5] 0.00-60.04 sec 6.58 GBytes 941 Mbits/sec receiver |
- Upload:
|
1 2 3 4 5 6 7 8 9 10 11 12 13 14 15 16 17 |
devkit@UPX-i11:~$ iperf3 -t 60 -c 192.168.31.18 -i 10 -R Connecting to host 192.168.31.18, port 5201 Reverse mode, remote host 192.168.31.18 is sending [ 5] local 192.168.31.12 port 42580 connected to 192.168.31.18 port 5201 [ ID] Interval Transfer Bitrate [ 5] 0.00-10.00 sec 1.09 GBytes 937 Mbits/sec [ 5] 10.00-20.00 sec 1.10 GBytes 941 Mbits/sec [ 5] 20.00-30.00 sec 1.10 GBytes 941 Mbits/sec [ 5] 30.00-40.00 sec 1.10 GBytes 942 Mbits/sec [ 5] 40.00-50.00 sec 1.10 GBytes 941 Mbits/sec [ 5] 50.00-60.00 sec 1.10 GBytes 942 Mbits/sec - - - - - - - - - - - - - - - - - - - - - - - - - [ ID] Interval Transfer Bitrate Retr [ 5] 0.00-60.04 sec 6.57 GBytes 940 Mbits/sec 0 sender [ 5] 0.00-60.00 sec 6.57 GBytes 941 Mbits/sec receiver iperf Done. |
- Full duplex (bidirectional)
|
1 2 3 4 5 6 7 8 9 10 11 12 13 14 15 16 17 18 19 20 21 22 23 |
devkit@UPX-i11:~$ iperf3 -t 60 -c 192.168.31.18 -i 10 --bidir Connecting to host 192.168.31.18, port 5201 [ 5] local 192.168.31.12 port 49904 connected to 192.168.31.18 port 5201 [ 7] local 192.168.31.12 port 49908 connected to 192.168.31.18 port 5201 [ ID][Role] Interval Transfer Bitrate Retr Cwnd [ 5][TX-C] 0.00-10.00 sec 1.09 GBytes 938 Mbits/sec 0 1.04 MBytes [ 7][RX-C] 0.00-10.00 sec 1.06 GBytes 907 Mbits/sec [ 5][TX-C] 10.00-20.00 sec 1.09 GBytes 937 Mbits/sec 0 1.04 MBytes [ 7][RX-C] 10.00-20.00 sec 1.06 GBytes 912 Mbits/sec [ 5][TX-C] 20.00-30.00 sec 1.09 GBytes 937 Mbits/sec 0 1.57 MBytes [ 7][RX-C] 20.00-30.00 sec 1.06 GBytes 913 Mbits/sec [ 5][TX-C] 30.00-40.00 sec 1.09 GBytes 938 Mbits/sec 0 1.57 MBytes [ 7][RX-C] 30.00-40.00 sec 1.06 GBytes 911 Mbits/sec [ 5][TX-C] 40.00-50.00 sec 1.09 GBytes 937 Mbits/sec 0 1.57 MBytes [ 7][RX-C] 40.00-50.00 sec 1.06 GBytes 913 Mbits/sec [ 5][TX-C] 50.00-60.00 sec 1.09 GBytes 937 Mbits/sec 0 1.57 MBytes [ 7][RX-C] 50.00-60.00 sec 1.06 GBytes 912 Mbits/sec - - - - - - - - - - - - - - - - - - - - - - - - - [ ID][Role] Interval Transfer Bitrate Retr [ 5][TX-C] 0.00-60.00 sec 6.55 GBytes 938 Mbits/sec 0 sender [ 5][TX-C] 0.00-60.04 sec 6.55 GBytes 937 Mbits/sec receiver [ 7][RX-C] 0.00-60.00 sec 6.37 GBytes 912 Mbits/sec 0 sender [ 7][RX-C] 0.00-60.04 sec 6.37 GBytes 911 Mbits/sec receiver |
The Gigabit Ethernet port works well on the IMX8M Industrial development kit.
But when I tried to setup WiFi I struggled trying to use intructions on the web until it was pointed out to me that the documentation to access and test peripherals was already available on VOIPAC’s wiki. I’m not surprised I was not successful the first time since there are quite a few steps, some of which admittely optional.
We can first check if the mwifiex device driver is available and loaded…
|
1 2 3 4 5 6 7 8 9 10 11 |
root@imx8mq-voipac:~# dmesg | grep mwifiex [ 5.403912] mwifiex_pcie 0000:01:00.0: enabling device (0000 -> 0002) [ 5.410484] mwifiex_pcie: PCI memory map Virt0: (____ptrval____) PCI memory map Virt2: (____ptrval____) [ 6.422858] mwifiex_pcie 0000:01:00.0: info: FW download over, size 632240 bytes [ 7.293043] mwifiex_pcie 0000:01:00.0: WLAN FW is active [ 7.397054] mwifiex_pcie 0000:01:00.0: Unknown api_id: 3 [ 7.402390] mwifiex_pcie 0000:01:00.0: Unknown api_id: 4 [ 7.407737] mwifiex_pcie 0000:01:00.0: Unknown GET_HW_SPEC TLV type: 0x217 [ 8.666622] mwifiex_pcie 0000:01:00.0: info: MWIFIEX VERSION: mwifiex 1.0 (16.68.1.p179) [ 8.669499] mwifiex_pcie 0000:01:00.0 wlp1s0: renamed from mlan0 [ 8.674917] mwifiex_pcie 0000:01:00.0: driver_version = mwifiex 1.0 (16.68.1.p179) |
and then whether the WiFi interface (wlp1s0) is present:
|
1 2 3 |
root@imx8mq-voipac:~# ip addr show dev wlp1s0 3: wlp1s0: <NO-CARRIER,BROADCAST,MULTICAST,UP> mtu 1500 qdisc mq state DOWN group default qlen 1000 link/ether 00:e9:3a:d6:68:f7 brd ff:ff:ff:ff:ff:ff |
We can scan for WiFi access points with the following command:
|
1 2 3 4 5 6 7 8 9 10 11 |
root@imx8mq-voipac:~# ifconfig wlp1s0 up && iw dev wlp1s0 scan | grep "SSID:" SSID: CNX_Software_Xiaomi SSID: SSID: 3BB-Punika-2.4G SSID: GW_AP_11604878 SSID: Nero 2.4G SSID: CNX_Software_Xiaomi_5G SSID: AUNchooree_2.4G SSID: true_2.4G SSID: CDS01_2.4Ghz SSID: ASUS_80 |
Then edit /etc/wpa_supplicant.conf configuration file with our parameters:
|
1 2 3 4 5 6 7 8 9 10 11 12 13 14 |
ctrl_interface=/var/run/wpa_supplicant ctrl_interface_group=0 update_config=1 network={ ssid="CNX_Software_Xiaomi_5G" proto=WPA2 key_mgmt=WPA-PSK pairwise=CCMP TKIP group=CCMP TKIP scan_ssid=1 psk="password_here" priority=10 } |
We can now start wpa_supplicant:
|
1 |
wpa_supplicant -i wlp1s0 -c/etc/wpa_supplicant.conf & |
successful output:
|
1 2 3 4 5 6 |
rfkill: Cannot open RFKILL control device wlp1s0: Trying to associate with 3c:cd:57:f5:af:91 (SSID='CNX_Software_Xiaomi_5G' freq=5180 MHz) wlp1s0: Associated with 3c:cd:57:f5:af:91 wlp1s0: CTRL-EVENT-SUBNET-STATUS-UPDATE status=0 wlp1s0: WPA: Key negotiation completed with 3c:cd:57:f5:af:91 [PTK=CCMP GTK=CCMP] wlp1s0: CTRL-EVENT-CONNECTED - Connection to 3c:cd:57:f5:af:91 completed [id=0 id_str=] |
At this point the WiFi connection is up, but we don’t have an IP address yet. You can obtain one with DHCP:
|
1 2 3 4 5 6 7 8 9 |
root@imx8mq-voipac:~# udhcpc -i wlp1s0 udhcpc: started, v1.31.1 udhcpc: sending discover udhcpc: sending discover udhcpc: sending discover udhcpc: sending select for 192.168.31.185 udhcpc: lease of 192.168.31.185 obtained, lease time 43200 RTNETLINK answers: File exists /etc/udhcpc.d/50default: Adding DNS 192.168.31.1 |
All good. So I launched iperf3 to test the performance.
- Download:
|
1 2 3 4 5 6 7 8 9 10 11 12 13 14 15 16 |
devkit@UPX-i11:~$ iperf3 -t 60 -c 192.168.31.185 -i 10 Connecting to host 192.168.31.185, port 5201 [ 5] local 192.168.31.12 port 36952 connected to 192.168.31.185 port 5201 [ ID] Interval Transfer Bitrate Retr Cwnd [ 5] 0.00-10.00 sec 17.8 MBytes 14.9 Mbits/sec 22 109 KBytes [ 5] 10.00-20.00 sec 15.3 MBytes 12.8 Mbits/sec 13 1.41 KBytes [ 5] 20.00-30.01 sec 0.00 Bytes 0.00 bits/sec 2 1.41 KBytes [ 5] 30.01-40.01 sec 0.00 Bytes 0.00 bits/sec 0 1.41 KBytes [ 5] 40.01-50.00 sec 3.11 MBytes 2.61 Mbits/sec 64 134 KBytes [ 5] 50.00-60.00 sec 27.4 MBytes 23.0 Mbits/sec 14 140 KBytes - - - - - - - - - - - - - - - - - - - - - - - - - [ ID] Interval Transfer Bitrate Retr [ 5] 0.00-60.00 sec 63.6 MBytes 8.89 Mbits/sec 115 sender [ 5] 0.00-60.00 sec 62.5 MBytes 8.73 Mbits/sec receiver iperf Done. |
- Upload:
|
1 2 3 4 5 6 7 8 9 10 11 12 13 14 15 16 17 |
devkit@UPX-i11:~$ iperf3 -t 60 -c 192.168.31.185 -i 10 -R Connecting to host 192.168.31.185, port 5201 Reverse mode, remote host 192.168.31.185 is sending [ 5] local 192.168.31.12 port 41622 connected to 192.168.31.185 port 5201 [ ID] Interval Transfer Bitrate [ 5] 0.00-10.00 sec 31.6 MBytes 26.5 Mbits/sec [ 5] 10.00-20.01 sec 4.60 MBytes 3.86 Mbits/sec [ 5] 20.01-30.01 sec 0.00 Bytes 0.00 bits/sec [ 5] 30.01-40.01 sec 0.00 Bytes 0.00 bits/sec [ 5] 40.01-50.00 sec 39.7 MBytes 33.3 Mbits/sec [ 5] 50.00-60.00 sec 60.2 MBytes 50.5 Mbits/sec - - - - - - - - - - - - - - - - - - - - - - - - - [ ID] Interval Transfer Bitrate Retr [ 5] 0.00-60.09 sec 139 MBytes 19.3 Mbits/sec 1 sender [ 5] 0.00-60.00 sec 136 MBytes 19.0 Mbits/sec receiver iperf Done. |
Something is wrong with a fairly low bitrate due in part to what looks like stalled transfer.
So I retried in another house:
|
1 2 3 4 5 6 |
root@imx8mq-voipac:~# ifconfig wlp1s0 up && iw dev wlp1s0 scan | grep "SSID:" SSID: MiniNET SSID: JUST4KYVOL SSID: CNX-SOFTWARE-ZTE SSID: CNX-GUEST SSID: CNX-SOFTWARE-ZTE_5G |
I connected to another 5GHz WiFi network (CNX-SOFTWARE-ZTE_5G) and while I could get an IP address and connect to the board through SSH over WiFi, it felt especially sluggish. I had no luck with iperf3:
|
1 2 |
jaufranc@CNX-LAPTOP-5:~$ iperf3 -t 60 -c 192.168.1.15 -i 10 iperf3: error - unable to send control message: Broken pipe |
So I switched to a 2.4 GHz network (CNX-SOFTWARE-ZTE), and it worked better/more reliably for the download:
|
1 2 3 4 5 6 7 8 9 10 11 12 13 14 15 16 |
jaufranc@CNX-LAPTOP-5:~$ iperf3 -t 60 -c 192.168.1.14 -i 10 Connecting to host 192.168.1.14, port 5201 [ 5] local 192.168.1.11 port 54396 connected to 192.168.1.14 port 5201 [ ID] Interval Transfer Bitrate Retr Cwnd [ 5] 0.00-10.00 sec 12.2 MBytes 10.2 Mbits/sec 1 1.56 MBytes [ 5] 10.00-20.00 sec 12.5 MBytes 10.5 Mbits/sec 189 1.92 MBytes [ 5] 20.00-30.00 sec 10.0 MBytes 8.39 Mbits/sec 116 1.80 MBytes [ 5] 30.00-40.00 sec 11.2 MBytes 9.44 Mbits/sec 0 1.95 MBytes [ 5] 40.00-50.00 sec 10.0 MBytes 8.39 Mbits/sec 113 1.83 MBytes [ 5] 50.00-60.00 sec 10.0 MBytes 8.39 Mbits/sec 98 1.53 MBytes - - - - - - - - - - - - - - - - - - - - - - - - - [ ID] Interval Transfer Bitrate Retr [ 5] 0.00-60.00 sec 65.9 MBytes 9.22 Mbits/sec 517 sender [ 5] 0.00-61.17 sec 64.7 MBytes 8.88 Mbits/sec receiver iperf Done. |
But I then the upload test did not work quite as expected:
|
1 2 3 4 5 6 7 8 9 10 11 12 |
jaufranc@CNX-LAPTOP-5:~$ iperf3 -t 60 -c 192.168.1.14 -i 10 -R Connecting to host 192.168.1.14, port 5201 Reverse mode, remote host 192.168.1.14 is sending [ 5] local 192.168.1.11 port 43346 connected to 192.168.1.14 port 5201 ^C[ ID] Interval Transfer Bitrate [ 5] 0.00-16228.56 sec 0.00 Bytes 0.00 bits/sec - - - - - - - - - - - - - - - - - - - - - - - - - [ ID] Interval Transfer Bitrate [ 5] 0.00-16228.56 sec 0.00 Bytes 0.00 bits/sec sender [ 5] 0.00-16228.56 sec 0.00 Bytes 0.00 bits/sec receiver iperf3: interrupt - the client has terminated |
The router is fairly close (about 2 meters) from the board and I used an Ubuntu laptop with a 2.5GbE USB dongle on the other side. So something is wrong – at least with my module – but we are not quite sure what yet, and this would have to be investigated further.
Storage benchmark
I’ve tested the microSD card (32GB Class A1 from Sandisk) performance with iozone3:
|
1 2 3 4 5 6 7 8 9 10 11 12 13 14 15 16 17 18 19 20 21 22 |
root@imx8mq-voipac:~# iozone -e -I -a -s 100M -r 4k -r 16k -r 512k -r 1024k -r 1 6384k -i 0 -i 1 -i 2 Iozone: Performance Test of File I/O Version $Revision: 3.489 $ Compiled for 64 bit mode. Build: linux Command line used: iozone -e -I -a -s 100M -r 4k -r 16k -r 512k -r 1024k -r 16384k -i 0 -i 1 -i 2 Output is in kBytes/sec Time Resolution = 0.000001 seconds. Processor cache size set to 1024 kBytes. Processor cache line size set to 32 bytes. File stride size set to 17 * record size. random random bkwd record stride kB reclen write rewrite read reread read write read rewrite read fwrite frewrite fread freread 102400 4 3258 3339 11332 11331 9893 2684 102400 16 8418 8273 30738 30909 28202 6304 102400 512 19210 19130 76710 79271 78177 20615 102400 1024 19117 18886 79251 79729 79401 19015 102400 16384 21387 18269 80903 81374 81007 18986 iozone test complete. |
I then followed by testing the performance of built-in 16GB eMMC flash:
|
1 2 3 4 5 6 7 8 9 10 11 12 13 14 15 |
root@imx8mq-voipac:~# mount /dev/mmcblk0p2 tmp [ 530.690725] EXT4-fs (mmcblk0p2): recovery complete [ 530.695659] EXT4-fs (mmcblk0p2): mounted filesystem with ordered data mode. Opts: (null) root@imx8mq-voipac:~# cd tmp/ root@imx8mq-voipac:~/tmp# iozone -e -I -a -s 100M -r 4k -r 16k -r 512k -r 1024k -r 16384k -i 0 -i 1 -i 2 random random bkwd record stride kB reclen write rewrite read reread read write read rewrite read fwrite frewrite fread freread 102400 4 2588 4219 16370 16426 15943 5788 102400 16 12663 13130 55096 56034 54720 13211 102400 512 57832 59009 184271 181290 181631 62813 102400 1024 60082 61077 200556 205770 204670 61864 102400 16384 60500 60908 208872 211997 209770 59403 iozone test complete. |
The eMMC flash is quite faster than my microSD card, and both results seem fine to me.
Audio testing
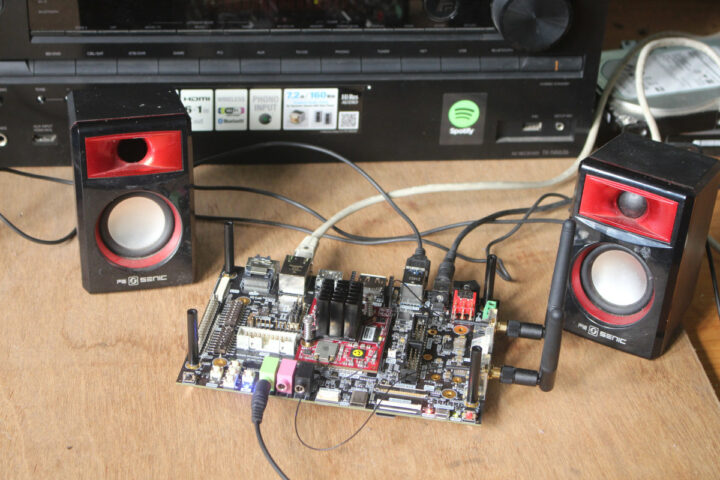
The development kit embeds audio features such as two built-in microphone and three audio jacks for Line Out, Mic, and headphones. So I’ll use arecord to record audio from the built-in microphone, and aplay to play back the audio through speakers connected to the Line Out jack.
I first went the easy way and downloaded a wav file fronm the Internet to test playback:
|
1 2 |
root@imx8mq-voipac:~# aplay StarWars3.wav Playing WAVE 'StarWars3.wav' : Signed 16 bit Little Endian, Rate 22050 Hz, Mono |
The audio plays in my speaker through the Line Out jack. All good. Recording with the built-in microphone required a bit more work:
|
1 2 3 4 5 6 7 8 9 10 11 12 13 14 15 16 17 18 19 20 21 22 23 24 |
root@imx8mq-voipac:~# amixer set 'Capture' '31' Simple mixer control 'Capture',0 Capabilities: cvolume cswitch Capture channels: Front Left - Front Right Limits: Capture 0 - 31 Front Left: Capture 31 [100%] [on] Front Right: Capture 31 [100%] [on] root@imx8mq-voipac:~# amixer set 'Capture Input' DMIC Simple mixer control 'Capture Input',0 Capabilities: enum Items: 'ADC' 'DMIC' Item0: 'DMIC' root@imx8mq-voipac:~# amixer set 'Left Capture Inverting Mux' 'IN2L' Simple mixer control 'Left Capture Inverting Mux',0 Capabilities: enum Items: 'IN1L' 'IN2L' 'IN3L' Item0: 'IN2L' root@imx8mq-voipac:~# amixer set 'Right Capture Inverting Mux' 'IN2R' Simple mixer control 'Right Capture Inverting Mux',0 Capabilities: enum Items: 'IN1R' 'IN2R' 'IN3R' Item0: 'IN2R' root@imx8mq-voipac:~# arecord -D sysdefault:CARD=wm8904audio -t wav -f cd test.wav Recording WAVE 'test.wav' : Signed 16 bit Little Endian, Rate 44100 Hz, Stereo |
But it worked fine:
|
1 2 |
root@imx8mq-voipac:~# aplay test.wav Playing WAVE 'test.wav' : Signed 16 bit Little Endian, Rate 44100 Hz, Stereo |
Note that it’s better to speak close to the microphone, as the first time I was around 1.5 meters away and the recorded volume was rather low.
That will be all for this getting started guide. I’d like to thank VOIPAC for sending the iMX8M Industrial Development Kit for review. The kit I received sells for 520 Euros plus 37 Euros for the high-gain antennas, but the Basic kit starts at 477 Euros.

Jean-Luc started CNX Software in 2010 as a part-time endeavor, before quitting his job as a software engineering manager, and starting to write daily news, and reviews full time later in 2011.
Support CNX Software! Donate via cryptocurrencies, become a Patron on Patreon, or purchase goods on Amazon or Aliexpress





Yocto is kind of painful and requires significant upfront engineering investment to understand. Buildroot is quicker and more hackish in certain corners. Depends on your needs and maintenance model.
It’s not my first time with Yocto, but I have to admit I still struggled quite a bit. I used to work with buildroot in the past and it was quite easier to use with a “make menuconfig” type of menu to select packages.