
This is a guest post by Leonardo Graboski Veiga, Field Application Engineer, Toradex Brasil
Introduction
Computer vision (CV) is everywhere – from cars to surveillance and production lines, the need for efficient, low power consumption yet powerful embedded systems is nowadays one of the bleeding edge scenarios of technology development.
Since this is a very computationally intensive task, running computer vision algorithms in an embedded system CPU might not be enough for some applications. Developers and scientists have noticed that the use of dedicated hardware, such as co-processors and GPUs – the latter traditionally employed for graphics rendering – can greatly improve CV algorithms performance.
In the embedded scenario, things usually are not as simple as they look. Embedded GPUs tend to be different from desktop GPUs, thus requiring many workarounds to get extra performance from them. A good example of a drawback from embedded GPUs is that they are hardly supported by OpenCV – the de facto standard libraries for computer vision – thus requiring a big effort from the developer to achieve some performance gains.
The silicon manufacturers are paying attention to the growing need for graphics and CV-oriented embedded systems, and powerful processors are being released. This is the case with the NVIDIA Tegra K1, which has a built-in GPU using the NVIDIA Kepler architecture, with 192 cores and a processing power of 325 GFLOPS. In addition, this is one of the very few embedded GPUs in the market that supports CUDA, a parallel computing platform from NVIDIA. The good news is that OpenCV also supports CUDA.
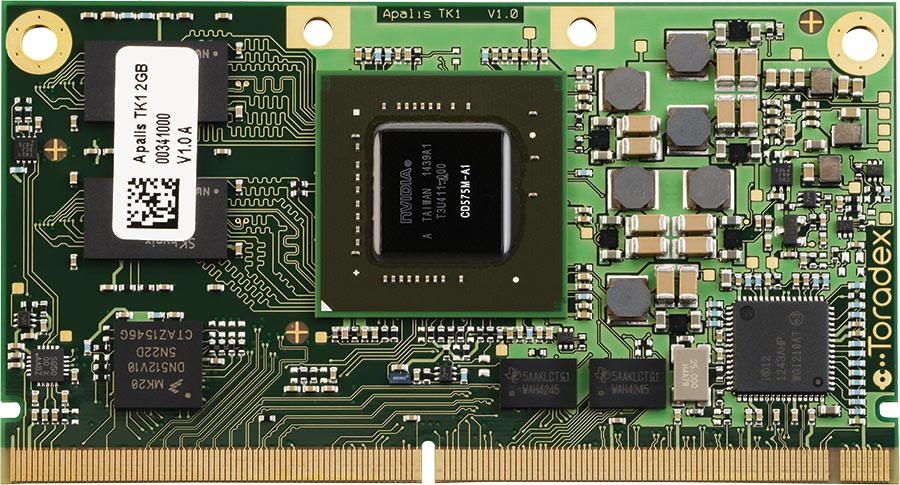
And this is why Toradex has decided to develop a System on Module (aka Computer on Module) – the Apalis TK1 – using this processor. In it, the K1 SoC Quad Core ARM Cortex-A15 CPU runs at up to 2.2GHz, interfaced to 2GB DDR3L RAM memory and a 16GB 8-bit eMMC. The full specification of the CoM can be found here.
The purpose of this article is to install the NVIDIA JetPack on the Apalis TK1 System on Module, thus also installing OpenCV for Tegra, and trying to assess how much effort is required to code some simple CV application accelerated by CUDA. The public OpenCV is also tested using the same examples, to determine if it is a viable alternative to the closed-source version from NVIDIA.
Hardware
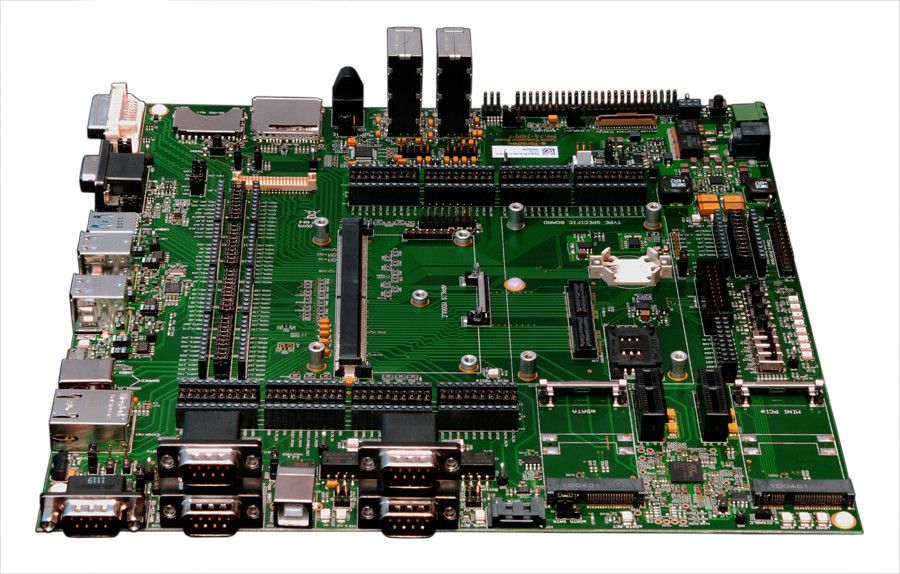
The hardware employed in this article consists of the Apalis TK1 System on Module and the Apalis Evaluation Board. The main features of the Apalis TK1 have been presented in the introduction, and regarding the Apalis Evaluation Board, we will use the DVI output to connect to a display and the USB ports to interface a USB camera and a keyboard. The Apalis TK1 is presented in figure 1 and the Apalis Evaluation Board in figure 2:
System Setup
NVIDIA already provides an SDK package – the NVIDIA JetPack – that comes with all tools that are supported for the TK1 architecture. It is an easy way to start developing applications with OpenCV for Tegra support. JetPack also provides many source code samples for CUDA, VisionWorks, and GameWorks. It also installs the NVIDIA Nsight, an IDE that is based on Eclipse and can be useful for debugging CPU and GPU applications.
OpenCV for Tegra is based on version 2.4.13 of the public OpenCV source code. It is closed-source but free to use and benefits from NEON and multicore optimizations that are not present in the open-source version; on the other hand, the non-free libraries are not included. If you want or need the open-source version, you can find more information on how to build OpenCV with CUDA support here – these instructions were followed and the public OpenCV 2.4.13 was also tested during this article’s development.
Toradex provides an article in the developer website with concise information describing how to install JetPack on the Apalis TK1.
Regarding hardware, it is recommended that you have an USB webcam connected to the Apalis Evaluation Board because samples tested in this article often need a video source as input.
OpenCV for Tegra
After you have finished installing the NVIDIA JetPack, OpenCV for Tegra will already be installed on the system, as well as the toolchain required for compilation on the target. You must have access to the serial terminal by means of an USB to RS-232 adapter or an SSH connection.
If you want to run Python code, an additional step on the target is required:
|
1 |
sudo apt-get install libopencv4tegra-python |
The easiest way to check that everything works as expected is to compile and run some samples from the public OpenCV repository since it already has the Cmake configuration files as well as some source code for applications that make use of CUDA:
|
1 2 3 4 |
git clone https://github.com/opencv/opencv.git -b 2.4 cd opencv/samples cmake . make |
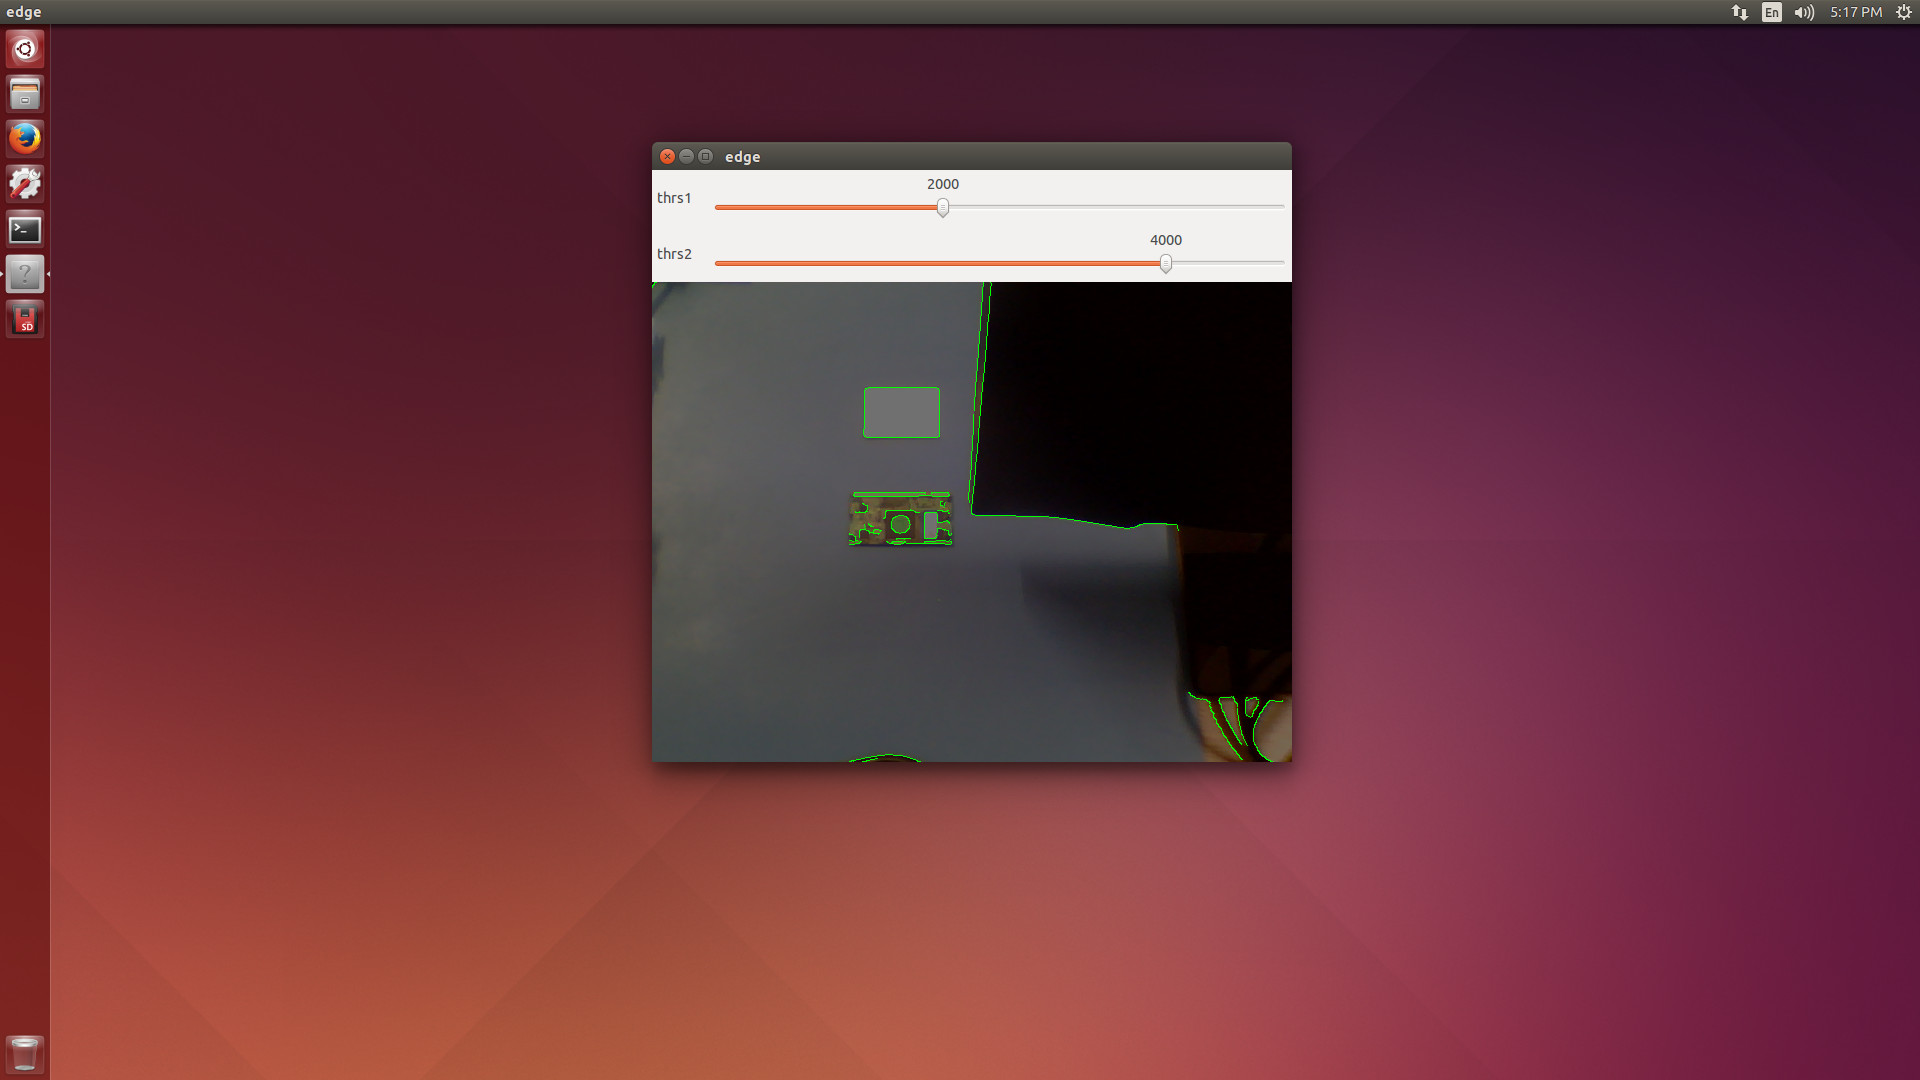
We can begin testing a Python sample, for instance, the edge detector. The running application is displayed in figure 3.
|
1 |
./python2/edge.py |
After the samples are compiled, you can try some of them. A nice try is the “background/foreground segmentation” samples since they are available with and without GPU support. You can run them from the commands below, as well as see the results in figures 4 and 5.
|
1 2 |
./cpp/cpp-example-bgfg_segm ./gpu/gpu-example-bgfg_segm --camera=true |
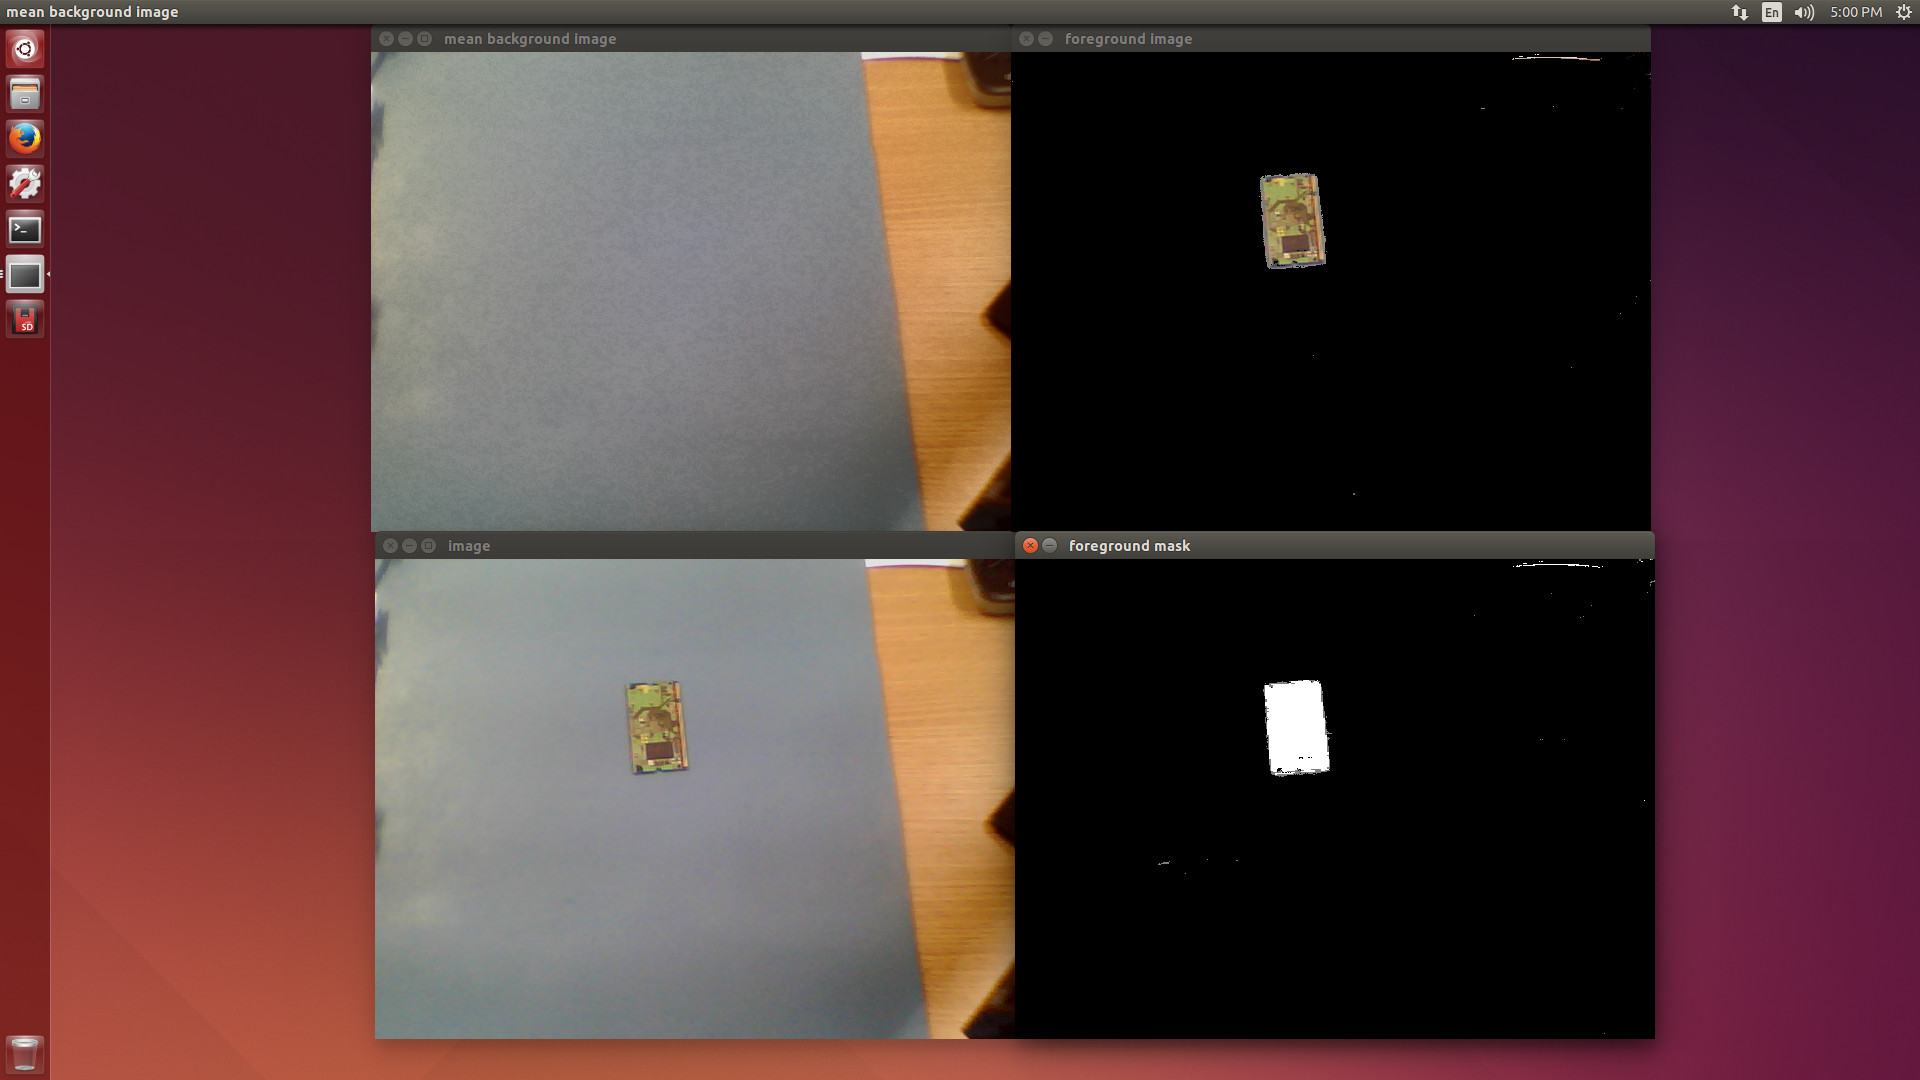
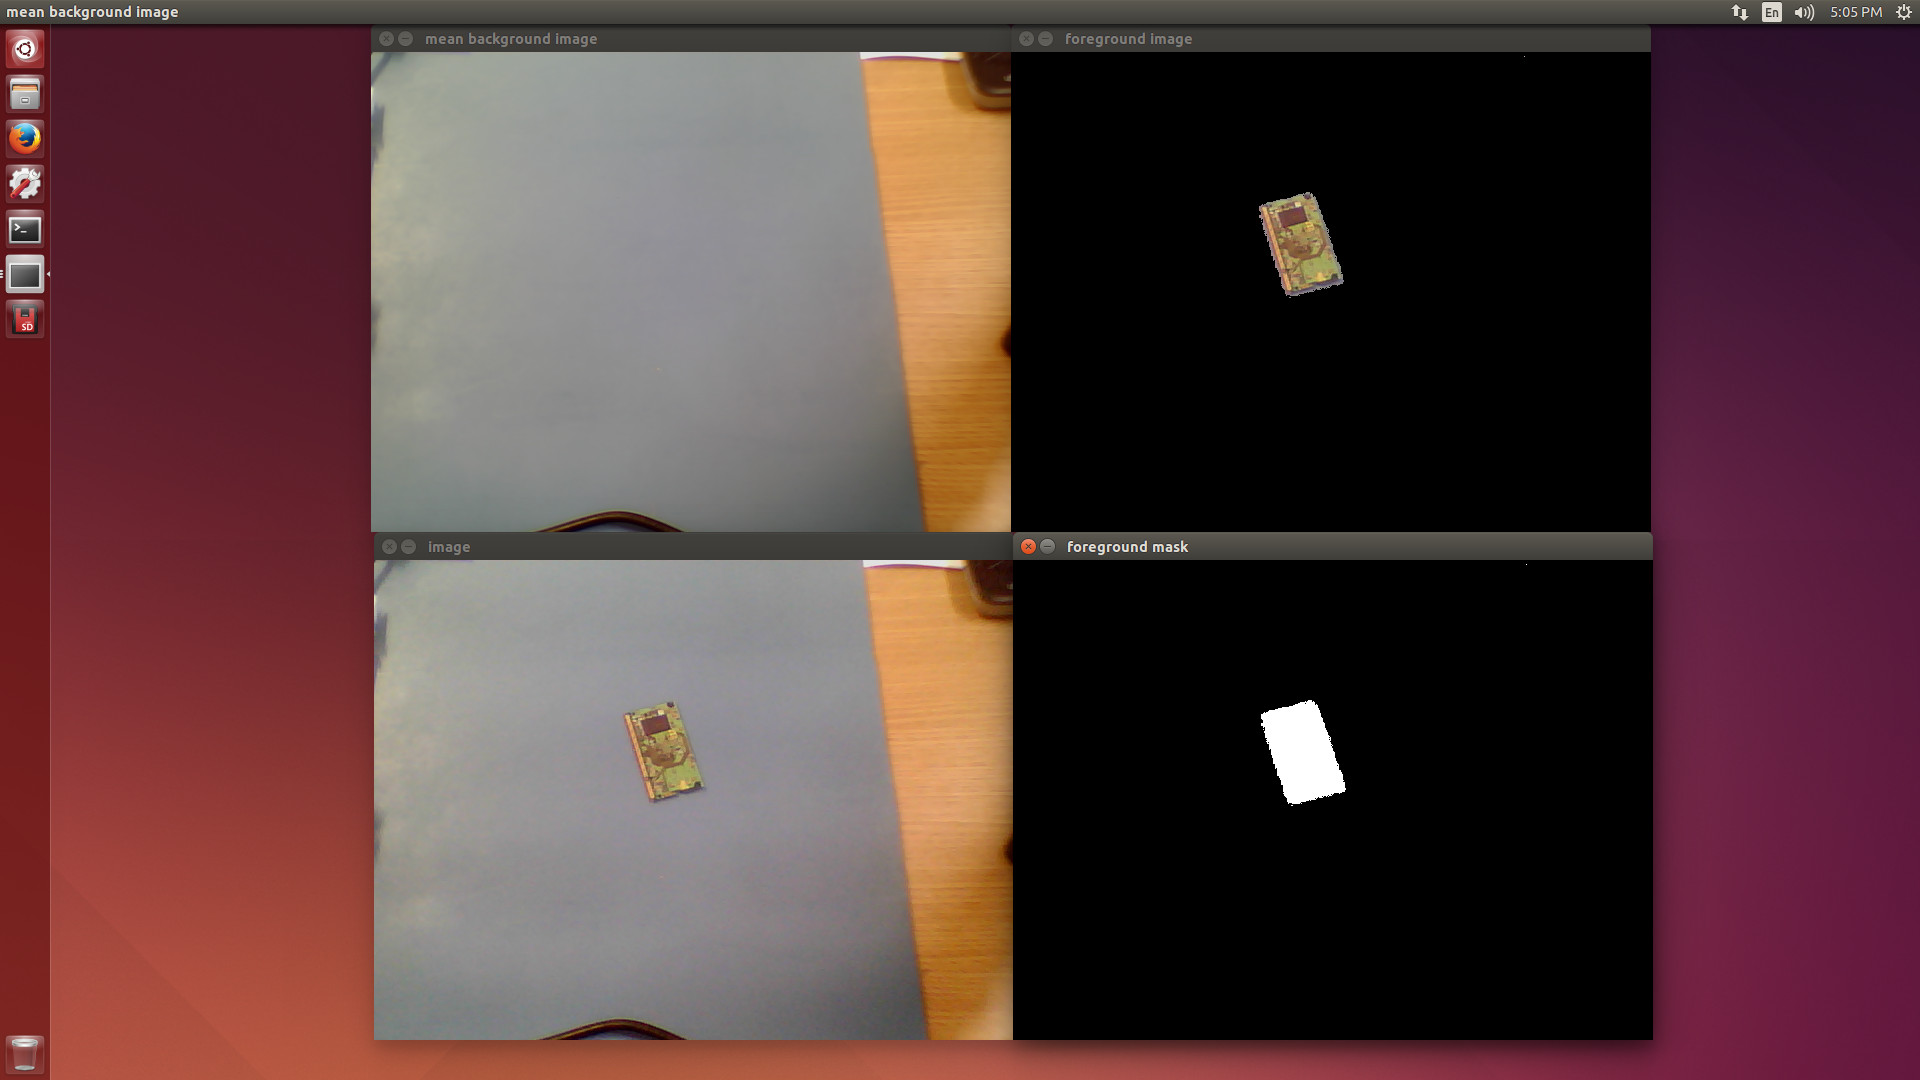
By running both samples it is possible to subjectively notice the performance difference. The CPU version has more delay.
Playing Around
After having things setup, the question comes: how easy it is to port some application from CPU to GPU, or even start developing with GPU support? It was decided to play around a little with the Sobel application that is well described in the Sobel Derivatives tutorial.
The purpose is to check if it’s possible to benefit from CUDA out-of-the-box, therefore only the function getTickCount from OpenCV is employed to measure the execution time of the main loop of the Sobel implementations. You can use the NVIDIA Nsight for advanced remote debugging and profiling.
The Code
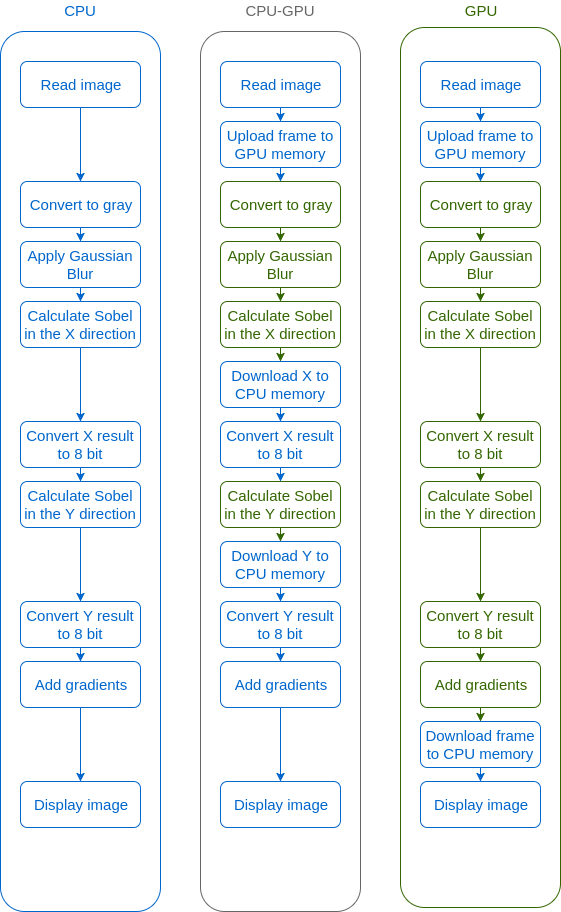
The first code is run completely on the CPU, while in the first attempt to port to GPU (the second code, which will be called CPU-GPU), the goal is to try to find functions analog to the CPU ones, but with GPU optimization. In the last attempt to port, some improvements are done, such as creating filter engines, which reduces buffer allocation, and finding a way to replace the CPU function convertScaleAbs into GPU accelerated functions.
A diagram describing the loop for the three examples is provided in figure 6.
The main loop for the three applications tested is presented below. You can find the full source code for them on Github:
- CPU only code:
1234567891011121314151617181920212223for(unsigned int i = 0; i < (nsamples-1); i++){Mat frame;//cap >> frame; // get a new frame from cameraframe = imread("/home/ubuntu/opencv/samples/dog.jpg", 1);cvtColor(frame, edges, COLOR_BGR2GRAY);GaussianBlur(edges, edges, Size(7,7), 1.5, 1.5);/// Gradient XSobel( edges, grad_x, ddepth, 1, 0, 3, scale, delta, BORDER_DEFAULT );convertScaleAbs( grad_x, abs_grad_x );/// Gradient YSobel( edges, grad_y, ddepth, 0, 1, 3, scale, delta, BORDER_DEFAULT );convertScaleAbs( grad_y, abs_grad_y );/// Total Gradient (approximate)addWeighted( abs_grad_x, 0.5, abs_grad_y, 0.5, 0, edges );imshow("edges", edges);if(waitKey(1) >= 0) break;} - CPU-GPU code:
123456789101112131415161718192021222324252627for(unsigned int i = 0; i < (nsamples-1); i++){Mat s_frame;//cap >> s_frame; // get a new frame from cameras_frame = imread("/home/ubuntu/opencv/samples/dog.jpg", 1);gpu::GpuMat frame;frame.upload(s_frame);gpu::cvtColor(frame, edges, COLOR_BGR2GRAY);gpu::GaussianBlur(edges, edges, Size(7,7), 1.5, 1.5);/// Gradient Xgpu::Sobel( edges, grad_x, ddepth, 1, 0, 3, scale, delta, BORDER_DEFAULT );grad_x.download(abs_grad_x);convertScaleAbs( abs_grad_x, abs_grad_x );/// Gradient Ygpu::Sobel( edges, grad_y, ddepth, 0, 1, 3, scale, delta, BORDER_DEFAULT );grad_y.download(abs_grad_y);convertScaleAbs( abs_grad_y, abs_grad_y );/// Total Gradient (approximate)addWeighted( abs_grad_x, 0.5, abs_grad_y, 0.5, 0, s_edges );imshow("edges", s_edges);if(waitKey(1) >= 0) break;} - GPU code
123456789101112131415161718192021222324252627282930313233//Create engine for Gaussian Blur and Sobel filtercv::Ptr<gpu::FilterEngine_GPU> filterGblur = gpu::createGaussianFilter_GPU(idepth, Size(7,7), 1.5, 1.5);cv::Ptr<gpu::FilterEngine_GPU> filterSobel1 = gpu::createDerivFilter_GPU(idepth, ddepth, 1, 0, 3, BORDER_DEFAULT);cv::Ptr<gpu::FilterEngine_GPU> filterSobel2 = gpu::createDerivFilter_GPU(idepth, ddepth, 0, 1, 3, BORDER_DEFAULT);for(unsigned int i = 0; i < (nsamples-1); i++){Mat s_frame;//cap >> s_frame; // get a new frame from cameras_frame = imread("/home/ubuntu/opencv/samples/dog.jpg", 1);cv::Rect imgsize = cv::Rect(0, 0, s_frame.cols, s_frame.rows);gpu::GpuMat frame;frame.upload(s_frame);gpu::cvtColor(frame, edges, COLOR_BGR2GRAY);filterGblur->apply(edges, edges, imgsize);/// Gradient XfilterSobel1->apply(edges, grad_x, imgsize);gpu::abs(grad_x, grad_x);grad_x.convertTo(grad_x, idepth);/// Gradient YfilterSobel2->apply(edges, grad_y, imgsize);gpu::abs(grad_y, grad_y);grad_y.convertTo(grad_y, idepth);/// Total Gradient (approximate)gpu::addWeighted( grad_x, 0.5, grad_y, 0.5, 0, edges );edges.download(s_edges);imshow("edges", s_edges);if(waitKey(1) >= 0) break;}
The Tests
- Each of the three examples is executed using a random picture in jpeg format as input.
- The input pictures dimensions in pixels that were tested are: 3483×2642, 2122×1415, 845×450 and 460×290.
- The main loop is being iterated 500 times for each run.
- All of the steps described in figure 6 have their execution time measured. This section will present the results.
- Therefore there are 12 runs total.
- The numbers presented in the results are the average values of the 500 iterations for each run.
The Results
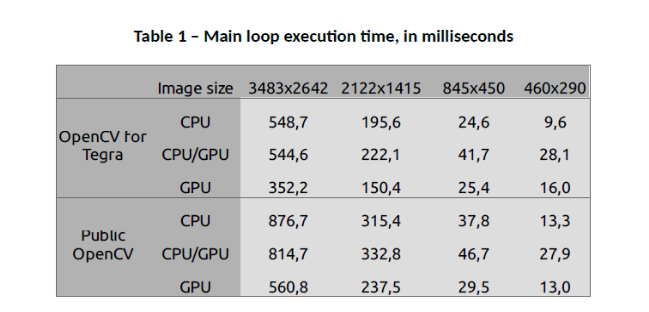
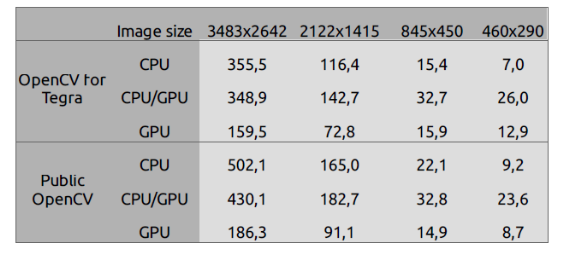
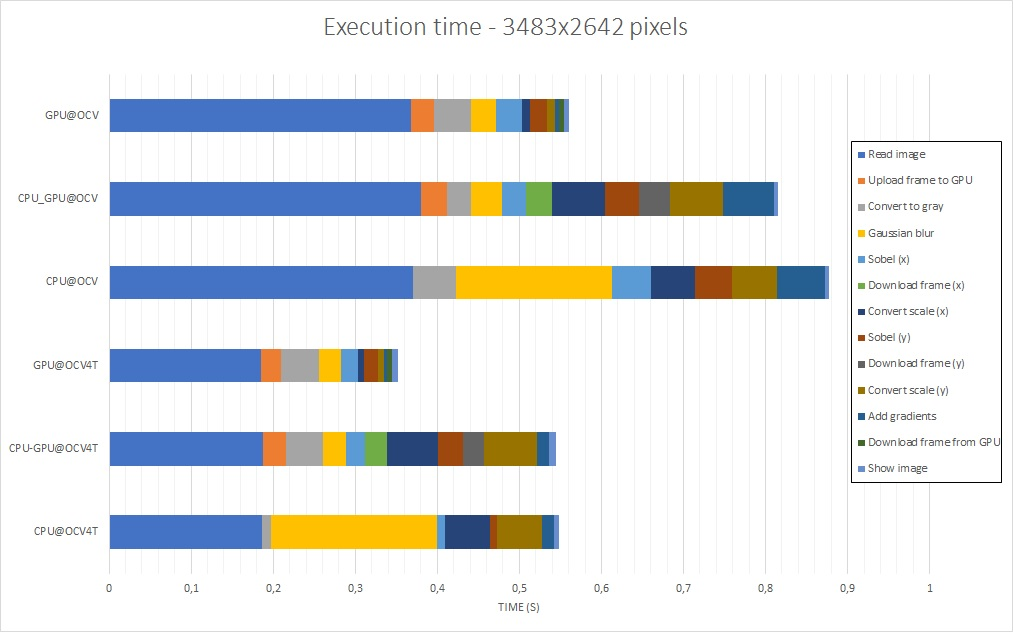
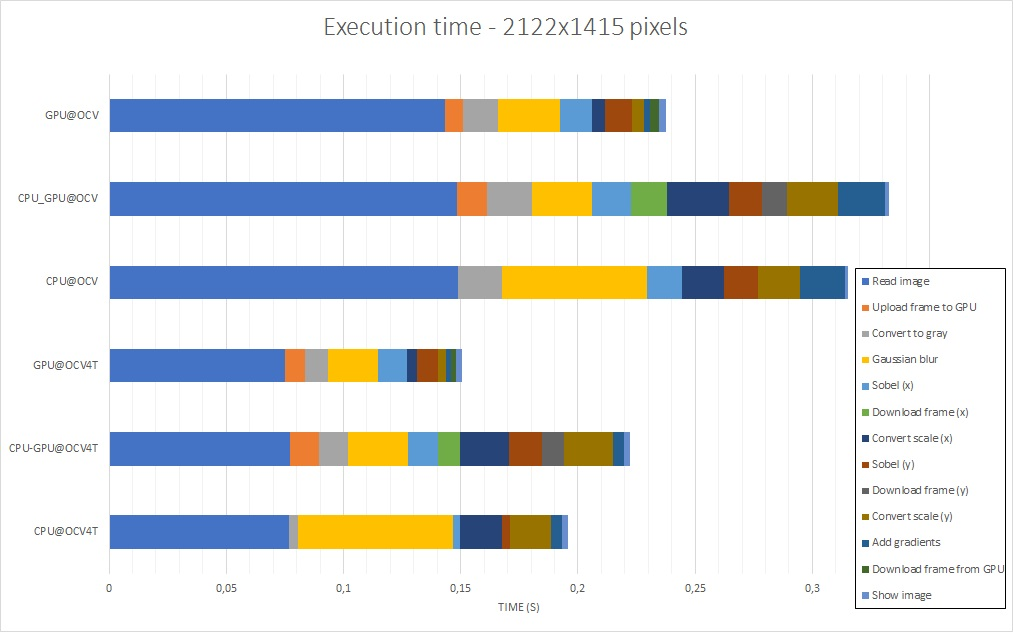
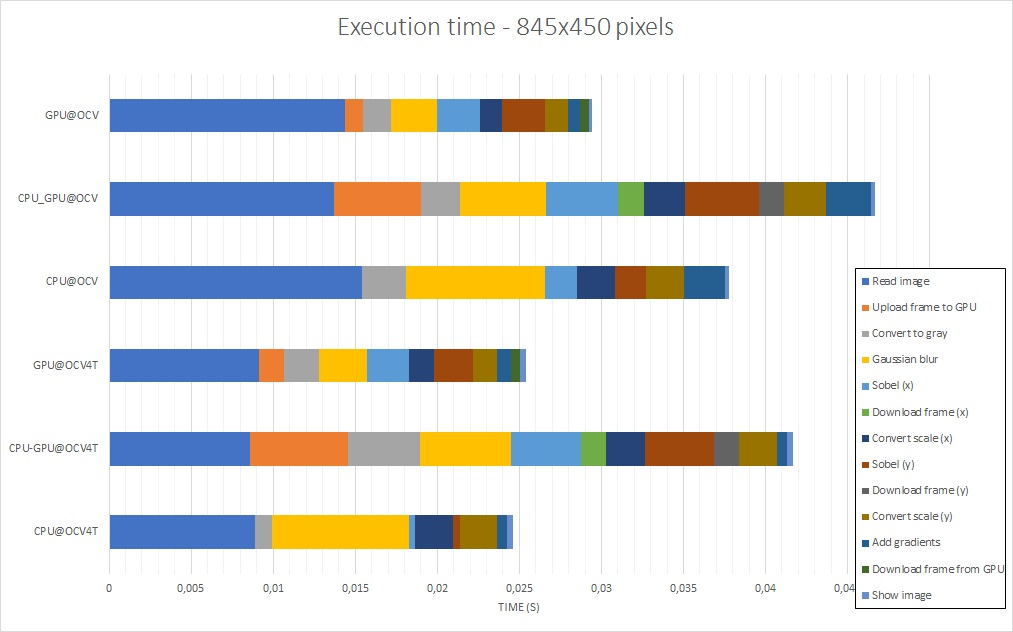
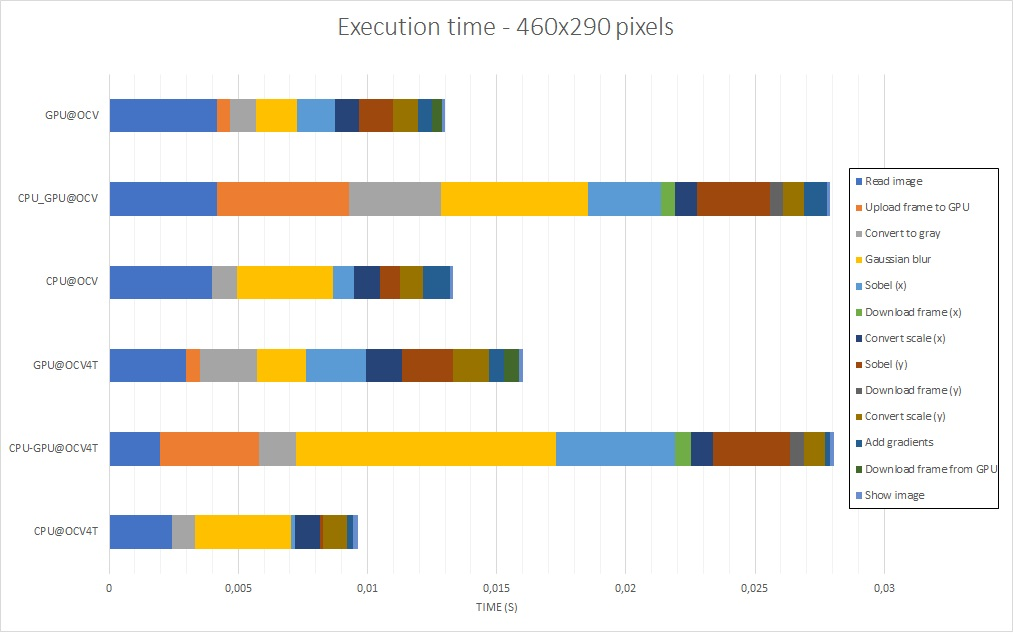
The results presented are the total time required to execute the main loop – with and without image capture and display time, available in tables 1 and 2 – and the time each task takes to be executed, which is described in figures 7, 8, 9 and 10. If you want to have a look at the raw data or reproduce the tests, everything is in the aforelinked GitHub repository.
The Analysis
Regarding OpenCV for Tegra in comparison to the public OpenCV, the results point out that OpenCV for Tegra has been optimized, mostly for some CPU functions. Even when discarding image read – that takes a long time to be executed, and has approximately a 2x gain – and display frame execution times, OpenCV for Tegra still bests the open-source version.
When considering only OpenCV for Tegra, from the tables, it is possible to see that using GPU functions without care might even make the performance worse than using only the CPU. Also, it is possible to notice that, for these specific implementations, GPU is better for large images, while CPU is best for small images – when there is a tie, it would be nice to have a power consumption comparison, which hasn’t been done, or also consider the fact that this GPU code is not optimized as best as possible.
Looking at the figures 7 to 10, it can be seen that the Gaussian blur and scale conversion from 16 bits to 8 bits had a big boost when running on GPU, while conversion of the original image to grayscale and the Sobel derivatives had their performance degraded. Another point of interest is the fact that transferring data from/to the GPU has a high cost, and this is, in part, one of the reasons why the first GPU port was unsuccessful – it had more copies than needed.
Regarding image size, it can be noticed that the image read and display have an impact in overall performance that might be relevant depending on the complexity of the algorithm being implemented, or how the image capture is being done.
There are probably many ways to try and/or make this code more optimized, be it by only using OpenCV; by combining custom CUDA functions with OpenCV; by writing the application fully in CUDA or; by using another framework or tool such as VisionWorks.
Two points that might be of interest regarding optimization still in OpenCV are the use of streams – asynchronous execution of code on the CPU/GPU – and zero-copy or shared memory, since the Tegra K1 has CPU and GPU shared memory supported by CUDA (see this NVIDIA presentation from GPU Technology Conference and this NVIDIA blog post for reference).
Conclusion
In this article, the installation of the NVIDIA JetPack SDK and deployment on the Toradex Apalis TK1 have been presented. Having this tool installed, you are able to use OpenCV for Tegra, thus benefiting from all of the optimizations provided by NVIDIA. The JetPack SDK also provides many other useful contents, such as CUDA, VisionWorks and GameWorks samples, and the NVIDIA Nsight IDE.
In order to assess how easy it is for a developer freshly introduced to the CV and GPU concepts to take advantage of CUDA, purely using OpenCV optimized functions, a CPU to GPU port of a Sobel filter application was written and tested. From this experience, some interesting results were found, such as the facts that GPU indeed improves performance – and this improvement magnitude depends on a series of factors, such as size of the input image, quality of implementation – or developer experience, algorithms being used and complexity of the application.
Having a myriad of sample source code, it is easy to start developing your own applications, although care is required in order to make the Apalis TK1 System on Module yield its best performance. You can find more development information in the NVIDIA documentation, as well as the OpenCV documentation. Toradex also provides documentation about Linux usage in its developer website, and has a community forum. Hope this information was helpful, see you next time!

Jean-Luc started CNX Software in 2010 as a part-time endeavor, before quitting his job as a software engineering manager, and starting to write daily news, and reviews full time later in 2011.
Support CNX Software! Donate via cryptocurrencies, become a Patron on Patreon, or purchase goods on Amazon or Aliexpress


