SunFounder has sent me a review sample of the Pironman 5 tower PC case for the Raspberry Pi 5. I had already reviewed the Pironman case for Raspberry Pi 4 last year, so I’ll do something similar this time around with the new Pironman 5 case adding support for NVMe SSD using the PCIe interface from the Pi 5 SBC.
The Pironman 5 review will include unboxing and an assembly guide, followed by software installation and features testing (e.g. OLED display, RGB LED control, remote control. soft power off, etc…), before testing the cooling efficiency of the device with some benchmarks.
Pironman 5 unboxing
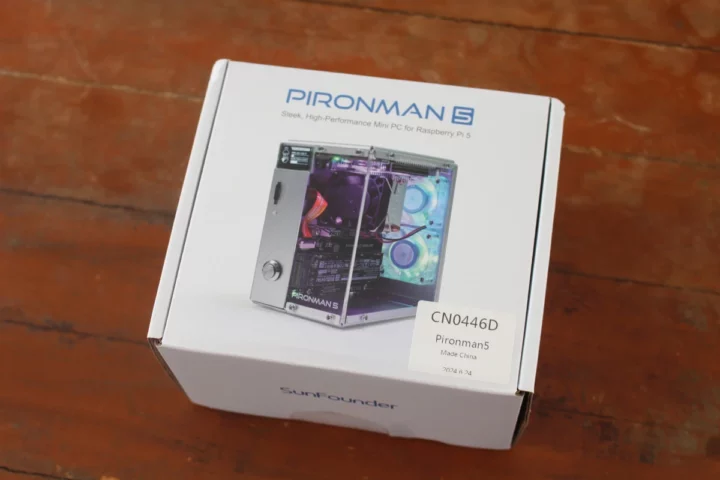
The Pironman 5 comes in a package that will be smaller than most people expect.
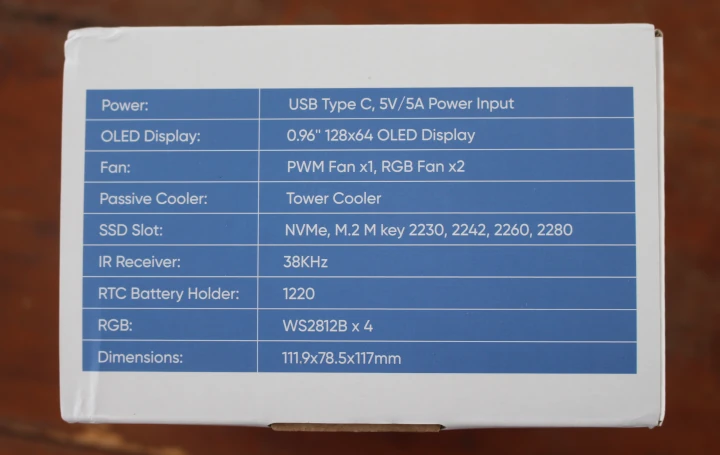
The main features are listed on the side with 5V/5A power input, a 0.96-inch OLED, a tower cooler, M.2 NVMe SSD support, an IR receiver, a CR1220 battery (included), four RGB LEDs, and the dimensions of the tiny tower PC case.
There are a few more accessories than in the original Pironman case due to the extra adapter and expansion boards.
The kit includes an assembly guide, the metal enclosure itself, two RGB fans with black dust filters, an OLED display, a hex key and screwdriver, a tower cooler, FPC PCIe cables, a power button, acrylic plates, various expansion/adapter boards, screws, standoffs, and other tidbits.
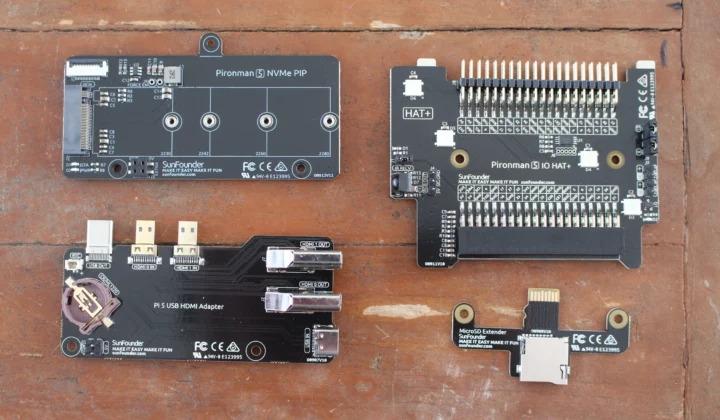
The Pironman 5 NVMe PiP board is designed to connect an M.2 NVMe SSD through the PCIe interface of the Raspberry Pi 5. It supports 2230, 2242, 2260, and 2280 SSDs. The Pironman 5 IO HAT+ board allows us to easily access the 40-pin GPIO header from the outside, controls the fans, and features an IR receiver and four RGB LEDs. The Pi 5 USB HDMI adapter moves the micro HDMI and USB-C ports to the rear panel with all other ports and exposes two full-size HDMI ports plus the USB-C port for power. It also includes a CR1220 battery socket and connector for the RTC. Finally, the microSD extender simply changes the location of the microSD card socket so that it can be easily accessed by users.
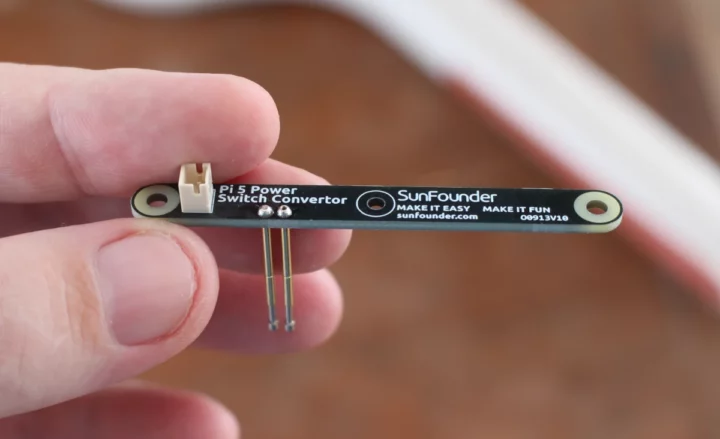
The Pi 5 Power Switch Convertor relies on two Pogo pins to connect to the Raspberry Pi 5 and a 2-pin connector for the power button.
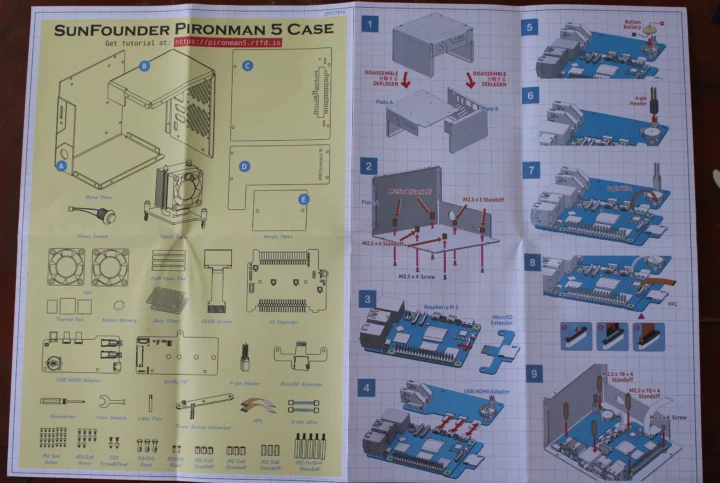
The enclosed guide lists all components and provides a 28-step assembly guide. You’ll find it with other information on the online tutorial available in English, German, and Japanese.
Pironman 5 case assembly with Raspberry Pi 5 and M.2 NVMe SSD
The Raspberry Pi 5 is not included so you’ll need to bring your own. Last time around, I used my Raspberry Pi 5 with a Cytron MAKERDISK SSD and the active cooler, so I had to remove all that to start with a “clean” Raspberry Pi 5 without thermal pads, heatsink, or HAT. The Pironman 5 works with multiple operating systems, but Raspberry Pi OS is recommended since it’s fully compatible with the Pironman 5 enclosure:
- Raspberry Pi OS 64-bit Desktop / Lite) – Perfectly compatible
- Ubuntu Desktop 23.10 – No SPI so the RGB LEDs do not light up
- Kali – No I2C, so the OLED screen does not work
- Home Assistant – Cannot enable I2C and SPI
[Update July 29, 2024: I was told the information above was outdated. Here’s the current OS support status:
- Raspberry Pi OS 32-bit/ 64-bit Desktop / Lite) – Perfectly compatible
- Ubuntu Desktop/Server 24.04 – Perfectly compatible
- Kali Linux 2024-05-15 – GPIO fan not working
- Home Assistant – perfectly compatible (the documentation comes with Home Assistant-specific instructions)
- Homebrigde – perfectly compatible
]
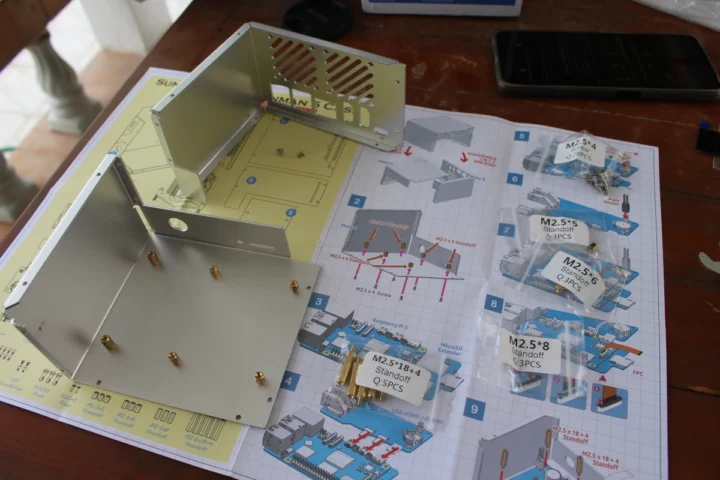
For this review, I’ll reuse the 256 GB Cytron MAKERDISK SSD with Raspberry Pi OS preinstalled. The first step of the assembly is to disassemble the metal case into two parts by removing a few screws and then installing M2.5 standoffs of different heights by carefully following the instructions in the assembly guide. Each standoff, nut, and screw types are in different bags each clearly marked, so assembly will be straightforward. Note that there are also a few spares, and if some screws fall on the ground that’s not a big issue.
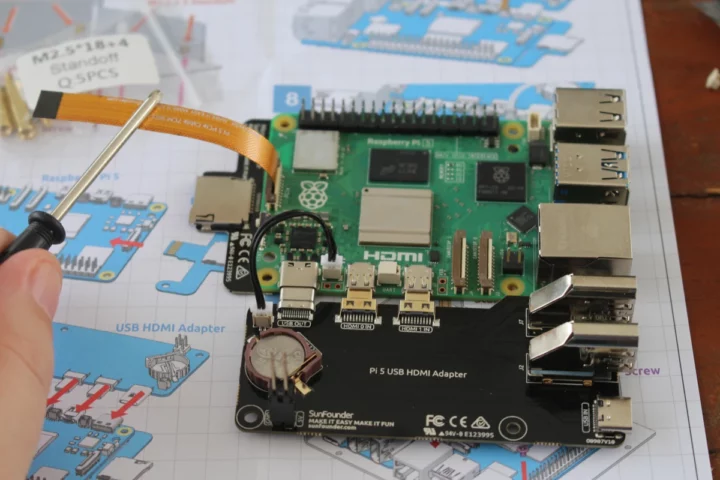
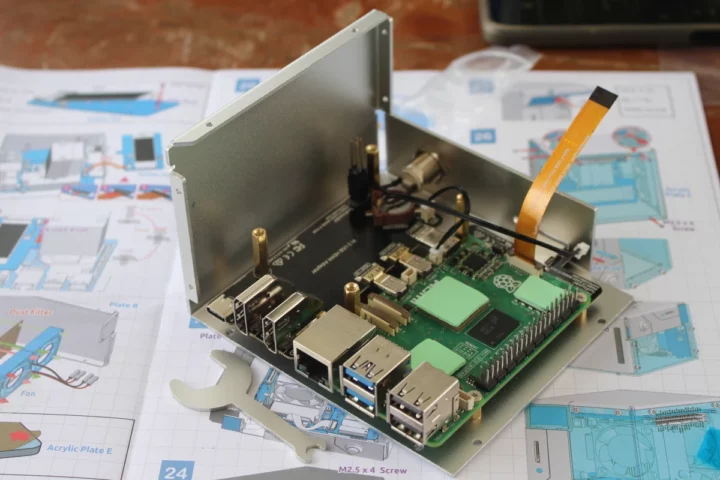
Let’s now insert the Pi 5 USB HDMI Adapter and microSD expender into our Raspberry Pi 5 board, insert the provided CR1220 battery, and connect the PCIe and RTC battery cables as shown in the photo below. Note the orientation of the FPC PCIe cable is important.
The next step is to install the power button in the case, and faster the Raspberry Pi 5 and adapter to the metal case with some standoffs. I truly like the hex key (bottom left) designed for the standoffs as it makes assembly so much easier for people with fat fingers.
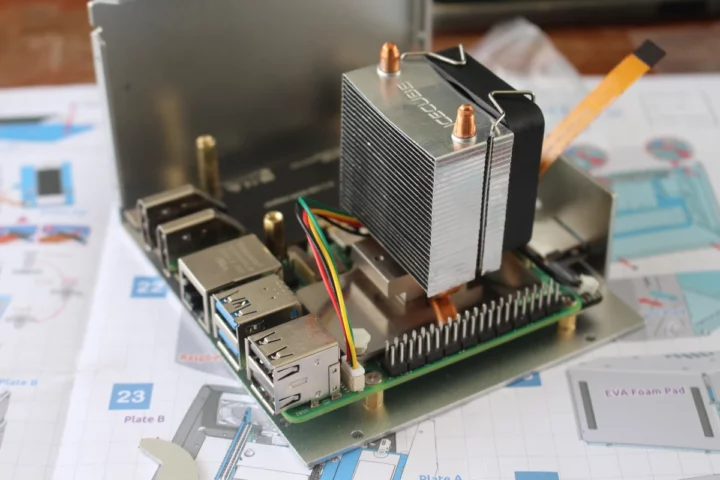
We’ll now add the three thermal pads on top of the BCM2712 SoC, wireless module, and VLI chip on the Raspberry Pi 5 because insert the tower cooler using the plastic bits with spring.
The 4-pin fan wire needs to be connected to the fan connector on the Raspberry Pi 5. At this point, we can attach the Pi 5 Power Switch Convertor making sure its pogo pins are aligned properly with the power button pins, and secure it with two screws. We can also connect the 2-pin wire from the power button.
The next step is optional and only needed if you plan to use an NVMe SSD. It’s not needed if you’re going to run Raspberry Pi OS from a microSD card. I installed one of the SSD studs in the 2242 location before securing a 256GB Cytron MAKERDISK NVMe SSD.
I then had to slot it on the 4-pin header and secure it with two screws (bottom left and right) and a black plastic rivet in the middle of the Pi 5 Power Switch Convertor.
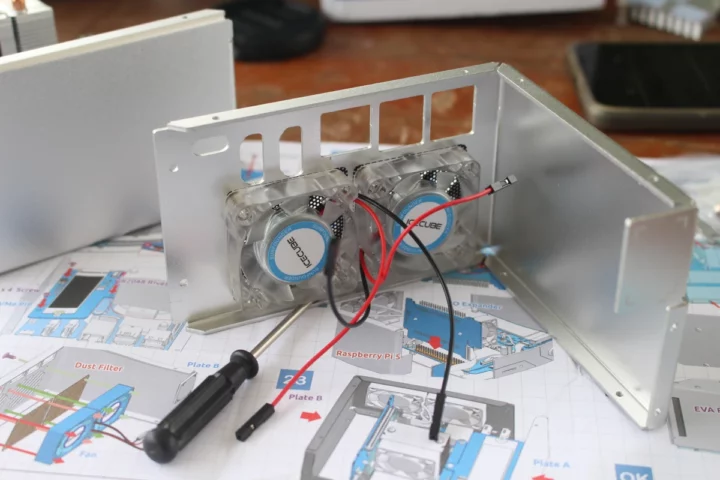
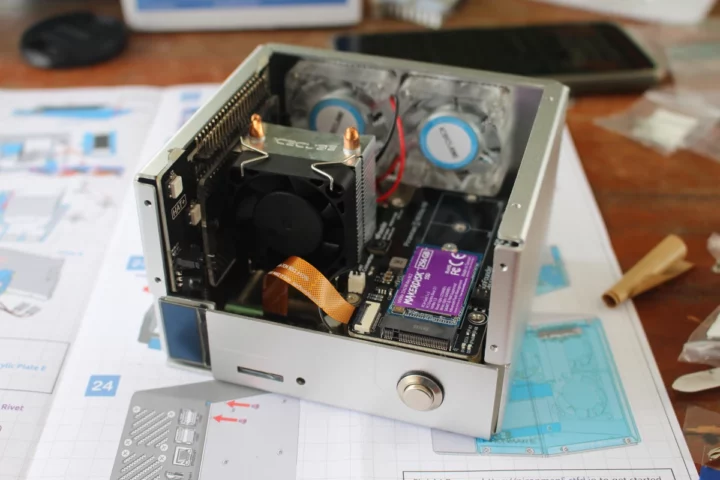
We can now switch to the other metal part of the Pironman 5 enclosure and install the two fans with dust filters (black) as shown in the image below.
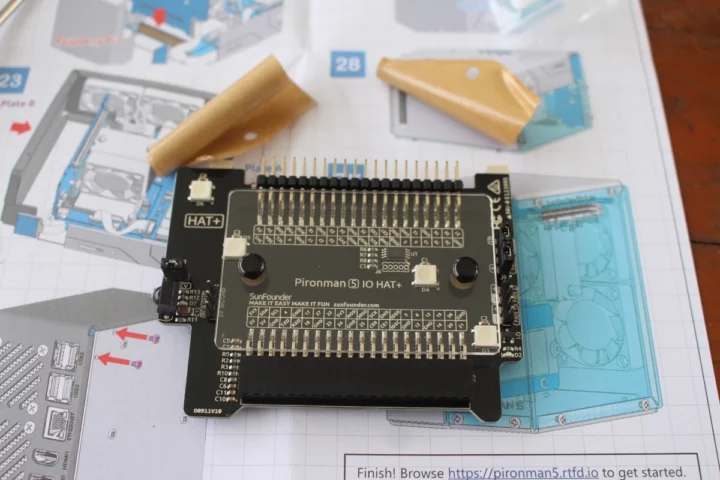
One acrylic plate needs to be installed on the Pironman 5 IO HAT+ after removing the protective films on both sides of the plate. It is secure by two plastic rivet.
We can now connect the two fans and the OLED display…
Before inserting the IO HAT+ into the 40-pin GPIO header of the Raspberry Pi 5, and placing both metal parts together.
The OLED display comes with a 3M sticker, and I initially placed it on the metal case before assembling the two parts. That was a mistake in hindsight, so I had to remove it and assemble the two metal parts before sticking the OLED on the enclosure.
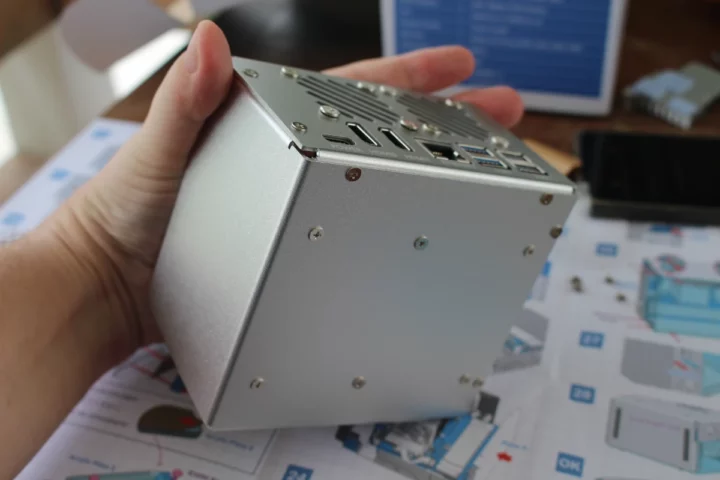
Everything is secured in place with plenty of M2.5 screws. The final step is the installation of the two remaining acrylic plates.
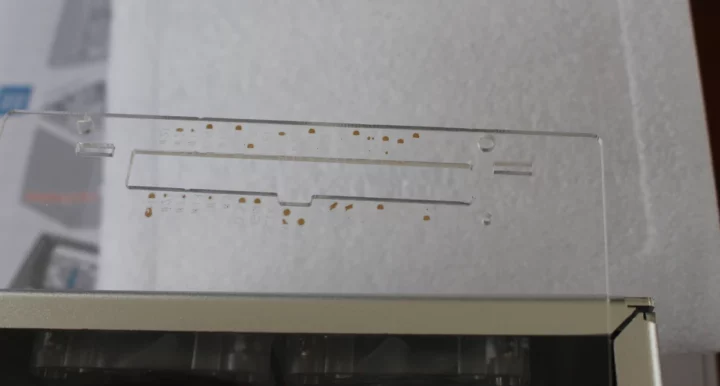
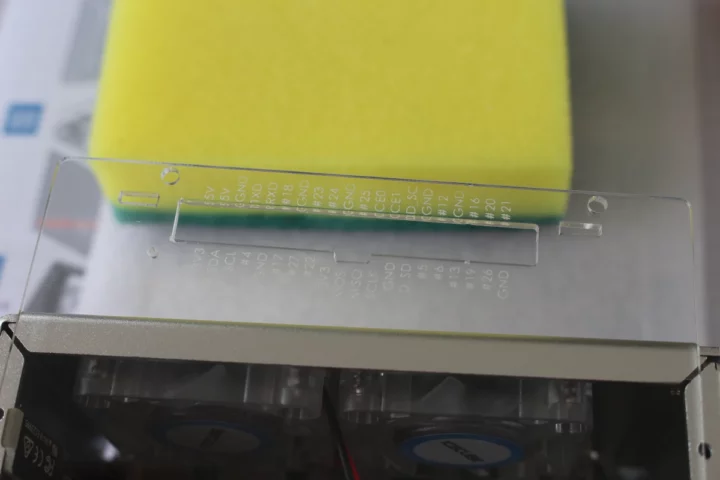
When I first removed the protective film from the larger acrylic plate, I noticed the markings around the GPIO opening still had some brown sticker.
I cleaned it up with a sponge and fingernails.
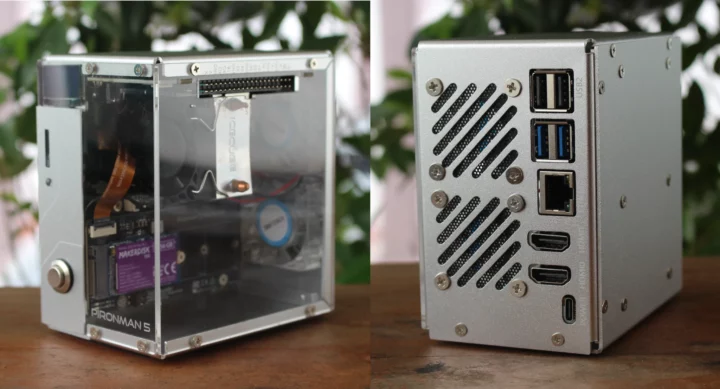
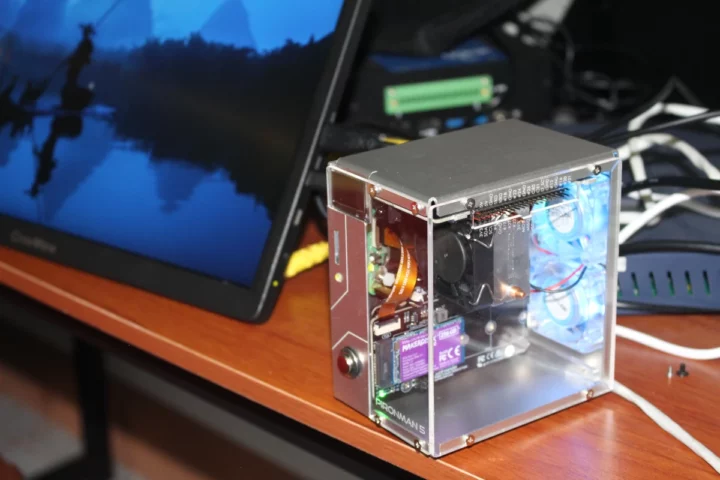
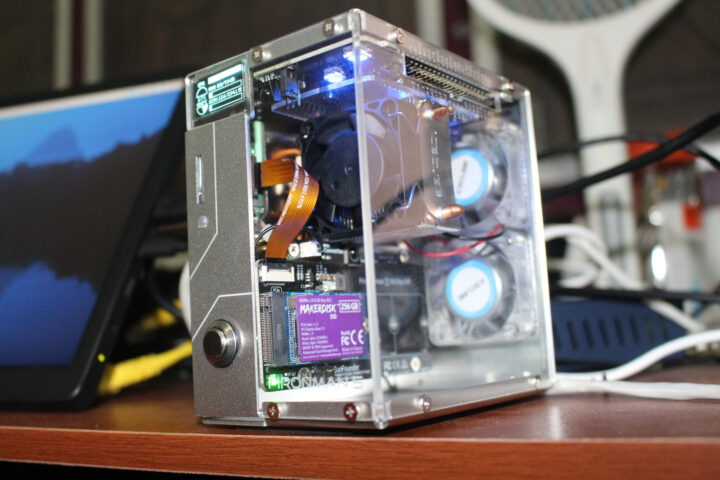
I could now complete the Pironman 5 assembly with the two acrylic plates securing them with four M2.5 screws each. The result is pretty neat and I find the design prettier than the original Pironman case.
It took me around one hour to complete the assembly.
Software installation
If I connect an Ethernet cable, HDMI display, and the 5V/5A power supply from Raspberry Pi, the system will boot to Raspberry Pi OS. But the OLED does not show anything, the RGB LEDs on the Pironman 5 IO HAT+ are off, and if I press the power button once the popup with shutdown, reboot, and logout will show up, and pressing again will turn off the system, but the fans will be still be rotating.
I can still press the button for 5 seconds for a hard shutdown after which the fan and associated RGB LEDs turn off. That’s because I haven’t installed the necessary software yet. So Let’s do that now.
The first step is to configure the Raspberry Pi 5 to deactivate GPIO power when shutting down the system in order to turn off the OLED screen and RGB fans. We’ll need to manually edit the EEPROM configuration file with the following command:
|
1 |
sudo rpi-eeprom-config -e |
Then we can modify the POWER_OFF_ON_HALT line and set it to 1. For instance:
|
1 2 3 4 5 |
[all] BOOT_UART=1 WAKE_ON_GPIO=1 POWER_OFF_ON_HALT=1 BOOT_ORDER=0xf416 |
Save the changes by pressing “Ctrl + X”, “Y” and “Enter”.
The next step is to install the Pironman5 Python script and dependencies:
|
1 2 3 4 |
cd ~ git clone https://github.com/sunfounder/pironman5.git cd pironman5 sudo python3 install.py |
If the command runs successfully, the output should look like:
|
1 2 3 4 5 6 7 8 9 10 11 12 13 14 15 16 17 18 19 20 21 22 23 24 25 26 27 28 29 30 31 32 33 34 35 36 37 38 39 40 41 42 43 44 45 46 47 |
Pironman 5 Installer - Update package list... Done - Install python3-pip... Done - Install python3-venv... Done - Install influxdb... Done - Install libjpeg-dev... Done - Install libfreetype6-dev... Done - Install kmod... Done - Install i2c-tools... Done - Install python3-gpiozero... Done - Create work directory... Done - Change work directory mode... Done - Change work directory owner... Done - Create log directory... Done - Change log directory mode... Done - Change log directory owner... Done - Remove old virtual environment... Done - Create virtual environment... Done - Install pip... Done - Install setuptools... Done - Install build... Done - Install influxdb... Done Installing pironman5... - Uninstall old package... Done - Install package... Done Installing pm_auto... - Uninstall old package... Done - Install package... Done Installing pm_dashboard... - Uninstall old package... Done - Install package... Done Installing sf_rpi_status... - Uninstall old package... Done - Install package... Done Setup auto start... - Copy binary file... Done - Change binary file mode... Done - Copy service file... Done - Enable service... Done - Reload systemd... Done - Start service... Done - add module: i2c-dev... Done - Copy dtoverlay sunfounder-pironman5.dtbo... Done - Change work directory owner... Done Finished Cleanup - Remove build... Done |
Once the installation is complete (no reboot necessary) the following happens:
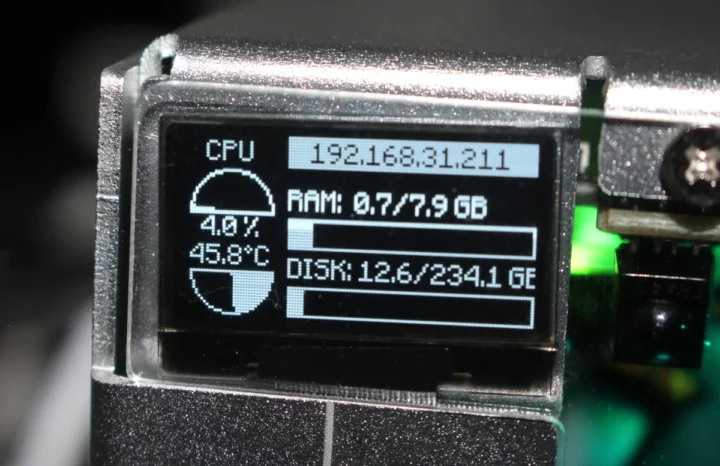
- The OLED displays CPU, RAM, Disk Usage, CPU Temperature, and the Raspberry Pi’s IP Address.
- The four WS2812 RGB LEDs will light up in blue in breathing mode.
- The RGB fans will stop and only activate when the CPU temperature reaches 60°C
I have both Ethernet and WiFi configured on my Pi 5, so the display will display both IP addresses in turns every few seconds. The display is really small, my old eyes find it hard to read, so I have to move closer for it to be readable.
If I press the button twice, the Raspberry Pi 5 will turn off, and so will the fans and RGB LEDs. The only thing remaining is the red LED from the Raspberry Pi.
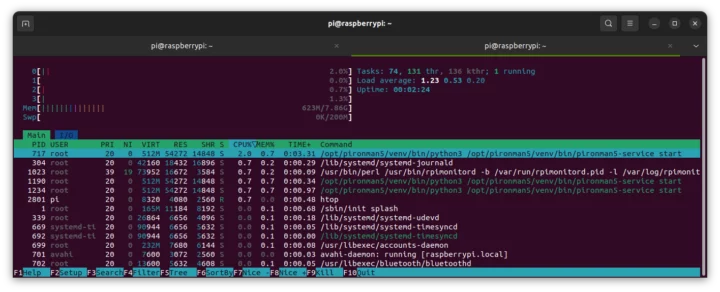
The pironman5.service will start automatically each time you start your Raspberry Pi 5. It does take some CPU resources, but nothing significant.
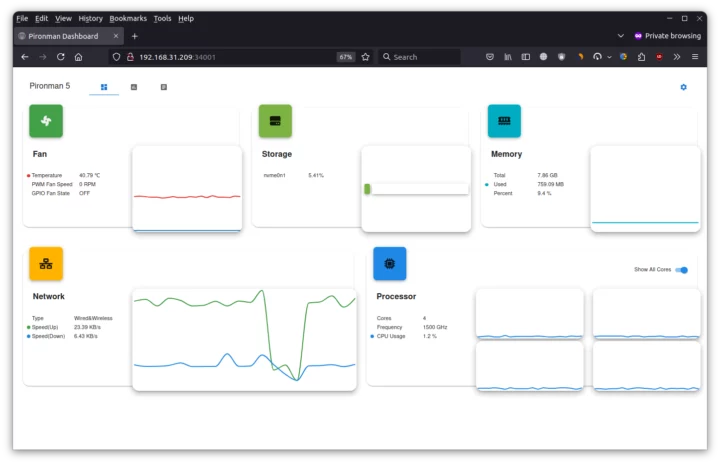
At this point would have a fully working system, and there’s nothing else you need to do. That’s unless you want to monitor the system and/or change a few settings. This can be done in the Pironman 5 dashboard accessible from http://<IP_Address>:34001. You’ll find five widgets for the fan and CPU temperature, storage, memory, networking, and processor usage.
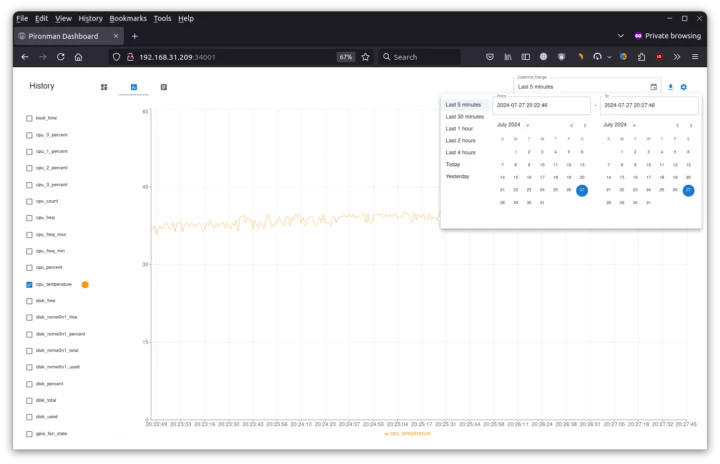
The second tab “History” allows you to see the chart of various parameters over several lengths of times from 5 minutes and up.
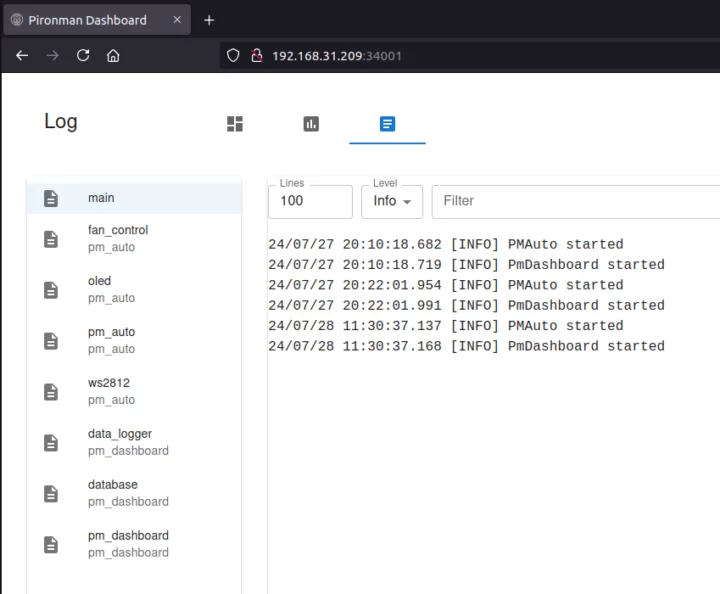
The third tab provides access to logs for the fan, RGB LEDs, OLED display, power management, etc…
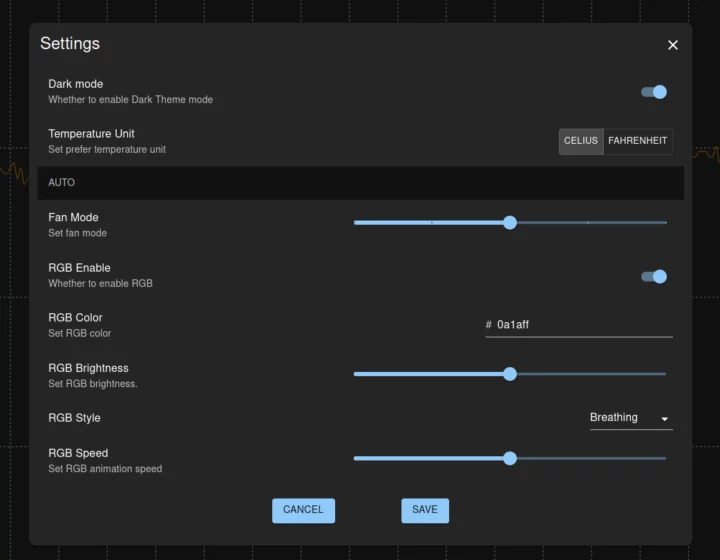
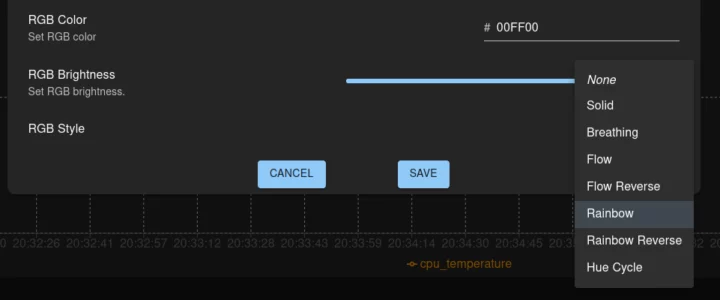
Finally, the gear icon on the right gives access to the Settings. We can enable/disable dark mode and select the temperature unit between °C and °F. Fan mode sets the fan from quiet up to always on. The remaining settings are for the RGB LEDs to enable them, and change the default color, brightness, style, and speed.
There are eight RGB styles: None, Solid, Breathing, Flow, Flow Reverse, Rainbow, Rainbow Reverse, and Hue cycle.
I set the RGB style to Rainbow and the speed to 100% to show what it looks like in the video below.
It’s an improvement over the original Pironman case for Raspberry Pi 4 whose fan and RGB LEDs could only be controlled from the command line, at least at the time of the (March 2023) review.
Talking about the command line, users can still control the RGB LEDs and fans from the Pironman5 client utility, for instance, to integrate some commands into a script:
|
1 2 3 4 5 6 7 8 9 10 11 12 13 14 15 16 17 18 19 20 21 22 23 24 25 26 27 28 29 30 31 32 33 34 35 36 37 38 |
pi@raspberrypi:~ $ sudo pironman5 --help usage: pironman5-service [-h] [-c] [-rc [RGB_COLOR]] [-rb [RGB_BRIGHTNESS]] [-rs [{solid,breathing,flow,flow_reverse,rainbow,rainbow_reverse,hue_cycle}]] [-rp [RGB_SPEED]] [-re [RGB_ENABLE]] [-rl [RGB_LED_COUNT]] [-u [{C,F}]] [-gm [GPIO_FAN_MODE]] [-gp [GPIO_FAN_PIN]] [--background [BACKGROUND]] [{start,restart,stop}] Pironman5 positional arguments: {start,restart,stop} Command options: -h, --help show this help message and exit -c, --config Show config -rc [RGB_COLOR], --rgb-color [RGB_COLOR] RGB color in hex format without # (e.g. 00aabb) -rb [RGB_BRIGHTNESS], --rgb-brightness [RGB_BRIGHTNESS] RGB brightness 0-100 -rs [{solid,breathing,flow,flow_reverse,rainbow,rainbow_reverse,hue_cycle}], --rgb-style [{solid,breathing,flow,flow_reverse,rainbow,rainbow_reverse,hue_cycle}] RGB style -rp [RGB_SPEED], --rgb-speed [RGB_SPEED] RGB speed 0-100 -re [RGB_ENABLE], --rgb-enable [RGB_ENABLE] RGB enable True/False -rl [RGB_LED_COUNT], --rgb-led-count [RGB_LED_COUNT] RGB LED count int -u [{C,F}], --temperature-unit [{C,F}] Temperature unit -gm [GPIO_FAN_MODE], --gpio-fan-mode [GPIO_FAN_MODE] GPIO fan mode, 0: Always On, 1: Performance, 2: Cool, 3: Balanced, 4: Quiet -gp [GPIO_FAN_PIN], --gpio-fan-pin [GPIO_FAN_PIN] GPIO fan pin --background [BACKGROUND] Run in background |
One part that’s missing from the Pironman 5 documentation is the IR receiver. Let’s try it with LIRC like we did last year with the original Pironman:
|
1 2 3 4 5 6 7 8 9 10 11 12 13 14 15 16 17 18 19 20 21 22 23 24 25 26 27 28 29 30 31 32 33 34 35 36 37 38 39 40 41 42 43 44 45 46 47 48 49 50 51 52 53 54 55 56 57 58 59 60 61 62 63 64 65 66 67 68 69 70 71 72 73 74 75 76 77 78 79 80 81 82 83 84 85 86 87 88 89 90 91 92 93 94 95 96 97 98 99 100 101 102 103 104 105 106 107 108 109 110 111 112 113 114 115 116 117 118 119 120 121 122 123 124 125 126 127 128 129 130 131 132 133 134 135 136 137 138 139 140 141 142 143 144 145 146 147 148 149 150 151 152 153 154 155 156 157 158 159 160 161 |
pi@raspberrypi:~ $ sudo mode2 --driver default -d /dev/lirc0 Using driver default on device /dev/lirc0 Trying device: /dev/lirc0 Using device: /dev/lirc0 Running as regular user pi pulse 3981 space 3981 pulse 506 space 1982 pulse 505 space 1983 pulse 506 space 1982 pulse 507 space 1983 pulse 508 space 991 pulse 506 space 992 pulse 507 space 1982 pulse 506 space 992 pulse 506 space 1984 pulse 506 space 1982 pulse 507 space 1982 pulse 507 space 1983 pulse 507 space 992 pulse 507 space 992 pulse 507 space 992 pulse 507 space 992 pulse 507 space 1983 pulse 506 space 1982 pulse 508 space 991 pulse 507 space 1982 pulse 508 space 991 pulse 507 space 992 pulse 507 space 992 pulse 507 space 991 pulse 507 space 8798 pulse 3985 space 3980 pulse 508 space 1980 pulse 508 space 1982 pulse 507 space 1981 pulse 508 space 1981 pulse 508 space 991 pulse 508 space 991 pulse 507 space 1981 pulse 508 space 991 pulse 508 space 1981 pulse 508 space 1981 pulse 508 space 1981 pulse 509 space 1980 pulse 508 space 991 pulse 508 space 991 pulse 508 space 991 pulse 508 space 992 pulse 507 space 1981 pulse 508 space 1982 pulse 507 space 991 pulse 507 space 1982 pulse 507 space 992 pulse 506 space 993 pulse 505 space 993 pulse 505 space 993 pulse 505 timeout 132457 pulse 3952 space 4011 pulse 478 space 2009 pulse 502 space 1987 pulse 504 space 1985 pulse 504 space 1987 pulse 502 space 994 pulse 505 space 994 pulse 507 space 1982 pulse 506 space 993 pulse 506 space 1983 pulse 506 space 1983 pulse 506 space 1983 pulse 506 space 993 pulse 506 space 992 pulse 507 space 992 pulse 502 space 997 pulse 507 space 992 pulse 507 space 1982 pulse 507 space 1982 pulse 508 space 991 pulse 507 space 1982 pulse 508 space 991 pulse 507 space 992 pulse 507 space 991 pulse 507 space 1982 pulse 507 timeout 132787 |
The system detects when I press some keys on my TV remote control. So all good, and it can be integrated into your program of choice such as Kodi or others.
Performance and thermal cooling
Let’s now check everything works as expected. First, let’s start with the NVMe SSD performance with iozone3:
|
1 2 3 4 5 6 7 8 9 10 11 12 |
pi@raspberrypi:~ $ iozone -e -I -a -s 100M -r 4k -r 16k -r 512k -r 1024k -r 16384k -i 0 -i 1 -i 2 Output is in kBytes/sec Time Resolution = 0.000001 seconds. random random bkwd record stride kB reclen write rewrite read reread read write read rewrite read fwrite frewrite fread freread 102400 4 223436 294809 62751 62198 62565 261397 102400 16 456433 511843 235498 225189 234955 483966 102400 512 720158 710109 817707 817642 817413 759632 102400 1024 716323 733577 837402 791827 835502 767438 102400 16384 776627 778954 799621 853465 853066 710309 iozone test complete. |
With PCIe Gen3 x1 configured, we get around 853 MB/s reads and 776 MB/s writes for the 256GB SSD, while I got 857 MB/s reads and 778MB/s writes when testing the SSD with Waveshare PCIe to M.2 HAT. So the results are about the same.
When the system is idle the two RGB fans are off and only the tower cooler fan turns, but at very low speed, and it took me one day to realize it was not off since there’s no noise. The temperature is around 49-50°C at idle in a room with an ambient temperature of about 28°C. I ran Thomas Kaiser’s sbc-bench.sh to check performance and temperature levels under loads:
|
1 2 3 4 5 6 7 8 9 |
pi@raspberrypi:~ $ sudo ./sbc-bench.sh -r Starting to examine hardware/software for review purposes... Average load and/or CPU utilization too high (too much background activity). Waiting... Too busy for benchmarking: 14:22:17 up 2:51, 4 users, load average: 1.30, 1.27, 1.21, cpu: 2% Too busy for benchmarking: 14:22:22 up 2:51, 4 users, load average: 1.28, 1.27, 1.21, cpu: 2% Too busy for benchmarking: 14:22:27 up 2:51, 4 users, load average: 1.34, 1.28, 1.21, cpu: 1% ... |
The script will refuse to start because of background activity due to the pironman service. So I disabled the CPU utilization check in the script, and restarted it:
|
1 2 3 4 5 6 7 8 9 10 11 12 13 14 15 16 17 18 19 20 21 22 23 24 25 26 27 28 29 30 31 32 33 34 35 36 37 38 39 40 41 42 43 44 45 46 47 48 49 50 51 52 53 54 55 56 57 58 59 60 61 62 63 64 65 66 67 68 69 70 71 72 73 74 75 76 77 78 79 80 81 82 83 84 85 86 87 88 89 90 91 92 93 94 95 96 97 98 99 100 101 102 103 104 105 106 107 108 109 110 111 112 113 114 115 116 117 118 119 120 121 122 123 124 125 126 127 128 129 130 131 132 133 134 135 136 137 138 |
pi@raspberrypi:~ $ sudo ./sbc-bench.sh -r Starting to examine hardware/software for review purposes... sbc-bench v0.9.67 Installing needed tools: apt-get -f -qq -y install lm-sensors sysstat lshw links mmc-utils smartmontools stress-ng. Trying to continue, tinymembench, ramlat, mhz, cpufetch, cpuminer. Done. Checking cpufreq OPP. Done. Executing tinymembench. Done. Executing RAM latency tester. Done. Executing OpenSSL benchmark. Done. Executing 7-zip benchmark. Done. Throttling test: heating up the device, 5 more minutes to wait. Done. Checking cpufreq OPP again. Done (12 minutes elapsed). Results validation: * Measured clockspeed not lower than advertised max CPU clockspeed * No swapping * Background activity (%system) OK * Too much other background activity: 2% avg, 5% max -> https://tinyurl.com/mr2wy5uv * No throttling Full results uploaded to https://0x0.st/XfWf.txt # Raspberry Pi 5 Model B Rev 1.0 Tested with sbc-bench v0.9.67 on Sun, 28 Jul 2024 14:39:29 +0700. Full info: [https://0x0.st/XfWf.txt](http://0x0.st/XfWf.txt) ### General information: Information courtesy of cpufetch: SoC: Broadcom BCM2712 Technology: 16nm Microarchitecture: Cortex-A76 Max Frequency: 2.400 GHz Cores: 4 cores Features: NEON,SHA1,SHA2,AES,CRC32 BCM2712, Kernel: aarch64, Userland: arm64 CPU sysfs topology (clusters, cpufreq members, clockspeeds) cpufreq min max CPU cluster policy speed speed core type 0 0 0 1500 2400 Cortex-A76 / r4p1 1 0 0 1500 2400 Cortex-A76 / r4p1 2 0 0 1500 2400 Cortex-A76 / r4p1 3 0 0 1500 2400 Cortex-A76 / r4p1 8048 KB available RAM ### Governors/policies (performance vs. idle consumption): Original governor settings: cpufreq-policy0: performance / 2400 MHz (conservative ondemand userspace powersave performance schedutil / 1500 1600 1700 1800 1900 2000 2100 2200 2300 2400) Tuned governor settings: cpufreq-policy0: performance / 2400 MHz Status of performance related policies found below /sys: /sys/module/pcie_aspm/parameters/policy: default [performance] powersave powersupersave ### Clockspeeds (idle vs. heated up): Before at 53.5°C: cpu0 (Cortex-A76): OPP: 2400, ThreadX: 2400, Measured: 2393 After at 55.1°C: cpu0 (Cortex-A76): OPP: 2400, ThreadX: 2400, Measured: 2391 ### Performance baseline * memcpy: 5200.3 MB/s, memchr: 13700.1 MB/s, memset: 11773.6 MB/s * 16M latency: 124.5 120.4 120.2 123.4 126.0 135.0 133.0 150.5 * 128M latency: 138.1 148.5 137.2 137.1 136.8 135.5 138.6 138.1 * 7-zip MIPS (3 consecutive runs): 10554, 10447, 10546 (10520 avg), single-threaded: 3151 * `aes-256-cbc 580540.12k 1027484.01k 1265490.77k 1336821.76k 1365371.56k 1367894.70k` * `aes-256-cbc 578939.30k 1027682.47k 1260826.88k 1333337.77k 1359861.08k 1362422.44k` ### PCIe and storage devices: * Raspberry RP1 PCIe 2.0 South Bridge: Speed 5GT/s, Width x4, driver in use: rp1, ASPM Disabled * 238.5GB "PCIe SSD" SSD as /dev/nvme0: Speed 8GT/s, Width x1 (downgraded), 0% worn out, drive temp: 42°C, ASPM Disabled ### Swap configuration: * /var/swap on /dev/nvme0n1p2: 200.0M (0K used) ### Software versions: * Debian GNU/Linux 12 (bookworm) * Build scripts: http://archive.raspberrypi.com/debian/ bookworm main * Compiler: /usr/bin/gcc (Debian 12.2.0-14) 12.2.0 / aarch64-linux-gnu * OpenSSL 3.0.13, built on 30 Jan 2024 (Library: OpenSSL 3.0.13 30 Jan 2024) * ThreadX: d1744d21 / 2024/04/20 11:53:30 ### Kernel info: * `/proc/cmdline: reboot=w coherent_pool=1M 8250.nr_uarts=1 pci=pcie_bus_safe smsc95xx.macaddr=D8:3A:DD:7B:E6:56 vc_mem.mem_base=0x3fc00000 vc_mem.mem_size=0x40000000 console=ttyAMA10,115200 console=tty1 root=PARTUUID=1d480928-02 rootfstype=ext4 fsck.repair=yes rootwait quiet splash plymouth.ignore-serial-consoles cfg80211.ieee80211_regdom=TH` * Vulnerability Spec store bypass: Mitigation; Speculative Store Bypass disabled via prctl * Vulnerability Spectre v1: Mitigation; __user pointer sanitization * Vulnerability Spectre v2: Mitigation; CSV2, BHB * Kernel 6.6.31+rpt-rpi-2712 / CONFIG_HZ=250 All known settings adjusted for performance. Device now ready for benchmarking. Once finished stop with [ctrl]-[c] to get info about throttling, frequency cap and too high background activity all potentially invalidating benchmark scores. All changes with storage and PCIe devices as well as suspicious dmesg contents will be reported too. Time fake/real load %cpu %sys %usr %nice %io %irq Temp VCore PMIC DC(V) 14:39:29: 2400/2400MHz 4.83 6% 0% 5% 0% 0% 0% 51.2°C 0.9093V 3.2W 5.13V 14:40:29: 2400/2400MHz 2.63 2% 0% 0% 0% 0% 0% 48.5°C 0.9090V 3.1W 5.09V 14:41:29: 2400/2400MHz 1.71 2% 0% 0% 0% 0% 0% 49.6°C 0.9090V 3.1W 5.13V 14:42:30: 2400/2400MHz 1.36 2% 0% 1% 0% 0% 0% 51.2°C 0.9095V 5.6W 5.13V ^C Cleaning up. Done. Checking cpufreq OPP again. Done. Clockspeeds now at 50.7°C: cpu0 (Cortex-A76): OPP: 2400, ThreadX: 2400, Measured: 2391 Results validation: * Measured clockspeed not lower than advertised max CPU clockspeed * No swapping * Background activity (%system) OK * No throttling |
Everything looks fine, but the background activity did likely impact the results, albeit very slightly. For example, 7-zip achieved 10520 MIPS on average, but when I tested the Raspberry Pi 5 with the active cool the score was 10,930 MIPS.
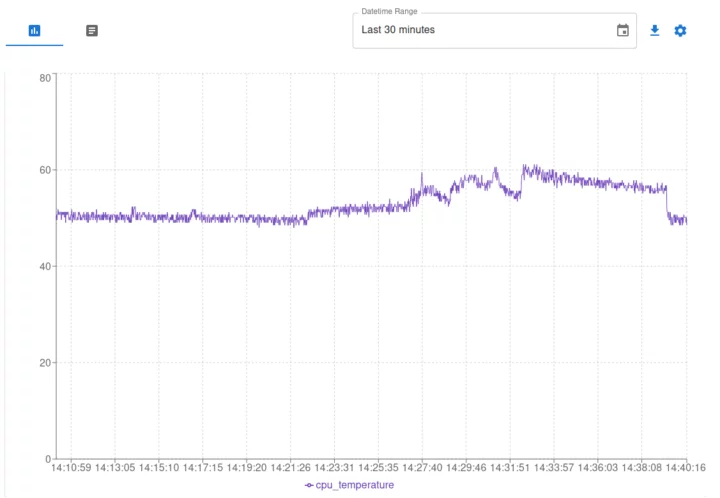
The two RGB fans started to work once the CPU temperature reached 60°C (in the single-threaded OpenSSL benchmark) and the CPU temperature never exceeded 61.1°C as reported in the script. We can also check the charts in the Pironman dashboard.
One downside of the dashboard is that you can only select predefined durations like 5 minutes or 30 minutes and it’s not possible to zoom in like in RPI-Monitor. So about half of the chart above shows the system temperature while idle.
 We can also see when the RGB fans (aka GPIO fans) were activated during the test, as well as the speed of the PWM fans on the tower cooler.
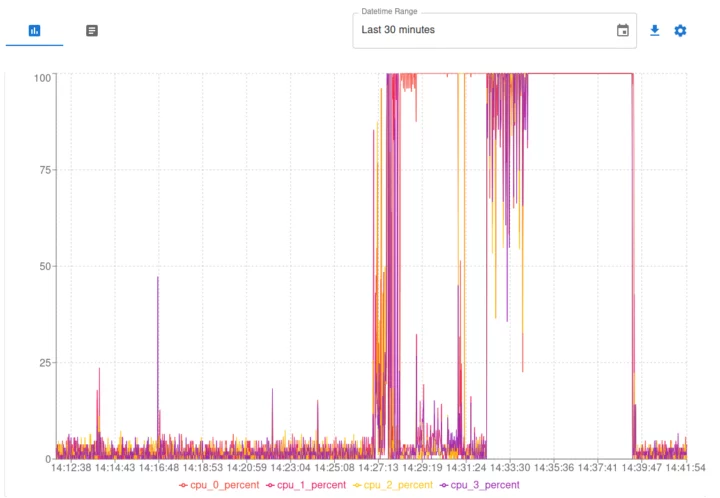
The CPU usage in percent for each of the cores can also be seen in the chart below.
Finally, I ran a stress test both to check the temperature, but also to measure power consumption (see below).
|
1 2 |
pi@raspberrypi:~ $ stress -c 4 stress: info: [5073] dispatching hogs: 4 cpu, 0 io, 0 vm, 0 hdd |
The temperature tops at 60.0°C as measured in sbc-bench.sh -m script. The GPIO fans will be turned on and off in this test as the temperature increases and then drops. After the first 30 thirty seconds, the fans were off, then they ran for a few minutes before stopping, and resuming after a little while, etc…
Pironman 5 power consumption
I’d assume people purchasing this kind of kit don’t mind about power consumption too much, but I still measured it with a power meter under various conditions.
- Power off – 0.1 Watts
- Idle
- RGB LEDs off, PWM fan set to quiet – 3.5 to 3.7 W
- Rainbow RGB LEDs 100% speed + PWM fan set to cool – 3.9 to 5.0 W
- Stress test
- Before RGB fans are enabled – 8.9 to 9.1 Watts
- After RGB fans are enabled (about 30 seconds) – 9.8 -10 Watts
The Pironman 5 was connected to an HDMI monitor, gigabit Ethernet, and two USB RF dongles for a keyboard and a mouse during measurements. It doesn’t consume much more than the Raspberry Pi 5 SBC with the active cooler. I can also see Raspberry Pi OS is now set to consume much less than when the Raspberry Pi 5 first launched, as a compatibility issue meant the power-off consumption was around 1.7.
Conclusion
SunFounder Pironman 5 is a great case for people wanting a fancy tower PC enclosure for their Raspberry Pi 5 over a more traditional enclosure. It does its job with an NVMe SSD HAT, an OLED information display, a power button, full-size HDMI ports, fancy RGB LEDs, and a cooling solution that keeps the system under 61°C at all times. GPIO pins are also easy to access from the outside. What’s not easily accessible are the MIPI CSI and DSI connectors, and getting a PoE HAT does not seem like an option.
I find the Pironman 5 to be an improvement of the Pironman case for Raspberry Pi 4 I reviewed last year, mostly thanks to aesthetic and software improvements, as I find the enclosure more eye-pleasing and it’s easier to monitor and control through a web-based interface. One small downside is that the Pironman 5 script uses more CPU usage (around 2 to 3%) than one would have expected.
I’d like to thank SunFounder for sending the Pironman 5 mini PC tower case for review. It can be purchased for $79.99 on the company’s online store, and it’s also listed on Aliexpress on third-party sellers but for about twice the price, so purchasing from the official website is recommended for now.

Jean-Luc started CNX Software in 2010 as a part-time endeavor, before quitting his job as a software engineering manager, and starting to write daily news, and reviews full time later in 2011.
Support CNX Software! Donate via cryptocurrencies, become a Patron on Patreon, or purchase goods on Amazon or Aliexpress. We also use affiliate links in articles to earn commissions if you make a purchase after clicking on those links.











It seems to be doing a good job of addressing the connectivity limitations of the RPi that are caused by its outdated form factor. Now maybe adding this price to that of an RPi will make some customers hesitate with alternate solutions.
I’ve got two pironman 5 now. Best cases for the any Raspberry pi device I’ve ever had.
Using one to house a Vector AI robot escape pod server and the other for the master k8s cluster.
Highly recommended!
It seems like a fine case, but I don’t understand how the raspberry pi 5 makes sense. A NUC costs less (total PSU+fan+hs+case+nvme), broader software compatibility, and more hardware features. If you need GPIO then slap a RPIzero2W OTG in a USB slot; $15 solution.